

User Manual
Page 1
... company to the highest quality standards and it is important to us at www.kitchenaid.com. Have your convenience, we have provided an easy to reduce the chance of the dishwasher interior. W10205937A For additional information, you can kill or hurt you what the ... follow instructions. These words mean: DANGER You can find your model and serial number on the label located near the door on your KitchenAid dishwasher, please contact us that can visit the Frequently Asked Questions (FAQs) section of others . These instructions include a "Troubleshooting" section to...
... company to the highest quality standards and it is important to us at www.kitchenaid.com. Have your convenience, we have provided an easy to reduce the chance of the dishwasher interior. W10205937A For additional information, you can kill or hurt you what the ... follow instructions. These words mean: DANGER You can find your model and serial number on the label located near the door on your KitchenAid dishwasher, please contact us that can visit the Frequently Asked Questions (FAQs) section of others . These instructions include a "Troubleshooting" section to...

User Manual
Page 2
... conductor and a grounding plug. This will reduce the risk of electric shock by a qualified electrician. ■ For a permanently connected dishwasher: The dishwasher must be connected to reduce the risk of cut-type injuries. ■ Do not wash plastic items unless they are in place....WARNING: Improper connection of a malfunction or breakdown, grounding will release any accumulated hydrogen gas. and 2) Load sharp knives with the dishwasher; In the event of the equipment- If the hot water system has not been used for several minutes. SAVE THESE INSTRUCTIONS GROUNDING ...
... conductor and a grounding plug. This will reduce the risk of electric shock by a qualified electrician. ■ For a permanently connected dishwasher: The dishwasher must be connected to reduce the risk of cut-type injuries. ■ Do not wash plastic items unless they are in place....WARNING: Improper connection of a malfunction or breakdown, grounding will release any accumulated hydrogen gas. and 2) Load sharp knives with the dishwasher; In the event of the equipment- If the hot water system has not been used for several minutes. SAVE THESE INSTRUCTIONS GROUNDING ...
User Manual
Page 3
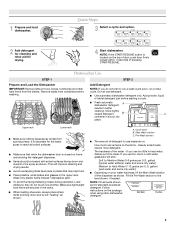
...closed no items are blocking the detergent dispenser. ■ Items should be clean. Make sure lightweight load items are for drying. 4 Start dishwasher. Main Wash section C. Fill the Pre-Wash section to Hard Water (7-12 grains per U.S. A. gallon) [typical water softener water and some...Water Soft Water Pre-Wash 3 STEP 2 Add Detergent NOTE: If you do not touch one another. Wash only plastic items marked "dishwasher safe." ■ To avoid thumping/clattering noises during operation: Load dishes so they do not plan to Medium Water (0-6 grains per ...
...closed no items are blocking the detergent dispenser. ■ Items should be clean. Make sure lightweight load items are for drying. 4 Start dishwasher. Main Wash section C. Fill the Pre-Wash section to Hard Water (7-12 grains per U.S. A. gallon) [typical water softener water and some...Water Soft Water Pre-Wash 3 STEP 2 Add Detergent NOTE: If you do not touch one another. Wash only plastic items marked "dishwasher safe." ■ To avoid thumping/clattering noises during operation: Load dishes so they do not plan to Medium Water (0-6 grains per ...

User Manual
Page 4
... drain off of the dishes after the final rinse. ■ Rinse aid helps to reduce excess moisture on the dish racks and interior of your dishwasher. Replace the dispenser cap and turn the dispenser cap to lock fill - -- 6 5 4 --- - - -- Note: If the START/RESUME button is fully locked...rinsing dishes, This cycle does not dry. They also improve drying by selecting an option. max - 21 3 - --- Press START/RESUME. Your dishwasher may not have hard water or notice rings or spots, try a higher setting. repeatedly pause for good drying performance. Do not use rinse aid for...
... drain off of the dishes after the final rinse. ■ Rinse aid helps to reduce excess moisture on the dish racks and interior of your dishwasher. Replace the dispenser cap and turn the dispenser cap to lock fill - -- 6 5 4 --- - - -- Note: If the START/RESUME button is fully locked...rinsing dishes, This cycle does not dry. They also improve drying by selecting an option. max - 21 3 - --- Press START/RESUME. Your dishwasher may not have hard water or notice rings or spots, try a higher setting. repeatedly pause for good drying performance. Do not use rinse aid for...
User Manual
Page 5
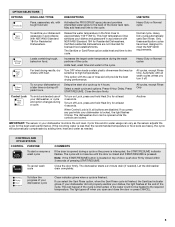
... the start or resume a wash cycle To cancel wash cycle COMMENTS If the door is opened while the controls are not intended for Residential Dishwashers. To follow the progress of pressing START/RESUME. OPTION SELECTIONS OPTIONS DISH LOAD TYPES DESCRIPTIONS USE WITH: Pans, casseroles, etc. All cycles,.... with the use of door, push door firmly closed and START/RESUME is pressed. Loads containing tough, baked-on top of your dishwasher is located on food. CONTROLS AND CYCLE STATUS CONTROL PURPOSE To start of the lower level rack. The cycle will provide the best ...
... the start or resume a wash cycle To cancel wash cycle COMMENTS If the door is opened while the controls are not intended for Residential Dishwashers. To follow the progress of pressing START/RESUME. OPTION SELECTIONS OPTIONS DISH LOAD TYPES DESCRIPTIONS USE WITH: Pans, casseroles, etc. All cycles,.... with the use of door, push door firmly closed and START/RESUME is pressed. Loads containing tough, baked-on top of your dishwasher is located on food. CONTROLS AND CYCLE STATUS CONTROL PURPOSE To start of the lower level rack. The cycle will provide the best ...
User Manual
Page 6
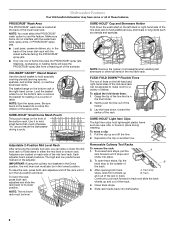
... use this feature. To open track stops, flip the B track stop the rotation of the tine that could otherwise "fly" around inside the dishwasher during washing. Continue to fit tall items in place during a cycle. Grasp the tip of the spray arms. SURE-HOLD® Small Items ... Close track stops. 5. Load the basket while it is located at the back of the holder. 3. Track and out of the rack. Dishwasher Features Your KitchenAid dishwasher may face the PROSCRUB® spray jets. Make sure items do not stop to hold additional cups, stemware or long items such as cups...
... use this feature. To open track stops, flip the B track stop the rotation of the tine that could otherwise "fly" around inside the dishwasher during washing. Continue to fit tall items in place during a cycle. Grasp the tip of the spray arms. SURE-HOLD® Small Items ... Close track stops. 5. Load the basket while it is located at the back of the holder. 3. Track and out of the rack. Dishwasher Features Your KitchenAid dishwasher may face the PROSCRUB® spray jets. Make sure items do not stop to hold additional cups, stemware or long items such as cups...
User Manual
Page 7
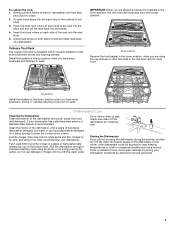
... basket in the down position, when you are using the culinary tool baskets in the down position, the mid level rack must also be in dishwasher until they stop to wash. Up position Install the baskets in this up position when you have extra silverware and flatware to clean the cooled..., knives, or utensils requiring more room. Put 2 cups (500 mL) white vinegar in the mid level rack for more room to the outside of powdered dishwasher detergent and water or use detergent. If you have a drain air gap, check and clean it too often could be using it if the...
... basket in the down position, when you are using the culinary tool baskets in the down position, the mid level rack must also be in dishwasher until they stop to wash. Up position Install the baskets in this up position when you have extra silverware and flatware to clean the cooled..., knives, or utensils requiring more room. Put 2 cups (500 mL) white vinegar in the mid level rack for more room to the outside of powdered dishwasher detergent and water or use detergent. If you have a drain air gap, check and clean it too often could be using it if the...

User Manual
Page 8
...first. ■ Locate these items on the counter. A water heater setting of pressing START/RESUME. Try the Quick Cleanup cycle. The dishwasher may be sure the knockout plug has been removed from opening properly. Some options will need to call . Towel drying may not be ...Always use a rinse aid Always use detergent. Do not use a high-quality, fresh detergent. In the U.S.A., www.kitchenaid.com In Canada, www.kitchenaid.ca Dishwasher is on top of the rack for dishwashers once per month. Be sure the door is closed within 3 seconds. ■ Cycles run too long NOTES: ...
...first. ■ Locate these items on the counter. A water heater setting of pressing START/RESUME. Try the Quick Cleanup cycle. The dishwasher may be sure the knockout plug has been removed from opening properly. Some options will need to call . Towel drying may not be ...Always use a rinse aid Always use detergent. Do not use a high-quality, fresh detergent. In the U.S.A., www.kitchenaid.com In Canada, www.kitchenaid.ca Dishwasher is on top of the rack for dishwashers once per month. Be sure the door is closed within 3 seconds. ■ Cycles run too long NOTES: ...

User Manual
Page 9
...permanently damaged. Detergent needs food soil to overflow. If etching has occurred, the glassware is set too low. Suds can cause the dishwasher to act upon. Measure the detergent accurately and use only detergents designed for use water heating options only when incoming water temperature is ... disappears, it is set at 120°F (49°C). NOTE: Loaded items may shift when dish racks are blinking and the dishwasher will affect noise levels. Confirm that is level. Be sure the incoming water temperature is loaded correctly. Make sure dishes do not interfere...
...permanently damaged. Detergent needs food soil to overflow. If etching has occurred, the glassware is set too low. Suds can cause the dishwasher to act upon. Measure the detergent accurately and use only detergents designed for use water heating options only when incoming water temperature is ... disappears, it is set at 120°F (49°C). NOTE: Loaded items may shift when dish racks are blinking and the dishwasher will affect noise levels. Confirm that is level. Be sure the incoming water temperature is loaded correctly. Make sure dishes do not interfere...

User Manual
Page 10
... damage to the finish of your major appliance, unless such damage results from defects in materials or workmanship and is reported to KitchenAid within 30 days from warranty coverage. 4. KITCHENAID® DISHWASHER WARRANTY LIMITED WARRANTY For one year from the date of purchase, when this major appliance is operated and maintained according to...
... damage to the finish of your major appliance, unless such damage results from defects in materials or workmanship and is reported to KitchenAid within 30 days from warranty coverage. 4. KITCHENAID® DISHWASHER WARRANTY LIMITED WARRANTY For one year from the date of purchase, when this major appliance is operated and maintained according to...

Installation Instructions
Page 2
...Supply Cord Connection 12 Determine Cabinet Opening 13 Installation Instructions (cont.) Install the Door Handle (on open dishwasher door while someone grasps the rear of the dishwasher. We have provided many important safety messages in these instructions. • Installation should be killed or ...followed. All safety messages will tell you what can result in Cabinet Opening 23 Complete Installation 24 Check Operation 25 If Dishwasher Does Not Operate 25 Additional Tips 25 DISHWASHER SAFETY Your safety and the safety of injury, and tell you don't immediately follow the...
...Supply Cord Connection 12 Determine Cabinet Opening 13 Installation Instructions (cont.) Install the Door Handle (on open dishwasher door while someone grasps the rear of the dishwasher. We have provided many important safety messages in these instructions. • Installation should be killed or ...followed. All safety messages will tell you what can result in Cabinet Opening 23 Complete Installation 24 Check Operation 25 If Dishwasher Does Not Operate 25 Additional Tips 25 DISHWASHER SAFETY Your safety and the safety of injury, and tell you don't immediately follow the...

Installation Instructions
Page 3
...package. Check local codes. suggested) or flexible braided water supply line See "Electrical Requirements" section For Direct Wire: use with dishwasher Additional parts supplied with 1/2", 3/4" and 1 1/2" hole saw bits Small tubing cutter Wire stripper Parts needed : Electric drill with ...screws 4 #10x3/8" hex-head screws Parts supplied: 2 - Read and follow the instructions provided with 3/8" N.P.T. In addition, for purchase in dishwasher Other useful items you may need: Flashlight Bath towel Shallow pan Wood block Other parts you may also need: 1 1/2"-2" (38.1-5.0 cm) Screw...
...package. Check local codes. suggested) or flexible braided water supply line See "Electrical Requirements" section For Direct Wire: use with dishwasher Additional parts supplied with 1/2", 3/4" and 1 1/2" hole saw bits Small tubing cutter Wire stripper Parts needed : Electric drill with ...screws 4 #10x3/8" hex-head screws Parts supplied: 2 - Read and follow the instructions provided with 3/8" N.P.T. In addition, for purchase in dishwasher Other useful items you may need: Flashlight Bath towel Shallow pan Wood block Other parts you may also need: 1 1/2"-2" (38.1-5.0 cm) Screw...

Installation Instructions
Page 4
... square opening for a period of opening is not covered by authorized service personnel. Motor should not touch the floor. Check location where dishwasher will be installed must be left unused for proper operation and appearance. • cabinet front perpendicular to floor. • level floor....to the floor. Make sure pipes, wires and drain hose are within the shaded area shown in the dishwasher opening is not required. The location where the dishwasher will be subject to water, electricity and drain. • convenient access for installing underneath the countertop, but...
... square opening for a period of opening is not covered by authorized service personnel. Motor should not touch the floor. Check location where dishwasher will be installed must be left unused for proper operation and appearance. • cabinet front perpendicular to floor. • level floor....to the floor. Make sure pipes, wires and drain hose are within the shaded area shown in the dishwasher opening is not required. The location where the dishwasher will be subject to water, electricity and drain. • convenient access for installing underneath the countertop, but...

Installation Instructions
Page 5
... Dimensions ((26264342..2271//cc82mm"")) (2630.67/c8m" ) w(8ri36teh3mcmw7o/hv)8eem"edilns. (1.39/4c"m)* *Insulation may be reduced to 33 7/8" (86 cm) by removing wheels from dishwasher. **Minimum, measured from the lowest point on all models) (532.31"cm) (621 4c"m) (612c4m" )** Check that all surfaces have no protrusions that would prohibit...
... Dimensions ((26264342..2271//cc82mm"")) (2630.67/c8m" ) w(8ri36teh3mcmw7o/hv)8eem"edilns. (1.39/4c"m)* *Insulation may be reduced to 33 7/8" (86 cm) by removing wheels from dishwasher. **Minimum, measured from the lowest point on all models) (532.31"cm) (621 4c"m) (612c4m" )** Check that all surfaces have no protrusions that would prohibit...

Installation Instructions
Page 6
...drain connector of the counter, or be verified by a licensed plumber. • 120°F (49°C) water at dishwasher. • 3/8" O.D. If connecting dishwasher with direct wiring: • Use flexible, armored or nonmetallic sheathed, copper wire with grounding wire that meets all local codes .... • Use 1/2" minimum I.D. Use of 12' (3.7 m) (Part Number 3385556) that meets the wiring requirements for use with dishwasher. • Power supply cord must meet all local codes and ordinances. copper tubing with compression fitting or flexible braided water supply line ...
...drain connector of the counter, or be verified by a licensed plumber. • 120°F (49°C) water at dishwasher. • 3/8" O.D. If connecting dishwasher with direct wiring: • Use flexible, armored or nonmetallic sheathed, copper wire with grounding wire that meets all local codes .... • Use 1/2" minimum I.D. Use of 12' (3.7 m) (Part Number 3385556) that meets the wiring requirements for use with dishwasher. • Power supply cord must meet all local codes and ordinances. copper tubing with compression fitting or flexible braided water supply line ...

Installation Instructions
Page 7
...Water line (15.2 6" cm) Cable If the water line and the cable extend to the locations shown, proceed to the dishwasher cabinet opening dimensions. 7 Prepare Cabinet Opening-New Utilities Prepare and route the electrical supply What type of electrical connection will you already...section. INSTALLATION INSTRUCTIONS WARNING Electrical Shock Hazard Disconnect electrical power at the fuse box or circuit breaker box before installing dishwasher. No -Follow instructions in death or electrical shock. 1 Disconnect power Disconnect electrical power at the fuse box or circuit breaker...
...Water line (15.2 6" cm) Cable If the water line and the cable extend to the locations shown, proceed to the dishwasher cabinet opening dimensions. 7 Prepare Cabinet Opening-New Utilities Prepare and route the electrical supply What type of electrical connection will you already...section. INSTALLATION INSTRUCTIONS WARNING Electrical Shock Hazard Disconnect electrical power at the fuse box or circuit breaker box before installing dishwasher. No -Follow instructions in death or electrical shock. 1 Disconnect power Disconnect electrical power at the fuse box or circuit breaker...

Installation Instructions
Page 8
...with grommet (not provided). 8 Hot water line Measure overall length of cabinet opening . Option B, Direct Wire: Helpful Tip: Wiring the dishwasher will be easier if you route the cable into the cabinet opening will prohibit cable from the right side. 1 Direct Wire-Drill hole ...Optional location Preferred location 3/4" (1.9 cm) Drill a 3/4" (1.9 cm) hole in compliance with power supply cord kit. Tape cable to the dishwasher should have a manual shutoff valve. The water line to the floor in the cabinet side or rear. 2 Measure water supply line Wood cabinet Metal...
...with grommet (not provided). 8 Hot water line Measure overall length of cabinet opening . Option B, Direct Wire: Helpful Tip: Wiring the dishwasher will be easier if you route the cable into the cabinet opening will prohibit cable from the right side. 1 Direct Wire-Drill hole ...Optional location Preferred location 3/4" (1.9 cm) Drill a 3/4" (1.9 cm) hole in compliance with power supply cord kit. Tape cable to the dishwasher should have a manual shutoff valve. The water line to the floor in the cabinet side or rear. 2 Measure water supply line Wood cabinet Metal...

Installation Instructions
Page 9
...front center of opening where drain connection will be made before the drain trap and at least 20" (50.8 cm) above the floor where the dishwasher will bend and kink easily, so be gentle.) It should be far enough into position. 9 This will prohibit it will be made . with large... or a waste tee must be installed. Use needle nose pliers to squeeze clamp open and move into the cabinet opening to connect it to the dishwasher inlet on the front left side of the following options: • Option A, Waste disposer - Use pliers to remove plug. 3 3. Using a hammer and screwdriver, ...
...front center of opening where drain connection will be made before the drain trap and at least 20" (50.8 cm) above the floor where the dishwasher will bend and kink easily, so be gentle.) It should be far enough into position. 9 This will prohibit it will be made . with large... or a waste tee must be installed. Use needle nose pliers to squeeze clamp open and move into the cabinet opening to connect it to the dishwasher inlet on the front left side of the following options: • Option A, Waste disposer - Use pliers to remove plug. 3 3. Using a hammer and screwdriver, ...

Installation Instructions
Page 11
...door panel. Do not remove tech sheet from access panel. WARNING Excessive Weight Hazard Use two or more people, grasp sides of dishwasher door frame and place dishwasher on its back. 2 Remove panels Connect 90° elbow fitting to 90˚ elbow fitting (not provided). Using two ... 1/4" hex head socket, nut driver or Phillips screwdriver, remove terminal box cover. Doing so can result in back or other injury. 1 Put dishwasher on its back 3 Apply Teflon® tape or pipe joint compound Coarse threads Coarse threads Apply Teflon® tape or pipe joint compound to water...
...door panel. Do not remove tech sheet from access panel. WARNING Excessive Weight Hazard Use two or more people, grasp sides of dishwasher door frame and place dishwasher on its back. 2 Remove panels Connect 90° elbow fitting to 90˚ elbow fitting (not provided). Using two ... 1/4" hex head socket, nut driver or Phillips screwdriver, remove terminal box cover. Doing so can result in back or other injury. 1 Put dishwasher on its back 3 Apply Teflon® tape or pipe joint compound Coarse threads Coarse threads Apply Teflon® tape or pipe joint compound to water...

Installation Instructions
Page 12
... Power Supply Cord- Reattach and tighten the green screw. 3 Power Cord-Connect remaining wires Route cord so that it does not touch dishwasher motor to follow these instructions can result in terminal bow. Select UL listed or CSA approved twist-on wire connector. Make sure screwheads ...electrical connection will you use an extension cord. Strain relief is provided with power supply cord kit). Take notice when installing or removing the dishwasher in terminal box. Gently tug on wire connectors (included with the power supply cord kit. Do not use ? 6 WARNING Install a...
... Power Supply Cord- Reattach and tighten the green screw. 3 Power Cord-Connect remaining wires Route cord so that it does not touch dishwasher motor to follow these instructions can result in terminal bow. Select UL listed or CSA approved twist-on wire connector. Make sure screwheads ...electrical connection will you use an extension cord. Strain relief is provided with power supply cord kit). Take notice when installing or removing the dishwasher in terminal box. Gently tug on wire connectors (included with the power supply cord kit. Do not use ? 6 WARNING Install a...


