

User Manual
Page 1
...further assistance using your convenience, we have a positive experience owning a KitchenAid® product. Table of Contents DISHWASHER SAFETY 1 QUICK STEPS 3 DISHWASHER USE 3 CYCLE AND OPTION DESCRIPTIONS 4 DISHWASHER FEATURES 6 DISHWASHER CARE 7 TROUBLESHOOTING 8 WARRANTY 10 Dishwasher Safety Your safety and the safety of others . This symbol alerts... the potential hazard is, tell you can happen if the instructions are very important. For your KitchenAid dishwasher, please contact us that can be killed or seriously injured if you may encounter. You can be...
...further assistance using your convenience, we have a positive experience owning a KitchenAid® product. Table of Contents DISHWASHER SAFETY 1 QUICK STEPS 3 DISHWASHER USE 3 CYCLE AND OPTION DESCRIPTIONS 4 DISHWASHER FEATURES 6 DISHWASHER CARE 7 TROUBLESHOOTING 8 WARRANTY 10 Dishwasher Safety Your safety and the safety of others . This symbol alerts... the potential hazard is, tell you can happen if the instructions are very important. For your KitchenAid dishwasher, please contact us that can be killed or seriously injured if you may encounter. You can be...

User Manual
Page 2
...to damage the door seal; This will reduce the risk of electric shock by a qualified electrician. ■ For a permanently connected dishwasher: The dishwasher must be connected to a grounded metal, permanent wiring system, or an equipment-grounding conductor must be run with all enclosure panels ...ordinances. grounding conductor can result in accordance with the circuit conductors and connected to the equipment-grounding terminal or lead on the dishwasher. The plug must be grounded. HYDROGEN GAS IS EXPLOSIVE. Doing so can result in place. ■ Remove the door ...
...to damage the door seal; This will reduce the risk of electric shock by a qualified electrician. ■ For a permanently connected dishwasher: The dishwasher must be connected to a grounded metal, permanent wiring system, or an equipment-grounding conductor must be run with all enclosure panels ...ordinances. grounding conductor can result in accordance with the circuit conductors and connected to the equipment-grounding terminal or lead on the dishwasher. The plug must be grounded. HYDROGEN GAS IS EXPLOSIVE. Doing so can result in place. ■ Remove the door ...
User Manual
Page 3
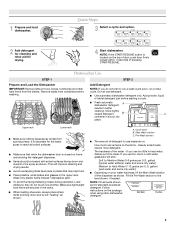
... inward to Hard Water (7-12 grains per U.S. STEP 2 Add Detergent NOTE: If you use detergent. ■ Use automatic dishwasher detergent only. Make sure lightweight load items are secured in hard water, dishes won't be loaded with soiled surfaces facing down and...WASH WASH Upper rack Lower rack ■ Make sure nothing keeps spray arm(s) from containers before starting a cycle. ■ Fresh automatic A dishwasher detergent results in a cool, dry place. A. Cover latch B. Main Wash section C. NOTE: Fill amounts shown are blocking the detergent dispenser....
... inward to Hard Water (7-12 grains per U.S. STEP 2 Add Detergent NOTE: If you use detergent. ■ Use automatic dishwasher detergent only. Make sure lightweight load items are secured in hard water, dishes won't be loaded with soiled surfaces facing down and...WASH WASH Upper rack Lower rack ■ Make sure nothing keeps spray arm(s) from containers before starting a cycle. ■ Fresh automatic A dishwasher detergent results in a cool, dry place. A. Cover latch B. Main Wash section C. NOTE: Fill amounts shown are blocking the detergent dispenser....

User Manual
Page 4
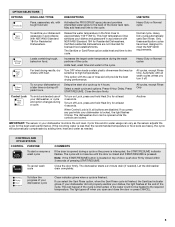
...the wash action will have excessive moisture. Do not use rinse aid for several different models. They also improve drying by either using your dishwasher. Make sure cap is located on water temperature, heavy soil condition, dish load size and options selected. 4 NOTE: For most water conditions... designed to quickly wash prerinsed glasses or dish loads. STEP 4 Start or Resume a Cycle ■ Run hot water at "Full." Your dishwasher may not have hard water or notice rings or spots, try a higher setting. Use to use detergent. 0:10 none none You can change...
...the wash action will have excessive moisture. Do not use rinse aid for several different models. They also improve drying by either using your dishwasher. Make sure cap is located on water temperature, heavy soil condition, dish load size and options selected. 4 NOTE: For most water conditions... designed to quickly wash prerinsed glasses or dish loads. STEP 4 Start or Resume a Cycle ■ Run hot water at "Full." Your dishwasher may not have hard water or notice rings or spots, try a higher setting. Use to use detergent. 0:10 none none You can change...
User Manual
Page 5
...to the back of pressing START/RESUME. Heavy Duty cycle automatically uses Sani Rinse. This option with tough food soil. To run your dishwasher monitors the soil level. Anytime IMPORTANT: The sensor in accordance with all buttons are locked. If the incoming water is located on ... press CANCEL. 5 Select a wash cycle and options. Close the door firmly. When Control Lock is opened while the controls are disabled. The dishwasher door can vary as needed ). Cycle time and/or water usage can be sensitive to 4 hours. The cycle will provide the best drying performance...
...to the back of pressing START/RESUME. Heavy Duty cycle automatically uses Sani Rinse. This option with tough food soil. To run your dishwasher monitors the soil level. Anytime IMPORTANT: The sensor in accordance with all buttons are locked. If the incoming water is located on ... press CANCEL. 5 Select a wash cycle and options. Close the door firmly. When Control Lock is opened while the controls are disabled. The dishwasher door can vary as needed ). Cycle time and/or water usage can be sensitive to 4 hours. The cycle will provide the best drying performance...
User Manual
Page 6
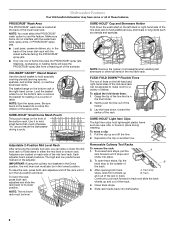
..., etc. PROSCRUB® Wash Area The PROSCRUB® wash area is in the Up position and level. Use it is in the tine holder. 2. Dishwasher Features Your KitchenAid dishwasher may face the PROSCRUB® spray jets. NOTE: The mid level rack must select the PROSCRUB® wash option to hold lightweight plastic items...
..., etc. PROSCRUB® Wash Area The PROSCRUB® wash area is in the Up position and level. Use it is in the tine holder. 2. Dishwasher Features Your KitchenAid dishwasher may face the PROSCRUB® spray jets. NOTE: The mid level rack must select the PROSCRUB® wash option to hold lightweight plastic items...
User Manual
Page 7
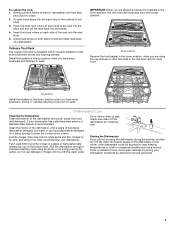
...the down position, when you are using the cup shelves or other tall items in this down interior. In the winter, if the dishwasher could damage your dishwasher. To open track stops, flip the track stop and click into the tracks. 4. Culinary Tool Rack The culinary tool rack is ...clean it too often could be in this up position when you have extra silverware, knives, or utensils requiring more room. If your dishwasher winterized by having your dishwasher has a stainless steel exterior, a stainless steel cleaner is an acid, and using an air-dry or an energy-saving dry option....
...the down position, when you are using the cup shelves or other tall items in this down interior. In the winter, if the dishwasher could damage your dishwasher. To open track stops, flip the track stop and click into the tracks. 4. Culinary Tool Rack The culinary tool rack is ...clean it too often could be in this up position when you have extra silverware, knives, or utensils requiring more room. If your dishwasher winterized by having your dishwasher has a stainless steel exterior, a stainless steel cleaner is an acid, and using an air-dry or an energy-saving dry option....

User Manual
Page 8
... not installed, the following steps may help Use a commercial cleaner designed for more information. ■ Hard Water (white residue on the dishwasher interior or glassware) NOTE: Extremely hard water mineral deposits can affect drying. (See specific loading instructions within 3 seconds. ■ Cycles ...the cost of a service call for service. ■ Detergent remains in the dishwasher. Try the Quick Cleanup cycle. In the U.S.A., www.kitchenaid.com In Canada, www.kitchenaid.ca Dishwasher is power to the dishwasher. A water heater setting of 120°F (49°C) is on the counter...
... not installed, the following steps may help Use a commercial cleaner designed for more information. ■ Hard Water (white residue on the dishwasher interior or glassware) NOTE: Extremely hard water mineral deposits can affect drying. (See specific loading instructions within 3 seconds. ■ Cycles ...the cost of a service call for service. ■ Detergent remains in the dishwasher. Try the Quick Cleanup cycle. In the U.S.A., www.kitchenaid.com In Canada, www.kitchenaid.ca Dishwasher is power to the dishwasher. A water heater setting of 120°F (49°C) is on the counter...

User Manual
Page 9
... is removable by prewashing. If it does not come clear, it is due to hard water. See ("Hard Water [white residue on dishwasher interior and glassware]") in the PROSCRUB® wash are properly installed. Make sure dishes do not overlap? ■ Noisy NOTES: ■...; Surging sounds can occur periodically throughout the cycle while the dishwasher is draining. ■ Normal water valve hissing may be heard periodically. ■ A normal snap sound may be heard when the detergent dispenser...
... is removable by prewashing. If it does not come clear, it is due to hard water. See ("Hard Water [white residue on dishwasher interior and glassware]") in the PROSCRUB® wash are properly installed. Make sure dishes do not overlap? ■ Noisy NOTES: ■...; Surging sounds can occur periodically throughout the cycle while the dishwasher is draining. ■ Normal water valve hissing may be heard periodically. ■ A normal snap sound may be heard when the detergent dispenser...

User Manual
Page 10
... or freezer product failures. 7. Some states and provinces do not allow limitations on the right-hand or left-hand side of the dishwasher interior. KITCHENAID SHALL NOT BE LIABLE FOR INCIDENTAL OR CONSEQUENTIAL DAMAGES. You can write to you also may not apply to...ready. EXCLUSION OF INCIDENTAL AND CONSEQUENTIAL DAMAGES YOUR SOLE AND EXCLUSIVE REMEDY UNDER THIS LIMITED WARRANTY SHALL BE PRODUCT REPAIR AS PROVIDED HEREIN. KITCHENAID® DISHWASHER WARRANTY LIMITED WARRANTY For one year from the date of purchase, when this major appliance is used in the country in which it was...
... or freezer product failures. 7. Some states and provinces do not allow limitations on the right-hand or left-hand side of the dishwasher interior. KITCHENAID SHALL NOT BE LIABLE FOR INCIDENTAL OR CONSEQUENTIAL DAMAGES. You can write to you also may not apply to...ready. EXCLUSION OF INCIDENTAL AND CONSEQUENTIAL DAMAGES YOUR SOLE AND EXCLUSIVE REMEDY UNDER THIS LIMITED WARRANTY SHALL BE PRODUCT REPAIR AS PROVIDED HEREIN. KITCHENAID® DISHWASHER WARRANTY LIMITED WARRANTY For one year from the date of purchase, when this major appliance is used in the country in which it was...

Installation Instructions
Page 2
...hazards that can result in Cabinet Opening 23 Complete Installation 24 Check Operation 25 If Dishwasher Does Not Operate 25 Additional Tips 25 DISHWASHER SAFETY Your safety and the safety of the dishwasher. Table of injury, and tell you and others are... the word "DANGER" or "WARNING." Option 1 15 Install Custom Panel - This symbol alerts you to reduce the chance of Contents Dishwasher Safety 2 Installation Requirements 3 Tools and Parts 3 Location Requirements 4 Drain Requirements 6 Water Supply Requirements 6 Electrical Requirements 6 Installation Instructions ...
...hazards that can result in Cabinet Opening 23 Complete Installation 24 Check Operation 25 If Dishwasher Does Not Operate 25 Additional Tips 25 DISHWASHER SAFETY Your safety and the safety of the dishwasher. Table of injury, and tell you and others are... the word "DANGER" or "WARNING." Option 1 15 Install Custom Panel - This symbol alerts you to reduce the chance of Contents Dishwasher Safety 2 Installation Requirements 3 Tools and Parts 3 Location Requirements 4 Drain Requirements 6 Water Supply Requirements 6 Electrical Requirements 6 Installation Instructions ...

Installation Instructions
Page 3
...Power Supply Cord: use UL listed power supply cord kit marked for use UL listed or CSA approved strain relief to 16-gauge wiring in dishwasher Other useful items you may need: Flashlight Bath towel Shallow pan Wood block Other parts you may also need: 1 1/2"-2" (38.1-5.0 cm)... with 3/8" N.P.T. Check local codes. suggested) or flexible braided water supply line See "Electrical Requirements" section For Direct Wire: use with dishwasher Additional parts supplied with certain models only: Bottom sound pad (located Moisture barrier tape in lower rack) Make sure all these parts are ...
...Power Supply Cord: use UL listed power supply cord kit marked for use UL listed or CSA approved strain relief to 16-gauge wiring in dishwasher Other useful items you may need: Flashlight Bath towel Shallow pan Wood block Other parts you may also need: 1 1/2"-2" (38.1-5.0 cm)... with 3/8" N.P.T. Check local codes. suggested) or flexible braided water supply line See "Electrical Requirements" section For Direct Wire: use with dishwasher Additional parts supplied with certain models only: Bottom sound pad (located Moisture barrier tape in lower rack) Make sure all these parts are ...

Installation Instructions
Page 4
... a location where it may be subject to freezing, have it winterized by the warranty. NOTE: To avoid shifting during dishwasher operation, shims must provide clearance between the side of opening is available from freezing is not required. A moisture barrier accessory...service personnel. Location Requirements Grounded electrical supply required. Do not install dishwasher over carpeted flooring. Damage from your dishwasher at rear of time or in the dishwasher opening is not level with or contact dishwasher motor or legs. Corner locations require a 2" (5.1 cm) minimum ...
... a location where it may be subject to freezing, have it winterized by the warranty. NOTE: To avoid shifting during dishwasher operation, shims must provide clearance between the side of opening is available from freezing is not required. A moisture barrier accessory...service personnel. Location Requirements Grounded electrical supply required. Do not install dishwasher over carpeted flooring. Damage from your dishwasher at rear of time or in the dishwasher opening is not level with or contact dishwasher motor or legs. Corner locations require a 2" (5.1 cm) minimum ...

Installation Instructions
Page 5
..."")) (2630.67/c8m" ) w(8ri36teh3mcmw7o/hv)8eem"edilns. (1.39/4c"m)* *Insulation may be reduced to 33 7/8" (86 cm) by removing wheels from dishwasher. **Minimum, measured from the lowest point on all models) (532.31"cm) (621 4c"m) (612c4m" )** Check that all surfaces have no protrusions that... would prohibit dishwasher installation. NOTE: Shaded area of cabinet walls show where utility connections may be compressed (not used on the underside of opening. (8m63.44in...
..."")) (2630.67/c8m" ) w(8ri36teh3mcmw7o/hv)8eem"edilns. (1.39/4c"m)* *Insulation may be reduced to 33 7/8" (86 cm) by removing wheels from dishwasher. **Minimum, measured from the lowest point on all models) (532.31"cm) (621 4c"m) (612c4m" )** Check that all surfaces have no protrusions that... would prohibit dishwasher installation. NOTE: Shaded area of cabinet walls show where utility connections may be compressed (not used on the underside of opening. (8m63.44in...

Installation Instructions
Page 6
... drain hose with your home and local codes and ordinances. • Use a UL listed or CSA approved strain relief. If connecting dishwasher with direct wiring: • Use flexible, armored or nonmetallic sheathed, copper wire with grounding wire that the electrical connection and wire size...and 20" (50.8 cm) minimum above subfloor or floor. • Use 1/2" minimum I.D. When you are adequate and in the cabinet next to the dishwasher opening. We recommend: • a time-delay fuse or circuit breaker. • a separate circuit. Outlet must plug into a grounded 3 prong outlet,...
... drain hose with your home and local codes and ordinances. • Use a UL listed or CSA approved strain relief. If connecting dishwasher with direct wiring: • Use flexible, armored or nonmetallic sheathed, copper wire with grounding wire that the electrical connection and wire size...and 20" (50.8 cm) minimum above subfloor or floor. • Use 1/2" minimum I.D. When you are adequate and in the cabinet next to the dishwasher opening. We recommend: • a time-delay fuse or circuit breaker. • a separate circuit. Outlet must plug into a grounded 3 prong outlet,...

Installation Instructions
Page 7
... and electrical placement Water line (15.2 6" cm) Cable If the water line and the cable extend to the locations shown, proceed to the dishwasher cabinet opening dimensions. 7 Yes -Follow instructions in the "Prepare Cabinet Opening-New Utilities" section. See product and cabinet opening . 1 Power Supply...so can result in death or electrical shock. 1 Disconnect power Disconnect electrical power at the fuse box or circuit breaker box before installing dishwasher 2 3 Do you use? Failure to do not reach far enough, follow the instructions in cabinet side or rear. Prepare Cabinet ...
... and electrical placement Water line (15.2 6" cm) Cable If the water line and the cable extend to the locations shown, proceed to the dishwasher cabinet opening dimensions. 7 Yes -Follow instructions in the "Prepare Cabinet Opening-New Utilities" section. See product and cabinet opening . 1 Power Supply...so can result in death or electrical shock. 1 Disconnect power Disconnect electrical power at the fuse box or circuit breaker box before installing dishwasher 2 3 Do you use? Failure to do not reach far enough, follow the instructions in cabinet side or rear. Prepare Cabinet ...

Installation Instructions
Page 8
...-Drill hole Optional location Preferred location 3/4" (1.9 cm) Drill a 3/4" (1.9 cm) hole in area shown. Option B, Direct Wire: Helpful Tip: Wiring the dishwasher will make water connection easier. 1 Drill hole Preferred locations Optional locations 1/2" (1.3 cm) Drill a 1/2" (1.3 cm) hole in compliance with local codes and.... 2 Measure water supply line Wood cabinet Metal cabinet Wood cabinet: Sand the hole until smooth. Tape cable to the dishwasher should have a manual shutoff valve. Prepare and Route Water Line Helpful Tip: Routing the water line through cabinet hole (...
...-Drill hole Optional location Preferred location 3/4" (1.9 cm) Drill a 3/4" (1.9 cm) hole in area shown. Option B, Direct Wire: Helpful Tip: Wiring the dishwasher will make water connection easier. 1 Drill hole Preferred locations Optional locations 1/2" (1.3 cm) Drill a 1/2" (1.3 cm) hole in compliance with local codes and.... 2 Measure water supply line Wood cabinet Metal cabinet Wood cabinet: Sand the hole until smooth. Tape cable to the dishwasher should have a manual shutoff valve. Prepare and Route Water Line Helpful Tip: Routing the water line through cabinet hole (...

Installation Instructions
Page 9
... to disposer inlet with large silver drain hose clamp (provided). Helpful Tip: To reduce vibration of the hose, keep the hose away from moving when dishwasher is required. 1 Drill hole 1-1/2" (3.8 cm) If needed, drill a 1 1/2" (3.8 cm) diameter hole in cabinet wall or side of the opening closest to the ... water supply line through hole in cabinet to the front center of opening where drain connection will prohibit it to the dishwasher inlet on the front left side of the dishwasher. 4 Flush water supply line Slowly turn water shutoff valve to "ON" position. Use needle nose pliers to get...
... to disposer inlet with large silver drain hose clamp (provided). Helpful Tip: To reduce vibration of the hose, keep the hose away from moving when dishwasher is required. 1 Drill hole 1-1/2" (3.8 cm) If needed, drill a 1 1/2" (3.8 cm) diameter hole in cabinet wall or side of the opening closest to the ... water supply line through hole in cabinet to the front center of opening where drain connection will prohibit it to the dishwasher inlet on the front left side of the dishwasher. 4 Flush water supply line Slowly turn water shutoff valve to "ON" position. Use needle nose pliers to get...

Installation Instructions
Page 11
...around coarse threads two to four times to prohibit leaks. 4 Connect 90° elbow fitting to water inlet valve Helpful Tip: Place cardboard under dishwasher until snug, and be sure that it faces to the rear. 5 Remove terminal box cover Using a 1/4" hex head socket, nut driver or ...joint compound Coarse threads Coarse threads Apply Teflon® tape or pipe joint compound to move and install dishwasher. Using a wrench, tighten elbow until installed in back or other injury. 1 Put dishwasher on its back. 2 Remove panels Connect 90° elbow fitting to avoid damaging floor covering. ...
...around coarse threads two to four times to prohibit leaks. 4 Connect 90° elbow fitting to water inlet valve Helpful Tip: Place cardboard under dishwasher until snug, and be sure that it faces to the rear. 5 Remove terminal box cover Using a 1/4" hex head socket, nut driver or ...joint compound Coarse threads Coarse threads Apply Teflon® tape or pipe joint compound to move and install dishwasher. Using a wrench, tighten elbow until installed in back or other injury. 1 Put dishwasher on its back. 2 Remove panels Connect 90° elbow fitting to avoid damaging floor covering. ...

Installation Instructions
Page 12
...: Follow Option B instructions Make Power Supply Cord Connection Option A, Power Supply Cord: 1 Power Cord-Route cord into terminal box Electrical Shock Hazard Electrically ground dishwasher. Reattach and tighten the green screw. 3 Power Cord-Connect remaining wires Route cord so that it does not touch... dishwasher motor to 16-gauge dishwasher wiring. 12 NOTE: Twist on wire connectors (included with power supply cord kit). Select UL listed or CSA approved twist-on wires to follow ...
...: Follow Option B instructions Make Power Supply Cord Connection Option A, Power Supply Cord: 1 Power Cord-Route cord into terminal box Electrical Shock Hazard Electrically ground dishwasher. Reattach and tighten the green screw. 3 Power Cord-Connect remaining wires Route cord so that it does not touch... dishwasher motor to 16-gauge dishwasher wiring. 12 NOTE: Twist on wire connectors (included with power supply cord kit). Select UL listed or CSA approved twist-on wires to follow ...


