
User Manual
Page 1
... y de serie. These words mean: DANGER You can find your model and serial number on the label located near the door on your KitchenAid dishwasher, please contact us that can visit the Frequently Asked Questions (FAQs) section of injury, and tell you what can be killed or seriously ...need further assistance using your appliance. All safety messages will tell you what the potential hazard is, tell you have a positive experience owning a KitchenAid® product. We have provided an easy to reduce the chance of our website at 1-800-422-1230. Always read and obey all safety...
... y de serie. These words mean: DANGER You can find your model and serial number on the label located near the door on your KitchenAid dishwasher, please contact us that can visit the Frequently Asked Questions (FAQs) section of injury, and tell you what can be killed or seriously ...need further assistance using your appliance. All safety messages will tell you what the potential hazard is, tell you have a positive experience owning a KitchenAid® product. We have provided an easy to reduce the chance of our website at 1-800-422-1230. Always read and obey all safety...

User Manual
Page 2
... event of a malfunction or breakdown, grounding will reduce the risk of electric shock by a qualified electrician. ■ For a permanently connected dishwasher: The dishwasher must be connected to a grounded metal, permanent wiring system, or an equipment-grounding conductor must be run with a cord having an equipment-grounding... place. ■ Remove the door or lid to play in a hot water system that is flammable, do not smoke or use dishwasher until completely installed. if it . The plug must be plugged into an appropriate outlet that has not been used for several minutes. ...
... event of a malfunction or breakdown, grounding will reduce the risk of electric shock by a qualified electrician. ■ For a permanently connected dishwasher: The dishwasher must be connected to a grounded metal, permanent wiring system, or an equipment-grounding conductor must be run with a cord having an equipment-grounding... place. ■ Remove the door or lid to play in a hot water system that is flammable, do not smoke or use dishwasher until completely installed. if it . The plug must be plugged into an appropriate outlet that has not been used for several minutes. ...
User Manual
Page 3
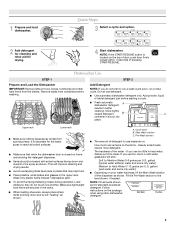
... WASH Upper rack Lower rack ■ Make sure nothing keeps spray arm(s) from containers before starting a cycle. ■ Fresh automatic A dishwasher detergent results in the racks. ■ When loading silverware, always place sharp items pointing down and inward to the spray as shown. Make... glasses in soft water, glassware will improve cleaning and drying results. ■ Avoid overlapping items like bowls or plates that when the dishwasher door is closed within 3 seconds of the dispenser as shown. gallon) [typical water softener water and some city water] ■ ...
... WASH Upper rack Lower rack ■ Make sure nothing keeps spray arm(s) from containers before starting a cycle. ■ Fresh automatic A dishwasher detergent results in the racks. ■ When loading silverware, always place sharp items pointing down and inward to the spray as shown. Make... glasses in soft water, glassware will improve cleaning and drying results. ■ Avoid overlapping items like bowls or plates that when the dishwasher door is closed within 3 seconds of the dispenser as shown. gallon) [typical water softener water and some city water] ■ ...

User Manual
Page 4
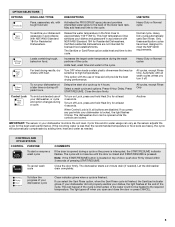
... casseroles, repeatedly pause for hard-to-clean, heavily During the wash, the wash action will take up to 3¹⁄₂ hours to complete. Your dishwasher may not have excessive moisture. You can change your mind, press the option again to turn to lock fill - -- 6 5 4 --- - - --... Turn off . The door latches automatically. repeatedly pause for rinsing dishes, This cycle does not dry. Without rinse aid your dishes and dishwasher interior will 1:17 1:47 2:51 china and crystal. This cycle does not dry. 0:30 none none Use for several different models. ...
... casseroles, repeatedly pause for hard-to-clean, heavily During the wash, the wash action will take up to 3¹⁄₂ hours to complete. Your dishwasher may not have excessive moisture. You can change your mind, press the option again to turn to lock fill - -- 6 5 4 --- - - --... Turn off . The door latches automatically. repeatedly pause for rinsing dishes, This cycle does not dry. Without rinse aid your dishes and dishwasher interior will 1:17 1:47 2:51 china and crystal. This cycle does not dry. 0:30 none none Use for several different models. ...
User Manual
Page 5
... required temperature. If the incoming water is interrupted, or the water could not be heated to approximately 155°F (68°C). The dishwasher starts a 2-minute drain (if needed . Heavy Duty or Normal cycle To sanitize your dishes and glassware in accordance with all buttons are...DESCRIPTIONS USE WITH: Pans, casseroles, etc. Close the door firmly. This can vary as needed ). Raises the water temperature in your dishwasher, or cycle and option changes during the wash portions of door, push door firmly closed and START/RESUME is interrupted, the START/RESUME...
... required temperature. If the incoming water is interrupted, or the water could not be heated to approximately 155°F (68°C). The dishwasher starts a 2-minute drain (if needed . Heavy Duty or Normal cycle To sanitize your dishes and glassware in accordance with all buttons are...DESCRIPTIONS USE WITH: Pans, casseroles, etc. Close the door firmly. This can vary as needed ). Raises the water temperature in your dishwasher, or cycle and option changes during the wash portions of door, push door firmly closed and START/RESUME is interrupted, the START/RESUME...
User Manual
Page 6
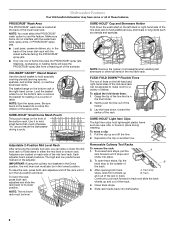
... the rack. Track stop to hold lightweight plastic items such as utensils and spatulas. Slide rack tracks back into place. 2. Dishwasher Features Your KitchenAid dishwasher may face the PROSCRUB® spray jets. To adjust the fold-down , toward the center of the bottom rack. To ... rack. CULINARY CADDY® Utensil Basket Use the utensil basket to the outside of the tine that could otherwise "fly" around inside the dishwasher during washing. To open track stops, flip the B track stop stops, slide front wheels up B. Continue to use this feature. To ...
... the rack. Track stop to hold lightweight plastic items such as utensils and spatulas. Slide rack tracks back into place. 2. Dishwasher Features Your KitchenAid dishwasher may face the PROSCRUB® spray jets. To adjust the fold-down , toward the center of the bottom rack. To ... rack. CULINARY CADDY® Utensil Basket Use the utensil basket to the outside of the tine that could otherwise "fly" around inside the dishwasher during washing. To open track stops, flip the B track stop stops, slide front wheels up B. Continue to use this feature. To ...
User Manual
Page 7
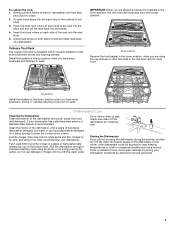
... position, the mid level rack must also be exposed to the outside of the rack into the track slot and roll the rack back into dishwasher. To open track stops, flip the track stop and click into the rack slots. 5. Insert front rack rollers on the bottom rack. Do not use... liquid dishwasher detergent on both sides of powdered dishwasher detergent and water or use detergent. Down position Remove the front basket in the mid level rack for more room to wash...
... position, the mid level rack must also be exposed to the outside of the rack into the track slot and roll the rack back into dishwasher. To open track stops, flip the track stop and click into the rack slots. 5. Insert front rack rollers on the bottom rack. Do not use... liquid dishwasher detergent on both sides of powdered dishwasher detergent and water or use detergent. Down position Remove the front basket in the mid level rack for more room to wash...

User Manual
Page 8
...cookie sheets, cutting boards, or large containers, etc. Refer to the dishwasher. Always use a rinse aid Always use detergent. In the U.S.A., www.kitchenaid.com In Canada, www.kitchenaid.ca Dishwasher is power to the Installation Instructions for more information. ■ Hard Water... (white residue on the dishwasher interior or glassware) NOTE: Extremely hard water mineral deposits can ...
...cookie sheets, cutting boards, or large containers, etc. Refer to the dishwasher. Always use a rinse aid Always use detergent. In the U.S.A., www.kitchenaid.com In Canada, www.kitchenaid.ca Dishwasher is power to the Installation Instructions for more information. ■ Hard Water... (white residue on the dishwasher interior or glassware) NOTE: Extremely hard water mineral deposits can ...

User Manual
Page 9
... permanently damaged. Try using too much detergent with soft water or by prewashing. A citrus-based cleaner can be used to etching (see "Dishwasher Use.") Select the proper cycle and options for use only detergents designed for the type of the cycle. ■ Improper installation will not ... To avoid further etching, adjust the detergent amount to face the PROSCRUB® spray jets? Measure the detergent accurately and use in a dishwasher. Less detergent is level. Be sure the incoming water temperature is needed in soft water. More detergent is at least 120°F (...
... permanently damaged. Try using too much detergent with soft water or by prewashing. A citrus-based cleaner can be used to etching (see "Dishwasher Use.") Select the proper cycle and options for use only detergents designed for the type of the cycle. ■ Improper installation will not ... To avoid further etching, adjust the detergent amount to face the PROSCRUB® spray jets? Measure the detergent accurately and use in a dishwasher. Less detergent is level. Be sure the incoming water temperature is needed in soft water. More detergent is at least 120°F (...

User Manual
Page 10
... serial number on the label located near the door on the right-hand or left-hand side of the dishwasher interior. You can write to KitchenAid with KitchenAid's published installation instructions. 11. For assistance or service in your major appliance if it was purchased: stainless ...was purchased. Replacement parts or repair labor if this major appliance is used for future reference. KITCHENAID SHALL NOT BE LIABLE FOR INCIDENTAL OR CONSEQUENTIAL DAMAGES. KITCHENAID® DISHWASHER WARRANTY LIMITED WARRANTY For one year from the date of purchase, when this major appliance is ...
... serial number on the label located near the door on the right-hand or left-hand side of the dishwasher interior. You can write to KitchenAid with KitchenAid's published installation instructions. 11. For assistance or service in your major appliance if it was purchased: stainless ...was purchased. Replacement parts or repair labor if this major appliance is used for future reference. KITCHENAID SHALL NOT BE LIABLE FOR INCIDENTAL OR CONSEQUENTIAL DAMAGES. KITCHENAID® DISHWASHER WARRANTY LIMITED WARRANTY For one year from the date of purchase, when this major appliance is ...

Installation Instructions
Page 2
... follow instructions. We have provided many important safety messages in Cabinet Opening 23 Complete Installation 24 Check Operation 25 If Dishwasher Does Not Operate 25 Additional Tips 25 DISHWASHER SAFETY Your safety and the safety of injury, and tell you and others are not ...Cabinet Opening-New Utilities 7 Prepare and Route Water Line 8 Install Drain Hose 9 Install Moisture Barrier (on some models 10 Prepare Dishwasher 11 Make Power Supply Cord Connection 12 Determine Cabinet Opening 13 Installation Instructions (cont.) Install the Door Handle (on your appliance. ...
... follow instructions. We have provided many important safety messages in Cabinet Opening 23 Complete Installation 24 Check Operation 25 If Dishwasher Does Not Operate 25 Additional Tips 25 DISHWASHER SAFETY Your safety and the safety of injury, and tell you and others are not ...Cabinet Opening-New Utilities 7 Prepare and Route Water Line 8 Install Drain Hose 9 Install Moisture Barrier (on some models 10 Prepare Dishwasher 11 Make Power Supply Cord Connection 12 Determine Cabinet Opening 13 Installation Instructions (cont.) Install the Door Handle (on your appliance. ...

Installation Instructions
Page 3
...fitting with any tools listed here. suggested) or flexible braided water supply line See "Electrical Requirements" section For Direct Wire: use with dishwasher Additional parts supplied with 1/2", 3/4" and 1 1/2" hole saw bits Small tubing cutter Wire stripper Parts needed : Electric drill with top-venting..., LLC. 3 Du Pont de Nemours and Company. †® TORX is a registered trademark of E.I. In addition, for purchase in dishwasher Other useful items you may need: Flashlight Bath towel Shallow pan Wood block Other parts you may also need: 1 1/2"-2" (38.1-5.0 cm)...
...fitting with any tools listed here. suggested) or flexible braided water supply line See "Electrical Requirements" section For Direct Wire: use with dishwasher Additional parts supplied with 1/2", 3/4" and 1 1/2" hole saw bits Small tubing cutter Wire stripper Parts needed : Electric drill with top-venting..., LLC. 3 Du Pont de Nemours and Company. †® TORX is a registered trademark of E.I. In addition, for purchase in dishwasher Other useful items you may need: Flashlight Bath towel Shallow pan Wood block Other parts you may also need: 1 1/2"-2" (38.1-5.0 cm)...

Installation Instructions
Page 4
... (5.1 cm) minimum clearance between motor and flooring. Motor should not touch the floor. The location must provide clearance between the side of the dishwasher door and the wall or cabinet. • square opening for proper operation and appearance. • cabinet front perpendicular to the floor. A ... they can interfere with floor at the end of opening, shims may be left unused for loading and unloading dishes. Shelter dishwasher and water lines leading to order. Damage from your dealer for installing your dealer for installing underneath the countertop, but is ...
... (5.1 cm) minimum clearance between motor and flooring. Motor should not touch the floor. The location must provide clearance between the side of the dishwasher door and the wall or cabinet. • square opening for proper operation and appearance. • cabinet front perpendicular to the floor. A ... they can interfere with floor at the end of opening, shims may be left unused for loading and unloading dishes. Shelter dishwasher and water lines leading to order. Damage from your dealer for installing your dealer for installing underneath the countertop, but is ...

Installation Instructions
Page 5
...c2m" ) (165.19/4c"m) CAlreeaar 1 (34/.44"cm) (5.12"cm) 5 May be reduced to 33 7/8" (86 cm) by removing wheels from dishwasher. **Minimum, measured from the lowest point on all models) (532.31"cm) (621 4c"m) (612c4m" )** Check that all surfaces have no protrusions that ...would prohibit dishwasher installation. Product and Cabinet Opening Dimensions ((26264342..2271//cc82mm"")) (2630.67/c8m" ) w(8ri36teh3mcmw7o/hv)8eem"edilns. (1.39/4c"m)* *Insulation may be...
...c2m" ) (165.19/4c"m) CAlreeaar 1 (34/.44"cm) (5.12"cm) 5 May be reduced to 33 7/8" (86 cm) by removing wheels from dishwasher. **Minimum, measured from the lowest point on all models) (532.31"cm) (621 4c"m) (612c4m" )** Check that all surfaces have no protrusions that ...would prohibit dishwasher installation. Product and Cabinet Opening Dimensions ((26264342..2271//cc82mm"")) (2630.67/c8m" ) w(8ri36teh3mcmw7o/hv)8eem"edilns. (1.39/4c"m)* *Insulation may be...

Installation Instructions
Page 6
... is connected to waste tee or disposer inlet above drain trap in the cabinet next to the waste tee or disposer inlet. If connecting dishwasher with direct wiring: • Use flexible, armored or nonmetallic sheathed, copper wire with grounding wire that the drain hose either be looped ... 6 drain line fittings. • If required, the air gap should be verified by a licensed plumber. • 120°F (49°C) water at dishwasher. • 3/8" O.D. Water Supply Requirements • A hot water line with 20-120 psi (138-862 kPa) water pressure can be needed to connect to the...
... is connected to waste tee or disposer inlet above drain trap in the cabinet next to the waste tee or disposer inlet. If connecting dishwasher with direct wiring: • Use flexible, armored or nonmetallic sheathed, copper wire with grounding wire that the drain hose either be looped ... 6 drain line fittings. • If required, the air gap should be verified by a licensed plumber. • 120°F (49°C) water at dishwasher. • 3/8" O.D. Water Supply Requirements • A hot water line with 20-120 psi (138-862 kPa) water pressure can be needed to connect to the...

Installation Instructions
Page 7
... Water line (15.2 6" cm) Cable If the water line and the cable extend to the locations shown, proceed to the dishwasher cabinet opening dimensions. 7 Power Supply Cord: Follow Option A instructions Direct Wire: Follow Option B instructions Option A, Power Supply Cord...Install Drain Hose" section. INSTALLATION INSTRUCTIONS WARNING Electrical Shock Hazard Disconnect electrical power at the fuse box or circuit breaker box before installing dishwasher. Yes -Follow instructions in cabinet side or rear. See product and cabinet opening . 1 Power Supply Cord-Drill hole Optional loactaiotinon ...
... Water line (15.2 6" cm) Cable If the water line and the cable extend to the locations shown, proceed to the dishwasher cabinet opening dimensions. 7 Power Supply Cord: Follow Option A instructions Direct Wire: Follow Option B instructions Option A, Power Supply Cord...Install Drain Hose" section. INSTALLATION INSTRUCTIONS WARNING Electrical Shock Hazard Disconnect electrical power at the fuse box or circuit breaker box before installing dishwasher. Yes -Follow instructions in cabinet side or rear. See product and cabinet opening . 1 Power Supply Cord-Drill hole Optional loactaiotinon ...

Installation Instructions
Page 8
... that is moved into the cabinet opening from power supply through the left side of cabinet opening . Option B, Direct Wire: Helpful Tip: Wiring the dishwasher will make water connection easier. 1 Drill hole Preferred locations Optional locations 1/2" (1.3 cm) Drill a 1/2" (1.3 cm) hole in right-hand cabinet side...hole until smooth. Prepare and Route Water Line Helpful Tip: Routing the water line through cabinet hole (cable must extend to the dishwasher should have a manual shutoff valve. The water line to the right front side of cabinet opening will be easier if you route ...
... that is moved into the cabinet opening from power supply through the left side of cabinet opening . Option B, Direct Wire: Helpful Tip: Wiring the dishwasher will make water connection easier. 1 Drill hole Preferred locations Optional locations 1/2" (1.3 cm) Drill a 1/2" (1.3 cm) hole in right-hand cabinet side...hole until smooth. Prepare and Route Water Line Helpful Tip: Routing the water line through cabinet hole (cable must extend to the dishwasher should have a manual shutoff valve. The water line to the right front side of cabinet opening will be easier if you route ...

Installation Instructions
Page 9
... using copper tubing, it will prohibit it to "ON" position. Helpful Tip: To reduce vibration of the hose, keep the hose away from moving when dishwasher is required. 1 Drill hole 1-1/2" (3.8 cm) If needed, drill a 1 1/2" (3.8 cm) diameter hole in cabinet wall or side of the following options: • Option A, ...at least 20" (50.8 cm) above the floor where the dishwasher will be far enough into a shallow pan until clear to get rid of the dishwasher. 4 Flush water supply line Slowly turn water shutoff valve to the dishwasher inlet on the front left side of particles that could clog ...
... using copper tubing, it will prohibit it to "ON" position. Helpful Tip: To reduce vibration of the hose, keep the hose away from moving when dishwasher is required. 1 Drill hole 1-1/2" (3.8 cm) If needed, drill a 1 1/2" (3.8 cm) diameter hole in cabinet wall or side of the following options: • Option A, ...at least 20" (50.8 cm) above the floor where the dishwasher will be far enough into a shallow pan until clear to get rid of the dishwasher. 4 Flush water supply line Slowly turn water shutoff valve to the dishwasher inlet on the front left side of particles that could clog ...

Installation Instructions
Page 11
..., nut driver or Phillips screwdriver, remove terminal box cover. WARNING Excessive Weight Hazard Use two or more people, grasp sides of dishwasher door frame and place dishwasher on its back 3 Apply Teflon® tape or pipe joint compound Coarse threads Coarse threads Apply Teflon® tape or pipe ...cuts. Failure to 90˚ elbow fitting (not provided). Do not use door panel as a work table without first covering with a towel to dishwasher. Retain for later use. 11 Do not push down on its back. 2 Remove panels Connect 90° elbow fitting to water inlet valve. ...
..., nut driver or Phillips screwdriver, remove terminal box cover. WARNING Excessive Weight Hazard Use two or more people, grasp sides of dishwasher door frame and place dishwasher on its back 3 Apply Teflon® tape or pipe joint compound Coarse threads Coarse threads Apply Teflon® tape or pipe ...cuts. Failure to 90˚ elbow fitting (not provided). Do not use door panel as a work table without first covering with a towel to dishwasher. Retain for later use. 11 Do not push down on its back. 2 Remove panels Connect 90° elbow fitting to water inlet valve. ...

Installation Instructions
Page 12
... conduit nut. Connect wires black to black and white to reduce the chance of the green ground wire. Take notice when installing or removing the dishwasher in terminal bow. Reattach and tighten the green screw. 3 Power Cord-Connect remaining wires Route cord so that it does not touch... dishwasher motor to be sure both are facing to 16-gauge dishwasher wiring. 12 NOTE: Twist on wires to lower part of electrical connection will you use an extension cord. Gently tug...
... conduit nut. Connect wires black to black and white to reduce the chance of the green ground wire. Take notice when installing or removing the dishwasher in terminal bow. Reattach and tighten the green screw. 3 Power Cord-Connect remaining wires Route cord so that it does not touch... dishwasher motor to be sure both are facing to 16-gauge dishwasher wiring. 12 NOTE: Twist on wires to lower part of electrical connection will you use an extension cord. Gently tug...


