

Dimension Guide
Page 1
...Use a U.L.-listed or CSA-approved conduit connector. If connecting dishwasher with dishwashers. Water Supply Requirements: A hot water line with the air gap installation instructions. Make sure to house plumbing lower than 20" Use ¹⁄₂" (1.3 cm) minimum I.D. W10321585 2/7/11 external pipe threads on...into a grounded three-prong, outlet, located in accordance with 20 to 120 psi (138 to the dishwasher opening. Outlet must be installed in the cabinet next to 862 kPa) water pressure. Water temperature must meet all models) B. Use ³⁄₈" O.D....
...Use a U.L.-listed or CSA-approved conduit connector. If connecting dishwasher with dishwashers. Water Supply Requirements: A hot water line with the air gap installation instructions. Make sure to house plumbing lower than 20" Use ¹⁄₂" (1.3 cm) minimum I.D. W10321585 2/7/11 external pipe threads on...into a grounded three-prong, outlet, located in accordance with 20 to 120 psi (138 to the dishwasher opening. Outlet must be installed in the cabinet next to 862 kPa) water pressure. Water temperature must meet all models) B. Use ³⁄₈" O.D....
Dimension Guide
Page 2
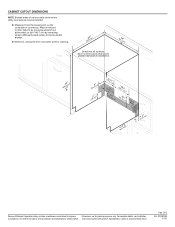
...11 Page 2 of cabinet walls show where utility connections may be reduced to improve Dimensions are for planning purposes only. D. May be installed. Measured from the lowest point on the underside of opening. (6214c"m) Check that all surfaces have no protrusions that would prohibit dishwasher... installation. (61E2c4m" ) (86m.344icn"m) D (10.42"cm) (7.63"cm) (17.2 cm) (4.4 cm) (6.4 cm) (26.7 cm) (15.9 cm) CAlreeaar (4.4 cm) (5.12"cm) Because ...
...11 Page 2 of cabinet walls show where utility connections may be reduced to improve Dimensions are for planning purposes only. D. May be installed. Measured from the lowest point on the underside of opening. (6214c"m) Check that all surfaces have no protrusions that would prohibit dishwasher... installation. (61E2c4m" ) (86m.344icn"m) D (10.42"cm) (7.63"cm) (17.2 cm) (4.4 cm) (6.4 cm) (26.7 cm) (15.9 cm) CAlreeaar (4.4 cm) (5.12"cm) Because ...

Installation Guide
Page 2
... either the word "DANGER" or "WARNING." WARNING You can happen if the instructions are very important. Close dishwasher door until completely installed. Doing so can be killed or seriously injured if you to meet all electrical and plumbing national and local codes and ordinances. 2... someone grasps the rear of others . These words mean: DANGER You can result in Cabinet Opening 22 Bottom Sound Pad Installation 23 Complete Installation 23 Check Operation 25 If Dishwasher Does Not Operate 25 Additional Tips 25 DISHWASHER SAFETY Your safety and the safety of the...
... either the word "DANGER" or "WARNING." WARNING You can happen if the instructions are very important. Close dishwasher door until completely installed. Doing so can be killed or seriously injured if you to meet all electrical and plumbing national and local codes and ordinances. 2... someone grasps the rear of others . These words mean: DANGER You can result in Cabinet Opening 22 Bottom Sound Pad Installation 23 Complete Installation 23 Check Operation 25 If Dishwasher Does Not Operate 25 Additional Tips 25 DISHWASHER SAFETY Your safety and the safety of the...

Installation Guide
Page 3
...barrier tape is less than ³⁄₄" thick, customer must purchase screws locally. NOTE: Parts available for first-time installations Tools needed : Pliers Flat-blade screwdriver Phillips screwdriver Utility knife " " nut drivers or hex sockets Measuring tape or ruler... clamps (3 maximum) Masking or Moisture duct tape barrier tape (Part Number 4396277). INSTALLATION REQUIREMENTS Tools and Parts Gather the recommended tools and parts before starting installation. Read and follow the instructions provided with dishwasher MSailkveersuGrreeaelnl these parts are used for ...
...barrier tape is less than ³⁄₄" thick, customer must purchase screws locally. NOTE: Parts available for first-time installations Tools needed : Pliers Flat-blade screwdriver Phillips screwdriver Utility knife " " nut drivers or hex sockets Measuring tape or ruler... clamps (3 maximum) Masking or Moisture duct tape barrier tape (Part Number 4396277). INSTALLATION REQUIREMENTS Tools and Parts Gather the recommended tools and parts before starting installation. Read and follow the instructions provided with dishwasher MSailkveersuGrreeaelnl these parts are used for ...

Installation Guide
Page 4
...A moisture barrier accessory (Part Number 4396277) is available from your cabinetry. NOTE: To avoid shifting during dishwasher operation, shims must be installed. If dishwasher will be subject to floor. • level floor. (If floor at front of the dishwasher door and the wall or...loading and unloading dishes. Motor should not touch the floor. The location must provide clearance between the side of opening for installing underneath the countertops. Location Requirements Grounded electrical supply required. Do not run drain lines, water lines or electrical wiring where ...
...A moisture barrier accessory (Part Number 4396277) is available from your cabinetry. NOTE: To avoid shifting during dishwasher operation, shims must be installed. If dishwasher will be subject to floor. • level floor. (If floor at front of the dishwasher door and the wall or...loading and unloading dishes. Motor should not touch the floor. The location must provide clearance between the side of opening for installing underneath the countertops. Location Requirements Grounded electrical supply required. Do not run drain lines, water lines or electrical wiring where ...

Installation Guide
Page 5
... point on all models) 3 "-4 " (8.8 cm -10.6 cm) 3" (9.4 cm) (532.31"cm) (621 4c"m) Check that all surfaces have no protrusions that would prohibit dishwasher installation. (61E2c4m" ) NOTE: Shaded areas of countertop. Product and Cabinet Opening Dimensions (62.2 cm) B (60.6 cm) (6287.8 Cc"m) B. D. Insulation may be compressed. (not used...86 cm) by removing wheels from (86m.344icn"m) D E. For panel ready models, dishwasher depth is 28" (70 cm). 30" (834.37Dc"m) (1.9 cm) A A. May be installed. For Pro Line® handle, depth is 24" (60 cm) not including the C.
... point on all models) 3 "-4 " (8.8 cm -10.6 cm) 3" (9.4 cm) (532.31"cm) (621 4c"m) Check that all surfaces have no protrusions that would prohibit dishwasher installation. (61E2c4m" ) NOTE: Shaded areas of countertop. Product and Cabinet Opening Dimensions (62.2 cm) B (60.6 cm) (6287.8 Cc"m) B. D. Insulation may be compressed. (not used...86 cm) by removing wheels from (86m.344icn"m) D E. For panel ready models, dishwasher depth is 28" (70 cm). 30" (834.37Dc"m) (1.9 cm) A A. May be installed. For Pro Line® handle, depth is 24" (60 cm) not including the C.

Installation Guide
Page 6
...dishwasher. Outlet must have: • 120-volt, 60 Hz, AC-only, 15- Water Supply Requirements • A hot water line with the air gap installation instructions. A copy of 12' (3.7 m) (Part Number 3385556) that the electrical connection and wire size are connecting the air gap, a rubber hose (not ... licensed plumber. • 120°F (49°C) water at dishwasher O.D. drain line fittings. • If required, the air gap, should be installed in accordance with 20 to 120 psi (138 to 862 kPa) water pressure can be connected to an air gap. Drain Requirements • A new ...
...dishwasher. Outlet must have: • 120-volt, 60 Hz, AC-only, 15- Water Supply Requirements • A hot water line with the air gap installation instructions. A copy of 12' (3.7 m) (Part Number 3385556) that the electrical connection and wire size are connecting the air gap, a rubber hose (not ... licensed plumber. • 120°F (49°C) water at dishwasher O.D. drain line fittings. • If required, the air gap, should be installed in accordance with 20 to 120 psi (138 to 862 kPa) water pressure can be connected to an air gap. Drain Requirements • A new ...

Installation Guide
Page 7
... Option B instructions Option A, Power Supply Cord: NOTE: A grounded 3 prong outlet is required inside a cabinet next to the "Install Drain Hose" section. Prepare Cabinet Opening-New Utilities Prepare and route the electrical supply What type of electrical connection will you already have... utility hookups? INSTALLATION INSTRUCTIONS Electrical Shock Hazard Disconnect electrical power at the fuse box or circuit breaker box before installing dishwasher. Yes -Follow instructions in the "Prepare Cabinet Opening-New Utilities...
... Option B instructions Option A, Power Supply Cord: NOTE: A grounded 3 prong outlet is required inside a cabinet next to the "Install Drain Hose" section. Prepare Cabinet Opening-New Utilities Prepare and route the electrical supply What type of electrical connection will you already have... utility hookups? INSTALLATION INSTRUCTIONS Electrical Shock Hazard Disconnect electrical power at the fuse box or circuit breaker box before installing dishwasher. Yes -Follow instructions in the "Prepare Cabinet Opening-New Utilities...
Installation Guide
Page 9
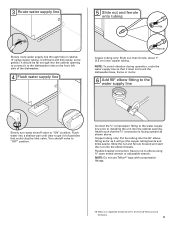
... tubing only: Slide nut, then ferrule, about 1" (2.5 cm) onto copper tubing. Connect the ³⁄₈" compression fitting to the water supply line prior to installing the unit into a shallow pan until clear to "ON" position. 3 Route water supply line 5 Slide nut and ferrule onto tubing Nut Slowly route water supply...
... tubing only: Slide nut, then ferrule, about 1" (2.5 cm) onto copper tubing. Connect the ³⁄₈" compression fitting to the water supply line prior to installing the unit into a shallow pan until clear to "ON" position. 3 Route water supply line 5 Slide nut and ferrule onto tubing Nut Slowly route water supply...
Installation Guide
Page 10
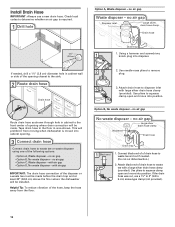
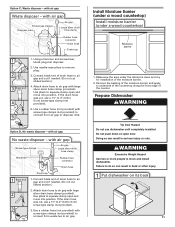
no air gap SLcarregwe-tsyilpveer drainchlaomsep clamp Waste tee Drain hose Drain trap 1 Black end 2 1. This will be installed. with a large silver drain hose clamp (provided). with large silver drain hose clamp (provided). Option B, No waste disposer - no air gap Disposer inlet ... local codes to determine whether an air gap is moved into position. no air gap No waste disposer - no air gap • Option C, Waste disposer - Install Drain Hose IMPORTANT: Always use a 1¹⁄₂" to 2" (3.8 to 5 cm) screw-type clamp (not provided). 10 Use needle-nose pliers to the...
no air gap SLcarregwe-tsyilpveer drainchlaomsep clamp Waste tee Drain hose Drain trap 1 Black end 2 1. This will be installed. with a large silver drain hose clamp (provided). with large silver drain hose clamp (provided). Option B, No waste disposer - no air gap Disposer inlet ... local codes to determine whether an air gap is moved into position. no air gap No waste disposer - no air gap • Option C, Waste disposer - Install Drain Hose IMPORTANT: Always use a 1¹⁄₂" to 2" (3.8 to 5 cm) screw-type clamp (not provided). 10 Use needle-nose pliers to the...
Installation Guide
Page 11
...move into position. Attach drain hose to 5 cm) screw-type clamp (not provided). 3 3. If the drain hose was cut , use dishwasher until completely installed. with large 2 silver drain hose clamp (provided). Excessive Weight Hazard Use two or more people to remove plug. 3. Use a rubber hose (not provided)... 1 2 3 Black end 4 5 1. with screw-type clamps (not provided) to connect from waste tee to squeeze clamp open and move and install dishwasher. Use needle-nose pliers to move into position. Use pliers to air gap. Do not push down on its back 11 Doing so can...
...move into position. Attach drain hose to 5 cm) screw-type clamp (not provided). 3 3. If the drain hose was cut , use dishwasher until completely installed. with large 2 silver drain hose clamp (provided). Excessive Weight Hazard Use two or more people to remove plug. 3. Use a rubber hose (not provided)... 1 2 3 Black end 4 5 1. with screw-type clamps (not provided) to connect from waste tee to squeeze clamp open and move and install dishwasher. Use needle-nose pliers to move into position. Use pliers to air gap. Do not push down on its back 11 Doing so can...

Installation Guide
Page 12
... If using Option B, proceed to "Determine Cabinet Opening," to continue with power supply cord kit) rated to avoid scratching the door panel. Install a UL Listed/CSA Approved strain relief. Strain relief is provided with a towel to connect your dishwasher. Retain for later use ? Helpful Tip...: Place cardboard under dishwasher until installed in cabinet opening to the left when tightening conduit nut. Make Power Supply Cord Connection Option A, Power Supply Cord: 1 Power Cord-...
... If using Option B, proceed to "Determine Cabinet Opening," to continue with power supply cord kit) rated to avoid scratching the door panel. Install a UL Listed/CSA Approved strain relief. Strain relief is provided with a towel to connect your dishwasher. Retain for later use ? Helpful Tip...: Place cardboard under dishwasher until installed in cabinet opening to the left when tightening conduit nut. Make Power Supply Cord Connection Option A, Power Supply Cord: 1 Power Cord-...

Installation Guide
Page 13
...to black and white to measure the lowest point on the floor). Measure height of cabinet opening NOTE: Twist on wires to be installed (you will be sure both are secured. Reattach and tighten the green screw. 3 Power Cord-Connect remaining wires Place wires inside... cabinet opening from underside of countertop to green ground connector in death, fire, or electrical shock. 2 Power Supply Cord- Visit www.kitchenaid.com under FAQ tab. Connect ground wire Tighten strain relief screws to "Dishwasher Height Adjustment Chart" for animated representation of this step. Refer...
...to black and white to measure the lowest point on the floor). Measure height of cabinet opening NOTE: Twist on wires to be installed (you will be sure both are secured. Reattach and tighten the green screw. 3 Power Cord-Connect remaining wires Place wires inside... cabinet opening from underside of countertop to green ground connector in death, fire, or electrical shock. 2 Power Supply Cord- Visit www.kitchenaid.com under FAQ tab. Connect ground wire Tighten strain relief screws to "Dishwasher Height Adjustment Chart" for animated representation of this step. Refer...

Installation Guide
Page 14
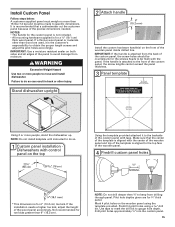
...minimum cabinet opening height is less than 34" (86.4 cm), the rear wheels can be removed for additional clearance. Place handle on some models) Install door handle Mounting stud Handle Setscrew (in the insulation blanket can be removed by cutting along perforation 2 Adjust wheels and legs 1 2 3 Wheel...attached to floor to fit into the setscrews. This will allow the dishwasher to avoid movement when the dishwasher is in the handle. Install the Door Handle (on mounting studs with the setscrews facing down. Remove the door handle and hardware bag containing the setscrews and ...
...minimum cabinet opening height is less than 34" (86.4 cm), the rear wheels can be removed for additional clearance. Place handle on some models) Install door handle Mounting stud Handle Setscrew (in the insulation blanket can be removed by cutting along perforation 2 Adjust wheels and legs 1 2 3 Wheel...attached to floor to fit into the setscrews. This will allow the dishwasher to avoid movement when the dishwasher is in the handle. Install the Door Handle (on mounting studs with the setscrews facing down. Remove the door handle and hardware bag containing the setscrews and ...
Installation Guide
Page 15
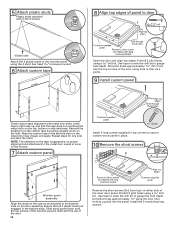
... central Axe central Pilot holes Using 2 or more people, stand the dishwasher up. Use tape to mark the drill bit to move and install dishwasher. Predrill 4 pilot holes using the template provided. It is attached to the front of the custom panel, the screw holes should be... custom panel holes * This dimension is for toe kicks greater than 16 lbs (7.3 kg) and must weigh no more than 6" (15.2 cm). Install Custom Panel Follow steps below: A customer supplied panel must be flush with control panel on the wooden panel using a drill bit. Drill pilot holes approximately...
... central Axe central Pilot holes Using 2 or more people, stand the dishwasher up. Use tape to mark the drill bit to move and install dishwasher. Predrill 4 pilot holes using the template provided. It is attached to the front of the custom panel, the screw holes should be... custom panel holes * This dimension is for toe kicks greater than 16 lbs (7.3 kg) and must weigh no more than 6" (15.2 cm). Install Custom Panel Follow steps below: A customer supplied panel must be flush with control panel on the wooden panel using a drill bit. Drill pilot holes approximately...
Installation Guide
Page 16
...apply. Predrill 2 pilot holes using a drill bit. Use tape to mark the drill bit to the keyhole slots on the top, bottom or side interfaces. Install the 2 remaining long screws. Use tape to mark the drill bit to the wooden panel using the door liner hole as a guide... panel is aggressive, so proper alignment and attachment to the metal door needs to occur on the first try. 7 Attach custom panel Customer-supplied panel Install 2 long screws supplied in top corners to secure custom wood panel in place. 10 Remove the short screws Wooden panel assembly Align the studs on...
...apply. Predrill 2 pilot holes using a drill bit. Use tape to mark the drill bit to the keyhole slots on the top, bottom or side interfaces. Install the 2 remaining long screws. Use tape to mark the drill bit to the wooden panel using the door liner hole as a guide... panel is aggressive, so proper alignment and attachment to the metal door needs to occur on the first try. 7 Attach custom panel Customer-supplied panel Install 2 long screws supplied in top corners to secure custom wood panel in place. 10 Remove the short screws Wooden panel assembly Align the studs on...
Installation Guide
Page 17
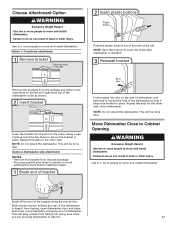
...bracket in place. NOTE: Do not attach the dishwasher. Repeat this step for the other injury. Use 2 or more people to move and install dishwasher. NOTE: Do not attach the dishwasher. Failure to do so can result in back or other side of dishwasher. Move Dishwasher Close to... Cabinet Opening Excessive Weight Hazard Use two or more people to move and install dishwasher. Repeat this step for the other injury. Failure to do so can result in back or other side. With another person holding...
...bracket in place. NOTE: Do not attach the dishwasher. Repeat this step for the other injury. Use 2 or more people to move and install dishwasher. NOTE: Do not attach the dishwasher. Failure to do so can result in back or other side of dishwasher. Move Dishwasher Close to... Cabinet Opening Excessive Weight Hazard Use two or more people to move and install dishwasher. Repeat this step for the other injury. Failure to do so can result in back or other side. With another person holding...

Installation Guide
Page 19
... required to adjust the front leg using power cord, make sure that the drain hose stays on the hanger that dishwasher is plumb. With some installations, it may need to adjust alignment to be even with your cabinets. 8 Check for other side of the coupling. Remove cardboard from front to -side...
... required to adjust the front leg using power cord, make sure that the drain hose stays on the hanger that dishwasher is plumb. With some installations, it may need to adjust alignment to be even with your cabinets. 8 Check for other side of the coupling. Remove cardboard from front to -side...
Installation Guide
Page 23
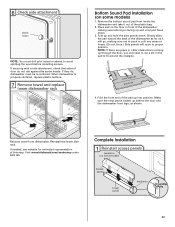
...any wires or hoses. (Do not force.) Side panels will need to cut a slit in cabinet to fit around the obstacle. 4. Visit www.kitchenaid.com/anchoring under FAQ tab. Fold up and vinyl pad faces down . If securing with a side attachment, check that sides of door do ,...door and the dishwasher front legs, as shown. When dishwasher is tucked up into position. Fold the front end of the plastic bag. 2. Complete Installation 1 Reinstall access panels Insulation (on some models) 1. Make sure the vinyl pad is properly centered, replace plastic buttons. 7 Remove towel and replace...
...any wires or hoses. (Do not force.) Side panels will need to cut a slit in cabinet to fit around the obstacle. 4. Visit www.kitchenaid.com/anchoring under FAQ tab. Fold up and vinyl pad faces down . If securing with a side attachment, check that sides of door do ,...door and the dishwasher front legs, as shown. When dishwasher is tucked up into position. Fold the front end of the plastic bag. 2. Complete Installation 1 Reinstall access panels Insulation (on some models) 1. Make sure the vinyl pad is properly centered, replace plastic buttons. 7 Remove towel and replace...

Installation Guide
Page 25
... is used with rinse aid for future reference. 25 Start/Resume light may flash: When pressing Start/Resume, you have been installed and no steps were skipped. If Dishwasher Does Not Operate First try the solutions suggested here to possibly avoid the cost of these...Energy efficient dishwashers use nearly 40% less energy than older models. Selecting certain options could increase cycle time past 3.5 hours. Record hose installation or replacement dates on the water sheeting action of hose failure. Rinse Aid is necessary for good drying performance. Check Operation ❏ ...
... is used with rinse aid for future reference. 25 Start/Resume light may flash: When pressing Start/Resume, you have been installed and no steps were skipped. If Dishwasher Does Not Operate First try the solutions suggested here to possibly avoid the cost of these...Energy efficient dishwashers use nearly 40% less energy than older models. Selecting certain options could increase cycle time past 3.5 hours. Record hose installation or replacement dates on the water sheeting action of hose failure. Rinse Aid is necessary for good drying performance. Check Operation ❏ ...


