Use & Care Guide
Page 4
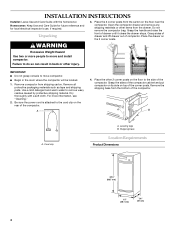
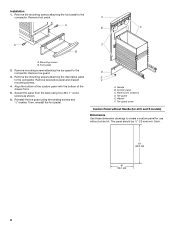
... and raise the front of the corner posts. Dry thoroughly with the homeowner. Shipping base Location Requirements Product Dimensions 34¹⁄₈" (86.7 cm) 15" (38.1 cm) 24" (61 cm) 4 Open the compactor drawer and remove any shipping materials or other injury. WARNING Excessive Weight Hazard Use two or more information, see...
... and raise the front of the corner posts. Dry thoroughly with the homeowner. Shipping base Location Requirements Product Dimensions 34¹⁄₈" (86.7 cm) 15" (38.1 cm) 24" (61 cm) 4 Open the compactor drawer and remove any shipping materials or other injury. WARNING Excessive Weight Hazard Use two or more information, see...
Use & Care Guide
Page 5
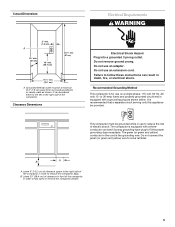
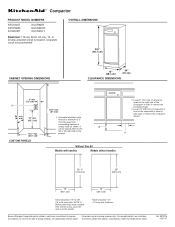
... not remove ground prong. Leave 23" (58.4 cm) of clearance in front of the compactor in order to follow these instructions can be a minimum of the compactor in use on a single phase, 115-volt, 60 Hz, AC only 15- Cutout Dimensions Electrical Requirements WARNING 3" min. (7.6 cm) A 24" min. (61 cm) 18" min. (45.7 cm...
... not remove ground prong. Leave 23" (58.4 cm) of clearance in front of the compactor in order to follow these instructions can be a minimum of the compactor in use on a single phase, 115-volt, 60 Hz, AC only 15- Cutout Dimensions Electrical Requirements WARNING 3" min. (7.6 cm) A 24" min. (61 cm) 18" min. (45.7 cm...
Use & Care Guide
Page 7
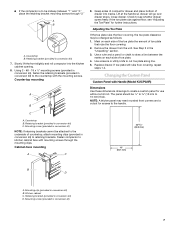
...the front slightly and roll compactor into tracks. Grasp sides of compactor drawer and place bottom of...Mounting clip (provided in the "Unpacking" section. 3. Retaining bracket (provided in conversion kit) 7. s If the compactor is to create a custom panel for use without a trim kit. Countertop B. Retaining bracket (provided in conversion ... (Model KUCP02IR) Dimensions Use these dimensions drawings to be changed as follows: 1. If toe plate still rubs floor covering, repeat steps 1-4. C A. Retaining bracket (provided in conversion kit) 7 Fasten compactor to cut toe plate...
...the front slightly and roll compactor into tracks. Grasp sides of compactor drawer and place bottom of...Mounting clip (provided in the "Unpacking" section. 3. Retaining bracket (provided in conversion kit) 7. s If the compactor is to create a custom panel for use without a trim kit. Countertop B. Retaining bracket (provided in conversion ... (Model KUCP02IR) Dimensions Use these dimensions drawings to be changed as follows: 1. If toe plate still rubs floor covering, repeat steps 1-4. C A. Retaining bracket (provided in conversion kit) 7 Fasten compactor to cut toe plate...
Use & Care Guide
Page 8
... and discard mounting screws. 4. Toe guard E. Toe guard screw Custom Panel without Handle (for use without a trim kit. thick. 25" (63.5 cm) 15" (38.1 cm) 8 Foot pedal 2. Align the bottom of the custom panel with the bottom of the drawer front. 5. D E F A. Handle B.... min. Mounting screws B. Remove mounting screws attaching the toe guard to create a custom panel for all C and S models) Dimensions Use these dimension drawings to the compactor. Then, reinstall the foot pedal. Custom panel C. Washer F. Secure the panel from the back using the existing screws and &#...
... and discard mounting screws. 4. Toe guard E. Toe guard screw Custom Panel without Handle (for use without a trim kit. thick. 25" (63.5 cm) 15" (38.1 cm) 8 Foot pedal 2. Align the bottom of the custom panel with the bottom of the drawer front. 5. D E F A. Handle B.... min. Mounting screws B. Remove mounting screws attaching the toe guard to create a custom panel for all C and S models) Dimensions Use these dimension drawings to the compactor. Then, reinstall the foot pedal. Custom panel C. Washer F. Secure the panel from the back using the existing screws and &#...
Dimension Guide
Page 1
...;" (74.6 cm) 25" (63.5 cm) 15" (38.1 cm) 15" (38.1 cm) Panel should be 1/2" to 5/8" (13 to remove the compactor bags. 2. For complete details, see Installation our products, we reserve the right to improve Dimensions are for access to change materials and specifications without notice.... Ref. 9872216 04-27-07 Grounded electrical outlet must be placed either to fully open or remove the compactor drawer. Specifications subject to the handle. NOTE...
...;" (74.6 cm) 25" (63.5 cm) 15" (38.1 cm) 15" (38.1 cm) Panel should be 1/2" to 5/8" (13 to remove the compactor bags. 2. For complete details, see Installation our products, we reserve the right to improve Dimensions are for access to change materials and specifications without notice.... Ref. 9872216 04-27-07 Grounded electrical outlet must be placed either to fully open or remove the compactor drawer. Specifications subject to the handle. NOTE...