Use & Care Guide
Page 1
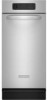
COMPACTOR Use & Care Guide For questions about features, operation/performance, parts, accessories or service, call: 1-800-422-1230 or visit our website at www.kitchenaid.com In Canada, for assistance, installation or service, call: 1-800-807-6777 or visit our website at www.KitchenAid.ca Table of Contents ...2 9872216
COMPACTOR Use & Care Guide For questions about features, operation/performance, parts, accessories or service, call: 1-800-422-1230 or visit our website at www.kitchenaid.com In Canada, for assistance, installation or service, call: 1-800-807-6777 or visit our website at www.KitchenAid.ca Table of Contents ...2 9872216
Use & Care Guide
Page 2
... Panel 7 COMPACTOR USE 9 How Your Compactor Works 9 Loading 10 WHISPER QUIET™ Plus System 10 Starting Your Compactor 10 Using Solid (Locked) Cycle 10 Using the Air Filter or Freshener 11 Removing a Filled Bag 11 Installing a New Bag 11 COMPACTOR CARE 12 Changing the Air Filter or Freshener 12 Cleaning 12 TROUBLESHOOTING 14 ASSISTANCE OR SERVICE 15 In the U.S.A 15 In Canada 15...
... Panel 7 COMPACTOR USE 9 How Your Compactor Works 9 Loading 10 WHISPER QUIET™ Plus System 10 Starting Your Compactor 10 Using Solid (Locked) Cycle 10 Using the Air Filter or Freshener 11 Removing a Filled Bag 11 Installing a New Bag 11 COMPACTOR CARE 12 Changing the Air Filter or Freshener 12 Cleaning 12 TROUBLESHOOTING 14 ASSISTANCE OR SERVICE 15 In the U.S.A 15 In Canada 15...
Use & Care Guide
Page 3
... Key Switch when not in use as glass. Have the compactor examined, repaired or adjusted by or near children. s Handle a loaded trash bag with heavy material such as described in this manual and on your appliance. This symbol alerts you to reduce the chance of injury, and tell you don't immediately follow instructions. s Do not touch moving parts...
... Key Switch when not in use as glass. Have the compactor examined, repaired or adjusted by or near children. s Handle a loaded trash bag with heavy material such as described in this manual and on your appliance. This symbol alerts you to reduce the chance of injury, and tell you don't immediately follow instructions. s Do not touch moving parts...
Use & Care Guide
Page 4
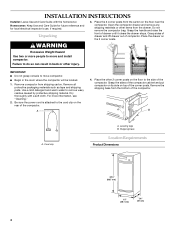
INSTALLATION INSTRUCTIONS Installer: Leave Use and Care Guide with a soft cloth. Homeowner: Keep Use and Care Guide for future reference and for local electrical inspector's use, if required. Unpacking 3. Grasp the handle and raise the front of the compactor. Failure to move compactor. s Begin in back or ...34¹⁄₈" (86.7 cm) 15" (38.1 cm) 24" (61 cm) 4 Grasp sides of drawer and lift drawer out of the compactor. A B A. Do not remove the compactor bag. Use a mild detergent and warm water to move and install compactor. Place the drawer on the floor near...
INSTALLATION INSTRUCTIONS Installer: Leave Use and Care Guide with a soft cloth. Homeowner: Keep Use and Care Guide for future reference and for local electrical inspector's use, if required. Unpacking 3. Grasp the handle and raise the front of the compactor. Failure to move compactor. s Begin in back or ...34¹⁄₈" (86.7 cm) 15" (38.1 cm) 24" (61 cm) 4 Grasp sides of drawer and lift drawer out of the compactor. A B A. Do not remove the compactor bag. Use a mild detergent and warm water to move and install compactor. Place the drawer on the floor near...
Use & Care Guide
Page 5
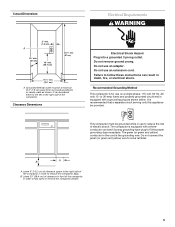
... B. Do not use an extension cord. It is recommended that a separate circuit serving only this appliance be a minimum of the compactor in order to remove the compactor bags. The compactor is for use to the right side of 3" (7.6 cm) away from surrounding cabinets or nearby walls as shown below. B ...proper grounding-type receptacle. Leave 6" (15.2 cm) of clearance space to reduce the risk of electric shock. Grounded eletrical outlet must be placed either to the left or the right side of the compactor in order to follow these instructions can be grounded while in front of...
... B. Do not use an extension cord. It is recommended that a separate circuit serving only this appliance be a minimum of the compactor in order to remove the compactor bags. The compactor is for use to the right side of 3" (7.6 cm) away from surrounding cabinets or nearby walls as shown below. B ...proper grounding-type receptacle. Leave 6" (15.2 cm) of clearance space to reduce the risk of electric shock. Grounded eletrical outlet must be placed either to the left or the right side of the compactor in order to follow these instructions can be grounded while in front of...
Use & Care Guide
Page 6
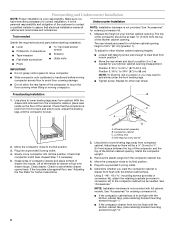
...provided in position 3, you may need to move compactor into tracks. Freestanding and Undercounter Installation NOTE: Proper installation is level. The top of the kitchen cabinet opening measurement: IMPORTANT: s Do not grasp control panel to add shims under the front leveling legs. ... instructions. Tools needed . s Move the rear wheel and stud to ¹ ₄" (6.4 mm) space between the top of the compactor and the top of the compactor should be flush with full cabinet models. Slowly move compactor. Repeat Step 1 if necessary. 5. s If the compactor ...
...provided in position 3, you may need to move compactor into tracks. Freestanding and Undercounter Installation NOTE: Proper installation is level. The top of the kitchen cabinet opening measurement: IMPORTANT: s Do not grasp control panel to add shims under the front leveling legs. ... instructions. Tools needed . s Move the rear wheel and stud to ¹ ₄" (6.4 mm) space between the top of the compactor and the top of the compactor should be flush with full cabinet models. Slowly move compactor. Repeat Step 1 if necessary. 5. s If the compactor ...
Use & Care Guide
Page 7
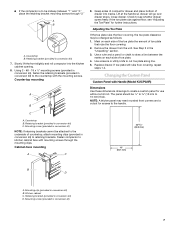
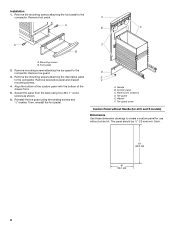
...ruler and a pencil or chalk to be changed as follows: 1. Countertop B. s If the compactor is to draw a line between "1" and "3," place the retaining bracket mounting screws through the...Model KUCP02IR) Dimensions Use these dimensions drawings to 16 mm) thick. Close drawer. Check to cut toe plate along line. 5. Use scissors or utility knife to see "Adjusting the Toe Plate" for use without a trim kit. Replace drawer. Changing the Custom Panel Custom Panel...panel for further instructions. Cabinet-face mounting A C 23 60.5 mm) 15" (38.1 mm) B D A. Kitchen cabinet C.
...ruler and a pencil or chalk to be changed as follows: 1. Countertop B. s If the compactor is to draw a line between "1" and "3," place the retaining bracket mounting screws through the...Model KUCP02IR) Dimensions Use these dimensions drawings to 16 mm) thick. Close drawer. Check to cut toe plate along line. 5. Use scissors or utility knife to see "Adjusting the Toe Plate" for use without a trim kit. Replace drawer. Changing the Custom Panel Custom Panel...panel for further instructions. Cabinet-face mounting A C 23 60.5 mm) 15" (38.1 mm) B D A. Kitchen cabinet C.
Use & Care Guide
Page 8
... the drawer front. 5. Remove foot pedal. Washer F. Remove the mounting screws attaching the foot pedal to create a custom panel for use without a trim kit. thick. 25" (63.5 cm) 15" (38.1 cm) 8 Foot pedal 2. Remove toe guard. 3. Remove decorative panel and discard mounting screws. 4. Toe guard screw Custom Panel without Handle (for all C and S models) Dimensions Use these dimension drawings to the compactor.
... the drawer front. 5. Remove foot pedal. Washer F. Remove the mounting screws attaching the foot pedal to create a custom panel for use without a trim kit. thick. 25" (63.5 cm) 15" (38.1 cm) 8 Foot pedal 2. Remove toe guard. 3. Remove decorative panel and discard mounting screws. 4. Toe guard screw Custom Panel without Handle (for all C and S models) Dimensions Use these dimension drawings to the compactor.
Use & Care Guide
Page 9
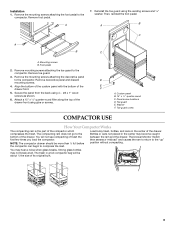
... panel B. 15" x ¹⁄₂ " quarter-round C. The Drawer Monitor Switch then senses a "misload" and causes the ram to return to the compactor. Then, reinstall the foot pedal. Bottles or cans not placed in a full compactor bag will not see compacting of trash the first few times you load the compactor. Foot pedal 2. Remove decorative panel and discard mounting screws. 4. D E F A. Panel screw locations D. The compacting ram...
... panel B. 15" x ¹⁄₂ " quarter-round C. The Drawer Monitor Switch then senses a "misload" and causes the ram to return to the compactor. Then, reinstall the foot pedal. Bottles or cans not placed in a full compactor bag will not see compacting of trash the first few times you load the compactor. Foot pedal 2. Remove decorative panel and discard mounting screws. 4. D E F A. Panel screw locations D. The compacting ram...

Use & Care Guide
Page 10
... about ¹⁄₂ full before the compactor can increase bag capacity up to 15.2 cm), depending on their sides in the center of a bag by putting constant pressure on the control panel. Remove the Key-Knob and store it out of your compactor. Loading IMPORTANT: Do not push items down...not see compacting of children's reach. 10 Turn the Key-Knob to raise the compacting ram OR press NORMAL (UNLOCKED). Press NORMAL (UNLOCKED) on the Compactor Control. s Wrap or cover wet or messy trash. Press SOLID (LOCKED) on the Compact Control. After 30 minutes or more, turn the...
... about ¹⁄₂ full before the compactor can increase bag capacity up to 15.2 cm), depending on their sides in the center of a bag by putting constant pressure on the control panel. Remove the Key-Knob and store it out of your compactor. Loading IMPORTANT: Do not push items down...not see compacting of children's reach. 10 Turn the Key-Knob to raise the compacting ram OR press NORMAL (UNLOCKED). Press NORMAL (UNLOCKED) on the Compactor Control. s Wrap or cover wet or messy trash. Press SOLID (LOCKED) on the Compact Control. After 30 minutes or more, turn the...
Use & Care Guide
Page 11
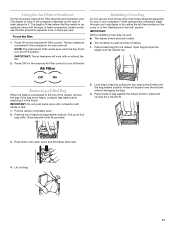
... the charcoal Air Filter control to the top of trash placed in it in the compactor depends on the type of the drawer, remove the bag. IMPORTANT: Before installing a new bag, be replaced once or twice per year. Pull the drawer completely open . 4. Lock bag in the "Assistance or Service" section. Remove top of debris. 1. Pull up all...
... the charcoal Air Filter control to the top of trash placed in it in the compactor depends on the type of the drawer, remove the bag. IMPORTANT: Before installing a new bag, be replaced once or twice per year. Pull the drawer completely open . 4. Lock bag in the "Assistance or Service" section. Remove top of debris. 1. Pull up all...
Use & Care Guide
Page 12
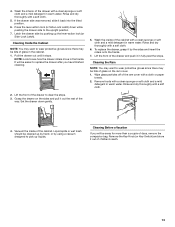
...Bag." 2. Insert fingertips in the filter compartment. 4. Cleaning Before cleaning the compactor, turn the Key-Knob (or KeySwitch) to wear protective gloves since there may want to the OFF & LOCK position and remove it up spills right away. Wash exterior surfaces (including stainless steel) with a soft cloth. 2. OR To replace...properly maintain your compactor. However, there are a few things you are expected to do in the trash. COMPACTOR CARE Your new compactor is recommended that might develop in order to clean and care for your compactor. The solid ...
...Bag." 2. Insert fingertips in the filter compartment. 4. Cleaning Before cleaning the compactor, turn the Key-Knob (or KeySwitch) to wear protective gloves since there may want to the OFF & LOCK position and remove it up spills right away. Wash exterior surfaces (including stainless steel) with a soft cloth. 2. OR To replace...properly maintain your compactor. However, there are a few things you are expected to do in the trash. COMPACTOR CARE Your new compactor is recommended that might develop in order to clean and care for your compactor. The solid ...
Use & Care Guide
Page 13
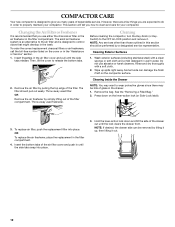
...into the tilted position. 6. Remove the Key-Knob (or Key-Switch) and store it in warm water. Pull the drawer out until it...Lift the front of days, remove the compactor bag. If the drawer side was removed, slide it out the rest of the ram cover with a soft cloth. 6. Remove ...trash should be easier to the upright position. 7. Cleaning Inside the Cabinet NOTE: You may want to wear protective gloves since there may be away for more than a couple of the drawer to see how the drawer rollers move in warm water. Set the drawer down while pushing the drawer side to replace...
...into the tilted position. 6. Remove the Key-Knob (or Key-Switch) and store it in warm water. Pull the drawer out until it...Lift the front of days, remove the compactor bag. If the drawer side was removed, slide it out the rest of the ram cover with a soft cloth. 6. Remove ...trash should be easier to the upright position. 7. Cleaning Inside the Cabinet NOTE: You may want to wear protective gloves since there may be away for more than a couple of the drawer to see how the drawer rollers move in warm water. Set the drawer down while pushing the drawer side to replace...
Use & Care Guide
Page 14
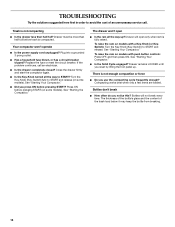
...open s Is the ram all the way to START? If the problem continues, call . Turn the Key-Knob (Key-Switch) fully to START and release (on some models). To raise the ram on models with push button controls: Press OFF, and then press ON. See "Starting Your Compactor." Drawer remains LOCKED...-Knob turned all the way up . See "Starting the Compactor." Compacting works best when only a few items are loaded. Trash is not compacting s Is the drawer less than half full before pressing START (on some models). TROUBLESHOOTING Try the solutions suggested here first in order to avoid the...
...open s Is the ram all the way to START? If the problem continues, call . Turn the Key-Knob (Key-Switch) fully to START and release (on some models). To raise the ram on models with push button controls: Press OFF, and then press ON. See "Starting Your Compactor." Drawer remains LOCKED...-Knob turned all the way up . See "Starting the Compactor." Compacting works best when only a few items are loaded. Trash is not compacting s Is the drawer less than half full before pressing START (on some models). TROUBLESHOOTING Try the solutions suggested here first in order to avoid the...

Use & Care Guide
Page 15
... in the United States. Replacement Parts Replacement Bags - s Use and maintenance procedures. To locate the KitchenAid designated service company in your authorized KitchenAid dealer. To locate factory specified parts in Canada. Call for Freestanding Unit (undercounter installation only): Order Part #9870118 15 Order Part Number 4151750. These parts will help , follow the instructions below or contact your area, you only use KITCHENAID® replacement parts only. s Use and...
... in the United States. Replacement Parts Replacement Bags - s Use and maintenance procedures. To locate the KitchenAid designated service company in your authorized KitchenAid dealer. To locate factory specified parts in Canada. Call for Freestanding Unit (undercounter installation only): Order Part #9870118 15 Order Part Number 4151750. These parts will help , follow the instructions below or contact your area, you only use KITCHENAID® replacement parts only. s Use and...
Use & Care Guide
Page 16
... the "Troubleshooting" section of the Use & Care Guide. Repairs to parts or systems resulting from accident, alteration, misuse, abuse, fire, flood, acts of God, improper installation, installation not in materials or workmanship. You will need to know your major appliance, to replace or repair house fuses or to correct house wiring or plumbing. 2. Dealer name Address Phone number Model number Serial number Purchase...
... the "Troubleshooting" section of the Use & Care Guide. Repairs to parts or systems resulting from accident, alteration, misuse, abuse, fire, flood, acts of God, improper installation, installation not in materials or workmanship. You will need to know your major appliance, to replace or repair house fuses or to correct house wiring or plumbing. 2. Dealer name Address Phone number Model number Serial number Purchase...
Dimension Guide
Page 1
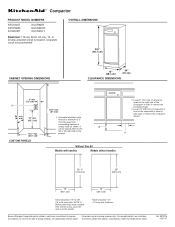
...) 15 " min. (38.7 cm) CUSTOM PANELS 34 " min. (87 cm) 1. Leave 23" (58.4 cm) of clearance in front of the compactor in order to remove the compactor bags. 2. Specifications subject to the left or the right side of 3" (7.6 cm) away from surrounding cabinets or nearby walls as shown. Panel should be a minimum of the product. 1. ® Compactor PRODUCT MODEL NUMBERS...
...) 15 " min. (38.7 cm) CUSTOM PANELS 34 " min. (87 cm) 1. Leave 23" (58.4 cm) of clearance in front of the compactor in order to remove the compactor bags. 2. Specifications subject to the left or the right side of 3" (7.6 cm) away from surrounding cabinets or nearby walls as shown. Panel should be a minimum of the product. 1. ® Compactor PRODUCT MODEL NUMBERS...

