Use & Care Guide
Page 6
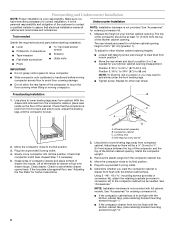
... to side. The rear wheels are preset for other rear wheel. Adjust the leveling legs until the compactor is your kitchen cabinet opening height of the compactor should be flush with full cabinet models. s Level s Phillips No. 2 screwdriver s Tape measure s Flat-blade screwdriver s hex-head socket wrench s Scissors s Utility knife s Pliers 1. If the...
... to side. The rear wheels are preset for other rear wheel. Adjust the leveling legs until the compactor is your kitchen cabinet opening height of the compactor should be flush with full cabinet models. s Level s Phillips No. 2 screwdriver s Tape measure s Flat-blade screwdriver s hex-head socket wrench s Scissors s Utility knife s Pliers 1. If the...
Use & Care Guide
Page 7
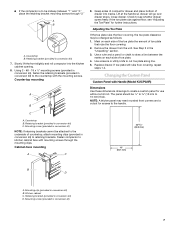
... in conversion kit) 7. Remove the drawer from the unit. Mounting screw (provided in conversion kit) to the countertop with Handle (Model KUCP02IR) Dimensions Use these dimensions drawings to cut toe plate along line. 5. Mounting clip (provided in the "Unpacking" section. 3....See Step 3 in conversion kit) B. Replace drawer. Cabinet-face mounting A C 23 60.5 mm) 15" (38.1 mm) B D A. Mounting screw (provided in conversion kit) D. Grasp sides of compactor drawer and place bottom of toe plate that rubs the floor covering. 2. C A. Mark on each side...
... in conversion kit) 7. Remove the drawer from the unit. Mounting screw (provided in conversion kit) to the countertop with Handle (Model KUCP02IR) Dimensions Use these dimensions drawings to cut toe plate along line. 5. Mounting clip (provided in the "Unpacking" section. 3....See Step 3 in conversion kit) B. Replace drawer. Cabinet-face mounting A C 23 60.5 mm) 15" (38.1 mm) B D A. Mounting screw (provided in conversion kit) D. Grasp sides of compactor drawer and place bottom of toe plate that rubs the floor covering. 2. C A. Mark on each side...
Use & Care Guide
Page 8
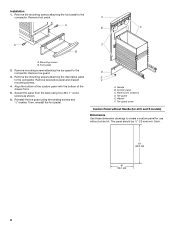
Remove foot pedal. A A B C A C B A. Remove the mounting screws attaching the decorative panel to the compactor. Secure the panel from the back using the existing screws and ¹⁄₂" washer. thick. 25" (63.5 cm) 15" (38.1 cm) 8 Reinstall the toe guard using four #8 x 1" wood screws as shown. 6. Then, reinstall... bottom of the custom panel with the bottom of the drawer front. 5. Toe guard screw Custom Panel without Handle (for all C and S models) Dimensions Use these dimension drawings to the compactor. D E F A. Toe guard E. Installation 1.
Remove foot pedal. A A B C A C B A. Remove the mounting screws attaching the decorative panel to the compactor. Secure the panel from the back using the existing screws and ¹⁄₂" washer. thick. 25" (63.5 cm) 15" (38.1 cm) 8 Reinstall the toe guard using four #8 x 1" wood screws as shown. 6. Then, reinstall... bottom of the custom panel with the bottom of the drawer front. 5. Toe guard screw Custom Panel without Handle (for all C and S models) Dimensions Use these dimension drawings to the compactor. D E F A. Toe guard E. Installation 1.
Use & Care Guide
Page 14
... first in order to avoid the cost of the trash load below it may keep the bottle from breaking. 14 Your compactor won 't open only when ram is not compacting s Is the drawer less than half full before pressing START (on models with a Key-Knob (or KeySwitch): Turn the Key... the Key-Knob (Key-Switch) fully to START? See "Starting the Compactor." There is compacted. The thickness of the bottle's glass and the content of an unnecessary service call an electrician. To raise the ram on some models). Trash is fully raised. Plug into a grounded 3 prong outlet. Replace the ...
... first in order to avoid the cost of the trash load below it may keep the bottle from breaking. 14 Your compactor won 't open only when ram is not compacting s Is the drawer less than half full before pressing START (on models with a Key-Knob (or KeySwitch): Turn the Key... the Key-Knob (Key-Switch) fully to START? See "Starting the Compactor." There is compacted. The thickness of the bottle's glass and the content of an unnecessary service call an electrician. To raise the ram on some models). Trash is fully raised. Plug into a grounded 3 prong outlet. Replace the ...

Use & Care Guide
Page 15
... below . When calling, please know the purchase date and the complete model and serial number of your authorized KitchenAid dealer. This information will fit right and work right because they are trained... to local dealers, repair parts distributors, and service companies. These parts will help , follow the instructions below or contact your compactor... installation only): Order Part #9870118 15 In Canada Call the KitchenAid Canada Customer Interaction Centre toll free: 1-800-807-6777.
... below . When calling, please know the purchase date and the complete model and serial number of your authorized KitchenAid dealer. This information will fit right and work right because they are trained... to local dealers, repair parts distributors, and service companies. These parts will help , follow the instructions below or contact your compactor... installation only): Order Part #9870118 15 In Canada Call the KitchenAid Canada Customer Interaction Centre toll free: 1-800-807-6777.
Use & Care Guide
Page 16
... use . 4. Expenses for travel and transportation for in the home. 7. KITCHENAID® COMPACTOR WARRANTY ONE YEAR LIMITED WARRANTY For one year from the date of purchase, when the compactor is installed, operated and maintained according to instructions attached to or furnished with ...CUSTOMER'S SOLE AND EXCLUSIVE REMEDY UNDER THIS LIMITED WARRANTY SHALL BE PRODUCT REPAIR AS PROVIDED HEREIN. Repairs when your complete model number and serial number. Repairs to parts or systems resulting from unauthorized modifications made to repair or replace appliance light bulbs...
... use . 4. Expenses for travel and transportation for in the home. 7. KITCHENAID® COMPACTOR WARRANTY ONE YEAR LIMITED WARRANTY For one year from the date of purchase, when the compactor is installed, operated and maintained according to instructions attached to or furnished with ...CUSTOMER'S SOLE AND EXCLUSIVE REMEDY UNDER THIS LIMITED WARRANTY SHALL BE PRODUCT REPAIR AS PROVIDED HEREIN. Repairs when your complete model number and serial number. Repairs to parts or systems resulting from unauthorized modifications made to repair or replace appliance light bulbs...
Dimension Guide
Page 1
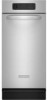
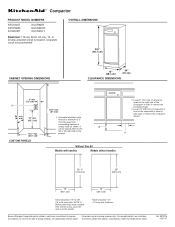
..., see Installation our products, we reserve the right to fully open or remove the compactor drawer. ® Compactor PRODUCT MODEL NUMBERS KFCK03IT KFCP02IR KUCK03IT KUCP02IR KUCS02CR KUCS03CT Electrical: 115-volt, 60-Hz, AC-only, 15- Leave 23" (58.4 cm) of clearance in front of the compactor in order to change without notice. A Without Trim Kit...
..., see Installation our products, we reserve the right to fully open or remove the compactor drawer. ® Compactor PRODUCT MODEL NUMBERS KFCK03IT KFCP02IR KUCK03IT KUCP02IR KUCS02CR KUCS03CT Electrical: 115-volt, 60-Hz, AC-only, 15- Leave 23" (58.4 cm) of clearance in front of the compactor in order to change without notice. A Without Trim Kit...