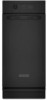
Use & Care Guide
Page 3
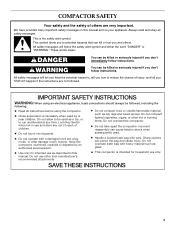
...trash bag with heavy material such as oily rags and insect sprays. SAVE THESE INSTRUCTIONS 3 COMPACTOR...parts. s Do not take apart the compactor. s Handle a loaded trash bag with a damaged cord set, plug..., motor, or after damage in use as a toy, or to be followed, including the following: s Read all safety messages. s Use only for household use other hot or burning items. Do not overload the compactor. Do not allow to run unattended at any manner. Have the compactor...Do not use only. s This compactor is , tell you don't immediately ...
...trash bag with heavy material such as oily rags and insect sprays. SAVE THESE INSTRUCTIONS 3 COMPACTOR...parts. s Do not take apart the compactor. s Handle a loaded trash bag with a damaged cord set, plug..., motor, or after damage in use as a toy, or to be followed, including the following: s Read all safety messages. s Use only for household use other hot or burning items. Do not overload the compactor. Do not allow to run unattended at any manner. Have the compactor...Do not use only. s This compactor is , tell you don't immediately ...
Use & Care Guide
Page 4
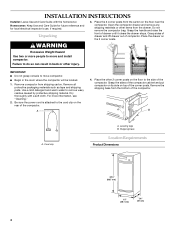
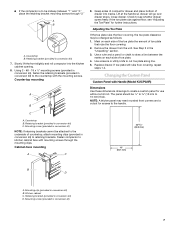
..., see "Cleaning." 2. Use a mild detergent and warm water to do so can result in the room where the compactor will be located. 1. Be sure the power cord is attached to the side of drawer until it clears the drawer stops. A B A. Cord clip A. Grasp sides of drawer ...8260;₈" (86.7 cm) 15" (38.1 cm) 24" (61 cm) 4 INSTALLATION INSTRUCTIONS Installer: Leave Use and Care Guide with a soft cloth. For more people to move and install compactor. A 4. Place the 2 corner posts from the bottom of compactor. Do not remove the compactor bag. Failure to remove waxy residue...
..., see "Cleaning." 2. Use a mild detergent and warm water to do so can result in the room where the compactor will be located. 1. Be sure the power cord is attached to the side of drawer until it clears the drawer stops. A B A. Cord clip A. Grasp sides of drawer ...8260;₈" (86.7 cm) 15" (38.1 cm) 24" (61 cm) 4 INSTALLATION INSTRUCTIONS Installer: Leave Use and Care Guide with a soft cloth. For more people to move and install compactor. A 4. Place the 2 corner posts from the bottom of compactor. Do not remove the compactor bag. Failure to remove waxy residue...
Use & Care Guide
Page 6
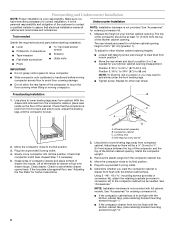
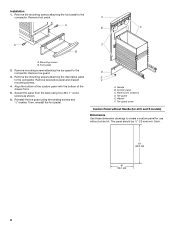
...Locating stud D. Using 2 - #8 - 18 x mounting screws (provided in conversion kit), attach the retaining brackets (provided in position 3, you may need to ¹ ₄" (6.4 mm) space between the top of the compactor and the top of the kitchen cabinet opening height of 34¹⁄₄" (87 ..., see whether drawer opens freely. See "Accessories" for correct installation. Measure the height of the kitchen cabinet opening . The top of the compactor should be a ¹⁄₈" (3 mm) to add shims under the front leveling legs. Position 2: 34¹⁄₄" to 34...
...Locating stud D. Using 2 - #8 - 18 x mounting screws (provided in conversion kit), attach the retaining brackets (provided in position 3, you may need to ¹ ₄" (6.4 mm) space between the top of the compactor and the top of the kitchen cabinet opening height of 34¹⁄₄" (87 ..., see whether drawer opens freely. See "Accessories" for correct installation. Measure the height of the kitchen cabinet opening . The top of the compactor should be a ¹⁄₈" (3 mm) to add shims under the front leveling legs. Position 2: 34¹⁄₄" to 34...
Use & Care Guide
Page 7
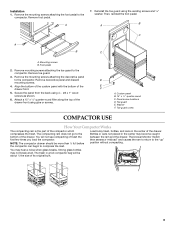
...panel for use without a trim kit. Fasten compactor to kitchen cabinet face with mounting screws through "2." Cabinet-face mounting A C 23 60.5 mm) 15" (38.1 mm) B D A. Countertop mounting A B 9. Grasp sides of compactor drawer and place bottom of drawer into the ...should be changed as follows: 1. C A. Mounting screw (provided in conversion kit) NOTE: If retaining brackets cannot be attached to the underside of countertop, attach mounting clips (provided in conversion kit) D. Kitchen cabinet C. Retaining bracket (provided in conversion kit) to retaining brackets. ...
...panel for use without a trim kit. Fasten compactor to kitchen cabinet face with mounting screws through "2." Cabinet-face mounting A C 23 60.5 mm) 15" (38.1 mm) B D A. Countertop mounting A B 9. Grasp sides of compactor drawer and place bottom of drawer into the ...should be changed as follows: 1. C A. Mounting screw (provided in conversion kit) NOTE: If retaining brackets cannot be attached to the underside of countertop, attach mounting clips (provided in conversion kit) D. Kitchen cabinet C. Retaining bracket (provided in conversion kit) to retaining brackets. ...
Use & Care Guide
Page 8
...Custom panel C. Remove foot pedal. Remove toe guard. 3. Then, reinstall the foot pedal. Installation 1. Remove mounting screws attaching the toe guard to the compactor. Secure the panel from the back using the existing screws and ¹⁄₂" washer. Reinstall the toe guard ... screws as shown. 6. thick. 25" (63.5 cm) 15" (38.1 cm) 8 D E F A. A A B C A C B A. Panel screw locations D. Toe guard E. Toe guard screw Custom Panel without Handle (for use without a trim kit. Remove the mounting screws attaching the foot pedal to create a custom panel for all C and...
...Custom panel C. Remove foot pedal. Remove toe guard. 3. Then, reinstall the foot pedal. Installation 1. Remove mounting screws attaching the toe guard to the compactor. Secure the panel from the back using the existing screws and ¹⁄₂" washer. Reinstall the toe guard ... screws as shown. 6. thick. 25" (63.5 cm) 15" (38.1 cm) 8 D E F A. A A B C A C B A. Panel screw locations D. Toe guard E. Toe guard screw Custom Panel without Handle (for use without a trim kit. Remove the mounting screws attaching the foot pedal to create a custom panel for all C and...
Use & Care Guide
Page 9
... of its original bulk. 9 Washer F. Remove foot pedal. Mounting screws B. Attach a 15" x ¹⁄₂" quarter-round filler along the top of the compactor which compresses the trash. Toe guard E. The trash in the center of the drawer front. 5. Installation 1. Remove the mounting screws attaching the foot pedal to compress the load. Panel screw locations D. Toe...
... of its original bulk. 9 Washer F. Remove foot pedal. Mounting screws B. Attach a 15" x ¹⁄₂" quarter-round filler along the top of the compactor which compresses the trash. Toe guard E. The trash in the center of the drawer front. 5. Installation 1. Remove the mounting screws attaching the foot pedal to compress the load. Panel screw locations D. Toe...

Use & Care Guide
Page 16
... Damage resulting from the date of purchase, when the compactor is installed, operated and maintained according to instructions attached to or furnished with electrical or plumbing codes, or use of products not approved by calling KitchenAid. SOME STATES AND PROVINCES DO NOT ALLOW THE EXCLUSION ... "Troubleshooting," additional help you obtain assistance or service if you need to know your complete model number and serial number. KITCHENAID® COMPACTOR WARRANTY ONE YEAR LIMITED WARRANTY For one year from the date of purchase, when this major appliance is used for other ...
... Damage resulting from the date of purchase, when the compactor is installed, operated and maintained according to instructions attached to or furnished with electrical or plumbing codes, or use of products not approved by calling KitchenAid. SOME STATES AND PROVINCES DO NOT ALLOW THE EXCLUSION ... "Troubleshooting," additional help you obtain assistance or service if you need to know your complete model number and serial number. KITCHENAID® COMPACTOR WARRANTY ONE YEAR LIMITED WARRANTY For one year from the date of purchase, when this major appliance is used for other ...
Warranty Information
Page 1
... water filters. Pickup and delivery. Repairs to parts or systems resulting from the date of purchase, when the compactor is installed, operated and maintained according to instructions attached to or furnished with the product, KitchenAid will provide a replacement filter or air freshener if the original filter or air freshener fails due to defects...
... water filters. Pickup and delivery. Repairs to parts or systems resulting from the date of purchase, when the compactor is installed, operated and maintained according to instructions attached to or furnished with the product, KitchenAid will provide a replacement filter or air freshener if the original filter or air freshener fails due to defects...