Use and Care Guide
Page 1
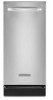
INTEGRATED COMPACTOR Use & Care Guide For questions about features, operation/performance, parts, accessories or service, call: 1-800-422-1230 or visit our website at www.kitchenaid.com In Canada, for assistance, installation or service, call: 1-800-807-6777 or visit our website at www.KitchenAid.ca Table of Contents...2 9872215B
INTEGRATED COMPACTOR Use & Care Guide For questions about features, operation/performance, parts, accessories or service, call: 1-800-422-1230 or visit our website at www.kitchenaid.com In Canada, for assistance, installation or service, call: 1-800-807-6777 or visit our website at www.KitchenAid.ca Table of Contents...2 9872215B

Use and Care Guide
Page 2
... COMPACTOR SAFETY 2 INSTALLATION INSTRUCTIONS 3 Unpacking 3 Location Requirements 4 Electrical Requirements 5 Undercounter Installation 5 COMPACTOR USE 7 How Your Compactor Works 7 Loading 7 WHISPER QUIET® Plus System 7 Starting Your Compactor 8 Using Solid (Locked) Cycle 8 Using the Air Filter or Freshener 8 Removing a Filled Bag 8 Installing a New Bag 8 COMPACTOR CARE 9 Changing the Air Filter or Freshener 9 Cleaning 9 TROUBLESHOOTING 10 ASSISTANCE OR SERVICE 11 In the U.S.A 11 In Canada 11 Accessories 11 WARRANTY 12 COMPACTOR...
... COMPACTOR SAFETY 2 INSTALLATION INSTRUCTIONS 3 Unpacking 3 Location Requirements 4 Electrical Requirements 5 Undercounter Installation 5 COMPACTOR USE 7 How Your Compactor Works 7 Loading 7 WHISPER QUIET® Plus System 7 Starting Your Compactor 8 Using Solid (Locked) Cycle 8 Using the Air Filter or Freshener 8 Removing a Filled Bag 8 Installing a New Bag 8 COMPACTOR CARE 9 Changing the Air Filter or Freshener 9 Cleaning 9 TROUBLESHOOTING 10 ASSISTANCE OR SERVICE 11 In the U.S.A 11 In Canada 11 Accessories 11 WARRANTY 12 COMPACTOR...
Use and Care Guide
Page 3
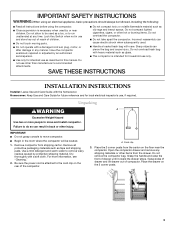
.... ■ Do not take apart the compactor. Have the compactor examined, repaired or adjusted by an authorized serviceperson. ■ Do not compact toxic or volatile flammable material such as a toy, or to remove waxy residue caused by or near the compactor. SAVE THESE INSTRUCTIONS INSTALLATION INSTRUCTIONS Installer: Leave Use and Care Guide with care. Dry thoroughly with heavy material such as tape...
.... ■ Do not take apart the compactor. Have the compactor examined, repaired or adjusted by an authorized serviceperson. ■ Do not compact toxic or volatile flammable material such as a toy, or to remove waxy residue caused by or near the compactor. SAVE THESE INSTRUCTIONS INSTALLATION INSTRUCTIONS Installer: Leave Use and Care Guide with care. Dry thoroughly with heavy material such as tape...
Use and Care Guide
Page 4
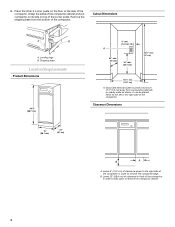
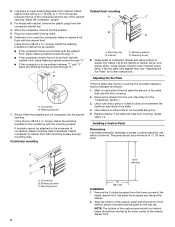
Place the other 2 corner posts on top of the compactor. Clearance Dimensions B A A. It can be a minimum of 3" (7.6 cm) away from the bottom of the compactor in order to fully open or remove the compactor drawer. 4 Leave 23" (58.4 cm) of clearance in front of the compactor. Grounded eletrical... put compactor on its side on the floor to the left or the right side of the compactor in order to remove the compactor bags. Shipping base Location Requirements Product Dimensions 34¹⁄₈" (86.7 cm) 15" (38.1 cm) 24" (61 cm) 3" min. (7.6 cm) A 24" min. (61 cm...
Place the other 2 corner posts on top of the compactor. Clearance Dimensions B A A. It can be a minimum of 3" (7.6 cm) away from the bottom of the compactor in order to fully open or remove the compactor drawer. 4 Leave 23" (58.4 cm) of clearance in front of the compactor. Grounded eletrical... put compactor on its side on the floor to the left or the right side of the compactor in order to remove the compactor bags. Shipping base Location Requirements Product Dimensions 34¹⁄₈" (86.7 cm) 15" (38.1 cm) 24" (61 cm) 3" min. (7.6 cm) A 24" min. (61 cm...
Use and Care Guide
Page 5
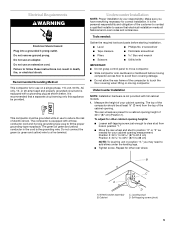
... yellow) wire to follow these instructions can result in death, fire, or electrical shock. Make sure you may need to reduce the risk of the compactor to assure that a separate circuit serving only this appliance be at least ¹ ₈" (3 mm) from hole in the cord is recommended that electrical installation meets all National and Local codes and...
... yellow) wire to follow these instructions can result in death, fire, or electrical shock. Make sure you may need to reduce the risk of the compactor to assure that a separate circuit serving only this appliance be at least ¹ ₈" (3 mm) from hole in the cord is recommended that electrical installation meets all National and Local codes and...
Use and Care Guide
Page 6
... on the rest tab. Installing a Custom Panel Dimensions Use these dimension drawings to see "Adjusting the Toe Plate" for use without a trim kit. 2. Move the compactor close to cut toe plate along line. 5. Countertop B. Retaining bracket 7. A B C A. Adjust legs so there will go over drawer stops. For model with the mounting screws. Using the two #8-18 x ¹ ₂" screws, fasten the retaining brackets to...
... on the rest tab. Installing a Custom Panel Dimensions Use these dimension drawings to see "Adjusting the Toe Plate" for use without a trim kit. 2. Move the compactor close to cut toe plate along line. 5. Countertop B. Retaining bracket 7. A B C A. Adjust legs so there will go over drawer stops. For model with the mounting screws. Using the two #8-18 x ¹ ₂" screws, fasten the retaining brackets to...
Use and Care Guide
Page 7
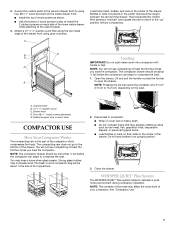
... compacting ram does not go to the bottom of the lower inside drawer front. ■ Install the top 2 wood screws as raw meat, fish, grapefruit rinds, disposable diapers, or personal hygiene items. ■ Load bottles or cans on each side of the...size of your compactor. Four #8 x 1" wood screws placement E. Strong glass bottles may hear a noise when glass breaks. WHISPER QUIET® Plus System The WHISPER QUIET® Plus system helps to the exterior drawer front by using glue or screws. A. Drawer front D. Secure the custom panel to maintain a quiet home...
... compacting ram does not go to the bottom of the lower inside drawer front. ■ Install the top 2 wood screws as raw meat, fish, grapefruit rinds, disposable diapers, or personal hygiene items. ■ Load bottles or cans on each side of the...size of your compactor. Four #8 x 1" wood screws placement E. Strong glass bottles may hear a noise when glass breaks. WHISPER QUIET® Plus System The WHISPER QUIET® Plus system helps to the exterior drawer front by using glue or screws. A. Drawer front D. Secure the custom panel to maintain a quiet home...
Use and Care Guide
Page 8
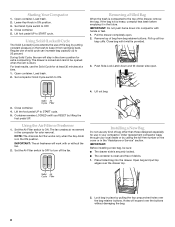
... foot pedal UP to START cycle. Installing a New Bag Do not use in your local dealer or by calling the toll-free number on the trash to keep it in place by pulling the four prepunched holes over the bag retainer buttons. Starting Your Compactor 1. Lift foot ... time. 1. Leave Key-Knob in the ON position. Regular use of bag other than those designed especially for odor removal. Close container. 4. Set the Air Filter switch to OFF to OFF. 4. Set Solid Cycle switch to turn off the fan. Set compactor Solid Cycle switch to ON. IMPORTANT: Before installing a new bag, be opened ...
... foot pedal UP to START cycle. Installing a New Bag Do not use in your local dealer or by calling the toll-free number on the trash to keep it in place by pulling the four prepunched holes over the bag retainer buttons. Starting Your Compactor 1. Lift foot ... time. 1. Leave Key-Knob in the ON position. Regular use of bag other than those designed especially for odor removal. Close container. 4. Set the Air Filter switch to OFF to OFF. 4. Set Solid Cycle switch to turn off the fan. Set compactor Solid Cycle switch to ON. IMPORTANT: Before installing a new bag, be opened ...
Use and Care Guide
Page 9
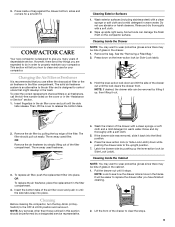
... service. COMPACTOR CARE Your new compactor is designed to give you many years of bag against the drawer bottom, sides and corners for your compactor. The solid air freshener system is an alternative to wear protective gloves since there may be performed by a designated service representative...foods can be easier to replace the drawer after you how to properly maintain your compactor. Remove the bag. Throw away used filter. Lift the front of the drawer out until it . To order the correct replacement charcoal filters or air fresheners, call the toll-free number listed...
... service. COMPACTOR CARE Your new compactor is designed to give you many years of bag against the drawer bottom, sides and corners for your compactor. The solid air freshener system is an alternative to wear protective gloves since there may be performed by a designated service representative...foods can be easier to replace the drawer after you how to properly maintain your compactor. Remove the bag. Throw away used filter. Lift the front of the drawer out until it . To order the correct replacement charcoal filters or air fresheners, call the toll-free number listed...

Use and Care Guide
Page 10
... every time. Bottles don't break ■ How often do you use the compacting cycle frequently enough? Remove foods with a cloth or paper towels. 2. Replace the fuse or reset the circuit breaker. TROUBLESHOOTING Try the solutions suggested here first in warm water. Turn the Key-Knob (Key-Switch) fully to avoid the cost of the ram cover with a clean sponge or soft cloth...
... every time. Bottles don't break ■ How often do you use the compacting cycle frequently enough? Remove foods with a cloth or paper towels. 2. Replace the fuse or reset the circuit breaker. TROUBLESHOOTING Try the solutions suggested here first in warm water. Turn the Key-Knob (Key-Switch) fully to avoid the cost of the ram cover with a clean sponge or soft cloth...
Use and Care Guide
Page 11
... local dealers, repair parts distributors, and service companies. This information will fit right and work right because they are made with : ■ Features and specifications on our full line of your appliance. When calling, please know the purchase date and the complete model and serial number of a service call 1-800-462-3819 and ask for custom panel dimensions. KitchenAid designated service technicians are trained...
... local dealers, repair parts distributors, and service companies. This information will fit right and work right because they are made with : ■ Features and specifications on our full line of your appliance. When calling, please know the purchase date and the complete model and serial number of a service call 1-800-462-3819 and ask for custom panel dimensions. KitchenAid designated service technicians are trained...
Use and Care Guide
Page 12
... normal, single-family household use your complete model number and serial number. KITCHENAID® COMPACTOR WARRANTY ONE YEAR LIMITED WARRANTY For one year from the date of purchase, when this major appliance is not installed in accordance with published installation instructions. The removal and reinstallation of your authorized KitchenAid dealer to repair or replace appliance light bulbs or water filters. THIS WARRANTY GIVES YOU SPECIFIC LEGAL RIGHTS AND YOU...
... normal, single-family household use your complete model number and serial number. KITCHENAID® COMPACTOR WARRANTY ONE YEAR LIMITED WARRANTY For one year from the date of purchase, when this major appliance is not installed in accordance with published installation instructions. The removal and reinstallation of your authorized KitchenAid dealer to repair or replace appliance light bulbs or water filters. THIS WARRANTY GIVES YOU SPECIFIC LEGAL RIGHTS AND YOU...


