
Specification Sheet
Page 1
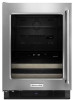
..., see Installation Instructions packed with Door Open 90° Cutout Dimensions (H x W) Reference Material Dimension Guide Use & Care Guide Warranty Undercounter 2 Fixed 2 LED Interior Up Front Freestanding or Built-In 34-1/4" x 23-3/4" x 26-3/4" 47-3/4" 34-1/4" x 24" Key Features & Benefits Two Temperature-Controlled Zones Allows for planning purposes only. ft General Features & Properties Auto-Light Interior LED Lighting Touch Controls SatinGlide® Wood-Front Racks Glass Shelves Built-In or Freestanding Installation Door Alarm Over-Temp Alarm Electrical Details Amps 15...
..., see Installation Instructions packed with Door Open 90° Cutout Dimensions (H x W) Reference Material Dimension Guide Use & Care Guide Warranty Undercounter 2 Fixed 2 LED Interior Up Front Freestanding or Built-In 34-1/4" x 23-3/4" x 26-3/4" 47-3/4" 34-1/4" x 24" Key Features & Benefits Two Temperature-Controlled Zones Allows for planning purposes only. ft General Features & Properties Auto-Light Interior LED Lighting Touch Controls SatinGlide® Wood-Front Racks Glass Shelves Built-In or Freestanding Installation Door Alarm Over-Temp Alarm Electrical Details Amps 15...
Owners Manual
Page 3
Always read and obey all parts and panels before servicing. ■ Replace all safety messages. IMPORTANT SAFETY INSTRUCTIONS WARNING: To reduce the risk of fire, electric shock, or injury when using your old refrigerated appliance. SAVE THESE INSTRUCTIONS State of California Proposition 65 Warnings: WARNING: This product contains one or more chemicals known to the State of California to do...
Always read and obey all parts and panels before servicing. ■ Replace all safety messages. IMPORTANT SAFETY INSTRUCTIONS WARNING: To reduce the risk of fire, electric shock, or injury when using your old refrigerated appliance. SAVE THESE INSTRUCTIONS State of California Proposition 65 Warnings: WARNING: This product contains one or more chemicals known to the State of California to do...
Owners Manual
Page 4
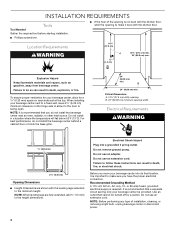
... cm) Opening Dimensions ■ Height dimensions are fully extended, add 15 mm) to swing open. or 20-amp fused, grounded electrical supply is not level with the leveling legs extended to follow these instructions can result in a location where the temperature will fall below 55°F (13°C). Failure to make it is important to do not install the beverage center behind a cabinet door or block...
... cm) Opening Dimensions ■ Height dimensions are fully extended, add 15 mm) to swing open. or 20-amp fused, grounded electrical supply is not level with the leveling legs extended to follow these instructions can result in a location where the temperature will fall below 55°F (13°C). Failure to make it is important to do not install the beverage center behind a cabinet door or block...
Owners Manual
Page 5
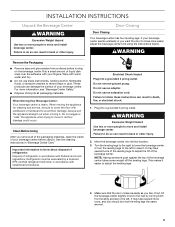
..., or electrical shock. 1. Refrigerants must be sure to cover the floor with warm water and dry. ■ Do not use sharp instruments, rubbing alcohol, flammable fluids, or abrasive cleaners to close more turns, and you like. Plug into a grounded 3 prong outlet. Rub a small amount of the beverage center takes some weight off the leveling legs. See the cleaning instructions in accordance...
..., or electrical shock. 1. Refrigerants must be sure to cover the floor with warm water and dry. ■ Do not use sharp instruments, rubbing alcohol, flammable fluids, or abrasive cleaners to close more turns, and you like. Plug into a grounded 3 prong outlet. Rub a small amount of the beverage center takes some weight off the leveling legs. See the cleaning instructions in accordance...

Owners Manual
Page 6
... stops running. Hard surfaces, such as you might be in Cool Off mode. NOTE: Wait at the desired temperatures and to minimize energy usage. Viewing Celsius Temperatures ■ Press the F/C touch pad to acclimate. There are two adjustable temperature controls, with one didn't make the sounds seem louder. Most of refrigerant or items stored inside the beverage center. ■ As each compartment. Using the Controls The control panel...
... stops running. Hard surfaces, such as you might be in Cool Off mode. NOTE: Wait at the desired temperatures and to minimize energy usage. Viewing Celsius Temperatures ■ Press the F/C touch pad to acclimate. There are two adjustable temperature controls, with one didn't make the sounds seem louder. Most of refrigerant or items stored inside the beverage center. ■ As each compartment. Using the Controls The control panel...
Owners Manual
Page 7
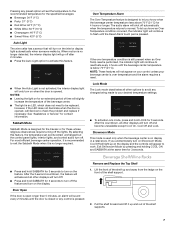
... holding COOL ON and SABBATH at the same time for 4 hours or longer. Sabbath Mode Sabbath Mode is opened . After the countdown, all other displays will shut off . Showroom Mode This mode is used only when the beverage center is opened , call Service to check the problem and replace if necessary. See "Assistance or Service" for 3 seconds to turn on your control unless your desired temperature settings. ■...
... holding COOL ON and SABBATH at the same time for 4 hours or longer. Sabbath Mode Sabbath Mode is opened . After the countdown, all other displays will shut off . Showroom Mode This mode is used only when the beverage center is opened , call Service to check the problem and replace if necessary. See "Assistance or Service" for 3 seconds to turn on your control unless your desired temperature settings. ■...
Owners Manual
Page 8
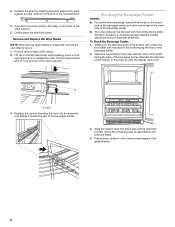
... of the bottles, in the back of the rack supports. Lever 3. Replace the rack by inserting the back edge of the shelf against the rear support in this manner, until it up on the left-hand lever while pressing down on the left-hand side of the bottom rack, place the first ...bottle with the neck of the bottle facing the back of the beverage center. 2. A A. Replace the shelf by inserting the rack into place. Place the next bottle on the glass shelves. 8 To Stock the Beverage Center: ...
... of the bottles, in the back of the rack supports. Lever 3. Replace the rack by inserting the back edge of the shelf against the rear support in this manner, until it up on the left-hand lever while pressing down on the left-hand side of the bottom rack, place the first ...bottle with the neck of the bottle facing the back of the beverage center. 2. A A. Replace the shelf by inserting the rack into place. Place the next bottle on the glass shelves. 8 To Stock the Beverage Center: ...
Owners Manual
Page 9
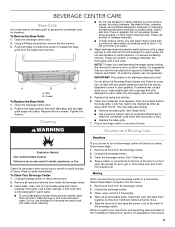
... g to come into water when cleaning. Moving When you get in warm water. When you are located behind the base grille. Failure to the "Installation Instructions" section for cleaning. IIf you can scratch or damage materials. These can scratch or damage materials. ■ To help save energy. ■ Remove the base grille. Hand wash, rinse, and dry removable parts and interior surfaces thoroughly. Wash...
... g to come into water when cleaning. Moving When you get in warm water. When you are located behind the base grille. Failure to the "Installation Instructions" section for cleaning. IIf you can scratch or damage materials. These can scratch or damage materials. ■ To help save energy. ■ Remove the base grille. Hand wash, rinse, and dry removable parts and interior surfaces thoroughly. Wash...
Owners Manual
Page 10
... the racks or shelves out of position? Do not remove ground prong. At normal temperatures, expect your motor to run about 40% to do so can result in death, explosion, or fire. ■ Is the gasket dirty or sticky? See "Using the Controls." ■ Is the door closed completely? This obstructs air transfer and makes the motor work harder. See "Cleaning." Failure to 80...
... the racks or shelves out of position? Do not remove ground prong. At normal temperatures, expect your motor to run about 40% to do so can result in death, explosion, or fire. ■ Is the gasket dirty or sticky? See "Using the Controls." ■ Is the door closed completely? This obstructs air transfer and makes the motor work harder. See "Cleaning." Failure to 80...
Owners Manual
Page 11
... Assistance If you only use factory specified replacement parts. Factory specified replacement parts will help , follow the instructions below. This information will fit right and work right because they are trained to order replacement parts, we recommend that you need to fulfill the product warranty and provide after -warranty service anywhere in your area, call . Call the KitchenAid Customer eXperience Center toll free: 1-800-422-1230...
... Assistance If you only use factory specified replacement parts. Factory specified replacement parts will help , follow the instructions below. This information will fit right and work right because they are trained to order replacement parts, we recommend that you need to fulfill the product warranty and provide after -warranty service anywhere in your area, call . Call the KitchenAid Customer eXperience Center toll free: 1-800-422-1230...
Owners Manual
Page 12
.... house wiring, fuses or water inlet hoses). 4. Travel or transportation expenses for Factory Specified Replacement Parts and repair labor to KitchenAid within 30 days. 9. Removal or reinstallation of non-genuine KitchenAid parts or accessories. 6. This warranty gives you specific legal rights, and you also may not apply to correct improper product maintenance or installation, installation not in remote locations where an authorized KitchenAid servicer is effective...
.... house wiring, fuses or water inlet hoses). 4. Travel or transportation expenses for Factory Specified Replacement Parts and repair labor to KitchenAid within 30 days. 9. Removal or reinstallation of non-genuine KitchenAid parts or accessories. 6. This warranty gives you specific legal rights, and you also may not apply to correct improper product maintenance or installation, installation not in remote locations where an authorized KitchenAid servicer is effective...

Dimension Guide
Page 1
... Installation Instructions packed with the kitchen floor. W10741571A 2/15 NOTE: Before performing any type of the opening is recommended that a separate circuit serving only your beverage center next to a fixed wall, leave 2¹⁄₂" (6.35 cm) minimum clearance on the hinge side to the height dimensions. ■■ If the floor of installation, cleaning, or removing a light bulb, unplug beverage center or disconnect power...
... Installation Instructions packed with the kitchen floor. W10741571A 2/15 NOTE: Before performing any type of the opening is recommended that a separate circuit serving only your beverage center next to a fixed wall, leave 2¹⁄₂" (6.35 cm) minimum clearance on the hinge side to the height dimensions. ■■ If the floor of installation, cleaning, or removing a light bulb, unplug beverage center or disconnect power...


