Warranty Information
Page 1
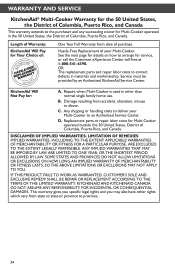
... THE EXTENT APPLICABLE WARRANTIES OF MERCHANTABILITY OR FITNESS FOR A PARTICULAR PURPOSE, ARE EXCLUDED TO THE EXTENT LEGALLY PERMISSIBLE. OR The replacement parts and repair labor costs to arrange for Multi-Cooker operated outside the 50 United States, District of your Multi-Cooker to an Authorized Service Center. Service must be provided by an Authorized KitchenAid Service Center. Replacement parts or repair labor costs for...
... THE EXTENT APPLICABLE WARRANTIES OF MERCHANTABILITY OR FITNESS FOR A PARTICULAR PURPOSE, ARE EXCLUDED TO THE EXTENT LEGALLY PERMISSIBLE. OR The replacement parts and repair labor costs to arrange for Multi-Cooker operated outside the 50 United States, District of your Multi-Cooker to an Authorized Service Center. Service must be provided by an Authorized KitchenAid Service Center. Replacement parts or repair labor costs for...

Warranty Information
Page 2
... or comparable replacement. Your replacement unit will also be required to initiate the claim. Hassle-Free Replacement Warranty - Please have your original sales receipt available when you receive your replacement MultiCooker, use the carton, packing materials, and prepaid shipping label to pack up your original Multi-Cooker and send it back to KitchenAid. Arranging for information on how to obtain service...
... or comparable replacement. Your replacement unit will also be required to initiate the claim. Hassle-Free Replacement Warranty - Please have your original sales receipt available when you receive your replacement MultiCooker, use the carton, packing materials, and prepaid shipping label to pack up your original Multi-Cooker and send it back to KitchenAid. Arranging for information on how to obtain service...

Use & Care Guide
Page 2
... Card. Remember to use and care for your free e-cookbook! We're committed to download your product. It will empower you create a lifetime of your product online at www.kitchenaid.com/quickstart for family and friends. Be sure to register your Multi-Cooker to helping you with the best way to register your appliance, keep this guide handy. To...
... Card. Remember to use and care for your free e-cookbook! We're committed to download your product. It will empower you create a lifetime of your product online at www.kitchenaid.com/quickstart for family and friends. Be sure to register your Multi-Cooker to helping you with the best way to register your appliance, keep this guide handy. To...
Use & Care Guide
Page 3
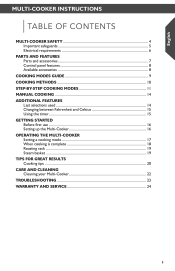
... MULTI-COOKER INSTRUCTIONS TABLE OF CONTENTS MULTI-COOKER SAFETY 4 Important safeguards 5 Electrical requirements 6 PARTS AND FEATURES Parts and accessories 7 Control panel features 8 Available accessories 8 COOKING MODES GUIDE 9 COOKING METHODS 10 STEP-BY-STEP COOKING MODES 11 MANUAL COOKING 14 ADDITIONAL FEATURES Last selections used 14 Changing between Fahrenheit and Celsius 15 Using the timer 15 GETTING STARTED Before first use 16 Setting up the Multi-Cooker 16 OPERATING THE MULTI-COOKER Setting a cooking...
... MULTI-COOKER INSTRUCTIONS TABLE OF CONTENTS MULTI-COOKER SAFETY 4 Important safeguards 5 Electrical requirements 6 PARTS AND FEATURES Parts and accessories 7 Control panel features 8 Available accessories 8 COOKING MODES GUIDE 9 COOKING METHODS 10 STEP-BY-STEP COOKING MODES 11 MANUAL COOKING 14 ADDITIONAL FEATURES Last selections used 14 Changing between Fahrenheit and Celsius 15 Using the timer 15 GETTING STARTED Before first use 16 Setting up the Multi-Cooker 16 OPERATING THE MULTI-COOKER Setting a cooking...
Use & Care Guide
Page 4
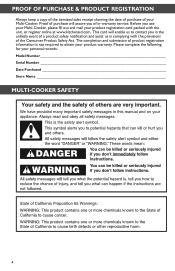
... us in -warranty service. The completion and submission of product registration information is not required to contact you of in complying with the unit, or register online at www.kitchenaid.com. Before you use your Multi-Cooker, please fill out and mail your product warranty. Please complete the following for your Multi-Cooker. PROOF OF PURCHASE & PRODUCT REGISTRATION Always keep a copy of...
... us in -warranty service. The completion and submission of product registration information is not required to contact you of in complying with the unit, or register online at www.kitchenaid.com. Before you use your Multi-Cooker, please fill out and mail your product warranty. Please complete the following for your Multi-Cooker. PROOF OF PURCHASE & PRODUCT REGISTRATION Always keep a copy of...
Use & Care Guide
Page 5
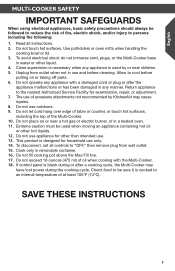
... hot surfaces, including the top of at least 165°F (74°C). Close supervision is necessary when any appliance with the Multi-Cooker. 18. This product is cooked to persons including the following: 1. To disconnect, set all instructions. 2. Read all controls to the nearest Authorized Service Facility for examination, repair, or adjustment. 7. Use potholders or oven mitts when handling the cooking bowl or lid. 3. The use...
... hot surfaces, including the top of at least 165°F (74°C). Close supervision is necessary when any appliance with the Multi-Cooker. 18. This product is cooked to persons including the following: 1. To disconnect, set all instructions. 2. Read all controls to the nearest Authorized Service Facility for examination, repair, or adjustment. 7. Use potholders or oven mitts when handling the cooking bowl or lid. 3. The use...

Use & Care Guide
Page 6
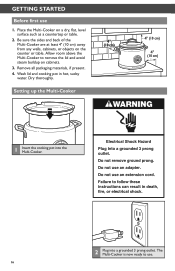
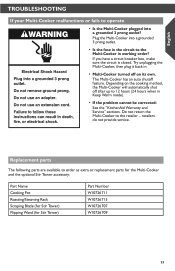
If the plug does not fit in any way. Do not modify the plug in the outlet, contact a qualified electrician. Do not use an extension cord. MULTI-COOKER SAFETY Electrical requirements Voltage: 120 VAC Frequency: 60 Hz Wattage: 700 Watts NOTE: This Multi-Cooker has a 3 prong grounded plug. If the power supply cord is too short, have a qualified electrician or technician install an outlet near the appliance. 6 To reduce the risk of electrical shock, this plug will fit in an outlet only one way.
If the plug does not fit in any way. Do not modify the plug in the outlet, contact a qualified electrician. Do not use an extension cord. MULTI-COOKER SAFETY Electrical requirements Voltage: 120 VAC Frequency: 60 Hz Wattage: 700 Watts NOTE: This Multi-Cooker has a 3 prong grounded plug. If the power supply cord is too short, have a qualified electrician or technician install an outlet near the appliance. 6 To reduce the risk of electrical shock, this plug will fit in an outlet only one way.

Use & Care Guide
Page 8
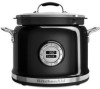
Specially designed flipping wand and scraping blade keep things moving, no matter what you are cooking. PARTS AND FEATURES Control panel features Temperature adjust select Cooking mode/ option select < and > FC h Sear Timer adjust select Temperature/ time display Cook mode display Power on/ status light Available Accessories Stir Tower KST4054 (sold separately) The Stir Tower works like your own personal sous chef to help keep food circulating, allowing for even heating and consistent mixing, all at the touch of a switch. 8
Specially designed flipping wand and scraping blade keep things moving, no matter what you are cooking. PARTS AND FEATURES Control panel features Temperature adjust select Cooking mode/ option select < and > FC h Sear Timer adjust select Temperature/ time display Cook mode display Power on/ status light Available Accessories Stir Tower KST4054 (sold separately) The Stir Tower works like your own personal sous chef to help keep food circulating, allowing for even heating and consistent mixing, all at the touch of a switch. 8
Use & Care Guide
Page 9
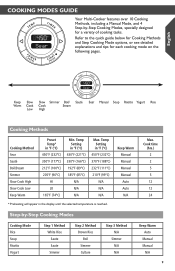
... Keep Slow Slow Simmer Boil/ Sauté Warm Cook Cook Steam Low High Sear Manual Soup Risotto Yogurt Rice Cooking Methods Cooking Method Sear Sauté Boil/Steam Simmer Slow Cook High Slow Cook Low Keep Warm Preset Temp* in °F (°C) 450°F (232°C) 350°F (177°C) 212°F (100°C) 205°F (96°C) HI LO 165°F (74°C) Min. COOKING MODES GUIDE FC h Sear Your Multi-Cooker...
... Keep Slow Slow Simmer Boil/ Sauté Warm Cook Cook Steam Low High Sear Manual Soup Risotto Yogurt Rice Cooking Methods Cooking Method Sear Sauté Boil/Steam Simmer Slow Cook High Slow Cook Low Keep Warm Preset Temp* in °F (°C) 450°F (232°C) 350°F (177°C) 212°F (100°C) 205°F (96°C) HI LO 165°F (74°C) Min. COOKING MODES GUIDE FC h Sear Your Multi-Cooker...
Use & Care Guide
Page 10
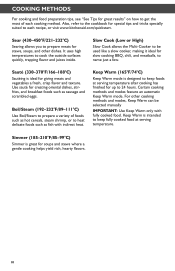
... and modes feature an automatic Keep Warm mode. Slow Cook (Low or High) Slow Cook allows the Multi-Cooker to be selected manually IMPORTANT: Use Keep Warm only with indirect heat. Keep Warm (165°F/74°C) Keep Warm mode is great for up to 24 hours. Simmer (185-210°F/85-99°C) Simmer is designed to keep fully cooked food at serving temperature after cooking has finished for soups and...
... and modes feature an automatic Keep Warm mode. Slow Cook (Low or High) Slow Cook allows the Multi-Cooker to be selected manually IMPORTANT: Use Keep Warm only with indirect heat. Keep Warm (165°F/74°C) Keep Warm mode is great for up to 24 hours. Simmer (185-210°F/85-99°C) Simmer is designed to keep fully cooked food at serving temperature after cooking has finished for soups and...

Use & Care Guide
Page 11
...modes offers white and brown rice programs for one cup of rice, then press START/ ENTER. 4. You can adjust the time based on the quantity of foods. English STEP-BY-STEP COOKING MODES Step-by-step cooking modes use multiple cooking methods to cook different kinds of rice. Press START... allows you to cook a variety of boilovers, rinse dry rice before adding to pot. 2. NOTE: To reduce the possibility of rice types, from step to Rice mode. The Multi-Cooker will automatically turn off after 24 hours. When in keep warm mode without setting timer, the Multi-Cooker will display For ...
...modes offers white and brown rice programs for one cup of rice, then press START/ ENTER. 4. You can adjust the time based on the quantity of foods. English STEP-BY-STEP COOKING MODES Step-by-step cooking modes use multiple cooking methods to cook different kinds of rice. Press START... allows you to cook a variety of boilovers, rinse dry rice before adding to pot. 2. NOTE: To reduce the possibility of rice types, from step to Rice mode. The Multi-Cooker will automatically turn off after 24 hours. When in keep warm mode without setting timer, the Multi-Cooker will display For ...

Use & Care Guide
Page 12
... to select. 2. If setting a cooking time, set the timer, then press START/ENTER to start timer countdown. 9. Add the starting ingredients. 4. If setting a simmer time, set the timer, then press START/ENTER to Simmer. 8. Press > to scroll to select. 2. Once sautéing is complete, press the > button for Keep Warm mode. Press START/ENTER to Simmer. 5. The Multi-Cooker will preheat to start...
... to select. 2. If setting a cooking time, set the timer, then press START/ENTER to start timer countdown. 9. Add the starting ingredients. 4. If setting a simmer time, set the timer, then press START/ENTER to Simmer. 8. Press > to scroll to select. 2. Once sautéing is complete, press the > button for Keep Warm mode. Press START/ENTER to Simmer. 5. The Multi-Cooker will preheat to start...

Use & Care Guide
Page 13
...Yogurt mode. If setting a cooking time, set the timer, then press START/ENTER to create your own delicious yogurts at lower temperatures than yogurt, using the yogurt mode. Use yogurt mode to start timer countdown. 4. The Multi-Cooker will cool down to start timer countdown. If setting a culture time, set the timer, then press START...cook any foods, other than other cooking modes and is designed for 4 cups (0.95L) of milk. Doing so can result in food poisoning or sickness. The Multi-Cooker will preheat to culture (step 2). 13 Allow about 10 to 12 minutes of heating time ...
...Yogurt mode. If setting a cooking time, set the timer, then press START/ENTER to create your own delicious yogurts at lower temperatures than yogurt, using the yogurt mode. Use yogurt mode to start timer countdown. 4. The Multi-Cooker will cool down to start timer countdown. If setting a culture time, set the timer, then press START...cook any foods, other than other cooking modes and is designed for 4 cups (0.95L) of milk. Doing so can result in food poisoning or sickness. The Multi-Cooker will preheat to culture (step 2). 13 Allow about 10 to 12 minutes of heating time ...
Use & Care Guide
Page 14
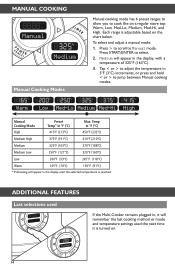
... remember the last cooking method or mode and temperature settings used FC h Set Tim FC h Simmer If the Multi-Cooker remains plugged in the display, with a temperature of 325°F (163°C). 3. ADDITIONAL FEATURES Last selections used the next time it will appear in the display until the selected temperature is turned on. 14 Press START/ENTER to Manual mode. Manual Cooking Modes (165...
... remember the last cooking method or mode and temperature settings used FC h Set Tim FC h Simmer If the Multi-Cooker remains plugged in the display, with a temperature of 325°F (163°C). 3. ADDITIONAL FEATURES Last selections used the next time it will appear in the display until the selected temperature is turned on. 14 Press START/ENTER to Manual mode. Manual Cooking Modes (165...
Use & Care Guide
Page 16
..., flat, level surface such as a countertop or table. 2. Wash lid and cooking pot in hot, sudsy water. Remove all packaging materials, if present. 4. Place the Multi-Cooker on the counter or table. GETTING STARTED Before first use . 16 Setting up the Multi-Cooker 4" (10 cm) 4" (10 cm) 4" (10 cm) F Sear 1 Insert the cooking pot into the Multi-Cooker. 2 Plug into a grounded 3 prong outlet.
..., flat, level surface such as a countertop or table. 2. Wash lid and cooking pot in hot, sudsy water. Remove all packaging materials, if present. 4. Place the Multi-Cooker on the counter or table. GETTING STARTED Before first use . 16 Setting up the Multi-Cooker 4" (10 cm) 4" (10 cm) 4" (10 cm) F Sear 1 Insert the cooking pot into the Multi-Cooker. 2 Plug into a grounded 3 prong outlet.

Use & Care Guide
Page 17
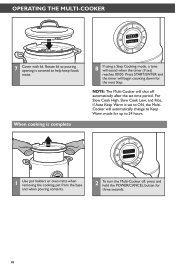
... "Cooking Modes Guide" for options. The default cooking temperature will change as the Multi-Cooker preheats. 4 To adjust the temperature, if desired, press the TEMP button, then press < or > to start the timer countdown. 6 Place ingredients in the cooking pot. 17 Press START/ENTER to decrease or increase the temperature. English OPERATING THE MULTI-COOKER Setting a cooking mode FC h Set Tim FC h Sear FC h Sauté 1 Press POWER...
... "Cooking Modes Guide" for options. The default cooking temperature will change as the Multi-Cooker preheats. 4 To adjust the temperature, if desired, press the TEMP button, then press < or > to start the timer countdown. 6 Place ingredients in the cooking pot. 17 Press START/ENTER to decrease or increase the temperature. English OPERATING THE MULTI-COOKER Setting a cooking mode FC h Set Tim FC h Sear FC h Sauté 1 Press POWER...
Use & Care Guide
Page 18
For Slow Cook High, Slow Cook Low, and Rice, if Auto Keep Warm is set ) reaches 00:00. FC h Set Tim F Sear 1 Use pot holders or oven mitts when removing the cooking pot from the base and when pouring contents. 2 To turn the Multi-Cooker off automatically after the set time period. When cooking is covered to 24 hours. NOTE: The Multi-Cooker will shut off , press and hold the POWER/CANCEL button for the...
For Slow Cook High, Slow Cook Low, and Rice, if Auto Keep Warm is set ) reaches 00:00. FC h Set Tim F Sear 1 Use pot holders or oven mitts when removing the cooking pot from the base and when pouring contents. 2 To turn the Multi-Cooker off automatically after the set time period. When cooking is covered to 24 hours. NOTE: The Multi-Cooker will shut off , press and hold the POWER/CANCEL button for the...

Use & Care Guide
Page 20
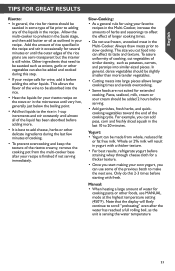
... a soup for cooking, but the cooking time may need to be lengthened. Brown 0.5 pounds (227 g) or less at a time for the best results and to avoid steaming the meat. • If using this part of the Soup cooking cycle. • The bits of cooked on foods on the steaming rack and set the multi-cooker to STEAM. Rinsing these types of flavor.
... a soup for cooking, but the cooking time may need to be lengthened. Brown 0.5 pounds (227 g) or less at a time for the best results and to avoid steaming the meat. • If using this part of the Soup cooking cycle. • The bits of cooked on foods on the steaming rack and set the multi-cooker to STEAM. Rinsing these types of flavor.
Use & Care Guide
Page 21
...-Cooker. This allows the flavor of longer cooking times. • Do not use frozen, uncooked meat in yogurt with fresh. To assure uniformity of cooking, cut food into the rice. • Heat the liquids for wine, add it occasionally for using your recipe is best to make the next one. Yogurt: • Yogurt can use MANUAL mode at the highest temperature setting...
...-Cooker. This allows the flavor of longer cooking times. • Do not use frozen, uncooked meat in yogurt with fresh. To assure uniformity of cooking, cut food into the rice. • Heat the liquids for wine, add it occasionally for using your recipe is best to make the next one. Yogurt: • Yogurt can use MANUAL mode at the highest temperature setting...
Use & Care Guide
Page 23
... in Keep Warm mode). • If the problem cannot be corrected: See the "KitchenAid Warranty and Service" sections. Replacement parts The following parts are available to the Multi-Cooker in the circuit to order as extra or replacement parts for the Multi-Cooker and the optional Stir Tower accessory: Part Name Cooking Pot Roasting/Steaming Rack Scraping Blade (for Stir Tower) Flipping Wand (for Stir Tower) Part Number W10726711...
... in Keep Warm mode). • If the problem cannot be corrected: See the "KitchenAid Warranty and Service" sections. Replacement parts The following parts are available to the Multi-Cooker in the circuit to order as extra or replacement parts for the Multi-Cooker and the optional Stir Tower accessory: Part Name Cooking Pot Roasting/Steaming Rack Scraping Blade (for Stir Tower) Flipping Wand (for Stir Tower) Part Number W10726711...


