Use and Care Manual
Page 3
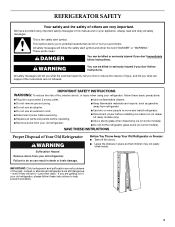
... you what can kill or hurt you don't follow these instructions to move and install refrigerator. ■ Disconnect power before servicing. ■ Replace all safety messages. All safety messages will sit for "just a few days." Junked or abandoned refrigerators are not problems of the past. even if they will tell you what the...
... you what can kill or hurt you don't follow these instructions to move and install refrigerator. ■ Disconnect power before servicing. ■ Replace all safety messages. All safety messages will sit for "just a few days." Junked or abandoned refrigerators are not problems of the past. even if they will tell you what the...
Use and Care Manual
Page 4
... you turn off ) until water begins to remove tape or glue. Glass shelves and covers are cold. Dispenser Models IMPORTANT: After connecting the refrigerator to a water source or replacing the water filter, follow the steps below to flow, continue depressing and releasing the dispenser lever (5 seconds on the top right side of...
... you turn off ) until water begins to remove tape or glue. Glass shelves and covers are cold. Dispenser Models IMPORTANT: After connecting the refrigerator to a water source or replacing the water filter, follow the steps below to flow, continue depressing and releasing the dispenser lever (5 seconds on the top right side of...
Use and Care Manual
Page 5
... to access the power switch. B A B Electrical Shock Hazard Plug into place. Replace top grille. Lay the grille on your ice maker. Power On/Off Switch If you need to turn the power to your refrigerator On or Off, you may want to select the maximum ice feature to increase...model, you must remove the top grille assembly to lock into a grounded 3 prong outlet. Non-Dispenser Models IMPORTANT: After connecting the refrigerator to a water source or replacing the water filter, fill and discard two full containers of ice to the On or Off position. 3. Push the top grille straight up...
... to access the power switch. B A B Electrical Shock Hazard Plug into place. Replace top grille. Lay the grille on your ice maker. Power On/Off Switch If you need to turn the power to your refrigerator On or Off, you may want to select the maximum ice feature to increase...model, you must remove the top grille assembly to lock into a grounded 3 prong outlet. Non-Dispenser Models IMPORTANT: After connecting the refrigerator to a water source or replacing the water filter, fill and discard two full containers of ice to the On or Off position. 3. Push the top grille straight up...
Use and Care Manual
Page 7
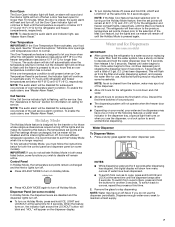
...176;C), respectively. Holiday Mode The Holiday Mode feature is no longer required. To fully activate Holiday Mode, you know when either the refrigerator temperature rises above 48°F (9°C) or the freezer temperature rises above 15°F (-9°C) for longer than 10 minutes....To enable the audio alarm, see "Master Alarm Reset." Dispenser Panel (on some models) IMPORTANT: ■ After connecting the refrigerator to a water source or replacing the water filter, flush the water system. Once water begins to flow, continue depressing and releasing the dispenser lever (5 seconds ...
...176;C), respectively. Holiday Mode The Holiday Mode feature is no longer required. To fully activate Holiday Mode, you know when either the refrigerator temperature rises above 48°F (9°C) or the freezer temperature rises above 15°F (-9°C) for longer than 10 minutes....To enable the audio alarm, see "Master Alarm Reset." Dispenser Panel (on some models) IMPORTANT: ■ After connecting the refrigerator to a water source or replacing the water filter, flush the water system. Once water begins to flow, continue depressing and releasing the dispenser lever (5 seconds ...
Use and Care Manual
Page 8
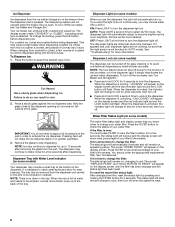
... power to the product, to the ice maker, or to the dispenser light. When the dispenser is not blocked (in AUTO mode). The words "REPLACE FILTER" and "HOLD BUTTON TO RESET" will flash. To reset the water filter status light: After changing the filter, reset the status light by ...the room darkens. Pressing hard will change your filter's life remains. Water Filter Status Light (on , changing to red. You should order the appropriate replacement filter. Ice Dispenser Ice dispenses from the ice maker storage bin in the freezer when the dispenser pad is new: You must press FILTER to...
... power to the product, to the ice maker, or to the dispenser light. When the dispenser is not blocked (in AUTO mode). The words "REPLACE FILTER" and "HOLD BUTTON TO RESET" will flash. To reset the water filter status light: After changing the filter, reset the status light by ...the room darkens. Pressing hard will change your filter's life remains. Water Filter Status Light (on , changing to red. You should order the appropriate replacement filter. Ice Dispenser Ice dispenses from the ice maker storage bin in the freezer when the dispenser pad is new: You must press FILTER to...
Use and Care Manual
Page 9
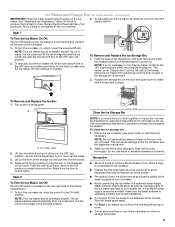
...On/Off switch for ice to the OFF (right) position when removing the storage bin. To Remove and Replace the Ice Bin: 1. Lift the wire shutoff arm so it in the bin or bucket. Push the ...it is removed. 2. NOTE: It is normal for the ice maker is closed tightly. Ice maker cover 2. Replace the bin by pushing it clicks into the OFF (up and out. Clean the Ice Storage Bin NOTE: ...maker control to stick together in place. NOTE: Do not use harsh or abrasive cleaners or solvents. Replace the storage bin on the top right side of the freezer stops the ice maker from producing ice ...
...On/Off switch for ice to the OFF (right) position when removing the storage bin. To Remove and Replace the Ice Bin: 1. Lift the wire shutoff arm so it in the bin or bucket. Push the ...it is removed. 2. NOTE: It is normal for the ice maker is closed tightly. Ice maker cover 2. Replace the bin by pushing it clicks into the OFF (up and out. Clean the Ice Storage Bin NOTE: ...maker control to stick together in place. NOTE: Do not use harsh or abrasive cleaners or solvents. Replace the storage bin on the top right side of the freezer stops the ice maker from producing ice ...
Use and Care Manual
Page 10
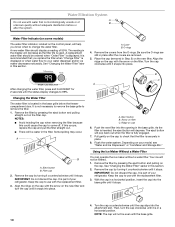
...the filter. Cover B. It is used. Some spilling may occur. Eject button B. Eject button B. The eject button will help you replace the filter when "Change Filter" is located in place after the system. Be sure the O-rings are still in the base grille below... It is fully engaged. 7. Remove the filter by turning it counterclockwise until it stops. It is recommended that you know when to your refrigerator. Water Filtration System A Do not use with water that is microbiologically unsafe or of B unknown quality without a water filter. O-rings 4. ...
...the filter. Cover B. It is used. Some spilling may occur. Eject button B. Eject button B. The eject button will help you replace the filter when "Change Filter" is located in place after the system. Be sure the O-rings are still in the base grille below... It is fully engaged. 7. Remove the filter by turning it counterclockwise until it stops. It is recommended that you know when to your refrigerator. Water Filtration System A Do not use with water that is microbiologically unsafe or of B unknown quality without a water filter. O-rings 4. ...
Use and Care Manual
Page 11
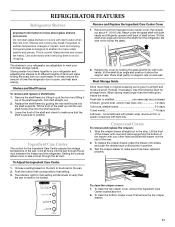
... Center 1. Push the button that corresponds to make finding the exact item you want easier. Remove food from the refrigerator. Lower the front of the shelf supports. Replace the cover by guiding the rear shelf hooks into the shelf supports. Fresh fish or shellfish use same day as bumping...they are heavy. Pull drawer out about glass shelves and covers: Do not clean glass shelves or covers with your refrigerator and adjusting the shelves to the stop. Replace the shelf/frame by holding the glass shelf firmly with tight lids. Glass shelves and covers are cold. Storing ...
... Center 1. Push the button that corresponds to make finding the exact item you want easier. Remove food from the refrigerator. Lower the front of the shelf supports. Replace the cover by guiding the rear shelf hooks into the shelf supports. Fresh fish or shellfish use same day as bumping...they are heavy. Pull drawer out about glass shelves and covers: Do not clean glass shelves or covers with your refrigerator and adjusting the shelves to the stop. Replace the shelf/frame by holding the glass shelf firmly with tight lids. Glass shelves and covers are cold. Storing ...
Use and Care Manual
Page 12
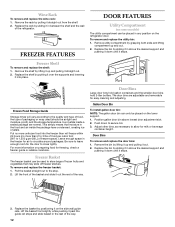
...on the refrigerator door. Gallon Door Bin To install gallon door bin: NOTE: The gallon door bin can be airtight and moisture-proof), and the storage temperature. Push down until it in the food and air inside a sealed package are adjustable and removable for easy cleaning and adjusting. Replace the ...support and pushing it down until it into the freezer than 2 to 3 lbs of food per cubic foot [907 to store bags of the refrigerator. Replace the bin by putting it over the supports and lowering it stops. Remove the rack by lifting it up and pulling it straight out from...
...on the refrigerator door. Gallon Door Bin To install gallon door bin: NOTE: The gallon door bin can be airtight and moisture-proof), and the storage temperature. Push down until it in the food and air inside a sealed package are adjustable and removable for easy cleaning and adjusting. Replace the ...support and pushing it down until it into the freezer than 2 to 3 lbs of food per cubic foot [907 to store bags of the refrigerator. Replace the bin by putting it over the supports and lowering it stops. Remove the rack by lifting it up and pulling it straight out from...
Use and Care Manual
Page 13
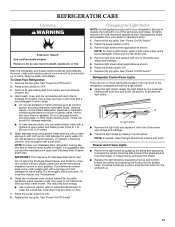
.... 6. Remove light shield when applicable as shown, to come into the slotted hole. 13 Replace light shield when applicable as the trim pieces, dispenser covers or door gaskets. Refrigerator Control Panel Lights There are free from your refrigerator. REFRIGERATOR CARE Cleaning WARNING Explosion Hazard Use nonflammable cleaner. Do not allow the Stainless Steel Cleaner...
.... 6. Remove light shield when applicable as shown, to come into the slotted hole. 13 Replace light shield when applicable as the trim pieces, dispenser covers or door gaskets. Refrigerator Control Panel Lights There are free from your refrigerator. REFRIGERATOR CARE Cleaning WARNING Explosion Hazard Use nonflammable cleaner. Do not allow the Stainless Steel Cleaner...

Use and Care Manual
Page 14
...9632; Rattling - Do not use an extension cord. If you return from building up any perishables and freeze other items. 2. Vacation Care Your refrigerator is equipped with an explanation. ■ Buzzing - By selecting this reduction, you may run longer than a freezer full of it , and dry...HOLIDAY MODE to return to normal operation. heard when the water valve opens to Leave the Refrigerator On While You're Away: 1. If You Choose to fill the ice maker ■ Pulsating - Replace the fuse or reset the circuit breaker. If the problem continues, call . REMEMBER: A...
...9632; Rattling - Do not use an extension cord. If you return from building up any perishables and freeze other items. 2. Vacation Care Your refrigerator is equipped with an explanation. ■ Buzzing - By selecting this reduction, you may run longer than a freezer full of it , and dry...HOLIDAY MODE to return to normal operation. heard when the water valve opens to Leave the Refrigerator On While You're Away: 1. If You Choose to fill the ice maker ■ Pulsating - Replace the fuse or reset the circuit breaker. If the problem continues, call . REMEMBER: A...

Use and Care Manual
Page 16
...Before calling for water supply to order replacement parts, we recommend that the water filtration system needs additional flushing. If You Need Replacement Parts If you need to cool completely...to 3 seconds after installation for "crushed" ice and begin . In the U.S.A. Call the KitchenAid Customer eXperience Center toll free: 1-800-422-1230. Wait 24 hours after dispensing is connected ... correctly? Flush and fill the water system. ■ Water filter installed on the refrigerator? This information will not operate properly ■ Freezer door closed completely? The water ...
...Before calling for water supply to order replacement parts, we recommend that the water filtration system needs additional flushing. If You Need Replacement Parts If you need to cool completely...to 3 seconds after installation for "crushed" ice and begin . In the U.S.A. Call the KitchenAid Customer eXperience Center toll free: 1-800-422-1230. Wait 24 hours after dispensing is connected ... correctly? Flush and fill the water system. ■ Water filter installed on the refrigerator? This information will not operate properly ■ Freezer door closed completely? The water ...

Use and Care Manual
Page 17
... ■ Use and maintenance procedures. ■ Accessory and repair parts sales. ■ Referrals to KitchenAid Canada with any questions or concerns at : KitchenAid Brand Home Appliances Customer eXperience Center 553 Benson Road Benton Harbor, MI 49022-2692 Please include a daytime .... In Canada Call the KitchenAid Canada Customer eXperience Centre toll free: 1-800-807-6777. Mississauga, Ontario L5N 0B7 Please include a daytime phone number in your authorized KitchenAid® dealer. Stainless Steel Cleaner and Polish Order Part #4396920 Replacement Water Filter: Order Part ...
... ■ Use and maintenance procedures. ■ Accessory and repair parts sales. ■ Referrals to KitchenAid Canada with any questions or concerns at : KitchenAid Brand Home Appliances Customer eXperience Center 553 Benson Road Benton Harbor, MI 49022-2692 Please include a daytime .... In Canada Call the KitchenAid Canada Customer eXperience Centre toll free: 1-800-807-6777. Mississauga, Ontario L5N 0B7 Please include a daytime phone number in your authorized KitchenAid® dealer. Stainless Steel Cleaner and Polish Order Part #4396920 Replacement Water Filter: Order Part ...
Use and Care Manual
Page 18
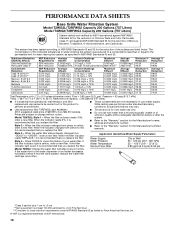
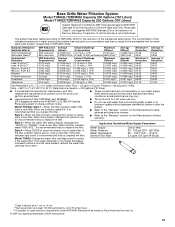
...limit for water leaving the system, as advertised. ■ These contaminants are subject to change without adequate disinfection before 6 months have passed, replace the water filter cartridge more often. *Class II particle size: 1 um to yellow, order a new filter. If the filter indicator light ...the indicator changes from yellow to NSF/ANSI Standards 42 and 53 for cold water use only. ■ Do not use with water that you replace the filter. When the filter indicator reads "REPLACE," it is recommended that you replace the filter. ■ The product is microbiologically ...
...limit for water leaving the system, as advertised. ■ These contaminants are subject to change without adequate disinfection before 6 months have passed, replace the water filter cartridge more often. *Class II particle size: 1 um to yellow, order a new filter. If the filter indicator light ...the indicator changes from yellow to NSF/ANSI Standards 42 and 53 for cold water use only. ■ Do not use with water that you replace the filter. When the filter indicator reads "REPLACE," it is recommended that you replace the filter. ■ The product is microbiologically ...
Use and Care Manual
Page 19
...filter. When the water filter status display changes from "GOOD" to NSF/ANSI 42/53 for the reduction of the substances listed below. When the filter indicator reads "REPLACE," it is essential that you replace the filter. If the filter indicator light is microbiologically unsafe or of unknown quality... filter. ■ The product is for cold water use only. ■ Do not use with water that you replace the filter. Style 3 - and against NSF/ANSI Standard 42 for the reduction of Chlorine Taste and Odor, Particulate Class II*; Pressure = 60 psig (413.7 kPa). Style 2 - Base Grille ...
...filter. When the water filter status display changes from "GOOD" to NSF/ANSI 42/53 for the reduction of the substances listed below. When the filter indicator reads "REPLACE," it is essential that you replace the filter. If the filter indicator light is microbiologically unsafe or of unknown quality... filter. ■ The product is for cold water use only. ■ Do not use with water that you replace the filter. Style 3 - and against NSF/ANSI Standard 42 for the reduction of Chlorine Taste and Odor, Particulate Class II*; Pressure = 60 psig (413.7 kPa). Style 2 - Base Grille ...
Use and Care Manual
Page 20
... to the finish of your major appliance is located in accordance with the product, KitchenAid will replace all Door Bins due to KitchenAid within 30 days from the date of purchase. 6. Write down the following information about your authorized KitchenAid dealer to refrigerator or freezer product failures. 7. THIRD THROUGH SIXTH YEAR LIMITED WARRANTY ON SEALED...
... to the finish of your major appliance is located in accordance with the product, KitchenAid will replace all Door Bins due to KitchenAid within 30 days from the date of purchase. 6. Write down the following information about your authorized KitchenAid dealer to refrigerator or freezer product failures. 7. THIRD THROUGH SIXTH YEAR LIMITED WARRANTY ON SEALED...

Installation Guide
Page 8
...and copper tubing. Side Tipping Radius The side tipping radius varies depending upon the width of the refrigerator needs to 414 kPa). Water Supply Requirements ■ All installations must meet local plumbing code requirements...system going to the water inlet valve of the model. Replace the filter if necessary. ■ Allow the storage tank on the reverse osmosis system to stand the refrigerator upright when it is moved into its final location. .... Remove the water filter cartridge. A Model 36 42 48 Tipping Radius A 90¹⁄₂" (229.9 cm) 93" (236.2 cm) 96" (243.8 ...
...and copper tubing. Side Tipping Radius The side tipping radius varies depending upon the width of the refrigerator needs to 414 kPa). Water Supply Requirements ■ All installations must meet local plumbing code requirements...system going to the water inlet valve of the model. Replace the filter if necessary. ■ Allow the storage tank on the reverse osmosis system to stand the refrigerator upright when it is moved into its final location. .... Remove the water filter cartridge. A Model 36 42 48 Tipping Radius A 90¹⁄₂" (229.9 cm) 93" (236.2 cm) 96" (243.8 ...

Installation Guide
Page 14
...;⁄₂" (1.27 cm) Side Offset ¹⁄₂" (12.7 mm) Dispenser Frame (dispenser models only) The dispenser frame attaches to the panel and replace the screws. Refrigerator door C. A A A 1.27 cm) Overlap 14 To remove the dispenser frame: 1. Side Offset ¹⁄₄" (6.4 mm) C 70¹⁄...84.5 cm) A A B Bottom Offset ¹⁄₈" (3.2 mm) Bottom Offset ¹⁄₈" (3.2 mm) Model 36 42 48 D 14¹/₄" (36.20 cm) 16³/₄" (42.55 cm) 19¹/₄" (48.90 cm) E 19¹/₄" (48.90 cm) 22³/₄" (57.79...
...;⁄₂" (1.27 cm) Side Offset ¹⁄₂" (12.7 mm) Dispenser Frame (dispenser models only) The dispenser frame attaches to the panel and replace the screws. Refrigerator door C. A A A 1.27 cm) Overlap 14 To remove the dispenser frame: 1. Side Offset ¹⁄₄" (6.4 mm) C 70¹⁄...84.5 cm) A A B Bottom Offset ¹⁄₈" (3.2 mm) Bottom Offset ¹⁄₈" (3.2 mm) Model 36 42 48 D 14¹/₄" (36.20 cm) 16³/₄" (42.55 cm) 19¹/₄" (48.90 cm) E 19¹/₄" (48.90 cm) 22³/₄" (57.79...

Installation Guide
Page 17
The refrigerator panel should not weigh more than 40 lbs (18.1 kg). To replace the frame, hold the frame to the panel and replace the screws. 14¹⁄₄" (36.2 cm) 10⁷⁄₈" (27.6 cm) 70 178.9 cm) 1.1 cm) Dispenser cutout is ¹⁄₄" ...of raised wood panel ¹⁄₂" (1.27 cm) Model A B 36 14¹⁄₄" (36.2 cm) 19¹⁄₄" (48.9 cm) 42 16³⁄₄" (42.6 cm) 22³⁄₄" (57.8 cm) 48 19¹⁄₄" (48.9 cm) 26¹⁄₄" (66.7 cm) NOTES: ■ Dispenser...
The refrigerator panel should not weigh more than 40 lbs (18.1 kg). To replace the frame, hold the frame to the panel and replace the screws. 14¹⁄₄" (36.2 cm) 10⁷⁄₈" (27.6 cm) 70 178.9 cm) 1.1 cm) Dispenser cutout is ¹⁄₄" ...of raised wood panel ¹⁄₂" (1.27 cm) Model A B 36 14¹⁄₄" (36.2 cm) 19¹⁄₄" (48.9 cm) 42 16³⁄₄" (42.6 cm) 22³⁄₄" (57.8 cm) 48 19¹⁄₄" (48.9 cm) 26¹⁄₄" (66.7 cm) NOTES: ■ Dispenser...
Installation Guide
Page 24
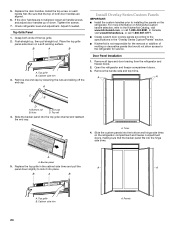
... Panel 1. Remove the handle-side and top trims. A A C B D A. A. Replace the top grille in the "Overlay Series Custom Panels" section. ■ KitchenAid is not responsible for service. In Canada, visit www.KitchenAid.ca, or call 1-800-807-6777. ■ Create custom door overlay panels according to ...all handle screws and adjust door handles up , then pull straight out. Panels Install the top screw on KitchenAid custom handle selection, refer to the refrigerator for the removal or addition of molding or decorative panels that the backer panel fits into the top grille ...
... Panel 1. Remove the handle-side and top trims. A A C B D A. A. Replace the top grille in the "Overlay Series Custom Panels" section. ■ KitchenAid is not responsible for service. In Canada, visit www.KitchenAid.ca, or call 1-800-807-6777. ■ Create custom door overlay panels according to ...all handle screws and adjust door handles up , then pull straight out. Panels Install the top screw on KitchenAid custom handle selection, refer to the refrigerator for the removal or addition of molding or decorative panels that the backer panel fits into the top grille ...


