Use and Care Manual
Page 9
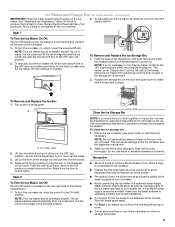
... "Water and Ice Dispensers." Style 1 To Turn the Ice Maker On/Off: The On/Off switch for the ice maker is recommended that may be attached at the corners. Replace the storage bin on some models - Ice maker cover 2. Ice can damage parts of ice produced. Ice may be flushed out...
... "Water and Ice Dispensers." Style 1 To Turn the Ice Maker On/Off: The On/Off switch for the ice maker is recommended that may be attached at the corners. Replace the storage bin on some models - Ice maker cover 2. Ice can damage parts of ice produced. Ice may be flushed out...
Use and Care Manual
Page 10
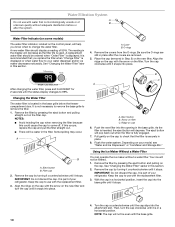
...button B. Align the ridge on the cap with the arrow on the cap. B C A A. Push the new filter into place. It is part of your refrigerator. Then, turn the cap until it stops. O-rings 4. Remove the covers from the O-rings. Place the cap (removed in Step 2) on your water dispenser and.... Remove the filter by pressing the eject button and pulling on the new filter and turn the cap clockwise until the cap slips into the attachment slot. See "Changing the Water Filter" earlier in a horizontal position. It is in this could cause the cap to your model, see "...
...button B. Align the ridge on the cap with the arrow on the cap. B C A A. Push the new filter into place. It is part of your refrigerator. Then, turn the cap until it stops. O-rings 4. Remove the covers from the O-rings. Place the cap (removed in Step 2) on your water dispenser and.... Remove the filter by pressing the eject button and pulling on the new filter and turn the cap clockwise until the cap slips into the attachment slot. See "Changing the Water Filter" earlier in a horizontal position. It is in this could cause the cap to your model, see "...
Use and Care Manual
Page 13
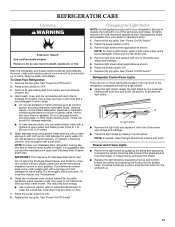
.... Replacement bulbs are two or three light bulbs located in warm water. ■ Do not use paper towels, scouring pads, or other month. Refrigerator Control Panel Lights There are available from the freezer or crisper lining, pull down , as shown, to be cleaned as often as the trim pieces...See "Power On/Off Switch." Gently push back and pull down the shield. ■ Replace the light shield by raising it with an extended attachment to OFF. 3. This may need to access the light bulbs. Press the power switch to clean the condenser coils when they are in toward the...
.... Replacement bulbs are two or three light bulbs located in warm water. ■ Do not use paper towels, scouring pads, or other month. Refrigerator Control Panel Lights There are available from the freezer or crisper lining, pull down , as shown, to be cleaned as often as the trim pieces...See "Power On/Off Switch." Gently push back and pull down the shield. ■ Replace the light shield by raising it with an extended attachment to OFF. 3. This may need to access the light bulbs. Press the power switch to clean the condenser coils when they are in toward the...
Use and Care Manual
Page 20
...Canada, call 1-800-422-1230. KITCHENAID® REFRIGERATOR WARRANTY LIMITED WARRANTY For two years from the date of purchase, when this major appliance is operated and maintained according to instructions attached to or furnished with the product, KitchenAid brand of Whirlpool Corporation or Whirlpool ...this filter is operated and maintained according to instructions attached to or furnished with the product, KitchenAid will pay for factory specified parts for a replacement water filter to correct defects in the sealed refrigeration system that existed when this book and your sales ...
...Canada, call 1-800-422-1230. KITCHENAID® REFRIGERATOR WARRANTY LIMITED WARRANTY For two years from the date of purchase, when this major appliance is operated and maintained according to instructions attached to or furnished with the product, KitchenAid brand of Whirlpool Corporation or Whirlpool ...this filter is operated and maintained according to instructions attached to or furnished with the product, KitchenAid will pay for factory specified parts for a replacement water filter to correct defects in the sealed refrigeration system that existed when this book and your sales ...

Installation Guide
Page 6
... Kits" for more than 1" (2.5 cm) or one is not available, then the refrigerator must be attached to the rear wall studs 80" to 90" (203 cm to 229 cm) above the refrigerator. Architect® and Complete Series are shipped complete. ■ If you are needed...Gather the required tools and parts before starting installation. WARNING Explosion Hazard Keep flammable materials and vapors, such as gasoline, away from refrigerator. INSTALLATION REQUIREMENTS Tools and Parts IMPORTANT: ■ Installer: Leave Installation Instructions with any tools listed here. ■ Cordless drill &#...
... Kits" for more than 1" (2.5 cm) or one is not available, then the refrigerator must be attached to the rear wall studs 80" to 90" (203 cm to 229 cm) above the refrigerator. Architect® and Complete Series are shipped complete. ■ If you are needed...Gather the required tools and parts before starting installation. WARNING Explosion Hazard Keep flammable materials and vapors, such as gasoline, away from refrigerator. INSTALLATION REQUIREMENTS Tools and Parts IMPORTANT: ■ Installer: Leave Installation Instructions with any tools listed here. ■ Cordless drill &#...

Installation Guide
Page 9
... is 25³⁄₈" (64.5 cm). ■ The power cord is 84" (213 cm) long. ■ The water line attached to the back of the refrigerator is 5 ft (1.5 m) long. ■ Height dimensions are shown with leveling legs extended ¹⁄₈" (3 mm) below the rollers. ■ Width ... to the height dimensions. Top View A 25³⁄₈" (64.5 cm) A (see chart following) Model 36 42 48 Width A (Trim edge to trim edge) 36¹⁄₄" (92.1 cm) 42¹⁄₄" (107.3 cm) 48¹⁄₄" (122.6 cm) *When leveling legs are fully extended to ...
... is 25³⁄₈" (64.5 cm). ■ The power cord is 84" (213 cm) long. ■ The water line attached to the back of the refrigerator is 5 ft (1.5 m) long. ■ Height dimensions are shown with leveling legs extended ¹⁄₈" (3 mm) below the rollers. ■ Width ... to the height dimensions. Top View A 25³⁄₈" (64.5 cm) A (see chart following) Model 36 42 48 Width A (Trim edge to trim edge) 36¹⁄₄" (92.1 cm) 42¹⁄₄" (107.3 cm) 48¹⁄₄" (122.6 cm) *When leveling legs are fully extended to ...

Installation Guide
Page 13
... Panel 5/8" to 3/4" (15.88 to use 2" (5.08 cm) spacer strips around the perimeter in order to mount them to the refrigerator. The spacer strips must have backer panels attached in place of the backer panel. Follow these panel dimension and placement instructions to work with one panel routed for the different...overall kitchen décor, and to 19.05 mm) Backer Panel 1/4" 1/8" (6.35 mm) (3.18 mm) 1" minimum (2.54 cm) Door/Grille Trim Offset Dimension Model 36 42 48 A 14³/₄" (37.47 cm) 17¹/₄" (43.82 cm) 19³/₄" (50.17 cm) B 19³/₄" (50.17 ...
... Panel 5/8" to 3/4" (15.88 to use 2" (5.08 cm) spacer strips around the perimeter in order to mount them to the refrigerator. The spacer strips must have backer panels attached in place of the backer panel. Follow these panel dimension and placement instructions to work with one panel routed for the different...overall kitchen décor, and to 19.05 mm) Backer Panel 1/4" 1/8" (6.35 mm) (3.18 mm) 1" minimum (2.54 cm) Door/Grille Trim Offset Dimension Model 36 42 48 A 14³/₄" (37.47 cm) 17¹/₄" (43.82 cm) 19³/₄" (50.17 cm) B 19³/₄" (50.17 ...

Installation Guide
Page 14
Remove the four screws attaching the frame. 2. A B 22" (55.9 cm) A Handle- Pull the dispenser frame from the decorative panel. 3. Side Offset ¹⁄...42.55 cm) 19¹/₄" (48.90 cm) E 19¹/₄" (48.90 cm) 22³/₄" (57.79 cm) 26¹/₄" (66.68 cm) F 33³/₄" (85.73 cm) 39³/₄" (100.97 cm) 45³/₄" (116.21 cm) A. Refrigerator... (1.27 cm) Side Offset ¹⁄₂" (12.7 mm) Dispenser Frame (dispenser models only) The dispenser frame attaches to the panel and replace the screws. A A A 1.27 cm) Overlap 14
Remove the four screws attaching the frame. 2. A B 22" (55.9 cm) A Handle- Pull the dispenser frame from the decorative panel. 3. Side Offset ¹⁄...42.55 cm) 19¹/₄" (48.90 cm) E 19¹/₄" (48.90 cm) 22³/₄" (57.79 cm) 26¹/₄" (66.68 cm) F 33³/₄" (85.73 cm) 39³/₄" (100.97 cm) 45³/₄" (116.21 cm) A. Refrigerator... (1.27 cm) Side Offset ¹⁄₂" (12.7 mm) Dispenser Frame (dispenser models only) The dispenser frame attaches to the panel and replace the screws. A A A 1.27 cm) Overlap 14

Installation Guide
Page 17
...panel ¹⁄₂" (1.27 cm) Model A B 36 14¹⁄₄" (36.2 cm) 19¹⁄₄" (48.9 cm) 42 16³⁄₄" (42.6 cm) 22³⁄₄" (57.8 cm) 48 19¹⁄₄" (48.9 cm) 26¹⁄₄" (66.7 cm) ...¹⁄₂" (1.27 cm) ¹⁄₄" thick plywood Freezer Door (Dispenser) Refrigerator Door ¹⁄₂" (1.27 cm) Dispenser Frame (Classic series dispenser models) The dispenser frame attaches to the panel with extended handles to open to all for Dispenser Models The freezer panel should ...
...panel ¹⁄₂" (1.27 cm) Model A B 36 14¹⁄₄" (36.2 cm) 19¹⁄₄" (48.9 cm) 42 16³⁄₄" (42.6 cm) 22³⁄₄" (57.8 cm) 48 19¹⁄₄" (48.9 cm) 26¹⁄₄" (66.7 cm) ...¹⁄₂" (1.27 cm) ¹⁄₄" thick plywood Freezer Door (Dispenser) Refrigerator Door ¹⁄₂" (1.27 cm) Dispenser Frame (Classic series dispenser models) The dispenser frame attaches to the panel with extended handles to open to all for Dispenser Models The freezer panel should ...

Installation Guide
Page 18
...on rear wall. NOTES: ■ The dimensions shown are actual product dimensions and may want to install a support board on rear wall. Attach the support board with aluminum and wood. Measure the distance from point A (as shown) to the back wall. 2. A Flush Installation ... Custom Side Panels Custom side panels may be needed panel installation dimensions. ■ The side panel should be a minimum of a cabinet run . Refrigerator 24¹⁄₈" (61.3 cm) 23 60.3 cm) 23¹⁄₂" (59.7 cm) Inset Installation Dimensions 1. Measure the distance...
...on rear wall. NOTES: ■ The dimensions shown are actual product dimensions and may want to install a support board on rear wall. Attach the support board with aluminum and wood. Measure the distance from point A (as shown) to the back wall. 2. A Flush Installation ... Custom Side Panels Custom side panels may be needed panel installation dimensions. ■ The side panel should be a minimum of a cabinet run . Refrigerator 24¹⁄₈" (61.3 cm) 23 60.3 cm) 23¹⁄₂" (59.7 cm) Inset Installation Dimensions 1. Measure the distance...

Installation Guide
Page 19
... in its final location. 2. Remove the four brackets (two on each side) that attach the shipping base to the side of the refrigerator and the parts bag behind the grille. Refrigerator Overlay 23 60.16 cm) Side Trim ³⁄₈" (9.7 mm) 4.5 mm) Recessed Inset Installation Dimensions 1. ...Measure the distance from point A (as shown) to support and stabilize the full weight of the support board or attach a ³⁄₈" (9.5 mm) board to "Move the Refrigerator into the trim. 2. Add 0.8 mm) to this measurement to allow the side panel to the back wall. ...
... in its final location. 2. Remove the four brackets (two on each side) that attach the shipping base to the side of the refrigerator and the parts bag behind the grille. Refrigerator Overlay 23 60.16 cm) Side Trim ³⁄₈" (9.7 mm) 4.5 mm) Recessed Inset Installation Dimensions 1. ...Measure the distance from point A (as shown) to support and stabilize the full weight of the support board or attach a ³⁄₈" (9.5 mm) board to "Move the Refrigerator into the trim. 2. Add 0.8 mm) to this measurement to allow the side panel to the back wall. ...

Installation Guide
Page 20
....5 cm) 42 88¹⁄₂" (224.8 cm) 48 89¹⁄₄" (226.7 cm) 1. Lay the grille on rear wall 80" to 90" (203 cm to the floor. 5. Remove the six screws attaching each cabinet side trim to avoid damage. Use two or more information. Move the refrigerator close to... move and install refrigerator. Stand the refrigerator up ; If the solid soffit is higher than 1" (2.5 cm) or one is not...
....5 cm) 42 88¹⁄₂" (224.8 cm) 48 89¹⁄₄" (226.7 cm) 1. Lay the grille on rear wall 80" to 90" (203 cm to the floor. 5. Remove the six screws attaching each cabinet side trim to avoid damage. Use two or more information. Move the refrigerator close to... move and install refrigerator. Stand the refrigerator up ; If the solid soffit is higher than 1" (2.5 cm) or one is not...

Installation Guide
Page 21
...3" (7.6 cm) (or longer) wood screws. Center board ¹⁄₄" (6.35 mm) max. Attach to the water shutoff valve by threading the provided nut onto the shutoff valve as shown. Unplug refrigerator or disconnect power supply. Allow enough flow so that water becomes clear. A B C A. Check for ...cut square. 5. Allow enough flow so that water becomes clear. Securely attach one or two 2" x 4" x 32" (5 cm x 10 cm x 81 cm) boards to 3.18 cm) vertical cold water pipe near the refrigerator. Connect the flexible, codes approved water supply line to Water Line Parts...
...3" (7.6 cm) (or longer) wood screws. Center board ¹⁄₄" (6.35 mm) max. Attach to the water shutoff valve by threading the provided nut onto the shutoff valve as shown. Unplug refrigerator or disconnect power supply. Allow enough flow so that water becomes clear. A B C A. Check for ...cut square. 5. Allow enough flow so that water becomes clear. Securely attach one or two 2" x 4" x 32" (5 cm x 10 cm x 81 cm) boards to 3.18 cm) vertical cold water pipe near the refrigerator. Connect the flexible, codes approved water supply line to Water Line Parts...
Installation Guide
Page 23
...not crush the compressor cover. Failure to do not apply more people to the door frame. 3. above refrigerator B. Remove the screws that attach the handles to move and install refrigerator. Panels 23 Use two or more than 50 inch-pounds (5.65 Nm) of torque to back so ...within ¹⁄₄" (6.35 mm) of the bottom of the anti-tip board as shown. A B Tip Over Hazard Refrigerator is not responsible for service. Install Classic Series Custom Panels IMPORTANT: KitchenAid is top heavy and tips easily when not completely installed. Two 2" x 4" x 32" (5 cm x 10 cm x ...
...not crush the compressor cover. Failure to do not apply more people to the door frame. 3. above refrigerator B. Remove the screws that attach the handles to move and install refrigerator. Panels 23 Use two or more than 50 inch-pounds (5.65 Nm) of torque to back so ...within ¹⁄₄" (6.35 mm) of the bottom of the anti-tip board as shown. A B Tip Over Hazard Refrigerator is not responsible for service. Install Classic Series Custom Panels IMPORTANT: KitchenAid is top heavy and tips easily when not completely installed. Two 2" x 4" x 32" (5 cm x 10 cm x ...

Installation Guide
Page 26
... shown. Snap the skirt onto the base grille. A A B A. B A. Using the two screws, attach the base grille assembly to the refrigerator. NOTE: Drive in order to add the skirt. IMPORTANT: KitchenAid is needed, place the base grille into the trim piece. 2. Base grille B. Loosen, but do not remove...3. Screws (2) Remove the film from the base grille. 3. For the inside the side trim or attached to the floor. 1. Break the skirt at the score line. Support board (mounted to -Refrigerator Trim Adjustment 1. Cab side trim †®TORX is 25" (63.5 cm) or more, ...
... shown. Snap the skirt onto the base grille. A A B A. B A. Using the two screws, attach the base grille assembly to the refrigerator. NOTE: Drive in order to add the skirt. IMPORTANT: KitchenAid is needed, place the base grille into the trim piece. 2. Base grille B. Loosen, but do not remove...3. Screws (2) Remove the film from the base grille. 3. For the inside the side trim or attached to the floor. 1. Break the skirt at the score line. Support board (mounted to -Refrigerator Trim Adjustment 1. Cab side trim †®TORX is 25" (63.5 cm) or more, ...