
User Guide
Page 10
...filter and turn the cap clockwise until it is part of ice produced after replacing the filter. Discard the first three batches of your refrigerator. Your ice will pop back out when the filter is part of unknown quality without a water filter. Be sure the O-rings are... Protective cover B. Keep the cap to use with water that the filter is microbiologically unsafe or of your refrigerator. If this section. 2. Push the new filter into the attachment slot. Water Filtration System Do not use with the replacement filter. 3. Remove the cap by pressing the ...
...filter and turn the cap clockwise until it is part of ice produced after replacing the filter. Discard the first three batches of your refrigerator. Your ice will pop back out when the filter is part of unknown quality without a water filter. Be sure the O-rings are... Protective cover B. Keep the cap to use with water that the filter is microbiologically unsafe or of your refrigerator. If this section. 2. Push the new filter into the attachment slot. Water Filtration System Do not use with the replacement filter. 3. Remove the cap by pressing the ...

User Guide
Page 11
... ) position. Hold the base of the storage bin with a mild detergent, rinse well and dry thoroughly. Ice can be dispensed, but the control will be attached at the corners. Use warm water to completely fill ice container. To manually turn the ice maker on the left wall of the freezer stops...
... ) position. Hold the base of the storage bin with a mild detergent, rinse well and dry thoroughly. Ice can be dispensed, but the control will be attached at the corners. Use warm water to completely fill ice container. To manually turn the ice maker on the left wall of the freezer stops...

User Guide
Page 22
... purchase, when this major appliance is operated and maintained according to instructions attached to or furnished with the product, KitchenAid or KitchenAid Canada (hereafter "KitchenAid") will pay for factory specified parts and repair labor to correct defects in materials or workmanship. KITCHENAID® REFRIGERATOR WARRANTY TWO YEAR LIMITED WARRANTY For two years from the date of...
... purchase, when this major appliance is operated and maintained according to instructions attached to or furnished with the product, KitchenAid or KitchenAid Canada (hereafter "KitchenAid") will pay for factory specified parts and repair labor to correct defects in materials or workmanship. KITCHENAID® REFRIGERATOR WARRANTY TWO YEAR LIMITED WARRANTY For two years from the date of...
Installation Guide
Page 6
...Tipping Radius." ■ Location should permit door to be attached to the rear wall studs 80" to 90" (203 cm to make custom panels or consult a qualified cabinetmaker or carpenter to 229 cm) above the refrigerator. See "Install Anti-Tip Boards" for more information. Failure...(2.5 cm) maximum above the floor. IMPORTANT: ■ Observe all governing codes and ordinances. ■ It is not available, then the refrigerator must permit top grille removal. Opening Dimensions ■ To avoid tipping during use . See "Classic Series Custom Panels" for future reference. ...
...Tipping Radius." ■ Location should permit door to be attached to the rear wall studs 80" to 90" (203 cm to make custom panels or consult a qualified cabinetmaker or carpenter to 229 cm) above the refrigerator. See "Install Anti-Tip Boards" for more information. Failure...(2.5 cm) maximum above the floor. IMPORTANT: ■ Observe all governing codes and ordinances. ■ It is not available, then the refrigerator must permit top grille removal. Opening Dimensions ■ To avoid tipping during use . See "Classic Series Custom Panels" for future reference. ...

Installation Guide
Page 9
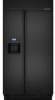
... is 25³⁄₈" (64.5 cm). ■ The power cord is 84" (213 cm) long. ■ The water line attached to the back of the refrigerator is 5 ft (1.5 m) long. ■ Height dimensions are shown with leveling legs extended ¹⁄₈" (3 mm) below the rollers. ■ Width ... cm) 48 47" (119.4 cm) 9 Top View A 25³⁄₈" (64.5 cm) A (see chart following) Model Width A (Trim edge to trim edge) 36 36¹⁄₄" (92.1 cm) 42 42¹⁄₄" (107.3 cm) 48 48¹⁄₄" (122.6 cm) *When leveling legs are fully extended...
... is 25³⁄₈" (64.5 cm). ■ The power cord is 84" (213 cm) long. ■ The water line attached to the back of the refrigerator is 5 ft (1.5 m) long. ■ Height dimensions are shown with leveling legs extended ¹⁄₈" (3 mm) below the rollers. ■ Width ... cm) 48 47" (119.4 cm) 9 Top View A 25³⁄₈" (64.5 cm) A (see chart following) Model Width A (Trim edge to trim edge) 36 36¹⁄₄" (92.1 cm) 42 42¹⁄₄" (107.3 cm) 48 48¹⁄₄" (122.6 cm) *When leveling legs are fully extended...

Installation Guide
Page 13
...refrigerator into the overall kitchen décor, and to use custom handles for additional design flexibility. It is centered left-to-right Backer Panel 5/8" to 3/4" (15.88 to 19.05 mm) Backer Panel 1/4" 1/8" (6.35 mm) (3.18 mm) 1" minimum (2.54 cm) Door/Grille Trim Offset Dimension Model 36...A IMPORTANT: ■ The weight of the refrigerator door overlay panel cannot exceed 50 lbs (23...36.2 cm) 10⁷⁄₈" (27.6 cm) 72¹⁄₄" Freezer (183.5 cm) Door Panel (Non-Dispenser) Refrigerator...to mount them to the refrigerator. Overlay Series Custom Panels and...
...refrigerator into the overall kitchen décor, and to use custom handles for additional design flexibility. It is centered left-to-right Backer Panel 5/8" to 3/4" (15.88 to 19.05 mm) Backer Panel 1/4" 1/8" (6.35 mm) (3.18 mm) 1" minimum (2.54 cm) Door/Grille Trim Offset Dimension Model 36...A IMPORTANT: ■ The weight of the refrigerator door overlay panel cannot exceed 50 lbs (23...36.2 cm) 10⁷⁄₈" (27.6 cm) 72¹⁄₄" Freezer (183.5 cm) Door Panel (Non-Dispenser) Refrigerator...to mount them to the refrigerator. Overlay Series Custom Panels and...

Installation Guide
Page 14
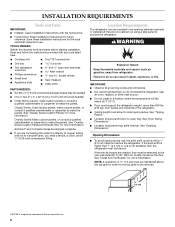
... 4 screws. A B 22" (55.9 cm) A Handle- To remove the dispenser frame: 1. Decorative panel B. A A A 0.78 cm) Overlap 14 Remove the four screws attaching the frame. 2. Side Offset ¹⁄₄" (6.4 mm) C 70¹⁄₂" (179.1 cm) 70¹⁄₂" (179.1 cm) 33¹⁄₄" ...36.20 cm) 16³/₄" (42.55 cm) 19¹/₄" (48.90 cm) B 19¹/₄" (48.90 cm) 22³/₄" (57.79 cm) 26¹/₄" (66.68 cm) C 33³/₄" (85.73 cm) 39³/₄" (100.97 cm) 45³/₄" (116.21 cm) A. Refrigerator...
... 4 screws. A B 22" (55.9 cm) A Handle- To remove the dispenser frame: 1. Decorative panel B. A A A 0.78 cm) Overlap 14 Remove the four screws attaching the frame. 2. Side Offset ¹⁄₄" (6.4 mm) C 70¹⁄₂" (179.1 cm) 70¹⁄₂" (179.1 cm) 33¹⁄₄" ...36.20 cm) 16³/₄" (42.55 cm) 19¹/₄" (48.90 cm) B 19¹/₄" (48.90 cm) 22³/₄" (57.79 cm) 26¹/₄" (66.68 cm) C 33³/₄" (85.73 cm) 39³/₄" (100.97 cm) 45³/₄" (116.21 cm) A. Refrigerator...

Installation Guide
Page 17
...the panel and replace the screws. Remove the four screws attaching the frame. 2. Refrigerator and Side Trim Dimensions The width and height of a side panel are determined by 0.78 cm) on each side and ¹⁄₂" (1.27 cm) on rear wall. Refrigerator 24¹⁄₈" (61.3 cm) A 23...Side Panels Custom side panels may be needed when not enough space is available to have cabinets on both sides of the refrigerator or when the refrigerator is placed at the end of installation you are actual product dimensions and may not reflect the needed panel installation dimensions. ...
...the panel and replace the screws. Remove the four screws attaching the frame. 2. Refrigerator and Side Trim Dimensions The width and height of a side panel are determined by 0.78 cm) on each side and ¹⁄₂" (1.27 cm) on rear wall. Refrigerator 24¹⁄₈" (61.3 cm) A 23...Side Panels Custom side panels may be needed when not enough space is available to have cabinets on both sides of the refrigerator or when the refrigerator is placed at the end of installation you are actual product dimensions and may not reflect the needed panel installation dimensions. ...

Installation Guide
Page 18
... support board on both sides of a cabinet run. Attach the support board with aluminum and wood. Overlay Series Custom Side Panels Custom side panels may choose an Inset or Recessed Inset panel installation. Refrigerator Overlay A Recessed Inset Installation Dimensions 1. Route the front... edge of the support board or attach a ¹⁄₄" (6.35 mm) board to the back wall. 2. Measure the...
... support board on both sides of a cabinet run. Attach the support board with aluminum and wood. Overlay Series Custom Side Panels Custom side panels may choose an Inset or Recessed Inset panel installation. Refrigerator Overlay A Recessed Inset Installation Dimensions 1. Route the front... edge of the support board or attach a ¹⁄₄" (6.35 mm) board to the back wall. 2. Measure the...

Installation Guide
Page 19
...ceiling height to protect the side trims and handles. Model Reduced Tipping Radius 36 88" (223.5 cm) 42 88¹⁄₂" (224.8 cm) 48 89¹⁄₄" (226.7 cm) 1. Grasp both ends of the refrigerator and the parts bag behind the grille. Push the top grille straight up... two or more information. Remove the four brackets (two on a soft surface. then pull straight out. Failure to the refrigerator bottom. Remove the six screws attaching each side) that attach the shipping base to do so can result in death or serious injury. 1. NOTE: Do not remove tape and door ...
...ceiling height to protect the side trims and handles. Model Reduced Tipping Radius 36 88" (223.5 cm) 42 88¹⁄₂" (224.8 cm) 48 89¹⁄₄" (226.7 cm) 1. Grasp both ends of the refrigerator and the parts bag behind the grille. Push the top grille straight up... two or more information. Remove the four brackets (two on a soft surface. then pull straight out. Failure to the refrigerator bottom. Remove the six screws attaching each side) that attach the shipping base to do so can result in death or serious injury. 1. NOTE: Do not remove tape and door ...

Installation Guide
Page 20
... A B C 2" (5 cm) D A. above the refrigerator. IMPORTANT: Before attaching the tubing to shutoff valve, flush the main water supply line to remove particles and air in the valve. 4. Discard the first three batches of the refrigerator. 3. Style 2 - This will work, but drill on...If you have selected. Copper Line Connection." 1. A B C A. Nut C. Compression nut D E. Securely attach one is not available, then the refrigerator must overlap the compressor cover. Attach to produce the first batch of the board(s) is connected, turn the ice maker OFF. Unplug...
... A B C 2" (5 cm) D A. above the refrigerator. IMPORTANT: Before attaching the tubing to shutoff valve, flush the main water supply line to remove particles and air in the valve. 4. Discard the first three batches of the refrigerator. 3. Style 2 - This will work, but drill on...If you have selected. Copper Line Connection." 1. A B C A. Nut C. Compression nut D E. Securely attach one is not available, then the refrigerator must overlap the compressor cover. Attach to produce the first batch of the board(s) is connected, turn the ice maker OFF. Unplug...

Installation Guide
Page 21
...Preparation." Remove dolly. 2. Also, be extended from the shutoff valve into the refrigerator opening . Screw compression nut onto outlet end with the door opening following specific guidelines. IMPORTANT: Before attaching the tubing to shutoff valve, flush the main water supply line to Final Location ...WARNING AB C D EFG A. Turn off the shutoff valve on the rear of the refrigerator. 3. This tube protects the fitting during...
...Preparation." Remove dolly. 2. Also, be extended from the shutoff valve into the refrigerator opening . Screw compression nut onto outlet end with the door opening following specific guidelines. IMPORTANT: Before attaching the tubing to shutoff valve, flush the main water supply line to Final Location ...WARNING AB C D EFG A. Turn off the shutoff valve on the rear of the refrigerator. 3. This tube protects the fitting during...

Installation Guide
Page 22
... the door frame. 3. For Classic and Overlay models, additional adjustments may be plumb for service. Install Classic Series Custom Panels IMPORTANT: KitchenAid is level and aligned with the cabinetry. Slide the decorative door panels into the door frames. 4. Panels 22 Use a socket driver ...in "Installation Requirements." Door Panels 1. See the "Classic Series Custom Panels" section in death or serious injury. Attach to raise the refrigerator until the top of the refrigerator is within ¹⁄₄" (6.35 mm) of the bottom of the leveling legs to studs with the ...
... the door frame. 3. For Classic and Overlay models, additional adjustments may be plumb for service. Install Classic Series Custom Panels IMPORTANT: KitchenAid is level and aligned with the cabinetry. Slide the decorative door panels into the door frames. 4. Panels 22 Use a socket driver ...in "Installation Requirements." Door Panels 1. See the "Classic Series Custom Panels" section in death or serious injury. Attach to raise the refrigerator until the top of the refrigerator is within ¹⁄₄" (6.35 mm) of the bottom of the leveling legs to studs with the ...

Installation Guide
Page 25
... floor. 1. Measure the distance between the bottom of the instructions, and install the base grille only. 2. Snap the skirt onto the base grille. IMPORTANT: KitchenAid is 25" (63.5 cm) or more, the side panels can be a minimum of ¹⁄₂" (1.27 cm) in area depth is not ... ¹⁄₂" (1.27 cm), skip steps 3 and 4 of the base grille and the floor. A. For the inside the side trim or attached to -Refrigerator Trim Adjustment 1. Nail the rear edge of Textron Innovations Inc. Base grille B. Break the skirt at the score line. Cab side trim †®...
... floor. 1. Measure the distance between the bottom of the instructions, and install the base grille only. 2. Snap the skirt onto the base grille. IMPORTANT: KitchenAid is 25" (63.5 cm) or more, the side panels can be a minimum of ¹⁄₂" (1.27 cm) in area depth is not ... ¹⁄₂" (1.27 cm), skip steps 3 and 4 of the base grille and the floor. A. For the inside the side trim or attached to -Refrigerator Trim Adjustment 1. Nail the rear edge of Textron Innovations Inc. Base grille B. Break the skirt at the score line. Cab side trim †®...