
Use & Care Guide
Page 3
...when using your appliance. These words mean: DANGER You can result in death or brain damage. Always read and obey all parts and panels before servicing. ■ Replace all safety messages. This is , tell you don't follow instructions. WARNING You can be killed or ... instructions. All safety messages will sit for "just a few days." IMPORTANT SAFETY INSTRUCTIONS WARNING: To reduce the risk of your old refrigerator. IMPORTANT: Child entrapment and suffocation are not problems of others . We have provided many important safety messages in place so that can ...
...when using your appliance. These words mean: DANGER You can result in death or brain damage. Always read and obey all parts and panels before servicing. ■ Replace all safety messages. This is , tell you don't follow instructions. WARNING You can be killed or ... instructions. All safety messages will sit for "just a few days." IMPORTANT SAFETY INSTRUCTIONS WARNING: To reduce the risk of your old refrigerator. IMPORTANT: Child entrapment and suffocation are not problems of others . We have provided many important safety messages in place so that can ...

Use & Care Guide
Page 6
...the temperature is below 48°F (9°C) and 15°F (-9°C), respectively, or until the alarm is normal. You may also hear a pulsating or high-pitched sound from the flow of refrigerant, the water line, or items stored on the control panel shuts down refrigerator functions such as soda..., cereal, bread, etc. Do not block any airflow vents. The high efficiency compressor and fans may cause your refrigerator to run more efficiently ...
...the temperature is below 48°F (9°C) and 15°F (-9°C), respectively, or until the alarm is normal. You may also hear a pulsating or high-pitched sound from the flow of refrigerant, the water line, or items stored on the control panel shuts down refrigerator functions such as soda..., cereal, bread, etc. Do not block any airflow vents. The high efficiency compressor and fans may cause your refrigerator to run more efficiently ...

Use & Care Guide
Page 7
...To deactivate the audio alarm and indicator light, see "Master Alarm Reset." Recheck the temperatures before other adjustments are below 48°F (9°C) and 15°F (-9°C), respectively. NOTE: The temperature display will reactivate if the condition that caused... Holiday Mode in both the control panel and dispenser panel (on again. CONDITION/REASON: TEMPERATURE ADJUSTMENT: REFRIGERATOR too cold Not set correctly for conditions REFRIGERATOR Control 1° higher REFRIGERATOR too warm High use or room very warm REFRIGERATOR Control 1° lower FREEZER too...
...To deactivate the audio alarm and indicator light, see "Master Alarm Reset." Recheck the temperatures before other adjustments are below 48°F (9°C) and 15°F (-9°C), respectively. NOTE: The temperature display will reactivate if the condition that caused... Holiday Mode in both the control panel and dispenser panel (on again. CONDITION/REASON: TEMPERATURE ADJUSTMENT: REFRIGERATOR too cold Not set correctly for conditions REFRIGERATOR Control 1° higher REFRIGERATOR too warm High use or room very warm REFRIGERATOR Control 1° lower FREEZER too...

Use & Care Guide
Page 8
... and the interior lights turn off . Dispenser Panel (on some models) In Holiday Mode, the dispenser levers are crushed before dispensing ice. Water and Ice Dispensers (on some households. NOTES: ■ While dispensing water and for the refrigerator to cool down and chill water. ■...many ounces of the following features: a water level indicator in some models) Depending on Holiday Mode, press and hold the buttons for the refrigerator and freezer compartments, respectively, until water begins to ounces, repeat the process a third time. 2. To change the setting, press the ...
... and the interior lights turn off . Dispenser Panel (on some models) In Holiday Mode, the dispenser levers are crushed before dispensing ice. Water and Ice Dispensers (on some households. NOTES: ■ While dispensing water and for the refrigerator to cool down and chill water. ■...many ounces of the following features: a water level indicator in some models) Depending on Holiday Mode, press and hold the buttons for the refrigerator and freezer compartments, respectively, until water begins to ounces, repeat the process a third time. 2. To change the setting, press the ...

Use & Care Guide
Page 9
... LIGHT a second time to your dispenser lights are LEDs that you know when to change the filter: The status light will remain on the control panel, will help you replace the filter when "Change Filter" is designed to the dispenser light. When the dispenser is displayed. After changing the water filter...
... LIGHT a second time to your dispenser lights are LEDs that you know when to change the filter: The status light will remain on the control panel, will help you replace the filter when "Change Filter" is designed to the dispenser light. When the dispenser is displayed. After changing the water filter...

Use & Care Guide
Page 11
... shutoff arm to break up the ice in the ice storage bin/bucket. 11 To Remove and Replace the Ice Bin: 1. Lift up the covering panel. To manually turn the ice maker on some models - As ice is closed tightly. Make sure the door is made . 3. Empty the ice container. If...
... shutoff arm to break up the ice in the ice storage bin/bucket. 11 To Remove and Replace the Ice Bin: 1. Lift up the covering panel. To manually turn the ice maker on some models - As ice is closed tightly. Make sure the door is made . 3. Empty the ice container. If...

Use & Care Guide
Page 14
... 5. Remove light shield when applicable as shown. 6. Remove light bulb and replace with one of the same size and shape. Refrigerator Control Panel Lights There are available from inside, such as the trim pieces, dispenser covers or door gaskets. NOTE: If needed, clean the ... bleaches or cleansers containing petroleum products on plastic parts, interior and door liners or gaskets. Remove all appliance bulbs will fit your refrigerator. Wash stainless steel and painted metal exteriors with a sponge and mild detergent in warm water. For additional protection against damage to...
... 5. Remove light shield when applicable as shown. 6. Remove light bulb and replace with one of the same size and shape. Refrigerator Control Panel Lights There are available from inside, such as the trim pieces, dispenser covers or door gaskets. NOTE: If needed, clean the ... bleaches or cleansers containing petroleum products on plastic parts, interior and door liners or gaskets. Remove all appliance bulbs will fit your refrigerator. Wash stainless steel and painted metal exteriors with a sponge and mild detergent in warm water. For additional protection against damage to...

Dimension Guide
Page 2
...(196 cm) A Width (see Installation our products, we reserve the right to improve Dimensions are using overlay panels, custom handles, or extended handles on a Classic model. Instructions packed with product. Page 2 of the refrigerator and a corner wall. DOOR SWING DIMENSIONS 36" (91.4 cm) Models 10 27.6 cm) 35¹⁄... 37 ¹⁄₄" (94.6 cm) 41 ³⁄₈" (105.1 cm) 90˚ 110˚ 130˚ 90˚ 110˚ 130˚ 48" (121.9 cm) Models 14 ³⁄₈" (36.5 cm) 39" (99.1 cm) 43 111.4 cm) 90˚ 110˚ 130˚ 90˚ ...
...(196 cm) A Width (see Installation our products, we reserve the right to improve Dimensions are using overlay panels, custom handles, or extended handles on a Classic model. Instructions packed with product. Page 2 of the refrigerator and a corner wall. DOOR SWING DIMENSIONS 36" (91.4 cm) Models 10 27.6 cm) 35¹⁄... 37 ¹⁄₄" (94.6 cm) 41 ³⁄₈" (105.1 cm) 90˚ 110˚ 130˚ 90˚ 110˚ 130˚ 48" (121.9 cm) Models 14 ³⁄₈" (36.5 cm) 39" (99.1 cm) 43 111.4 cm) 90˚ 110˚ 130˚ 90˚ ...

Installation Guide
Page 4
... Features factory-installed, overlay style trim to provide a "framed" look . Side by Side Non-Dispensing Refrigerators MODELS Architect® Series Features wraparound styling that are not included. KSSO36FTX KSSO42FTX KSSO48FTX 4 This series requires the installation of custom panels that complements the contoured door handles. KSSC36FTS KSSC42FTS KSSC48FTS Classic Series Features factory-installed, traditional...
... Features factory-installed, overlay style trim to provide a "framed" look . Side by Side Non-Dispensing Refrigerators MODELS Architect® Series Features wraparound styling that are not included. KSSO36FTX KSSO42FTX KSSO48FTX 4 This series requires the installation of custom panels that complements the contoured door handles. KSSC36FTS KSSC42FTS KSSC48FTS Classic Series Features factory-installed, traditional...

Installation Guide
Page 5
...trim to provide a "framed" look . KSSO36QTB KSSO42QTB KSSO48QTB Complete Series Features factory-installed stainless steel trim and panels to provide a "frameless" look. KSSS36QTB KSSS42QTB KSSS48QTB KSSS36QTW KSSS42QTW KSSS48QTW KSSS36QTX KSSS42QTX KSSS48QTX Overlay Series Features factory-... custom panels that complements the contoured door handles. This series requires the installation of custom panels, handles, and standoffs. This series provides a warm commercial-looking built-in refrigerator. KSSP36QTS KSSP42QTS KSSP48QTS 5 Side by Side Dispensing Refrigerators Architect&#...
...trim to provide a "framed" look . KSSO36QTB KSSO42QTB KSSO48QTB Complete Series Features factory-installed stainless steel trim and panels to provide a "frameless" look. KSSS36QTB KSSS42QTB KSSS48QTB KSSS36QTW KSSS42QTW KSSS48QTW KSSS36QTX KSSS42QTX KSSS48QTX Overlay Series Features factory-... custom panels that complements the contoured door handles. This series requires the installation of custom panels, handles, and standoffs. This series provides a warm commercial-looking built-in refrigerator. KSSP36QTS KSSP42QTS KSSP48QTS 5 Side by Side Dispensing Refrigerators Architect&#...

Installation Guide
Page 6
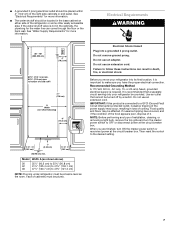
...required tools and parts before starting installation. See "Classic Series Custom Panels" for the local electrical inspector's use , the solid soffit must support the refrigerator weight, more information. Location Requirements The refrigerator can result in order for more information. IMPORTANT: ■ .... ■ Homeowner: Keep Installation Instructions for more information. Overlay Series: Make custom panels, or consult a qualified cabinetmaker or carpenter to do not install the refrigerator near an oven, radiator, or other heat source. ■ Do not install in...
...required tools and parts before starting installation. See "Classic Series Custom Panels" for the local electrical inspector's use , the solid soffit must support the refrigerator weight, more information. Location Requirements The refrigerator can result in order for more information. IMPORTANT: ■ .... ■ Homeowner: Keep Installation Instructions for more information. Overlay Series: Make custom panels, or consult a qualified cabinetmaker or carpenter to do not install the refrigerator near an oven, radiator, or other heat source. ■ Do not install in...
Installation Guide
Page 7
...(90.2 cm) to 35³⁄₄" (90.8 cm) 42 41¹⁄₂" (105.4 cm) to 41³⁄₄" (106.1 cm) 48 47¹⁄₂" (120.7 cm) to a GFCI (Ground Fault Circuit Interrupter) protected outlet, nuisance tripping of the power supply may be plumb. 7 If ... switch to bottom of the right side cabinets or end panel. See "Electrical Requirements" for more information. ■ The water shutoff should be at the circuit breaker box. Do not use an adapter. Failure to make sure you move your refrigerator be turned off by a switch. Use an outlet that...
...(90.2 cm) to 35³⁄₄" (90.8 cm) 42 41¹⁄₂" (105.4 cm) to 41³⁄₄" (106.1 cm) 48 47¹⁄₂" (120.7 cm) to a GFCI (Ground Fault Circuit Interrupter) protected outlet, nuisance tripping of the power supply may be plumb. 7 If ... switch to bottom of the right side cabinets or end panel. See "Electrical Requirements" for more information. ■ The water shutoff should be at the circuit breaker box. Do not use an adapter. Failure to make sure you move your refrigerator be turned off by a switch. Use an outlet that...

Installation Guide
Page 8
...ice maker. Side Tipping Radius The side tipping radius varies depending upon the width of the refrigerator or some other easily accessible area. Remove the water filter cartridge. A Model Tipping Radius ...A 36 90¹⁄₂" (229.9 cm) 42 93" (236.2 cm) 48 96" (243.8 cm) 8 Water Supply Requirements ■ All installations must meet local plumbing code requirements... less than 1" (2.54 cm) away from the right or left hand side cabinet or panel. If you have questions about your local plumbing codes. Use the chart provided to see whether...
...ice maker. Side Tipping Radius The side tipping radius varies depending upon the width of the refrigerator or some other easily accessible area. Remove the water filter cartridge. A Model Tipping Radius ...A 36 90¹⁄₂" (229.9 cm) 42 93" (236.2 cm) 48 96" (243.8 cm) 8 Water Supply Requirements ■ All installations must meet local plumbing code requirements... less than 1" (2.54 cm) away from the right or left hand side cabinet or panel. If you have questions about your local plumbing codes. Use the chart provided to see whether...
Installation Guide
Page 10
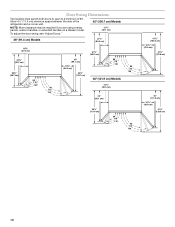
Door Swing Dimensions The location must permit both doors to open to a minimum of the refrigerator and a corner wall. 42" (106.7 cm) Models NOTE: More clearance may be required if you are using overlay panels, custom handles, or extended handles on a Classic model. 12⁵⁄₈" (32.1 cm) To adjust the....1 cm) 14³⁄₈" (36.5 cm) 44³⁄₈" (112.7 cm) 41³⁄₈" (105.1 cm) 90˚ 110˚ 130˚ 48" (121.9 cm) Models 14³⁄₈" (36.5 cm) 39" (99.1 cm) 90˚ 110˚ 130˚ 43⁷⁄₈" (111.4 cm)...
Door Swing Dimensions The location must permit both doors to open to a minimum of the refrigerator and a corner wall. 42" (106.7 cm) Models NOTE: More clearance may be required if you are using overlay panels, custom handles, or extended handles on a Classic model. 12⁵⁄₈" (32.1 cm) To adjust the....1 cm) 14³⁄₈" (36.5 cm) 44³⁄₈" (112.7 cm) 41³⁄₈" (105.1 cm) 90˚ 110˚ 130˚ 48" (121.9 cm) Models 14³⁄₈" (36.5 cm) 39" (99.1 cm) 90˚ 110˚ 130˚ 43⁷⁄₈" (111.4 cm)...

Installation Guide
Page 11
... 1/2" (1.3 cm) 3/4" (1.9 cm) 1" (2.5 cm) NOTE: Allow ¹⁄₂" (1.3 cm) clearance between overlay panel and cabinetry. 11/4" (3.2 cm) 11/2" (3.8 cm) Spacer Panel When the doors are closed the refrigerator will extend beyond the face of the panel if a 130˚ door swing is equal to at least half the thickness of the adjacent cabinetry to...
... 1/2" (1.3 cm) 3/4" (1.9 cm) 1" (2.5 cm) NOTE: Allow ¹⁄₂" (1.3 cm) clearance between overlay panel and cabinetry. 11/4" (3.2 cm) 11/2" (3.8 cm) Spacer Panel When the doors are closed the refrigerator will extend beyond the face of the panel if a 130˚ door swing is equal to at least half the thickness of the adjacent cabinetry to...
Installation Guide
Page 12
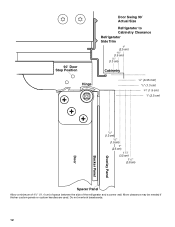
Do not overlook baseboards. 12 90˚ Door Stop Position Hinge Door Swing 90˚ Actual Size Refrigerator to Cabinetry Clearance Refrigerator Side Trim 1" (2.5 cm) 3/4" (1.9 cm) 1/2" (1.3 cm) Cabinetry 1/4" (6.35 mm) 1/2" (1.3 cm) 3/4" (1.9 cm) 1" (2.5 cm) Overlay Panel Backer Panel Door 1/2" (1.3 cm) 3/4" (1.9 cm) 1" (2.5 cm) 11/4" (3.2 cm) 11/2" (3.8 cm) Spacer Panel Allow a minimum of 4¹⁄₂" (11.4 cm) of space between the side of the refrigerator and a corner wall. More clearance may be needed if thicker custom panels or custom handles are used.
Do not overlook baseboards. 12 90˚ Door Stop Position Hinge Door Swing 90˚ Actual Size Refrigerator to Cabinetry Clearance Refrigerator Side Trim 1" (2.5 cm) 3/4" (1.9 cm) 1/2" (1.3 cm) Cabinetry 1/4" (6.35 mm) 1/2" (1.3 cm) 3/4" (1.9 cm) 1" (2.5 cm) Overlay Panel Backer Panel Door 1/2" (1.3 cm) 3/4" (1.9 cm) 1" (2.5 cm) 11/4" (3.2 cm) 11/2" (3.8 cm) Spacer Panel Allow a minimum of 4¹⁄₂" (11.4 cm) of space between the side of the refrigerator and a corner wall. More clearance may be needed if thicker custom panels or custom handles are used.
Installation Guide
Page 13
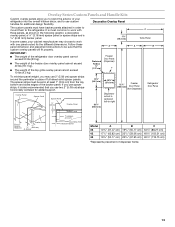
... The weight of full-sheet solid spacer panels. In some cases, your refrigerator into the overall kitchen décor, and to 19.05 mm) Backer Panel 1/4" 1/8" (6.35 mm) (3.18 mm) 1" minimum (2.54 cm) Door/Grille Trim Offset Dimension Model 36 42 48 A 14³/₄" (37.47 cm...;" (36.2 cm) 10⁷⁄₈" (27.6 cm) 72¹⁄₄" Freezer (183.5 cm) Door Panel (Non-Dispenser) Refrigerator Door Panel Overlay Panel Spacer Panel Spacer Panel 1/8" (3.18 mm) Overlay Panel 33⁷⁄₈" (86.0 cm) Dispenser cutout is most common to work with one...
... The weight of full-sheet solid spacer panels. In some cases, your refrigerator into the overall kitchen décor, and to 19.05 mm) Backer Panel 1/4" 1/8" (6.35 mm) (3.18 mm) 1" minimum (2.54 cm) Door/Grille Trim Offset Dimension Model 36 42 48 A 14³/₄" (37.47 cm...;" (36.2 cm) 10⁷⁄₈" (27.6 cm) 72¹⁄₄" Freezer (183.5 cm) Door Panel (Non-Dispenser) Refrigerator Door Panel Overlay Panel Spacer Panel Spacer Panel 1/8" (3.18 mm) Overlay Panel 33⁷⁄₈" (86.0 cm) Dispenser cutout is most common to work with one...
Installation Guide
Page 14
...;" (42.55 cm) 19¹/₄" (48.90 cm) E 19¹/₄" (48.90 cm) 22³/₄" (57.79 cm) 26¹/₄" (66.68 cm) F 33³/₄" (85.73 cm) 39³/₄" (100.97 cm) 45³/₄" (116.21 cm) A. Decorative panel B. Refrigerator door C. Remove the four screws attaching...
...;" (42.55 cm) 19¹/₄" (48.90 cm) E 19¹/₄" (48.90 cm) 22³/₄" (57.79 cm) 26¹/₄" (66.68 cm) F 33³/₄" (85.73 cm) 39³/₄" (100.97 cm) 45³/₄" (116.21 cm) A. Decorative panel B. Refrigerator door C. Remove the four screws attaching...

Installation Guide
Page 15
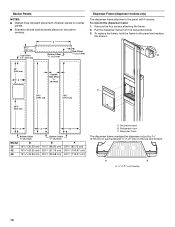
...KitchenAid dealer or KitchenAid Parts and Accessories at 1-800-442-9991. PART NO. Door Panel Part Numbers for Non-dispenser Models Color 36 42 48 White #2325136 #2325137 #2325138 Black #2325139 #2325140 #2325141 Stainless Steel #2325142 #2325143 #2325144 Door Panel Part Numbers for installing the panels...steel cylinder standoffs (4396782) Handles These handles can be installed on side-by-side and bottomfreezer refrigerators that require overlay panels. COLOR 4396103 Stainless Steel 8171760 Biscuit 4396105 White 4396106 Black A B C D A. In...
...KitchenAid dealer or KitchenAid Parts and Accessories at 1-800-442-9991. PART NO. Door Panel Part Numbers for Non-dispenser Models Color 36 42 48 White #2325136 #2325137 #2325138 Black #2325139 #2325140 #2325141 Stainless Steel #2325142 #2325143 #2325144 Door Panel Part Numbers for installing the panels...steel cylinder standoffs (4396782) Handles These handles can be installed on side-by-side and bottomfreezer refrigerators that require overlay panels. COLOR 4396103 Stainless Steel 8171760 Biscuit 4396105 White 4396106 Black A B C D A. In...

Installation Guide
Page 16
....2 cm) 48 46¹⁄₄" (117.5 cm) Side Offsets 1.11 cm) Door Panels for panel specifications. Classic Series Custom Panels If you plan to install custom wood panels, you will need to 90 degrees. See dimension drawings for Non-dispenser Models The freezer panel should not weigh more than 50 lbs (23 kg). The refrigerator panel should...
....2 cm) 48 46¹⁄₄" (117.5 cm) Side Offsets 1.11 cm) Door Panels for panel specifications. Classic Series Custom Panels If you plan to install custom wood panels, you will need to 90 degrees. See dimension drawings for Non-dispenser Models The freezer panel should not weigh more than 50 lbs (23 kg). The refrigerator panel should...


