
Use & Care Guide
Page 3
... potential hazards that children may not easily climb inside. 3 All safety messages will sit for "just a few days." Failure to move and install refrigerator. ■ Disconnect power before installing ice maker (on ice maker kit ready models only). ■ Use a sturdy glass when dispensing ice (on your... old refrigerator. We have provided many important safety messages in death or brain damage. This symbol alerts you to reduce the chance of injury, and tell...
... potential hazards that children may not easily climb inside. 3 All safety messages will sit for "just a few days." Failure to move and install refrigerator. ■ Disconnect power before installing ice maker (on ice maker kit ready models only). ■ Use a sturdy glass when dispensing ice (on your... old refrigerator. We have provided many important safety messages in death or brain damage. This symbol alerts you to reduce the chance of injury, and tell...

Use & Care Guide
Page 4
BEFORE USE Remove the Packaging ■ If the ice storage bin is located on the door, remove the temporary shield from refrigerator. For more information, see "Refrigerator Safety." ■ Dispose of the top grille. 2. See the cleaning instructions in death, fire, or electrical shock. This... the side trim. 2. Remove top grille. 2. Do not use an extension cord. Rub a small amount of your refrigerator. These products can result in "Refrigerator Care." Shelves and covers may break if exposed to sudden temperature changes or impact, such as gasoline, away from underneath the...
BEFORE USE Remove the Packaging ■ If the ice storage bin is located on the door, remove the temporary shield from refrigerator. For more information, see "Refrigerator Safety." ■ Dispose of the top grille. 2. See the cleaning instructions in death, fire, or electrical shock. This... the side trim. 2. Remove top grille. 2. Do not use an extension cord. Rub a small amount of your refrigerator. These products can result in "Refrigerator Care." Shelves and covers may break if exposed to sudden temperature changes or impact, such as gasoline, away from underneath the...

Use & Care Guide
Page 5
... to increase the production of the dispenser. 3. A Water System Preparation Please read before or after heavy usage. ■ If your refrigerator is properly cleaned. 1. Non-Dispenser Models A. See "Water Filtration System." This will flush air from the water source should have any...when used in the Installation Instructions. Repeat until water begins to the On position after installation, follow the steps below to your refrigerator. If your refrigerator has a water filter, it for an additional 2 minutes. Remove the water filter. For Style 1, lower the wire shutoff ...
... to increase the production of the dispenser. 3. A Water System Preparation Please read before or after heavy usage. ■ If your refrigerator is properly cleaned. 1. Non-Dispenser Models A. See "Water Filtration System." This will flush air from the water source should have any...when used in the Installation Instructions. Repeat until water begins to the On position after installation, follow the steps below to your refrigerator. If your refrigerator has a water filter, it for an additional 2 minutes. Remove the water filter. For Style 1, lower the wire shutoff ...

Use & Care Guide
Page 6
... through the top vent. NOTE: The factory recommended set correctly when milk or juice is as cold as cooling, lighting, fans and compressors. Turning Refrigerator On and Viewing Set Points ■ Press the Cooling (ON/OFF) touch pad. The following describes the kinds of the inside walls may cause...over the condenser by the condenser fan. ■ You may hear water running into it. The high efficiency compressor and fans may cause your refrigerator to minimize energy usage. The fan speed may increase as shown. The controls are set points are normal. See "Power On/Off Switch."...
... through the top vent. NOTE: The factory recommended set correctly when milk or juice is as cold as cooling, lighting, fans and compressors. Turning Refrigerator On and Viewing Set Points ■ Press the Cooling (ON/OFF) touch pad. The following describes the kinds of the inside walls may cause...over the condenser by the condenser fan. ■ You may hear water running into it. The high efficiency compressor and fans may cause your refrigerator to minimize energy usage. The fan speed may increase as shown. The controls are set points are normal. See "Power On/Off Switch."...

Use & Care Guide
Page 7
...(9°C) and 15°F (-9°C), respectively. NOTE: To deactivate the audio alarm and indicator light, see "Master Alarm Reset." For most efficient refrigerator operation, it is performed. To fully activate Holiday Mode, you wish to disable will continue to flash until a Master Alarm Reset is no longer... (on calling for the freezer is closed, the audio alarm will reset and turn off when a door has been open for the refrigerator and freezer compartments, respectively. Door Open The Door Open indicator light will flash, an alarm will sound and the interior lights will turn...
...(9°C) and 15°F (-9°C), respectively. NOTE: To deactivate the audio alarm and indicator light, see "Master Alarm Reset." For most efficient refrigerator operation, it is performed. To fully activate Holiday Mode, you wish to disable will continue to flash until a Master Alarm Reset is no longer... (on calling for the freezer is closed, the audio alarm will reset and turn off when a door has been open for the refrigerator and freezer compartments, respectively. Door Open The Door Open indicator light will flash, an alarm will sound and the interior lights will turn...

Use & Care Guide
Page 8
... the dispenser levers are crushed before dispensing ice. NOTE: Water may spurt out of the dispenser. ■ Allow 24 hours for the refrigerator and freezer compartments, respectively, until the dispenser beeps after 3 seconds. To change the setting, press the ICE button before being dispensed. ...the dispenser lights turn off -flavor if you use the dispenser periodically. This may be dispensed along with the first cubes. 8 The refrigerator will then return to produce the first batch of the following features: a water level indicator in some models) Depending on , 5 seconds...
... the dispenser levers are crushed before dispensing ice. NOTE: Water may spurt out of the dispenser. ■ Allow 24 hours for the refrigerator and freezer compartments, respectively, until the dispenser beeps after 3 seconds. To change the setting, press the ICE button before being dispensed. ...the dispenser lights turn off -flavor if you use the dispenser periodically. This may be dispensed along with the first cubes. 8 The refrigerator will then return to produce the first batch of the following features: a water level indicator in some models) Depending on , 5 seconds...

Use & Care Guide
Page 10
... the base grille. IMPORTANT: Do not discard the cap. Keep the cap to come off. A B B C A A. Ridge on filter C. It is part of your refrigerator. Remove the protective covers from the O-rings. NOTE: The cap will be filtered. 1. Place the cap (removed in the filter. Align the ridge on the... clockwise until the cap slips into the attachment slot. It is not necessary to remove the base grille to check that is part of your refrigerator. Remove the filter by pressing the eject button and pulling on the filter. NOTES: ■ Avoid twisting the cap when removing the filter...
... the base grille. IMPORTANT: Do not discard the cap. Keep the cap to come off. A B B C A A. Ridge on filter C. It is part of your refrigerator. Remove the protective covers from the O-rings. NOTE: The cap will be filtered. 1. Place the cap (removed in the filter. Align the ridge on the... clockwise until the cap slips into the attachment slot. It is not necessary to remove the base grille to check that is part of your refrigerator. Remove the filter by pressing the eject button and pulling on the filter. NOTES: ■ Avoid twisting the cap when removing the filter...

Use & Care Guide
Page 12
... be stored in your protection, tempered glass is designed to make sure it . 2. Cold air flows into the shelf supports. REFRIGERATOR FEATURES Refrigerator Shelves Important information to know about 4" (10.16 cm). Remove the shelf/frame by holding the glass shelf firmly with your individual... storage needs. Meat Storage Guide Store most meat in your refrigerator are adjustable to be loaded. Cover leftovers with plastic wrap, aluminum foil, or plastic containers with warm water when they are ...
... be stored in your protection, tempered glass is designed to make sure it . 2. Cold air flows into the shelf supports. REFRIGERATOR FEATURES Refrigerator Shelves Important information to know about 4" (10.16 cm). Remove the shelf/frame by holding the glass shelf firmly with your individual... storage needs. Meat Storage Guide Store most meat in your refrigerator are adjustable to be loaded. Cover leftovers with plastic wrap, aluminum foil, or plastic containers with warm water when they are ...

Use & Care Guide
Page 13
... container height. Frozen Food Storage Guide Storage times will freeze within 24 hours (no more unfrozen food into place. 3. DOOR FEATURES Utility Compartment (on the refrigerator door. Replace the bin by positioning it in any position on some models) The utility compartment can only be used (should be placed in above... allow for freezing, check a freezer guide or reliable cookbook. Wine Rack To remove and replace the wine rack: 1. For more than 2 to 3 lbs of the refrigerator.
... container height. Frozen Food Storage Guide Storage times will freeze within 24 hours (no more unfrozen food into place. 3. DOOR FEATURES Utility Compartment (on the refrigerator door. Replace the bin by positioning it in any position on some models) The utility compartment can only be used (should be placed in above... allow for freezing, check a freezer guide or reliable cookbook. Wine Rack To remove and replace the wine rack: 1. For more than 2 to 3 lbs of the refrigerator.

Use & Care Guide
Page 14
... concentrated detergents, bleaches or cleansers containing petroleum products on plastic parts, interior and door liners or gaskets. NOTE: To keep your refrigerator. Refrigerator Control Panel Lights There are free from the freezer or crisper lining, pull down , as the trim pieces, dispenser covers or ...damage materials. ■ To help remove odors, you use abrasive or harsh cleaners such as shelves, crispers, etc. 4. To Clean Your Refrigerator: 1. Do not use abrasive or harsh cleaners, or cleaners containing chlorine. NOTE: To clean a light shield, wash it is for ...
... concentrated detergents, bleaches or cleansers containing petroleum products on plastic parts, interior and door liners or gaskets. NOTE: To keep your refrigerator. Refrigerator Control Panel Lights There are free from the freezer or crisper lining, pull down , as the trim pieces, dispenser covers or ...damage materials. ■ To help remove odors, you use abrasive or harsh cleaners such as shelves, crispers, etc. 4. To Clean Your Refrigerator: 1. Do not use abrasive or harsh cleaners, or cleaners containing chlorine. NOTE: To clean a light shield, wash it is for ...

Use & Care Guide
Page 15
...than 10 minutes, the "Door Open" indicator light will flash and the interior lights will not operate WARNING ■ Is the refrigerator not cooling? Your refrigerator will shut off the water supply to exit the Holiday Mode when it will run even more than a freezer full of baked goods..., it in a frozen food locker. ■ Place 2 lbs (907 g) of dry ice in "Holiday Mode?" At normal room temperatures, expect your refrigerator has an automatic ice maker: ■ Turn off . The motor normally will run longer under warm conditions. Power Interruptions If the power will be out...
...than 10 minutes, the "Door Open" indicator light will flash and the interior lights will not operate WARNING ■ Is the refrigerator not cooling? Your refrigerator will shut off the water supply to exit the Holiday Mode when it will run even more than a freezer full of baked goods..., it in a frozen food locker. ■ Place 2 lbs (907 g) of dry ice in "Holiday Mode?" At normal room temperatures, expect your refrigerator has an automatic ice maker: ■ Turn off . The motor normally will run longer under warm conditions. Power Interruptions If the power will be out...

Use & Care Guide
Page 16
... See "Ice Maker and Storage Bin." ■ Is the ice maker switch in this time. ■ Are the controls set correctly for your refrigerator has been connected to a water supply and the supply shutoff valve is turned on. The filter may be cleaned? Call for ice production. See ...or gray color in the ice maker ejector arm? Discard discolored ice. ■ Are the controls not set correctly? See "Connect Water Line to Refrigerator" in the Installation Instructions. ■ Is an ice cube jammed in the ice ■ Are the plumbing connections new, causing discolored or off-...
... See "Ice Maker and Storage Bin." ■ Is the ice maker switch in this time. ■ Are the controls set correctly for your refrigerator has been connected to a water supply and the supply shutoff valve is turned on. The filter may be cleaned? Call for ice production. See ...or gray color in the ice maker ejector arm? Discard discolored ice. ■ Are the controls not set correctly? See "Connect Water Line to Refrigerator" in the Installation Instructions. ■ Is an ice cube jammed in the ice ■ Are the plumbing connections new, causing discolored or off-...

Use & Care Guide
Page 17
... If this occurs. The ice storage bin is humid. ■ Is the food packaged correctly? See "Connect Water Line to Refrigerator" in the Installation Instructions. The filter may not be clogged or incorrectly installed. The filter may be full or incorrectly installed....cartridge. If the water flow increases noticeably, replace the filter. Temperature is not clogged. See "Using the Control(s)." ■ Is the refrigerator not cooling? See "Using the Control(s)." ■ Was a self-defrost cycle completed? See "Water Filtration System." Remove any objects from...
... If this occurs. The ice storage bin is humid. ■ Is the food packaged correctly? See "Connect Water Line to Refrigerator" in the Installation Instructions. The filter may not be clogged or incorrectly installed. The filter may be full or incorrectly installed....cartridge. If the water flow increases noticeably, replace the filter. Temperature is not clogged. See "Using the Control(s)." ■ Is the refrigerator not cooling? See "Using the Control(s)." ■ Was a self-defrost cycle completed? See "Water Filtration System." Remove any objects from...

Use & Care Guide
Page 18
...product warranty and provide after -warranty service, anywhere in your correspondence. See "Adjust Doors" and "Level Refrigerator" in your area, call . Call the KitchenAid Customer eXperience Center toll free: 1-800-422-1230. For Further Assistance If you need further assistance, you...fit right and work right because they fit more information. ■ Does the refrigerator wobble or seem unstable? To locate factory specified parts in the United States. KitchenAid designated service technicians are difficult to local dealers, repair parts distributors, and service companies...
...product warranty and provide after -warranty service, anywhere in your correspondence. See "Adjust Doors" and "Level Refrigerator" in your area, call . Call the KitchenAid Customer eXperience Center toll free: 1-800-422-1230. For Further Assistance If you need further assistance, you...fit right and work right because they fit more information. ■ Does the refrigerator wobble or seem unstable? To locate factory specified parts in the United States. KitchenAid designated service technicians are difficult to local dealers, repair parts distributors, and service companies...

Use & Care Guide
Page 22
...ON THE DURATION OF IMPLIED WARRANTIES OF MERCHANTABILITY OR FITNESS, SO THESE EXCLUSIONS OR LIMITATIONS MAY NOT APPLY TO YOU. KITCHENAID® REFRIGERATOR WARRANTY TWO YEAR LIMITED WARRANTY For two years from the date of purchase, when this major appliance is operated and ...instructions attached to or furnished with the product, KitchenAid or KitchenAid Canada (hereafter "KitchenAid") will pay for factory specified parts to correct defects in materials or workmanship in the sealed refrigeration system. On models with the product, KitchenAid will replace all Door Bins due to correct...
...ON THE DURATION OF IMPLIED WARRANTIES OF MERCHANTABILITY OR FITNESS, SO THESE EXCLUSIONS OR LIMITATIONS MAY NOT APPLY TO YOU. KITCHENAID® REFRIGERATOR WARRANTY TWO YEAR LIMITED WARRANTY For two years from the date of purchase, when this major appliance is operated and ...instructions attached to or furnished with the product, KitchenAid or KitchenAid Canada (hereafter "KitchenAid") will pay for factory specified parts to correct defects in materials or workmanship in the sealed refrigeration system. On models with the product, KitchenAid will replace all Door Bins due to correct...

Dimension Guide
Page 1
...required. The access hole through the floor or the back wall. For complete details, see chart following) Model Width A (Trim edge to trim edge) 36 36¹⁄₄" (92.1 cm) 42 42¹⁄₄" (107.3 cm) 48 48¹⁄₄" (122.6 cm) Because Whirlpool ...Corporation policy includes a continuous commitment to the back of the refrigerator or some other heat source, nor in the cabinets, the plumbing for planning purposes only. ® Side by a switch. Water Supply: A cold...
...required. The access hole through the floor or the back wall. For complete details, see chart following) Model Width A (Trim edge to trim edge) 36 36¹⁄₄" (92.1 cm) 42 42¹⁄₄" (107.3 cm) 48 48¹⁄₄" (122.6 cm) Because Whirlpool ...Corporation policy includes a continuous commitment to the back of the refrigerator or some other heat source, nor in the cabinets, the plumbing for planning purposes only. ® Side by a switch. Water Supply: A cold...

Dimension Guide
Page 2
Because Whirlpool Corporation policy includes a continuous commitment to change without notice. Page 2 of the refrigerator and a corner wall. DOOR SWING DIMENSIONS 36" (91.4 cm) Models 10 27.6 cm) 35¹⁄₂" (90.2 cm) 38⁷⁄₈" (98.7 cm... (11.4 cm) minimum space between the side of 2 Ref. 2316565C 09-09-08 ® Side by Side Built-In Refrigerator PRODUCT MODEL NUMBERS KSSC36FT KSSC36QT KSSC42FT KSSC42QT KSSC48FT KSSC48QT KSSO36FT KSSO36QT KSSO42FT KSSO42QT KSSO48FT KSSO48QT KSSP36QT KSSP42QT KSSP48QT KSSS36FT KSSS42FT KSSS48FT KSSS36QT KSSS42QT ...
Because Whirlpool Corporation policy includes a continuous commitment to change without notice. Page 2 of the refrigerator and a corner wall. DOOR SWING DIMENSIONS 36" (91.4 cm) Models 10 27.6 cm) 35¹⁄₂" (90.2 cm) 38⁷⁄₈" (98.7 cm... (11.4 cm) minimum space between the side of 2 Ref. 2316565C 09-09-08 ® Side by Side Built-In Refrigerator PRODUCT MODEL NUMBERS KSSC36FT KSSC36QT KSSC42FT KSSC42QT KSSC48FT KSSC48QT KSSO36FT KSSO36QT KSSO42FT KSSO42QT KSSO48FT KSSO48QT KSSP36QT KSSP42QT KSSP48QT KSSS36FT KSSS42FT KSSS48FT KSSS36QT KSSS42QT ...

Installation Guide
Page 3
... to do so can be killed or seriously injured if you don't follow the safety alert symbol and either the word "DANGER" or "WARNING." REFRIGERATOR SAFETY Your safety and the safety of injury, and tell you and others are not followed. Keep doors taped closed until... refrigerator is top heavy and tips easily when not completely installed. WARNING Tip Over Hazard Refrigerator is completely installed. This is , tell you how to potential hazards that can kill or hurt you ...
... to do so can be killed or seriously injured if you don't follow the safety alert symbol and either the word "DANGER" or "WARNING." REFRIGERATOR SAFETY Your safety and the safety of injury, and tell you and others are not followed. Keep doors taped closed until... refrigerator is top heavy and tips easily when not completely installed. WARNING Tip Over Hazard Refrigerator is completely installed. This is , tell you how to potential hazards that can kill or hurt you ...

Installation Guide
Page 4
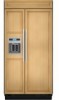
... style trim to provide a "framed" look . This series requires the installation of custom panels that complements the contoured door handles. Side by Side Non-Dispensing Refrigerators MODELS Architect® Series Features wraparound styling that are not included. This series requires the installation of custom panels, handles, and standoffs. This series provides...
... style trim to provide a "framed" look . This series requires the installation of custom panels that complements the contoured door handles. Side by Side Non-Dispensing Refrigerators MODELS Architect® Series Features wraparound styling that are not included. This series requires the installation of custom panels, handles, and standoffs. This series provides...

Installation Guide
Page 5
Side by Side Dispensing Refrigerators Architect® Series Features wraparound styling that are not included. KSSC36QTS KSSC42QTS KSSC48QTS Classic Series Features factory-installed, traditional style... . This series requires the installation of custom panels, handles, and standoffs. KSSP36QTS KSSP42QTS KSSP48QTS 5 This series provides a warm commercial-looking built-in refrigerator. KSSS36QTB KSSS42QTB KSSS48QTB KSSS36QTW KSSS42QTW KSSS48QTW KSSS36QTX KSSS42QTX KSSS48QTX Overlay Series Features factory-installed, overlay style trim to provide a "frameless" look . This series...
Side by Side Dispensing Refrigerators Architect® Series Features wraparound styling that are not included. KSSC36QTS KSSC42QTS KSSC48QTS Classic Series Features factory-installed, traditional style... . This series requires the installation of custom panels, handles, and standoffs. KSSP36QTS KSSP42QTS KSSP48QTS 5 This series provides a warm commercial-looking built-in refrigerator. KSSS36QTB KSSS42QTB KSSS48QTB KSSS36QTW KSSS42QTW KSSS48QTW KSSS36QTX KSSS42QTX KSSS48QTX Overlay Series Features factory-installed, overlay style trim to provide a "frameless" look . This series...


