Use and Care Manual
Page 3
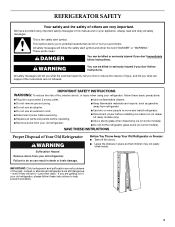
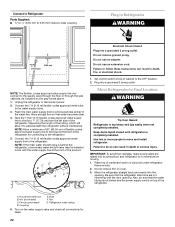
...; Disconnect power before servicing. ■ Replace all safety messages. Always read and obey all parts and panels before operating. ■ Remove doors from your old refrigerator. ■ Keep flammable materials and vapors, such as gasoline, away from your refrigerator, follow these instructions to reduce the chance of injury, and tell you what can...
...; Disconnect power before servicing. ■ Replace all safety messages. Always read and obey all parts and panels before operating. ■ Remove doors from your old refrigerator. ■ Keep flammable materials and vapors, such as gasoline, away from your refrigerator, follow these instructions to reduce the chance of injury, and tell you what can...
Use and Care Manual
Page 9
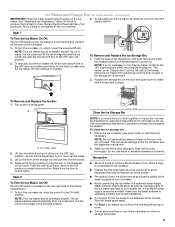
... to the OFF (arm up the front of the ice maker. 1. Accessory) IMPORTANT: Flush the water system before turning on some models - Ice can damage parts of the freezer stops the ice maker from producing ice if the door is open or the storage bin is a wire shutoff arm located on...
... to the OFF (arm up the front of the ice maker. 1. Accessory) IMPORTANT: Flush the water system before turning on some models - Ice can damage parts of the freezer stops the ice maker from producing ice if the door is open or the storage bin is a wire shutoff arm located on...
Use and Care Manual
Page 10
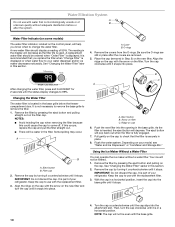
... With the cap in the display will not be water in the base grille. NOTE: The cap will decrease as the filter life is part of your refrigerator. A. It is used. As the filter is not necessary to remove the base grille to use with water that the filter is in Step... is securely in this occurs, replace the cap and pull the filter straight out. ■ There will pop back out when the filter is part of your refrigerator. The eject button will be even with the replacement filter. 3. Keep the cap to your model, see "Water and Ice Dispensers" or "Ice Maker...
... With the cap in the display will not be water in the base grille. NOTE: The cap will decrease as the filter life is part of your refrigerator. A. It is used. As the filter is not necessary to remove the base grille to use with water that the filter is in Step... is securely in this occurs, replace the cap and pull the filter straight out. ■ There will pop back out when the filter is part of your refrigerator. The eject button will be even with the replacement filter. 3. Keep the cap to your model, see "Water and Ice Dispensers" or "Ice Maker...
Use and Care Manual
Page 13
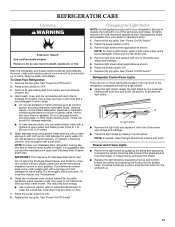
... 5. Light shield ■ Remove the light bulb and replace it is for Stainless Steel parts only! Both the refrigerator and freezer sections defrost automatically. Hand wash, rinse, and dry removable parts and interior surfaces thoroughly. These can scratch or damage materials. ■ To help save energy...Replace the top grille. Changing the Light Bulbs NOTE: Not all removable parts from your dealer or appliance store. 1. Rinse and dry the shield well. 4. Press the power switch ON. 7. Refrigerator Control Panel Lights There are in death, explosion, or fire. Remove ...
... 5. Light shield ■ Remove the light bulb and replace it is for Stainless Steel parts only! Both the refrigerator and freezer sections defrost automatically. Hand wash, rinse, and dry removable parts and interior surfaces thoroughly. These can scratch or damage materials. ■ To help save energy...Replace the top grille. Changing the Light Bulbs NOTE: Not all removable parts from your dealer or appliance store. 1. Rinse and dry the shield well. 4. Press the power switch ON. 7. Refrigerator Control Panel Lights There are in death, explosion, or fire. Remove ...

Use and Care Manual
Page 16
...maker installation for the water supply to cool completely. ■ Recently dispensed large amount of water. ■ Refrigerator connected to local dealers, repair parts distributors, and service companies. Our consultants provide assistance with the same precision used to begin dispensing again. ■...? Water is leaking from the dispenser is normal. ■ Glass not being held in too long. Flush the water system. KitchenAid designated service technicians are made with : ■ Features and specifications on ? The filter may not be clogged or incorrectly installed....
...maker installation for the water supply to cool completely. ■ Recently dispensed large amount of water. ■ Refrigerator connected to local dealers, repair parts distributors, and service companies. Our consultants provide assistance with the same precision used to begin dispensing again. ■...? Water is leaking from the dispenser is normal. ■ Glass not being held in too long. Flush the water system. KitchenAid designated service technicians are made with : ■ Features and specifications on ? The filter may not be clogged or incorrectly installed....

Use and Care Manual
Page 17
.... Stainless Steel Cleaner and Polish Order Part #4396920 Replacement Water Filter: Order Part #4396841 (T2RFWG2) In Canada, Order Part #4396841B (T2RFWG2) WATER FILTER CERTIFICATIONS 17 KitchenAid Canada designated service technicians are trained to local dealers, repair parts distributors, and service companies. In Canada... If you need further assistance, you can write to KitchenAid with : ■ Features and specifications on our full line of appliances. ■ Use and maintenance procedures. ■ Accessory and repair parts sales. ■ Referrals to fulfill the product warranty...
.... Stainless Steel Cleaner and Polish Order Part #4396920 Replacement Water Filter: Order Part #4396841 (T2RFWG2) In Canada, Order Part #4396841B (T2RFWG2) WATER FILTER CERTIFICATIONS 17 KitchenAid Canada designated service technicians are trained to local dealers, repair parts distributors, and service companies. In Canada... If you need further assistance, you can write to KitchenAid with : ■ Features and specifications on our full line of appliances. ■ Use and maintenance procedures. ■ Accessory and repair parts sales. ■ Referrals to fulfill the product warranty...
Use and Care Manual
Page 18
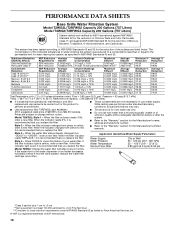
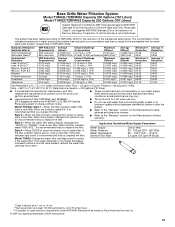
... concentration of the indicated substances in water entering the system was performed under standard laboratory conditions, actual performance may vary. ■ Use replacement filter T2RFWG2, part #4396841. 2010 suggested retail price of $39.99 U.S.A./$54.95 Canada. When the indicator reads 0%, it is recommended that operational, maintenance, and filter replacement requirements...
... concentration of the indicated substances in water entering the system was performed under standard laboratory conditions, actual performance may vary. ■ Use replacement filter T2RFWG2, part #4396841. 2010 suggested retail price of $39.99 U.S.A./$54.95 Canada. When the indicator reads 0%, it is recommended that operational, maintenance, and filter replacement requirements...
Use and Care Manual
Page 19
... concentration of the indicated substances in water entering the system was performed under standard laboratory conditions, actual performance may vary. ■ Use replacement filter T2RFWG2, part #4396841. 2010 suggested retail price of Chlorine Taste and Odor, Particulate Class II*; If the filter indicator light is red, it is recommended that you...
... concentration of the indicated substances in water entering the system was performed under standard laboratory conditions, actual performance may vary. ■ Use replacement filter T2RFWG2, part #4396841. 2010 suggested retail price of Chlorine Taste and Odor, Particulate Class II*; If the filter indicator light is red, it is recommended that you...
Use and Care Manual
Page 20
... major appliance is operated and maintained according to instructions attached to or furnished with the product, KitchenAid will pay for factory specified parts and repair labor for future reference. Service calls to refrigerator or freezer product failures. 7. Consumable parts are unable to resolve the problem after checking "Troubleshooting," additional help you obtain assistance or...
... major appliance is operated and maintained according to instructions attached to or furnished with the product, KitchenAid will pay for factory specified parts and repair labor for future reference. Service calls to refrigerator or freezer product failures. 7. Consumable parts are unable to resolve the problem after checking "Troubleshooting," additional help you obtain assistance or...

Installation Guide
Page 6
...be within 1" (2.5 cm) maximum above the floor. WARNING Explosion Hazard Keep flammable materials and vapors, such as gasoline, away from refrigerator. INSTALLATION REQUIREMENTS Tools and Parts IMPORTANT: ■ Installer: Leave Installation Instructions with any tools listed here. ■ Cordless drill ■ Torx®†T27...use , the solid soffit must be recessed in order for more than 1" (2.5 cm) or one is not available, then the refrigerator must be maintained above the top grille in an opening between cabinets or installed at the end of Saturn Fasteners, Inc. 6 ...
...be within 1" (2.5 cm) maximum above the floor. WARNING Explosion Hazard Keep flammable materials and vapors, such as gasoline, away from refrigerator. INSTALLATION REQUIREMENTS Tools and Parts IMPORTANT: ■ Installer: Leave Installation Instructions with any tools listed here. ■ Cordless drill ■ Torx®†T27...use , the solid soffit must be recessed in order for more than 1" (2.5 cm) or one is not available, then the refrigerator must be maintained above the top grille in an opening between cabinets or installed at the end of Saturn Fasteners, Inc. 6 ...

Installation Guide
Page 15
... installed on side-by -side and bottomfreezer refrigerators that require overlay panels. Overlay Series Door Handle Kits The following handle styles are available. Round end arc handle (4396779) with stainless steel clamshell standoffs (4396775) C. Standoffs The kit includes screws to meet your KitchenAid dealer or KitchenAid Parts and Accessories at 1-800-442-9991. Factory...
... installed on side-by -side and bottomfreezer refrigerators that require overlay panels. Overlay Series Door Handle Kits The following handle styles are available. Round end arc handle (4396779) with stainless steel clamshell standoffs (4396775) C. Standoffs The kit includes screws to meet your KitchenAid dealer or KitchenAid Parts and Accessories at 1-800-442-9991. Factory...

Installation Guide
Page 19
... the back wall. Measure the distance from point A (as shown) to support and stabilize the full weight of the refrigerator and the parts bag behind the grille. NOTE: Do not remove tape and door bracing until refrigerator is completely installed. Add 0.8 mm) to this measurement to allow the side panel to "Move the...
... the back wall. Measure the distance from point A (as shown) to support and stabilize the full weight of the refrigerator and the parts bag behind the grille. NOTE: Do not remove tape and door bracing until refrigerator is completely installed. Add 0.8 mm) to this measurement to allow the side panel to "Move the...

Installation Guide
Page 21
...screws must overlap the compressor cover. The board(s) must be screwed into the outlet end squarely as far as recommended. Connect to wall studs behind refrigerator. Unplug refrigerator or disconnect power supply. A B C A. Check for leaks. IMPORTANT: ■ Make sure it will work, but drill on before you...to studs with the pipe clamp. Securely attach one or two 2" x 4" x 32" (5 cm x 10 cm x 81 cm) boards to Water Line Parts Needed: ■ Minimum 7 ft (2.13 m) flexible, codes approved water supply line Style 1 - Attach to the water shutoff valve by threading the provided ...
...screws must overlap the compressor cover. The board(s) must be screwed into the outlet end squarely as far as recommended. Connect to wall studs behind refrigerator. Unplug refrigerator or disconnect power supply. A B C A. Check for leaks. IMPORTANT: ■ Make sure it will work, but drill on before you...to studs with the pipe clamp. Securely attach one or two 2" x 4" x 32" (5 cm x 10 cm x 81 cm) boards to Water Line Parts Needed: ■ Minimum 7 ft (2.13 m) flexible, codes approved water supply line Style 1 - Attach to the water shutoff valve by threading the provided ...
Installation Guide
Page 22
...) D. Plug into a grounded 3 prong outlet. Place top of the product. Connect the 7 ft (2.13 m) flexible codes approved water tube to the refrigerator. Unplug the refrigerator or disconnect power. 2. Connect to Refrigerator Parts Supplied to ¹⁄₄" (6.35 mm to 6.35 mm) male-to-male coupling Plug in... Refrigerator WARNING 7" (17.78 cm) 1" (2.54 cm) NOTE: The flexible, codes approved water supply line can connect to do so ...
...) D. Plug into a grounded 3 prong outlet. Place top of the product. Connect the 7 ft (2.13 m) flexible codes approved water tube to the refrigerator. Unplug the refrigerator or disconnect power. 2. Connect to Refrigerator Parts Supplied to ¹⁄₄" (6.35 mm to 6.35 mm) male-to-male coupling Plug in... Refrigerator WARNING 7" (17.78 cm) 1" (2.54 cm) NOTE: The flexible, codes approved water supply line can connect to do so ...

Installation Guide
Page 27
...lever for 5 seconds, then release it for easy reference. Style 2 - Systems certified for use, before use with water that all boxes, parts packages and packing materials from the interior of ice. ■ Allow 3 days to flow. Style 1 - Open the freezer door and turn... out of ice. Follow the directions specific to increase the production of the dispenser. 3. Dispenser Models IMPORTANT: After connecting the refrigerator to a water source or replacing the water filter, follow the steps below to increase the production of unknown quality without adequate disinfection...
...lever for 5 seconds, then release it for easy reference. Style 2 - Systems certified for use, before use with water that all boxes, parts packages and packing materials from the interior of ice. ■ Allow 3 days to flow. Style 1 - Open the freezer door and turn... out of ice. Follow the directions specific to increase the production of the dispenser. 3. Dispenser Models IMPORTANT: After connecting the refrigerator to a water source or replacing the water filter, follow the steps below to increase the production of unknown quality without adequate disinfection...

Parts Diagram
Page 1
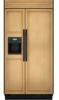
W10231842 Rev. A CABINET PARTS For Models: KSSO36QTB03, KSSO36QTX03 (Black) (Etched Aluminum) 36" BUILT IN REFRIGERATOR 09−08 Litho In U.S.A. (mjb) (psw) 1 Part No.
W10231842 Rev. A CABINET PARTS For Models: KSSO36QTB03, KSSO36QTX03 (Black) (Etched Aluminum) 36" BUILT IN REFRIGERATOR 09−08 Litho In U.S.A. (mjb) (psw) 1 Part No.

Parts Diagram
Page 2
...2005921 Screw 34 Bracket, Support Base (Front) 2006616 Left 2006556 Right 35 1157158 Screw 36 2006617 Bracket, Support Base (Rear) (2) 37 2006346 Washer 38 2266880 Bushing, Extension ...Tube 2209709 5/16−1/4" 2300868 1/4" 41 8281163 Screw 42 Switch, Rocker Arm 1118894 Refrigerator Door Side 1115373 Freezer Door Side 43 2215938 Cover, Switch (2) 44 487415 Screw ...(2) 45 Bracket, Switch 2221097 Right 2221096 Left 46 2215612 Cover, Rear 2 W10231842 Part No. CABINET PARTS For Models: KSSO36QTB03, KSSO36QTX03 (Black) (Etched Aluminum) Illus. DESCRIPTION 13 4396841 ...
...2005921 Screw 34 Bracket, Support Base (Front) 2006616 Left 2006556 Right 35 1157158 Screw 36 2006617 Bracket, Support Base (Rear) (2) 37 2006346 Washer 38 2266880 Bushing, Extension ...Tube 2209709 5/16−1/4" 2300868 1/4" 41 8281163 Screw 42 Switch, Rocker Arm 1118894 Refrigerator Door Side 1115373 Freezer Door Side 43 2215938 Cover, Switch (2) 44 487415 Screw ...(2) 45 Bracket, Switch 2221097 Right 2221096 Left 46 2215612 Cover, Rear 2 W10231842 Part No. CABINET PARTS For Models: KSSO36QTB03, KSSO36QTX03 (Black) (Etched Aluminum) Illus. DESCRIPTION 13 4396841 ...

Parts Diagram
Page 6
DESCRIPTION 1 Liner (Not A Serviceable Part) 2 2306010 Thermistor 3 2208970 Air Duct 4 2259077 Ladder, Shelf (2) 5 520965 Screw Support, Ladder (8) 6 2006475 Screw 7 487539 Screw 8 2302937 Thermistor 9 2302986 Lid, Meat Pan Baffle 10 W10169528 ... 22 2302992 Spacer, Air− Baffle 23 2309087 Cover, Diffuser 24 2259412 Seal, Air Duct (Round Hole) 25 2259398 Seal, Air Duct (Square Hole) 6 W10231842 REFRIGERATOR LINER PARTS For Models: KSSO36QTB03, KSSO36QTX03 (Black) (Etched Aluminum) Illus...
DESCRIPTION 1 Liner (Not A Serviceable Part) 2 2306010 Thermistor 3 2208970 Air Duct 4 2259077 Ladder, Shelf (2) 5 520965 Screw Support, Ladder (8) 6 2006475 Screw 7 487539 Screw 8 2302937 Thermistor 9 2302986 Lid, Meat Pan Baffle 10 W10169528 ... 22 2302992 Spacer, Air− Baffle 23 2309087 Cover, Diffuser 24 2259412 Seal, Air Duct (Round Hole) 25 2259398 Seal, Air Duct (Square Hole) 6 W10231842 REFRIGERATOR LINER PARTS For Models: KSSO36QTB03, KSSO36QTX03 (Black) (Etched Aluminum) Illus...

Parts Diagram
Page 7
CONTROL PANEL PARTS For Models: KSSO36QTB03, KSSO36QTX03 (Black) (Etched Aluminum) W10231842 Illus. No. Part No. DESCRIPTION 1 2316544 Control Box Assy 2 2317000 Clip, Box 3 2310390 Wire, Jumper 4 2324971 Bracket, Control Box 5 2307594 Shield, Control Box 6 487539 Screw (2) 7 2306086 Display, Ingredient Care Center 8 2223857 Socket, Light 9 2326255 Light Bulb (2) 10 8281185 Screw 7
CONTROL PANEL PARTS For Models: KSSO36QTB03, KSSO36QTX03 (Black) (Etched Aluminum) W10231842 Illus. No. Part No. DESCRIPTION 1 2316544 Control Box Assy 2 2317000 Clip, Box 3 2310390 Wire, Jumper 4 2324971 Bracket, Control Box 5 2307594 Shield, Control Box 6 487539 Screw (2) 7 2306086 Display, Ingredient Care Center 8 2223857 Socket, Light 9 2326255 Light Bulb (2) 10 8281185 Screw 7

Parts Diagram
Page 8
DESCRIPTION 1 Top Grille Assy 2313977B Black 2313977S Stainless Steel 2 W10161693 Cover, Unit 3 486194 Screw 4 2256466 Back Panel 5 W10185625 Cover, Unit Front 6 487415 Screw 7 W10167456 Wire Assembly RC/FC Light Switch 8 489348 Clamp 9 2003347 Tee Bolt (4) 10 1161548 Nut (4) 11 2215910 Grommet, Flexible 8 W10231842 No. TOP GRILLE AND UNIT COVER PARTS For Models: KSSO36QTB03, KSSO36QTX03 (Black) (Etched Aluminum) Illus. Part No.
DESCRIPTION 1 Top Grille Assy 2313977B Black 2313977S Stainless Steel 2 W10161693 Cover, Unit 3 486194 Screw 4 2256466 Back Panel 5 W10185625 Cover, Unit Front 6 487415 Screw 7 W10167456 Wire Assembly RC/FC Light Switch 8 489348 Clamp 9 2003347 Tee Bolt (4) 10 1161548 Nut (4) 11 2215910 Grommet, Flexible 8 W10231842 No. TOP GRILLE AND UNIT COVER PARTS For Models: KSSO36QTB03, KSSO36QTX03 (Black) (Etched Aluminum) Illus. Part No.


