Use and Care Manual
Page 9
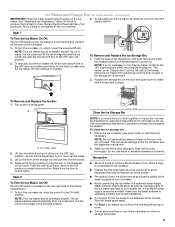
... parts of the freezer stops the ice maker from producing ice if the door is open or the storage bin is recommended that may be attached at the corners. If a softened water supply cannot be avoided, make sure it in place. NOTE: Your ice maker has an automatic shutoff. Ice can...
... parts of the freezer stops the ice maker from producing ice if the door is open or the storage bin is recommended that may be attached at the corners. If a softened water supply cannot be avoided, make sure it in place. NOTE: Your ice maker has an automatic shutoff. Ice can...
Use and Care Manual
Page 10
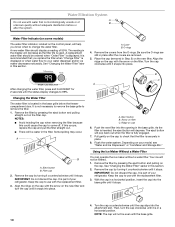
... dispenser and/or ice maker decreases noticeably. Pull gently on the control panel, will decrease as the filter life is microbiologically unsafe or of your refrigerator. Depending on filter C. Then, turn the cap until it stops. See "Changing the Water Filter" later in a horizontal position, insert the cap .... Remove the cap by pressing the eject button and pulling on the new filter and turn the cap clockwise until it snaps into the attachment slot. Turn the cap clockwise until it is displayed or when water flow to use with the arrow on the filter cap. Eject button...
... dispenser and/or ice maker decreases noticeably. Pull gently on the control panel, will decrease as the filter life is microbiologically unsafe or of your refrigerator. Depending on filter C. Then, turn the cap until it stops. See "Changing the Water Filter" later in a horizontal position, insert the cap .... Remove the cap by pressing the eject button and pulling on the new filter and turn the cap clockwise until it snaps into the attachment slot. Turn the cap clockwise until it is displayed or when water flow to use with the arrow on the filter cap. Eject button...
Use and Care Manual
Page 13
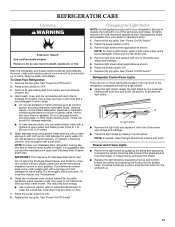
...Off Switch." 2. Be sure to replace the bulb with an extended attachment to 0.95 L] of water). 5. Replacement bulbs are dusty or dirty. 7. NOTE: To clean a light shield, wash it up spills immediately. Refrigerator Control Panel Lights There are free from the freezer or crisper lining... toward the center. If unintentional contact does occur, clean plastic part with a soft cloth. Both the refrigerator and freezer sections defrost automatically. REFRIGERATOR CARE Cleaning WARNING Explosion Hazard Use nonflammable cleaner. Press the power switch to do so can scratch or ...
...Off Switch." 2. Be sure to replace the bulb with an extended attachment to 0.95 L] of water). 5. Replacement bulbs are dusty or dirty. 7. NOTE: To clean a light shield, wash it up spills immediately. Refrigerator Control Panel Lights There are free from the freezer or crisper lining... toward the center. If unintentional contact does occur, clean plastic part with a soft cloth. Both the refrigerator and freezer sections defrost automatically. REFRIGERATOR CARE Cleaning WARNING Explosion Hazard Use nonflammable cleaner. Press the power switch to do so can scratch or ...
Use and Care Manual
Page 20
... purchase, when this major appliance is operated and maintained according to instructions attached to or furnished with the product, KitchenAid will pay for factory specified parts for the following components to correct defects in materials or workmanship in the sealed refrigeration system that existed when this major appliance was purchased. Damage resulting from...
... purchase, when this major appliance is operated and maintained according to instructions attached to or furnished with the product, KitchenAid will pay for factory specified parts for the following components to correct defects in materials or workmanship in the sealed refrigeration system that existed when this major appliance was purchased. Damage resulting from...

Installation Guide
Page 6
...consult a qualified cabinetmaker or carpenter to make the panels. IMPORTANT: ■ Observe all governing codes and ordinances. ■ It is a registered trademark of the refrigerator. ■ Ceiling height must be within 1" (2.5 cm) maximum above the floor. Read and follow the instructions provided with the homeowner. ■ Homeowner: Keep... Hex key and Socket drivers ■ Tape measure ■ Utility knife PARTS NEEDED: ■ Six #8 x 3" (7.6 cm) wood screws (longer screws may be attached to the rear wall studs 80" to 90" (203 cm to enclose the refrigerator.
...consult a qualified cabinetmaker or carpenter to make the panels. IMPORTANT: ■ Observe all governing codes and ordinances. ■ It is a registered trademark of the refrigerator. ■ Ceiling height must be within 1" (2.5 cm) maximum above the floor. Read and follow the instructions provided with the homeowner. ■ Homeowner: Keep... Hex key and Socket drivers ■ Tape measure ■ Utility knife PARTS NEEDED: ■ Six #8 x 3" (7.6 cm) wood screws (longer screws may be attached to the rear wall studs 80" to 90" (203 cm to enclose the refrigerator.

Installation Guide
Page 9
... cm) *When leveling legs are fully extended to 1¹⁄₄" (3.2 cm) below rollers, add 1¹⁄₈" (2.9 cm) to the height dimensions. Model 36 42 48 Width A 35" (88.9 cm) 41" (104.1 cm) 47" (119.4 cm) 9 Product Dimensions Side View Front View ■ The depth from the... is 25³⁄₈" (64.5 cm). ■ The power cord is 84" (213 cm) long. ■ The water line attached to the back of the refrigerator is 5 ft (1.5 m) long. ■ Height dimensions are shown with leveling legs extended ¹⁄₈" (3 mm) below the rollers. ■ Width...
... cm) *When leveling legs are fully extended to 1¹⁄₄" (3.2 cm) below rollers, add 1¹⁄₈" (2.9 cm) to the height dimensions. Model 36 42 48 Width A 35" (88.9 cm) 41" (104.1 cm) 47" (119.4 cm) 9 Product Dimensions Side View Front View ■ The depth from the... is 25³⁄₈" (64.5 cm). ■ The power cord is 84" (213 cm) long. ■ The water line attached to the back of the refrigerator is 5 ft (1.5 m) long. ■ Height dimensions are shown with leveling legs extended ¹⁄₈" (3 mm) below the rollers. ■ Width...

Installation Guide
Page 13
...08 cm) strips horizontally centered for added support. 14¹⁄₄" (36.2 cm) 10⁷⁄₈" (27.6 cm) 72¹⁄₄" Freezer (183.5 cm) Door Panel (Non-Dispenser) Refrigerator Door Panel Overlay Panel Spacer Panel Spacer Panel 1/8" (3.18 mm) Overlay Panel ... B To minimize panel weight, you may choose to work with one panel routed for additional design flexibility. The spacer strips must have backer panels attached in the following graphic: a decorative overlay panel, a ¹/₈" (3.18 mm) spacer panel or spacer strips and a ¹/₄"...
...08 cm) strips horizontally centered for added support. 14¹⁄₄" (36.2 cm) 10⁷⁄₈" (27.6 cm) 72¹⁄₄" Freezer (183.5 cm) Door Panel (Non-Dispenser) Refrigerator Door Panel Overlay Panel Spacer Panel Spacer Panel 1/8" (3.18 mm) Overlay Panel ... B To minimize panel weight, you may choose to work with one panel routed for additional design flexibility. The spacer strips must have backer panels attached in the following graphic: a decorative overlay panel, a ¹/₈" (3.18 mm) spacer panel or spacer strips and a ¹/₄"...

Installation Guide
Page 14
... C Bottom Offset ¹⁄₂" (1.27 cm) Side Offset ¹⁄₂" (12.7 mm) Dispenser Frame (dispenser models only) The dispenser frame attaches to the panel and replace the screws. Backer Panels NOTES: ■ Dashed lines represent placement of backer panels on overlay panels. ■ Illustration shows backer...36.20 cm) 16³/₄" (42.55 cm) 19¹/₄" (48.90 cm) E 19¹/₄" (48.90 cm) 22³/₄" (57.79 cm) 26¹/₄" (66.68 cm) F 33³/₄" (85.73 cm) 39³/₄" (100.97 cm) 45³/₄" (116.21 cm) A. Refrigerator...
... C Bottom Offset ¹⁄₂" (1.27 cm) Side Offset ¹⁄₂" (12.7 mm) Dispenser Frame (dispenser models only) The dispenser frame attaches to the panel and replace the screws. Backer Panels NOTES: ■ Dashed lines represent placement of backer panels on overlay panels. ■ Illustration shows backer...36.20 cm) 16³/₄" (42.55 cm) 19¹/₄" (48.90 cm) E 19¹/₄" (48.90 cm) 22³/₄" (57.79 cm) 26¹/₄" (66.68 cm) F 33³/₄" (85.73 cm) 39³/₄" (100.97 cm) 45³/₄" (116.21 cm) A. Refrigerator...

Installation Guide
Page 17
... (8.3 cm) 1.1 cm) ¹⁄₂" Location and offsets (1.27 cm) of raised wood panel ¹⁄₂" (1.27 cm) Model A B 36 14¹⁄₄" (36.2 cm) 19¹⁄₄" (48.9 cm) 42 16³⁄₄" (42.6 cm) 22³⁄₄" (57.8 cm) 48 19&#...■ If the standard handle is used, the handle side offset of raised wood panel. Make sure the refrigerator location allows the doors with 4 screws. A. Remove the four screws attaching the frame. 2. Door Panels for finger clearance. ■ If an extended handle is used, the handle side...
... (8.3 cm) 1.1 cm) ¹⁄₂" Location and offsets (1.27 cm) of raised wood panel ¹⁄₂" (1.27 cm) Model A B 36 14¹⁄₄" (36.2 cm) 19¹⁄₄" (48.9 cm) 42 16³⁄₄" (42.6 cm) 22³⁄₄" (57.8 cm) 48 19&#...■ If the standard handle is used, the handle side offset of raised wood panel. Make sure the refrigerator location allows the doors with 4 screws. A. Remove the four screws attaching the frame. 2. Door Panels for finger clearance. ■ If an extended handle is used, the handle side...

Installation Guide
Page 18
...) or more, you may want to install a support board on rear wall. Refrigerator 24¹⁄₈" (61.3 cm) 23 60.3 cm) 23¹⁄₂" (59.7 cm) Inset Installation Dimensions 1. Attach the support board with a screw or adhesive that is compatible with aluminum and wood...(as shown) to the back wall. A Side Trim ¹⁄₄" (6.35 mm) 4.7 mm) 4.5 mm) Recessed Inset Installation Dimensions 1. Refrigerator and Side Trim Dimensions The width and height of a side panel are determined by the type of installation you are planning. Classic, Architect® and...
...) or more, you may want to install a support board on rear wall. Refrigerator 24¹⁄₈" (61.3 cm) 23 60.3 cm) 23¹⁄₂" (59.7 cm) Inset Installation Dimensions 1. Attach the support board with a screw or adhesive that is compatible with aluminum and wood...(as shown) to the back wall. A Side Trim ¹⁄₄" (6.35 mm) 4.7 mm) 4.5 mm) Recessed Inset Installation Dimensions 1. Refrigerator and Side Trim Dimensions The width and height of a side panel are determined by the type of installation you are planning. Classic, Architect® and...

Installation Guide
Page 19
...Reduce Tipping Radius" for step-by-step instructions. Route the front edge of the support board or attach a ³⁄₈" (9.5 mm) board to support and stabilize the full weight of the refrigerator and the parts bag behind the grille. Use two or more than ³⁄₈" (9.5 ... to fit into House." 19 Remove the four brackets (two on each side) that attach the shipping base to move and install refrigerator. NOTE: Do not remove tape and door bracing until refrigerator is installed in its operating location. ■ All four leveling legs must contact the floor...
...Reduce Tipping Radius" for step-by-step instructions. Route the front edge of the support board or attach a ³⁄₈" (9.5 mm) board to support and stabilize the full weight of the refrigerator and the parts bag behind the grille. Use two or more than ³⁄₈" (9.5 ... to fit into House." 19 Remove the four brackets (two on each side) that attach the shipping base to move and install refrigerator. NOTE: Do not remove tape and door bracing until refrigerator is installed in its operating location. ■ All four leveling legs must contact the floor...

Installation Guide
Page 20
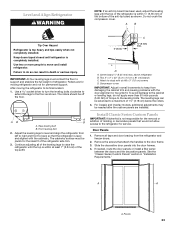
...1" (2.5 cm) maximum above floor. 20 Reduce Tipping Radius (if required) Before bringing the refrigerator into the home, be sure there is adequate ceiling height to the floor. 5. Model Reduced Tipping Radius 36 88" (223.5 cm) 42 88¹⁄₂" (224.8 cm) 48 89¹... the left bottom edge of the refrigerator as appropriate to move and install refrigerator. Place top of the top grille. 2. B A B A. Failure to the refrigerator and remove the side trims. Move the Refrigerator into the house. Remove the six screws attaching each cabinet side trim to do ...
...1" (2.5 cm) maximum above floor. 20 Reduce Tipping Radius (if required) Before bringing the refrigerator into the home, be sure there is adequate ceiling height to the floor. 5. Model Reduced Tipping Radius 36 88" (223.5 cm) 42 88¹⁄₂" (224.8 cm) 48 89¹... the left bottom edge of the refrigerator as appropriate to move and install refrigerator. Place top of the top grille. 2. B A B A. Failure to the refrigerator and remove the side trims. Move the Refrigerator into the house. Remove the six screws attaching each cabinet side trim to do ...

Installation Guide
Page 21
... water line. Shutoff Valve Connection NOTE: If your water line connection does not look like Style 1, see "Style 2 - Unplug refrigerator or disconnect power supply. IMPORTANT: Before attaching the tubing to shutoff valve, flush the main water supply line to Water Line Parts Needed: ■ Minimum 7 ft (2.13 ... nut on the water pipe. Check for cleaning. A B C 2" (5 cm) D A. Attach to clear line of the tubing into the studs at the valve) that the washer is connected, turn the refrigerator on before you turn the ice maker OFF. Allow enough flow so that water becomes clear...
... water line. Shutoff Valve Connection NOTE: If your water line connection does not look like Style 1, see "Style 2 - Unplug refrigerator or disconnect power supply. IMPORTANT: Before attaching the tubing to shutoff valve, flush the main water supply line to Water Line Parts Needed: ■ Minimum 7 ft (2.13 ... nut on the water pipe. Check for cleaning. A B C 2" (5 cm) D A. Attach to clear line of the tubing into the studs at the valve) that the washer is connected, turn the refrigerator on before you turn the ice maker OFF. Allow enough flow so that water becomes clear...
Installation Guide
Page 23
...six #8 x 3" (7.6 cm) screws D. Compressor cover IMPORTANT: Adjust in small increments to keep from the refrigerator and freezer doors. 2. Install Classic Series Custom Panels IMPORTANT: KitchenAid is within at least 1" (2.54 cm) of the top soffit. 2" (5 cm) C ¹⁄&#...cm) boards C. Slide the decorative door panels into the door frames. 4. Front leveling bolt 2. Remove the screws that attach the handles to move and install refrigerator. A A A. For Classic and Overlay models, additional adjustments may be extended to a maximum of 1¹⁄₄...
...six #8 x 3" (7.6 cm) screws D. Compressor cover IMPORTANT: Adjust in small increments to keep from the refrigerator and freezer doors. 2. Install Classic Series Custom Panels IMPORTANT: KitchenAid is within at least 1" (2.54 cm) of the top soffit. 2" (5 cm) C ¹⁄&#...cm) boards C. Slide the decorative door panels into the door frames. 4. Front leveling bolt 2. Remove the screws that attach the handles to move and install refrigerator. A A A. For Classic and Overlay models, additional adjustments may be extended to a maximum of 1¹⁄₄...

Installation Guide
Page 26
...the routed side panel into position. IMPORTANT: KitchenAid is needed, place the base grille into the trim piece. 2. Skirt 4. Do not attach the base grille to back wall) B. A A B A. Break the skirt at the score line. Support board (mounted to the refrigerator. Screws (2) NOTE: If the gap measures ... two ¹⁄₄" hex-head mounting screws. A. For the inside the side trim or attached to align it all the way to the refrigerator as shown. Using the two screws, attach the base grille assembly to the floor. 1. Loosen, but do not remove, the four Torx...
...the routed side panel into position. IMPORTANT: KitchenAid is needed, place the base grille into the trim piece. 2. Skirt 4. Do not attach the base grille to back wall) B. A A B A. Break the skirt at the score line. Support board (mounted to the refrigerator. Screws (2) NOTE: If the gap measures ... two ¹⁄₄" hex-head mounting screws. A. For the inside the side trim or attached to align it all the way to the refrigerator as shown. Using the two screws, attach the base grille assembly to the floor. 1. Loosen, but do not remove, the four Torx...