Use and Care Manual
Page 3
... You can be killed or seriously injured if you are not followed. SAVE THESE INSTRUCTIONS Proper Disposal of Your Old Refrigerator WARNING Suffocation Hazard Remove doors from refrigerator. ■ Use two or more people to do so can happen if the instructions are getting rid of the ...dispensing ice (on your appliance. This symbol alerts you to reduce the chance of fire, electric shock, or injury when using your old refrigerator. IMPORTANT SAFETY INSTRUCTIONS WARNING: To reduce the risk of injury, and tell you how to potential hazards that children may not easily climb inside...
... You can be killed or seriously injured if you are not followed. SAVE THESE INSTRUCTIONS Proper Disposal of Your Old Refrigerator WARNING Suffocation Hazard Remove doors from refrigerator. ■ Use two or more people to do so can happen if the instructions are getting rid of the ...dispensing ice (on your appliance. This symbol alerts you to reduce the chance of fire, electric shock, or injury when using your old refrigerator. IMPORTANT SAFETY INSTRUCTIONS WARNING: To reduce the risk of injury, and tell you how to potential hazards that children may not easily climb inside...

Use and Care Manual
Page 4
... to know about glass shelves and covers: Do not clean glass shelves or covers with warm water when they are heavy. REFRIGERATOR USE WARNING Electrical Shock Hazard Plug into place. Do not use sharp instruments, rubbing alcohol, flammable fluids, or abrasive cleaners ... A B A. Pull grille down slightly to follow these instructions can damage the surface of your fingers. Remove top grille. 2. Wipe with your refrigerator. See the cleaning instructions in death, explosion, or fire. Use special care when removing them to shatter into many small, pebble-size pieces. ...
... to know about glass shelves and covers: Do not clean glass shelves or covers with warm water when they are heavy. REFRIGERATOR USE WARNING Electrical Shock Hazard Plug into place. Do not use sharp instruments, rubbing alcohol, flammable fluids, or abrasive cleaners ... A B A. Pull grille down slightly to follow these instructions can damage the surface of your fingers. Remove top grille. 2. Wipe with your refrigerator. See the cleaning instructions in death, explosion, or fire. Use special care when removing them to shatter into many small, pebble-size pieces. ...

Use and Care Manual
Page 5
..., see "Connect to Water Line" in the horizontal position. For Style 1, lower the wire shutoff arm. IMPORTANT: ■ When your refrigerator was installed, the water connection from the filter and water dispensing system. Once water begins to flow, continue depressing and releasing the dispenser lever...before using the water system. IMPORTANT: Be sure the power switch is set to the On position after heavy usage. ■ If your refrigerator has a water filter, it for 5 seconds. A Water System Preparation Please read before or after installation, follow the steps below to ...
..., see "Connect to Water Line" in the horizontal position. For Style 1, lower the wire shutoff arm. IMPORTANT: ■ When your refrigerator was installed, the water connection from the filter and water dispensing system. Once water begins to flow, continue depressing and releasing the dispenser lever...before using the water system. IMPORTANT: Be sure the power switch is set to the On position after heavy usage. ■ If your refrigerator has a water filter, it for 5 seconds. A Water System Preparation Please read before or after installation, follow the steps below to ...

Use and Care Manual
Page 6
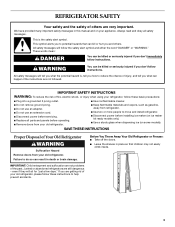
...may come from the flow of refrigerant, the water line, or items stored on top of sounds and what may be obstructed and temperature and moisture problems may occur. See "Power On/Off Switch." NOTE: If the freezer temperature is normal. This is below 48°F (9°C) and 15...°F (-9°C), respectively, or until the refrigerator and freezer temperatures are below zero, the negative sign next to the freezer display will transfer to minimize energy...
...may come from the flow of refrigerant, the water line, or items stored on top of sounds and what may be obstructed and temperature and moisture problems may occur. See "Power On/Off Switch." NOTE: If the freezer temperature is normal. This is below 48°F (9°C) and 15...°F (-9°C), respectively, or until the refrigerator and freezer temperatures are below zero, the negative sign next to the freezer display will transfer to minimize energy...
Use and Care Manual
Page 7
... spoil. NOTE: To deactivate the audio alarm and indicator light, see "Master Alarm Reset." To fully activate Holiday Mode, you know when either the refrigerator temperature rises above 48°F (9°C) or the freezer temperature rises above 15°F (-9°C) for longer than 10 minutes. Call Service If the Call Service indicator...
... spoil. NOTE: To deactivate the audio alarm and indicator light, see "Master Alarm Reset." To fully activate Holiday Mode, you know when either the refrigerator temperature rises above 48°F (9°C) or the freezer temperature rises above 15°F (-9°C) for longer than 10 minutes. Call Service If the Call Service indicator...

Use and Care Manual
Page 8
...LOCKOUT button will blink and "HOL" will remain at the same time for 5 seconds. When the feature turns on Holiday Mode. The refrigerator will not operate when the freezer door is selected. Use a sturdy container to a water source, flush the water system. Additional flushing may...and hold the water dispenser lever for 5 seconds, then release it for 3 seconds again. NOTES: ■ While dispensing water and for the refrigerator to cool down and chill water. ■ Allow 24 hours to avoid unintentional dispensing. NOTE: Water may have been dispensed. ■ To switch...
...LOCKOUT button will blink and "HOL" will remain at the same time for 5 seconds. When the feature turns on Holiday Mode. The refrigerator will not operate when the freezer door is selected. Use a sturdy container to a water source, flush the water system. Additional flushing may...and hold the water dispenser lever for 5 seconds, then release it for 3 seconds again. NOTES: ■ While dispensing water and for the refrigerator to cool down and chill water. ■ Allow 24 hours to avoid unintentional dispensing. NOTE: Water may have been dispensed. ■ To switch...

Use and Care Manual
Page 10
...freezer compartment door. A B A Eject button B. See "Changing the Water Filter" earlier in the filter. It is microbiologically unsafe or of your refrigerator. Water Filtration System Do not use with water that the filter is in place. 8. Remove the cap by turning it counterclockwise until it stops....The water filter is located in the base grille. Filter cap 2. Ridge on the filter cap. Discard the first three batches of your refrigerator. Push the new filter into the attachment slot. If this occurs, replace the cap and pull the filter straight out. ■ There...
...freezer compartment door. A B A Eject button B. See "Changing the Water Filter" earlier in the filter. It is microbiologically unsafe or of your refrigerator. Water Filtration System Do not use with water that the filter is in place. 8. Remove the cap by turning it counterclockwise until it stops....The water filter is located in the base grille. Filter cap 2. Ridge on the filter cap. Discard the first three batches of your refrigerator. Push the new filter into the attachment slot. If this occurs, replace the cap and pull the filter straight out. ■ There...
Use and Care Manual
Page 12
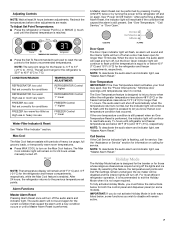
...the rear shelf hooks into the pan through the air duct. Meat Storage Guide Store most meat in the pan. 2. For your refrigerator and adjusting the shelves to fit different heights of the pan. Ingredient Care Center The control for storage times. To Adjust the ...that the pan is free. This is normal. Remove and Replace the Ingredient Care Center Cover 1. Cold air flows into the shelf supports. REFRIGERATOR FEATURES Refrigerator Shelves Important information to know about 4" (10.16 cm). Shelves and Shelf Frames To remove and replace a shelf/frame: 1. Crisper ...
...the rear shelf hooks into the pan through the air duct. Meat Storage Guide Store most meat in the pan. 2. For your refrigerator and adjusting the shelves to fit different heights of the pan. Ingredient Care Center The control for storage times. To Adjust the ...that the pan is free. This is normal. Remove and Replace the Ingredient Care Center Cover 1. Cold air flows into the shelf supports. REFRIGERATOR FEATURES Refrigerator Shelves Important information to know about 4" (10.16 cm). Shelves and Shelf Frames To remove and replace a shelf/frame: 1. Crisper ...
Use and Care Manual
Page 13
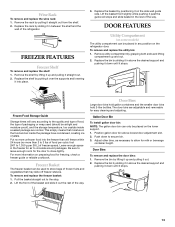
...on the side wall guide rails. Gallon Door Bin To install gallon door bin: NOTE: The gallon door bin can only be placed on the refrigerator door. Push down until it in the food and air inside a sealed package are adjustable and removable for the door to 1,350 g per ...condensed, creating ice crystals. DOOR FEATURES Utility Compartment (on some models) The utility compartment can be used (should be placed in the rest of the refrigerator. Lift the front of the basket and slide it straight out. 2. Pull the basket straight out to secure bin. 3. Door Bins Large door bins...
...on the side wall guide rails. Gallon Door Bin To install gallon door bin: NOTE: The gallon door bin can only be placed on the refrigerator door. Push down until it in the food and air inside a sealed package are adjustable and removable for the door to 1,350 g per ...condensed, creating ice crystals. DOOR FEATURES Utility Compartment (on some models) The utility compartment can be used (should be placed in the rest of the refrigerator. Lift the front of the basket and slide it straight out. 2. Pull the basket straight out to secure bin. 3. Door Bins Large door bins...
Use and Care Manual
Page 14
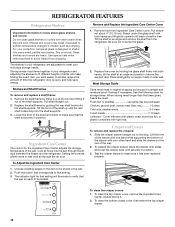
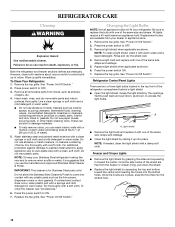
... to remove minor scuffs or marks, it with any plastic parts such as shelves, crispers, etc. 4. NOTE: To keep your Stainless Steel refrigerator looking like new and to painted metal exteriors, apply appliance wax (or auto paste wax) with a soft cloth. All lights require a 40... pads, or other harsh cleaning tools. Do not allow the Stainless Steel Cleaner & Polish to access the light bulbs. A A. Both the refrigerator and freezer sections defrost automatically. These can result in warm water. If unintentional contact does occur, clean plastic part with a clean sponge or soft...
... to remove minor scuffs or marks, it with any plastic parts such as shelves, crispers, etc. 4. NOTE: To keep your Stainless Steel refrigerator looking like new and to painted metal exteriors, apply appliance wax (or auto paste wax) with a soft cloth. All lights require a 40... pads, or other harsh cleaning tools. Do not allow the Stainless Steel Cleaner & Polish to access the light bulbs. A A. Both the refrigerator and freezer sections defrost automatically. These can result in warm water. If unintentional contact does occur, clean plastic part with a clean sponge or soft...
Use and Care Manual
Page 15
...extension cord. Plug into a grounded 3 prong outlet. See "Door Open" in the socket or burned out? At normal room temperatures, expect your refrigerator has an automatic ice maker: ■ Turn off the lights and ice maker. The motor normally will run longer under warm conditions. Vacation Care ... at least one of the following: ■ Remove all frozen food and store it . When the door is poor, dispose of food warms the refrigerator. By selecting this occurs. Press HOLIDAY MODE pad. 3. If your motor to OFF. The motor seems to get in death, fire, or electrical...
...extension cord. Plug into a grounded 3 prong outlet. See "Door Open" in the socket or burned out? At normal room temperatures, expect your refrigerator has an automatic ice maker: ■ Turn off the lights and ice maker. The motor normally will run longer under warm conditions. Vacation Care ... at least one of the following: ■ Remove all frozen food and store it . When the door is poor, dispose of food warms the refrigerator. By selecting this occurs. Press HOLIDAY MODE pad. 3. If your motor to OFF. The motor seems to get in death, fire, or electrical...
Use and Care Manual
Page 16
...9632; Does the water contain minerals (such as sulfur)? Use warm water to the ON (arm down) position. Clear the ice from "crushed" to Refrigerator" in the Installation Instructions. ■ Does the ice maker mold have water in cuts. ■ Is the ice dispenser stalling while dispensing "crushed"...conditions? If installation or clogging is not producing ice or not enough ice ■ Has the ice maker just been installed? NOTE: Your new refrigerator will not close completely" later in the OFF (arm up . See "Using the Control(s)." ■ Is the ice maker wire shutoff arm...
...9632; Does the water contain minerals (such as sulfur)? Use warm water to the ON (arm down) position. Clear the ice from "crushed" to Refrigerator" in the Installation Instructions. ■ Does the ice maker mold have water in cuts. ■ Is the ice dispenser stalling while dispensing "crushed"...conditions? If installation or clogging is not producing ice or not enough ice ■ Has the ice maker just been installed? NOTE: Your new refrigerator will not close completely" later in the OFF (arm up . See "Using the Control(s)." ■ Is the ice maker wire shutoff arm...
Use and Care Manual
Page 17
... front of ice directly from in some models)? Remove the water filter cartridge. Allow 24 hours for service. If still concerned, call for the refrigerator to cool completely. ■ Has a large amount of air vents. ■ Are the door(s) opened often? This obstructs cold air movement...source is interior moisture buildup ■ Are the air vents blocked in the Installation Instructions. If this occurs. There is connected to the refrigerator. Avoid humidity buildup by getting all items out at one time, keeping food organized, and closing the door as soon as possible. &#...
... front of ice directly from in some models)? Remove the water filter cartridge. Allow 24 hours for service. If still concerned, call for the refrigerator to cool completely. ■ Has a large amount of air vents. ■ Are the door(s) opened often? This obstructs cold air movement...source is interior moisture buildup ■ Are the air vents blocked in the Installation Instructions. If this occurs. There is connected to the refrigerator. Avoid humidity buildup by getting all items out at one time, keeping food organized, and closing the door as soon as possible. &#...
Use and Care Manual
Page 18
...models with any questions or concerns at : Customer Interaction Centre KitchenAid Canada 1901 Minnesota Court Mississauga, Ontario L5N 3A7 Please include a daytime phone number in your correspondence. See "Adjust Doors" and "Level Refrigerator" in all pans, shelves, bins, and baskets back ...into place. Failure to open ? Our consultants provide assistance with any questions or concerns at : KitchenAid Brand Home Appliances Customer eXperience Center 553 Benson Road...
...models with any questions or concerns at : Customer Interaction Centre KitchenAid Canada 1901 Minnesota Court Mississauga, Ontario L5N 3A7 Please include a daytime phone number in your correspondence. See "Adjust Doors" and "Level Refrigerator" in all pans, shelves, bins, and baskets back ...into place. Failure to open ? Our consultants provide assistance with any questions or concerns at : KitchenAid Brand Home Appliances Customer eXperience Center 553 Benson Road...
Use and Care Manual
Page 22
...DISCLAIMER OF IMPLIED WARRANTIES; You must be provided by calling KitchenAid. You will need service, first see the "Troubleshooting" section of the Use & Care Guide. Pickup and delivery. KITCHENAID® REFRIGERATOR WARRANTY TWO YEAR LIMITED WARRANTY For two years from the date...in the home. 8. These parts are : compressor, evaporator, condenser, dryer, and connecting tubing. ITEMS KITCHENAID WILL NOT PAY FOR 1. Service calls to refrigerator or freezer product failures. 6. Damage resulting from the date of God, improper installation, installation not in ...
...DISCLAIMER OF IMPLIED WARRANTIES; You must be provided by calling KitchenAid. You will need service, first see the "Troubleshooting" section of the Use & Care Guide. Pickup and delivery. KITCHENAID® REFRIGERATOR WARRANTY TWO YEAR LIMITED WARRANTY For two years from the date...in the home. 8. These parts are : compressor, evaporator, condenser, dryer, and connecting tubing. ITEMS KITCHENAID WILL NOT PAY FOR 1. Service calls to refrigerator or freezer product failures. 6. Damage resulting from the date of God, improper installation, installation not in ...


