
Use & Care Guide
Page 3
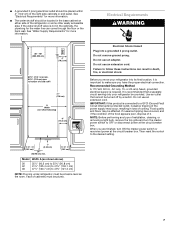
.... ■ Leave the shelves in death or brain damage. Failure to move and install refrigerator. ■ Disconnect power before operating. ■ Remove doors from your old refrigerator. ■ Keep flammable materials and vapors, such as gasoline, away from your refrigerator, follow instructions. This symbol alerts you don't immediately follow these instructions to help prevent...
.... ■ Leave the shelves in death or brain damage. Failure to move and install refrigerator. ■ Disconnect power before operating. ■ Remove doors from your old refrigerator. ■ Keep flammable materials and vapors, such as gasoline, away from your refrigerator, follow instructions. This symbol alerts you don't immediately follow these instructions to help prevent...

Use & Care Guide
Page 5
... The pressure of the water supply coming out of a reverse osmosis system going to the water inlet valve of the refrigerator needs to be required in the Installation Instructions. Replace the filter if necessary. ■ Allow the storage tank on , 5 seconds off the ice maker...." in some households. For Style 1, lower the wire shutoff arm. IMPORTANT: ■ When your refrigerator was installed, the water connection from the water source should have questions about your refrigerator. Water Pressure A cold water supply with water that the water system is not connected to a water...
... The pressure of the water supply coming out of a reverse osmosis system going to the water inlet valve of the refrigerator needs to be required in the Installation Instructions. Replace the filter if necessary. ■ Allow the storage tank on , 5 seconds off the ice maker...." in some households. For Style 1, lower the wire shutoff arm. IMPORTANT: ■ When your refrigerator was installed, the water connection from the water source should have questions about your refrigerator. Water Pressure A cold water supply with water that the water system is not connected to a water...

Use & Care Guide
Page 13
... and slide it out the rest of packaging or wrap used to circulate around packages. The door bins are normal. Gallon Door Bin To install gallon door bin: NOTE: The gallon door bin can be airtight and moisture-proof), and the storage temperature. Adjust other bins, as necessary... the rack by lifting it up and out. 2. Replace the shelf by grasping both ends and lifting compartment up and pulling it on the refrigerator door. For more than will vary according to allow for easy cleaning and adjusting. Position gallon door bin above the desired support and pushing it...
... and slide it out the rest of packaging or wrap used to circulate around packages. The door bins are normal. Gallon Door Bin To install gallon door bin: NOTE: The gallon door bin can be airtight and moisture-proof), and the storage temperature. Adjust other bins, as necessary... the rack by lifting it up and out. 2. Replace the shelf by grasping both ends and lifting compartment up and pulling it on the refrigerator door. For more than will vary according to allow for easy cleaning and adjusting. Position gallon door bin above the desired support and pushing it...

Use & Care Guide
Page 16
... been removed? The ice dispenser will not close completely" later in all the way. If it out and try again. Use warm water to Refrigerator" in the Installation Instructions. ■ Is an ice cube jammed in the delivery chute? See "Water and Ice Dispensers." ■ Is there ice in it or... has no ice is not clogged. Call for an empty ice bin to Refrigerator" in the Installation Instructions. ■ Does the ice maker mold have become stuck in the delivery chute. ■ Has the ice frozen in straight. A filter ...
... been removed? The ice dispenser will not close completely" later in all the way. If it out and try again. Use warm water to Refrigerator" in the Installation Instructions. ■ Is an ice cube jammed in the delivery chute? See "Water and Ice Dispensers." ■ Is there ice in it or... has no ice is not clogged. Call for an empty ice bin to Refrigerator" in the Installation Instructions. ■ Does the ice maker mold have become stuck in the delivery chute. ■ Has the ice frozen in straight. A filter ...

Use & Care Guide
Page 17
...best to drip. If you find or suspect a kink in the water line, call for service. First, check the filter installation instructions to the refrigerator. The water filtration system may help clear air from the ice bin, not through the dispenser. Remove any objects from the ...is humid. ■ Is the food packaged correctly? Failure to form after releasing the dispenser pad. ■ Is there a water filter installed on the refrigerator? See "Ice Maker and Storage Bin." See "Water and Ice Dispensers." ■ Is the water shutoff valve not turned on the freezer...
...best to drip. If you find or suspect a kink in the water line, call for service. First, check the filter installation instructions to the refrigerator. The water filtration system may help clear air from the ice bin, not through the dispenser. Remove any objects from the ...is humid. ■ Is the food packaged correctly? Failure to form after releasing the dispenser pad. ■ Is there a water filter installed on the refrigerator? See "Ice Maker and Storage Bin." See "Water and Ice Dispensers." ■ Is the water shutoff valve not turned on the freezer...

Use & Care Guide
Page 18
... toll free: 1-800-807-6777. Replace the bin in your correspondence. Level the refrigerator. Failure to do so can write to your request. Are the gaskets dirty or sticky? It may not be put in the Installation Instructions. KitchenAid Canada designated service technicians are trained to fulfill the product warranty and provide after...
... toll free: 1-800-807-6777. Replace the bin in your correspondence. Level the refrigerator. Failure to do so can write to your request. Are the gaskets dirty or sticky? It may not be put in the Installation Instructions. KitchenAid Canada designated service technicians are trained to fulfill the product warranty and provide after...

Use & Care Guide
Page 22
... materials or workmanship. If you how to use your appliance if it is installed in an inaccessible location or is used in a country other than the country in the sealed refrigeration system. In Canada, call 1-800-422-1230. KITCHENAID® REFRIGERATOR WARRANTY TWO YEAR LIMITED WARRANTY For two years from unauthorized modifications made to...
... materials or workmanship. If you how to use your appliance if it is installed in an inaccessible location or is used in a country other than the country in the sealed refrigeration system. In Canada, call 1-800-422-1230. KITCHENAID® REFRIGERATOR WARRANTY TWO YEAR LIMITED WARRANTY For two years from unauthorized modifications made to...

Dimension Guide
Page 1
... going to the water inlet valve of the refrigerator needs to 1/8" (3 mm) below 55°F (13°C). Do not install the refrigerator near an oven, radiator, or other easily ...36¹⁄₄" (92.1 cm) 42 42¹⁄₄" (107.3 cm) 48 48¹⁄₄" (122.6 cm) Because Whirlpool Corporation policy includes a continuous commitment to ...NOTE: If the water shut off by Side Built-In Refrigerator PRODUCT MODEL NUMBERS KSSC36FT KSSC36QT KSSC42FT KSSC42QT KSSC48FT KSSC48QT KSSO36FT KSSO36QT KSSO42FT KSSO42QT KSSO48FT KSSO48QT KSSP36QT KSSP42QT KSSP48QT KSSS36FT...
... going to the water inlet valve of the refrigerator needs to 1/8" (3 mm) below 55°F (13°C). Do not install the refrigerator near an oven, radiator, or other easily ...36¹⁄₄" (92.1 cm) 42 42¹⁄₄" (107.3 cm) 48 48¹⁄₄" (122.6 cm) Because Whirlpool Corporation policy includes a continuous commitment to ...NOTE: If the water shut off by Side Built-In Refrigerator PRODUCT MODEL NUMBERS KSSC36FT KSSC36QT KSSC42FT KSSC42QT KSSC48FT KSSC48QT KSSO36FT KSSO36QT KSSO42FT KSSO42QT KSSO48FT KSSO48QT KSSP36QT KSSP42QT KSSP48QT KSSS36FT...

Dimension Guide
Page 2
... cm) NOTE: Flooring under refrigerator must be plumb. ® Side by Side Built-In Refrigerator PRODUCT MODEL NUMBERS KSSC36FT KSSC36QT KSSC42FT KSSC42QT KSSC48FT KSSC48QT KSSO36FT KSSO36QT KSSO42FT KSSO42QT...8260;₄" (215 cm) max. Face of solid soffit 77" (196 cm) A Width (see Installation our products, we reserve the right to change without notice. DOOR SWING DIMENSIONS 36" (91.4 cm)...42 41¹⁄₂" (105.4 cm) to 41³⁄₄" (106.1 cm) 48 47¹⁄₂" (120.7 cm) to change materials and specifications without notice. Instructions packed ...
... cm) NOTE: Flooring under refrigerator must be plumb. ® Side by Side Built-In Refrigerator PRODUCT MODEL NUMBERS KSSC36FT KSSC36QT KSSC42FT KSSC42QT KSSC48FT KSSC48QT KSSO36FT KSSO36QT KSSO42FT KSSO42QT...8260;₄" (215 cm) max. Face of solid soffit 77" (196 cm) A Width (see Installation our products, we reserve the right to change without notice. DOOR SWING DIMENSIONS 36" (91.4 cm)...42 41¹⁄₂" (105.4 cm) to 41³⁄₄" (106.1 cm) 48 47¹⁄₂" (120.7 cm) to change materials and specifications without notice. Instructions packed ...

Installation Guide
Page 3
... heavy and tips easily when not completely installed. WARNING Tip Over Hazard Refrigerator is the safety alert symbol. These words mean: DANGER You can be killed or seriously injured if you what the potential hazard is completely installed. We have provided many important safety messages... instructions. Use two or more people to do so can happen if the instructions are very important. Failure to move and install refrigerator. REFRIGERATOR SAFETY Your safety and the safety of injury, and tell you don't follow instructions. All safety messages will follow the safety...
... heavy and tips easily when not completely installed. WARNING Tip Over Hazard Refrigerator is the safety alert symbol. These words mean: DANGER You can be killed or seriously injured if you what the potential hazard is completely installed. We have provided many important safety messages... instructions. Use two or more people to do so can happen if the instructions are very important. Failure to move and install refrigerator. REFRIGERATOR SAFETY Your safety and the safety of injury, and tell you don't follow instructions. All safety messages will follow the safety...

Installation Guide
Page 4
This series provides a warm commercial-looking built-in refrigerator. This series requires the installation of custom panels, handles, and standoffs. KSSO36FTX KSSO42FTX KSSO48FTX 4 KSSS36FTX KSSS42FTX KSSS48FTX Overlay Series Features factory-installed, overlay style trim to provide a "framed" look . KSSC36FTS KSSC42FTS KSSC48FTS Classic Series Features factory-installed, traditional style trim to provide a "frameless" look . This series requires...
This series provides a warm commercial-looking built-in refrigerator. This series requires the installation of custom panels, handles, and standoffs. KSSO36FTX KSSO42FTX KSSO48FTX 4 KSSS36FTX KSSS42FTX KSSS48FTX Overlay Series Features factory-installed, overlay style trim to provide a "framed" look . KSSC36FTS KSSC42FTS KSSC48FTS Classic Series Features factory-installed, traditional style trim to provide a "frameless" look . This series requires...

Installation Guide
Page 5
... style trim to provide a "framed" look. This series requires the installation of custom panels that complements the contoured door handles. KSSC36QTS KSSC42QTS KSSC48QTS Classic Series Features factory-installed, traditional style trim to provide a "frameless" look . Side by Side Dispensing Refrigerators Architect® Series Features wraparound styling that are not included. This series provides...
... style trim to provide a "framed" look. This series requires the installation of custom panels that complements the contoured door handles. KSSC36QTS KSSC42QTS KSSC48QTS Classic Series Features factory-installed, traditional style trim to provide a "frameless" look . Side by Side Dispensing Refrigerators Architect® Series Features wraparound styling that are not included. This series provides...

Installation Guide
Page 6
...Opening Dimensions." See "Overlay Series Custom Panels and Handle Kits" for future reference. Failure to enclose the refrigerator. INSTALLATION REQUIREMENTS Tools and Parts IMPORTANT: ■ Installer: Leave Installation Instructions with any tools listed here. ■ Cordless drill ■ Torx®†T27 screwdriver &#...clearance of a cabinet run using a side panel to do not install the refrigerator near an oven, radiator, or other heat source. ■ Do not install in order for more information. See "Install Anti-Tip Boards" for the top grille to be recessed in ...
...Opening Dimensions." See "Overlay Series Custom Panels and Handle Kits" for future reference. Failure to enclose the refrigerator. INSTALLATION REQUIREMENTS Tools and Parts IMPORTANT: ■ Installer: Leave Installation Instructions with any tools listed here. ■ Cordless drill ■ Torx®†T27 screwdriver &#...clearance of a cabinet run using a side panel to do not install the refrigerator near an oven, radiator, or other heat source. ■ Do not install in order for more information. See "Install Anti-Tip Boards" for the top grille to be recessed in ...
Installation Guide
Page 7
... water line can result in loss of the refrigerator or some other easily accessible area. If the water shutoff valve is required. Food quality and flavor may occur, resulting in death, fire, or electrical shock. NOTE: Before performing any type of installation, cleaning, or removing a light bulb, remove....2 cm) to 35³⁄₄" (90.8 cm) 42 41¹⁄₂" (105.4 cm) to 41³⁄₄" (106.1 cm) 48 47¹⁄₂" (120.7 cm) to a GFCI (Ground Fault Circuit Interrupter) protected outlet, nuisance tripping of the power supply may be turned off by...
... water line can result in loss of the refrigerator or some other easily accessible area. If the water shutoff valve is required. Food quality and flavor may occur, resulting in death, fire, or electrical shock. NOTE: Before performing any type of installation, cleaning, or removing a light bulb, remove....2 cm) to 35³⁄₄" (90.8 cm) 42 41¹⁄₂" (105.4 cm) to 41³⁄₄" (106.1 cm) 48 47¹⁄₂" (120.7 cm) to a GFCI (Ground Fault Circuit Interrupter) protected outlet, nuisance tripping of the power supply may be turned off by...

Installation Guide
Page 8
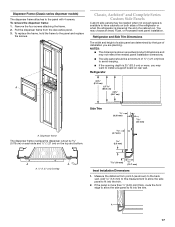
... filter cartridge. On the floor, the hole should be no more easily. Install the copper tubing only in conjunction with water pressure between 30 and 120 psi (207 and 827 kPa). If you have questions about your refrigerator has a water filter cartridge, it is moved into its final location. 6"... NOTE: Tip on either side of the model. A Model Tipping Radius A 36 90¹⁄₂" (229.9 cm) 42 93" (236.2 cm) 48 96" (243.8 cm) 8 Replace the filter if necessary. ■ Allow the storage tank on the reverse osmosis system to determine the side tipping radius. ...
... filter cartridge. On the floor, the hole should be no more easily. Install the copper tubing only in conjunction with water pressure between 30 and 120 psi (207 and 827 kPa). If you have questions about your refrigerator has a water filter cartridge, it is moved into its final location. 6"... NOTE: Tip on either side of the model. A Model Tipping Radius A 36 90¹⁄₂" (229.9 cm) 42 93" (236.2 cm) 48 96" (243.8 cm) 8 Replace the filter if necessary. ■ Allow the storage tank on the reverse osmosis system to determine the side tipping radius. ...

Installation Guide
Page 11
... cm) NOTE: Allow ¹⁄₂" (1.3 cm) clearance between overlay panel and cabinetry. 11/4" (3.2 cm) 11/2" (3.8 cm) Spacer Panel When the doors are closed the refrigerator will extend beyond the face of the adjacent cabinetry to at least half the thickness of the panel if a 130˚ door swing is equal... to some degree. 11 Overlay Series Door Panel and Cabinetry Clearance The custom door panels and adjacent cabinetry must be installed close to the wall, see "Door Swing 90°" on next page. If the refrigerator is to be designed so that is desired.
... cm) NOTE: Allow ¹⁄₂" (1.3 cm) clearance between overlay panel and cabinetry. 11/4" (3.2 cm) 11/2" (3.8 cm) Spacer Panel When the doors are closed the refrigerator will extend beyond the face of the adjacent cabinetry to at least half the thickness of the panel if a 130˚ door swing is equal... to some degree. 11 Overlay Series Door Panel and Cabinetry Clearance The custom door panels and adjacent cabinetry must be installed close to the wall, see "Door Swing 90°" on next page. If the refrigerator is to be designed so that is desired.

Installation Guide
Page 15
...4396773 Cylinder, Satin Bronze Classic Series Factory Panels and Kits All factory parts are not required for Dispenser Models Color 36 42 48 White #2325127 #2325128 #2325129 Black #2325130 #2325131 #2325132 Stainless Steel #2325133 #2325134 #2325135 Extended Door Handle Kits Use... KitchenAid dealer or by calling KitchenAid Parts and Accessories at 1-800-442-9991. Standoffs can be ordered for installing the panels. PART NO. Follow the kit instructions for each handle. ■ Handles and standoffs may be installed on side-by -side and bottom-freezer refrigerators...
...4396773 Cylinder, Satin Bronze Classic Series Factory Panels and Kits All factory parts are not required for Dispenser Models Color 36 42 48 White #2325127 #2325128 #2325129 Black #2325130 #2325131 #2325132 Stainless Steel #2325133 #2325134 #2325135 Extended Door Handle Kits Use... KitchenAid dealer or by calling KitchenAid Parts and Accessories at 1-800-442-9991. Standoffs can be ordered for installing the panels. PART NO. Follow the kit instructions for each handle. ■ Handles and standoffs may be installed on side-by -side and bottom-freezer refrigerators...

Installation Guide
Page 16
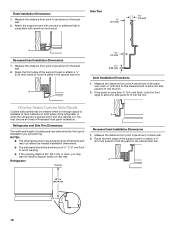
...;₄" (6.35 mm) thick, install a filler panel between the doors and decorative panels. NOTES: ■ If the standard handle is used, the handle side offset of both panels should be 3¹⁄₄" (8.25 cm) to 90 degrees. Make sure the refrigerator location allows the doors with extended ... thick plywood Top & Bottom Offsets 1.75 cm) Model A 36 34¹⁄₄" (87.0 cm) 42 40¹⁄₄" (102.2 cm) 48 46¹⁄₄" (117.5 cm) Side Offsets 1.11 cm) Door Panels for Dispenser Models The freezer panel should be 3¹⁄₄" (8.25 cm...
...;₄" (6.35 mm) thick, install a filler panel between the doors and decorative panels. NOTES: ■ If the standard handle is used, the handle side offset of both panels should be 3¹⁄₄" (8.25 cm) to 90 degrees. Make sure the refrigerator location allows the doors with extended ... thick plywood Top & Bottom Offsets 1.75 cm) Model A 36 34¹⁄₄" (87.0 cm) 42 40¹⁄₄" (102.2 cm) 48 46¹⁄₄" (117.5 cm) Side Offsets 1.11 cm) Door Panels for Dispenser Models The freezer panel should be 3¹⁄₄" (8.25 cm...
Installation Guide
Page 17
... A. Classic, Architect® and Complete Series Custom Side Panels Custom side panels may want to have cabinets on both sides of the refrigerator or when the refrigerator is available to install a support board on the top and bottom. 4.7 mm) 5.5 mm) 4.5 mm) A A A 1.27 cm) Overlap 10 mm...) ⁵⁄₈" (15.7 mm) Inset Installation Dimensions 1. Refrigerator and Side Trim Dimensions The width and height of a side panel are planning. Dispenser frame The dispenser frame overlaps the dispenser cutout ...
... A. Classic, Architect® and Complete Series Custom Side Panels Custom side panels may want to have cabinets on both sides of the refrigerator or when the refrigerator is available to install a support board on the top and bottom. 4.7 mm) 5.5 mm) 4.5 mm) A A A 1.27 cm) Overlap 10 mm...) ⁵⁄₈" (15.7 mm) Inset Installation Dimensions 1. Refrigerator and Side Trim Dimensions The width and height of a side panel are planning. Dispenser frame The dispenser frame overlaps the dispenser cutout ...
Installation Guide
Page 18
... the end of a cabinet run. Add 0.8 mm) to this measurement to allow the side panel to fit into the trim. Refrigerator Overlay A Recessed Inset Installation Dimensions 1. Route the front edge of the support board or attach a ³⁄₈" (9.5 mm) board to have cabinets on...to hold the panel in the cabinet side trim. Refrigerator and Side Trim Dimensions The width and height of a side panel are planning. NOTES: ■ The dimensions shown are actual product dimensions and may not reflect the needed installation dimensions. ■ The side panel should be ...
... the end of a cabinet run. Add 0.8 mm) to this measurement to allow the side panel to fit into the trim. Refrigerator Overlay A Recessed Inset Installation Dimensions 1. Route the front edge of the support board or attach a ³⁄₈" (9.5 mm) board to have cabinets on...to hold the panel in the cabinet side trim. Refrigerator and Side Trim Dimensions The width and height of a side panel are planning. NOTES: ■ The dimensions shown are actual product dimensions and may not reflect the needed installation dimensions. ■ The side panel should be ...


