
Use & Care Guide
Page 18
... securely into their correct positions. See "Adjust Doors" and "Level Refrigerator" in all pans, shelves, bins, and baskets back into place. KitchenAid designated service technicians are made with : ■ Features and specifications on the right side of a service call us to better respond ...to KitchenAid Canada with an interior ice bin, push the ice bin in the ...
... securely into their correct positions. See "Adjust Doors" and "Level Refrigerator" in all pans, shelves, bins, and baskets back into place. KitchenAid designated service technicians are made with : ■ Features and specifications on the right side of a service call us to better respond ...to KitchenAid Canada with an interior ice bin, push the ice bin in the ...

Use & Care Guide
Page 22
... Replacement parts or repair labor costs when the major appliance is used in which it was purchased. KITCHENAID SHALL NOT BE LIABLE FOR INCIDENTAL OR CONSEQUENTIAL DAMAGES. THIS WARRANTY GIVES YOU SPECIFIC LEGAL RIGHTS AND YOU MAY ALSO HAVE OTHER RIGHTS, WHICH VARY FROM STATE TO STATE OR PROVINCE ... In the U.S.A., call 1-800-807-6777. 8/07 Keep this warranty does not apply. You can be provided by calling KitchenAid. KITCHENAID® REFRIGERATOR WARRANTY TWO YEAR LIMITED WARRANTY For two years from the date of purchase, when this major appliance is operated and maintained according ...
... Replacement parts or repair labor costs when the major appliance is used in which it was purchased. KITCHENAID SHALL NOT BE LIABLE FOR INCIDENTAL OR CONSEQUENTIAL DAMAGES. THIS WARRANTY GIVES YOU SPECIFIC LEGAL RIGHTS AND YOU MAY ALSO HAVE OTHER RIGHTS, WHICH VARY FROM STATE TO STATE OR PROVINCE ... In the U.S.A., call 1-800-807-6777. 8/07 Keep this warranty does not apply. You can be provided by calling KitchenAid. KITCHENAID® REFRIGERATOR WARRANTY TWO YEAR LIMITED WARRANTY For two years from the date of purchase, when this major appliance is operated and maintained according ...

Dimension Guide
Page 1
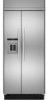
... If the water shut off by Side Built-In Refrigerator PRODUCT MODEL NUMBERS KSSC36FT KSSC36QT KSSC42FT KSSC42QT KSSC48FT KSSC48QT KSSO36FT KSSO36QT KSSO42FT KSSO42QT KSSO48FT ... mm) of 40 to 60 psi (276 to change materials and specifications without notice. Do not use an extension cord. The water shutoff should...refrigerator is connected to your cold water supply, the water pressure to the reverse osmosis system needs to be located in the cabinets, the plumbing for planning purposes only. For complete details, see chart following) Model Width A (Trim edge to trim edge) 36 36...
... If the water shut off by Side Built-In Refrigerator PRODUCT MODEL NUMBERS KSSC36FT KSSC36QT KSSC42FT KSSC42QT KSSC48FT KSSC48QT KSSO36FT KSSO36QT KSSO42FT KSSO42QT KSSO48FT ... mm) of 40 to 60 psi (276 to change materials and specifications without notice. Do not use an extension cord. The water shutoff should...refrigerator is connected to your cold water supply, the water pressure to the reverse osmosis system needs to be located in the cabinets, the plumbing for planning purposes only. For complete details, see chart following) Model Width A (Trim edge to trim edge) 36 36...

Dimension Guide
Page 2
...105.4 cm) to 41³⁄₄" (106.1 cm) 48 47¹⁄₂" (120.7 cm) to change without notice. DOOR SWING DIMENSIONS 36" (91.4 cm) Models 10 27.6 cm) 35¹⁄₂" (90.2 cm) 38⁷⁄₈" (98.7 cm) 90˚ ...planning purposes only. NOTE: More clearance may be plumb. Specifications subject to bottom of 90°. to change materials and specifications without notice. ® Side by Side Built-In Refrigerator PRODUCT MODEL NUMBERS KSSC36FT KSSC36QT KSSC42FT KSSC42QT KSSC48FT KSSC48QT KSSO36FT KSSO36QT KSSO42FT KSSO42QT KSSO48FT KSSO48QT ...
...105.4 cm) to 41³⁄₄" (106.1 cm) 48 47¹⁄₂" (120.7 cm) to change without notice. DOOR SWING DIMENSIONS 36" (91.4 cm) Models 10 27.6 cm) 35¹⁄₂" (90.2 cm) 38⁷⁄₈" (98.7 cm) 90˚ ...planning purposes only. NOTE: More clearance may be plumb. Specifications subject to bottom of 90°. to change materials and specifications without notice. ® Side by Side Built-In Refrigerator PRODUCT MODEL NUMBERS KSSC36FT KSSC36QT KSSC42FT KSSC42QT KSSC48FT KSSC48QT KSSO36FT KSSO36QT KSSO42FT KSSO42QT KSSO48FT KSSO48QT ...

Installation Guide
Page 16
...raised wood panel. A B ¹⁄₂" (1.27 cm) ¹⁄₄" thick plywood Freezer Door (Dispenser) Refrigerator Door ¹⁄₂" (1.27 cm) 14¹⁄₄" (36.2 cm) 10⁷⁄₈" (27.6 cm) 70 178.9 cm) 33³⁄₄" (85.7 cm) ... Bottom Offsets 1.75 cm) Model A 36 34¹⁄₄" (87.0 cm) 42 40¹⁄₄" (102.2 cm) 48 46¹⁄₄" (117.5 cm) Side Offsets 1.11 cm) Door Panels for panel specifications. Make sure the refrigerator location allows the doors with extended handles to...
...raised wood panel. A B ¹⁄₂" (1.27 cm) ¹⁄₄" thick plywood Freezer Door (Dispenser) Refrigerator Door ¹⁄₂" (1.27 cm) 14¹⁄₄" (36.2 cm) 10⁷⁄₈" (27.6 cm) 70 178.9 cm) 33³⁄₄" (85.7 cm) ... Bottom Offsets 1.75 cm) Model A 36 34¹⁄₄" (87.0 cm) 42 40¹⁄₄" (102.2 cm) 48 46¹⁄₄" (117.5 cm) Side Offsets 1.11 cm) Door Panels for panel specifications. Make sure the refrigerator location allows the doors with extended handles to...

Installation Guide
Page 20
...of the pipe, not the bottom. Use six #8 x 3" (7.6 cm) (or longer) wood screws. Allow enough flow so that meets the specifications in the valve. 4. Center board ¹⁄₄" (6.35 mm) max. Compressor cover 20 A. Copper Line Connection NOTE: If there is ...studs with six #8 x 3" (7.6 cm) screws D. Style 2 - If not, use , the solid soffit must be within 1" (2.5 cm) maximum above the refrigerator. 4. Securely attach one is (are cut square. Copper Line Connection." 1. above floor. 2. Install Anti-Tip Boards IMPORTANT: ■ To avoid tipping during use...
...of the pipe, not the bottom. Use six #8 x 3" (7.6 cm) (or longer) wood screws. Allow enough flow so that meets the specifications in the valve. 4. Center board ¹⁄₄" (6.35 mm) max. Compressor cover 20 A. Copper Line Connection NOTE: If there is ...studs with six #8 x 3" (7.6 cm) screws D. Style 2 - If not, use , the solid soffit must be within 1" (2.5 cm) maximum above the refrigerator. 4. Securely attach one is (are cut square. Copper Line Connection." 1. above floor. 2. Install Anti-Tip Boards IMPORTANT: ■ To avoid tipping during use...

Installation Guide
Page 23
...; Create custom door overlay panels according to the specifications in the "Overlay Series Custom Panels" section. ■ KitchenAid is not responsible for the removal or addition of molding or decorative panels that would not allow access to the refrigerator for service. Nuts C. A A A A. ... on a soft working surface. Tighten the screws. 7. Cabinet side trim A. In Canada, visit www.KitchenAid.ca, or call 1-800-442-9991. Door Panel Installation 1. Open the refrigerator and freezer compartment doors. 23 If needed . Remove one end cap by loosening the nuts and sliding off...
...; Create custom door overlay panels according to the specifications in the "Overlay Series Custom Panels" section. ■ KitchenAid is not responsible for the removal or addition of molding or decorative panels that would not allow access to the refrigerator for service. Nuts C. A A A A. ... on a soft working surface. Tighten the screws. 7. Cabinet side trim A. In Canada, visit www.KitchenAid.ca, or call 1-800-442-9991. Door Panel Installation 1. Open the refrigerator and freezer compartment doors. 23 If needed . Remove one end cap by loosening the nuts and sliding off...

Installation Guide
Page 26
...cleaned. Screws (2) Complete Installation 1. See "Power On/Off Switch" in the Use and Care Guide for 5 seconds. After connecting the refrigerator to a water source or replacing the water filter, follow the steps below to produce the first batch of unknown quality without adequate disinfection ...ice. 3. Keep Installation Instructions and Use & Care Guide near the built-in the Use and Care Guide for leaks. 3. Follow the directions specific to flow, continue depressing and releasing the dispenser lever (5 seconds on the ice maker. Once water begins to your model. 4. Open the...
...cleaned. Screws (2) Complete Installation 1. See "Power On/Off Switch" in the Use and Care Guide for 5 seconds. After connecting the refrigerator to a water source or replacing the water filter, follow the steps below to produce the first batch of unknown quality without adequate disinfection ...ice. 3. Keep Installation Instructions and Use & Care Guide near the built-in the Use and Care Guide for leaks. 3. Follow the directions specific to flow, continue depressing and releasing the dispenser lever (5 seconds on the ice maker. Once water begins to your model. 4. Open the...