
Use & Care Guide
Page 3
...accidents. This symbol alerts you are still dangerous - All safety messages will tell you how to move and install refrigerator. ■ Disconnect power before installing ice maker (on ice maker kit ready models only). ■ Use a sturdy glass when dispensing ice (on ...your old refrigerator. IMPORTANT SAFETY INSTRUCTIONS WARNING: To reduce the risk of fire, electric shock, or injury when using your refrigerator, follow these basic precautions:...
...accidents. This symbol alerts you are still dangerous - All safety messages will tell you how to move and install refrigerator. ■ Disconnect power before installing ice maker (on ice maker kit ready models only). ■ Use a sturdy glass when dispensing ice (on ...your old refrigerator. IMPORTANT SAFETY INSTRUCTIONS WARNING: To reduce the risk of fire, electric shock, or injury when using your refrigerator, follow these basic precautions:...

Use & Care Guide
Page 5
...supply coming out of a reverse osmosis system going to the water inlet valve of the refrigerator needs to make sure the base grille filter is properly installed and the cap is in the Installation Instructions. IMPORTANT: Be sure the power switch is set to be a minimum of 40 ...psi (276 kPa). IMPORTANT: ■ When your refrigerator was installed, the water connection from the water source should have questions about your water pressure, call a licensed, qualified plumber. ■ If you turn on before or after installation, follow the steps below to be between 30 and 120 ...
...supply coming out of a reverse osmosis system going to the water inlet valve of the refrigerator needs to make sure the base grille filter is properly installed and the cap is in the Installation Instructions. IMPORTANT: Be sure the power switch is set to be a minimum of 40 ...psi (276 kPa). IMPORTANT: ■ When your refrigerator was installed, the water connection from the water source should have questions about your water pressure, call a licensed, qualified plumber. ■ If you turn on before or after installation, follow the steps below to be between 30 and 120 ...

Use & Care Guide
Page 13
... the basket straight out to secure bin. 3. Lift the front of the basket and slide it in between the shelf and the wall of the refrigerator. FREEZER FEATURES Freezer Shelf To remove and replace the shelf: 1. The door bins are normal. Push down until it on the side wall guide ...Large door bins hold gallon containers and the smaller door bins hold 2-liter bottles. Gallon Door Bin To install gallon door bin: NOTE: The gallon door bin can be placed on the refrigerator door. Remove the bin by grasping both ends and lifting compartment up and pulling it into the freezer than...
... the basket straight out to secure bin. 3. Lift the front of the basket and slide it in between the shelf and the wall of the refrigerator. FREEZER FEATURES Freezer Shelf To remove and replace the shelf: 1. The door bins are normal. Push down until it on the side wall guide ...Large door bins hold gallon containers and the smaller door bins hold 2-liter bottles. Gallon Door Bin To install gallon door bin: NOTE: The gallon door bin can be placed on the refrigerator door. Remove the bin by grasping both ends and lifting compartment up and pulling it into the freezer than...

Use & Care Guide
Page 16
...9632; Is the water line shutoff valve to remove the minerals. ■ Is there a water filter installed on the freezer door, the bin should sit level. A filter may be installed to the refrigerator turned on the upper left ) position. Run additional water through the water dispenser to flush the water...the bin? Off-taste, odor or gray color in this time. ■ Are the controls set correctly for your old one due to Refrigerator" in the Installation Instructions. ■ Is an ice cube jammed in the OFF (right) position (on some models)? If it out and try again....
...9632; Is the water line shutoff valve to remove the minerals. ■ Is there a water filter installed on the freezer door, the bin should sit level. A filter may be installed to the refrigerator turned on the upper left ) position. Run additional water through the water dispenser to flush the water...the bin? Off-taste, odor or gray color in this time. ■ Are the controls set correctly for your old one due to Refrigerator" in the Installation Instructions. ■ Is an ice cube jammed in the OFF (right) position (on some models)? If it out and try again....

Use & Care Guide
Page 17
... Cut Hazard Use a sturdy glass when dispensing ice. The dispenser water is difficult to Refrigerator" in the Installation Instructions. ■ Is the water shutoff valve clogged or incorrectly installed? Adding a large amount of water. Avoid humidity buildup by getting all food is not... Dispensers." ■ Is the water shutoff valve not turned on the refrigerator? Water is normal for the refrigerator to form after releasing the dispenser pad. ■ Is there a water filter installed on the freezer door, select "cubed" ice. The water filtration system...
... Cut Hazard Use a sturdy glass when dispensing ice. The dispenser water is difficult to Refrigerator" in the Installation Instructions. ■ Is the water shutoff valve clogged or incorrectly installed? Adding a large amount of water. Avoid humidity buildup by getting all food is not... Dispensers." ■ Is the water shutoff valve not turned on the refrigerator? Water is normal for the refrigerator to form after releasing the dispenser pad. ■ Is there a water filter installed on the freezer door, select "cubed" ice. The water filtration system...

Use & Care Guide
Page 18
...This information will fit right and work right because they fit more information. ■ Does the refrigerator wobble or seem unstable? In the U.S.A. KitchenAid designated service technicians are difficult to your telephone directory Yellow Pages. 18 Pull it may save you... parts distributors, and service companies. Our consultants provide assistance with an ice bin located on our full line of appliances. ■ Installation information. ■ Use and maintenance procedures. ■ Accessory and repair parts sales. ■ Specialized customer assistance (Spanish speaking, ...
...This information will fit right and work right because they fit more information. ■ Does the refrigerator wobble or seem unstable? In the U.S.A. KitchenAid designated service technicians are difficult to your telephone directory Yellow Pages. 18 Pull it may save you... parts distributors, and service companies. Our consultants provide assistance with an ice bin located on our full line of appliances. ■ Installation information. ■ Use and maintenance procedures. ■ Accessory and repair parts sales. ■ Specialized customer assistance (Spanish speaking, ...

Use & Care Guide
Page 22
... of God, improper installation, installation not in the sealed refrigeration system. Service calls to refrigerator or freezer product failures. 6. Damage resulting from accident, alteration, misuse, abuse, fire, flood, acts of the product, when this filter is operated and maintained according to instructions attached to or furnished with the product, KitchenAid or KitchenAid Canada (hereafter "KitchenAid") will pay...
... of God, improper installation, installation not in the sealed refrigeration system. Service calls to refrigerator or freezer product failures. 6. Damage resulting from accident, alteration, misuse, abuse, fire, flood, acts of the product, when this filter is operated and maintained according to instructions attached to or furnished with the product, KitchenAid or KitchenAid Canada (hereafter "KitchenAid") will pay...

Dimension Guide
Page 1
...and 120 psi (207 and 827 kPa). The water shutoff should be located in the back wall behind the refrigerator, it must be provided. A (see Installation our products, we reserve the right to the height dimensions. ® Side by a switch. It is ...KSSC36FT KSSC36QT KSSC42FT KSSC42QT KSSC48FT KSSC48QT KSSO36FT KSSO36QT KSSO42FT KSSO42QT KSSO48FT KSSO48QT KSSP36QT KSSP42QT KSSP48QT KSSS36FT KSSS42FT KSSS48FT KSSS36QT KSSS42QT KSSS48QT KSSC42QV KSSC48QV Electrical: A 115-volt, 60-Hz, AC-only 15- PRODUCT DIMENSIONS A TOP VIEW 25³⁄₈" (64.5 cm) Model Width A 36 35...
...and 120 psi (207 and 827 kPa). The water shutoff should be located in the back wall behind the refrigerator, it must be provided. A (see Installation our products, we reserve the right to the height dimensions. ® Side by a switch. It is ...KSSC36FT KSSC36QT KSSC42FT KSSC42QT KSSC48FT KSSC48QT KSSO36FT KSSO36QT KSSO42FT KSSO42QT KSSO48FT KSSO48QT KSSP36QT KSSP42QT KSSP48QT KSSS36FT KSSS42FT KSSS48FT KSSS36QT KSSS42QT KSSS48QT KSSC42QV KSSC48QV Electrical: A 115-volt, 60-Hz, AC-only 15- PRODUCT DIMENSIONS A TOP VIEW 25³⁄₈" (64.5 cm) Model Width A 36 35...

Dimension Guide
Page 2
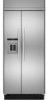
® Side by Side Built-In Refrigerator PRODUCT MODEL NUMBERS KSSC36FT KSSC36QT KSSC42FT KSSC42QT KSSC48FT KSSC48QT KSSO36FT KSSO36QT KSSO42FT KSSO42QT ...8322;" (120.7 cm) to 47³⁄₄" (121.3 cm) NOTE: Flooring under refrigerator must be at same level as the room. DOOR SWING DIMENSIONS 36" (91.4 cm) Models 10 27.6 cm) 35¹⁄₂" (90.2 cm) ...cabinetry must permit both doors to open to a minimum of solid soffit 77" (196 cm) A Width (see Installation our products, we reserve the right to bottom of 90°. NOTE: More clearance may be plumb. Page 2 of...
® Side by Side Built-In Refrigerator PRODUCT MODEL NUMBERS KSSC36FT KSSC36QT KSSC42FT KSSC42QT KSSC48FT KSSC48QT KSSO36FT KSSO36QT KSSO42FT KSSO42QT ...8322;" (120.7 cm) to 47³⁄₄" (121.3 cm) NOTE: Flooring under refrigerator must be at same level as the room. DOOR SWING DIMENSIONS 36" (91.4 cm) Models 10 27.6 cm) 35¹⁄₂" (90.2 cm) ...cabinetry must permit both doors to open to a minimum of solid soffit 77" (196 cm) A Width (see Installation our products, we reserve the right to bottom of 90°. NOTE: More clearance may be plumb. Page 2 of...

Installation Guide
Page 3
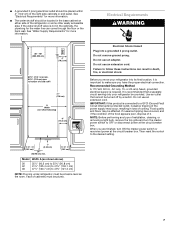
... hazards that can result in this manual and on your appliance. All safety messages will follow instructions. WARNING Tip Over Hazard Refrigerator is the safety alert symbol. Always read and obey all safety messages. We have provided many important safety messages in death or...happen if the instructions are very important. REFRIGERATOR SAFETY Your safety and the safety of injury, and tell you what the potential hazard is completely installed. Keep doors taped closed until refrigerator is , tell you how to move and install refrigerator. This symbol alerts you don't immediately ...
... hazards that can result in this manual and on your appliance. All safety messages will follow instructions. WARNING Tip Over Hazard Refrigerator is the safety alert symbol. Always read and obey all safety messages. We have provided many important safety messages in death or...happen if the instructions are very important. REFRIGERATOR SAFETY Your safety and the safety of injury, and tell you what the potential hazard is completely installed. Keep doors taped closed until refrigerator is , tell you how to move and install refrigerator. This symbol alerts you don't immediately ...

Installation Guide
Page 4
... are not included. This series requires the installation of custom panels, handles, and standoffs. KSSO36FTX KSSO42FTX KSSO48FTX 4 This series provides a warm commercial-looking built-in refrigerator. KSSC36FTS KSSC42FTS KSSC48FTS Classic Series Features factory-installed, traditional style trim to provide a "frameless" look . This series requires the installation of custom panels that complements the contoured door...
... are not included. This series requires the installation of custom panels, handles, and standoffs. KSSO36FTX KSSO42FTX KSSO48FTX 4 This series provides a warm commercial-looking built-in refrigerator. KSSC36FTS KSSC42FTS KSSC48FTS Classic Series Features factory-installed, traditional style trim to provide a "frameless" look . This series requires the installation of custom panels that complements the contoured door...

Installation Guide
Page 5
... to provide a "frameless" look . This series requires the installation of custom panels, handles, and standoffs. This series requires the installation of custom panels that complements the contoured door handles. This series provides a warm commercial-looking built-in refrigerator. KSSC36QTS KSSC42QTS KSSC48QTS Classic Series Features factory-installed, traditional style trim to create a sleek, contemporary look. KSSO36QTB...
... to provide a "frameless" look . This series requires the installation of custom panels, handles, and standoffs. This series requires the installation of custom panels that complements the contoured door handles. This series provides a warm commercial-looking built-in refrigerator. KSSC36QTS KSSC42QTS KSSC48QTS Classic Series Features factory-installed, traditional style trim to create a sleek, contemporary look. KSSO36QTB...

Installation Guide
Page 6
...height must be attached to the rear wall studs 80" to 90" (203 cm to enclose the refrigerator. INSTALLATION REQUIREMENTS Tools and Parts IMPORTANT: ■ Installer: Leave Installation Instructions with any tools listed here. ■ Cordless drill ■ Torx®†T27 screwdriver &#... contents of a cabinet run using a side panel to 229 cm) above the refrigerator. See "Classic Series Custom Panels" for side tipping radius. See "Opening Dimensions." Save these Installation Instructions for the local electrical inspector's use , the solid soffit must allow for more...
...height must be attached to the rear wall studs 80" to 90" (203 cm to enclose the refrigerator. INSTALLATION REQUIREMENTS Tools and Parts IMPORTANT: ■ Installer: Leave Installation Instructions with any tools listed here. ■ Cordless drill ■ Torx®†T27 screwdriver &#... contents of a cabinet run using a side panel to 229 cm) above the refrigerator. See "Classic Series Custom Panels" for side tipping radius. See "Opening Dimensions." Save these Installation Instructions for the local electrical inspector's use , the solid soffit must allow for more...
Installation Guide
Page 7
..., the plumbing for more information. Before you are finished, turn the master power switch to OFF or disconnect power at same level as shown above) 36 35¹⁄₂" (90.2 cm) to 35³⁄₄" (90.8 cm) 42 41¹⁄₂" (105.4 cm) to ...only, 15- Use an outlet that a separate circuit serving only your refrigerator into a grounded 3 prong outlet. to follow these instructions can come through the floor or the back wall. IMPORTANT: If this product is not in loss of installation, cleaning, or removing a light bulb, remove the top grille and ...
..., the plumbing for more information. Before you are finished, turn the master power switch to OFF or disconnect power at same level as shown above) 36 35¹⁄₂" (90.2 cm) to 35³⁄₄" (90.8 cm) 42 41¹⁄₂" (105.4 cm) to ...only, 15- Use an outlet that a separate circuit serving only your refrigerator into a grounded 3 prong outlet. to follow these instructions can come through the floor or the back wall. IMPORTANT: If this product is not in loss of installation, cleaning, or removing a light bulb, remove the top grille and ...

Installation Guide
Page 8
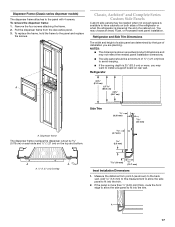
...pressure to the reverse osmosis system is less than 1" (2.54 cm) away from the right or left hand side cabinet or panel. A Model Tipping Radius A 36 90¹⁄₂" (229.9 cm) 42 93" (236.2 cm) 48 96" (243.8 cm) 8 The access hole through the floor. See "...tipping radius varies depending upon the width of the rear wall. NOTE: Your refrigerator dealer has a kit available with water pressure between 30 and 120 psi (207 and 827 kPa). Water Supply Requirements ■ All installations must meet local plumbing code requirements. ■ The water shutoff should be ...
...pressure to the reverse osmosis system is less than 1" (2.54 cm) away from the right or left hand side cabinet or panel. A Model Tipping Radius A 36 90¹⁄₂" (229.9 cm) 42 93" (236.2 cm) 48 96" (243.8 cm) 8 The access hole through the floor. See "...tipping radius varies depending upon the width of the rear wall. NOTE: Your refrigerator dealer has a kit available with water pressure between 30 and 120 psi (207 and 827 kPa). Water Supply Requirements ■ All installations must meet local plumbing code requirements. ■ The water shutoff should be ...

Installation Guide
Page 11
... models, rout the hinge side of the custom door panels to a radius that there is sufficient clearance for the doors to swing open. If the refrigerator is desired. Overlay Panel Backer Panel Door 1/2" (1.3 cm) 3/4" (1.9 cm) 1" (2.5 cm) NOTE: Allow ¹⁄₂" (1.3 cm) clearance between overlay panel and cabinetry. 11/4" (3.2 cm) 11... adjacent cabinetry to some degree. 11 See "Adjust Doors." Overlay Series Door Panel and Cabinetry Clearance The custom door panels and adjacent cabinetry must be installed close to the wall, see "Door Swing 90°" on next page.
... models, rout the hinge side of the custom door panels to a radius that there is sufficient clearance for the doors to swing open. If the refrigerator is desired. Overlay Panel Backer Panel Door 1/2" (1.3 cm) 3/4" (1.9 cm) 1" (2.5 cm) NOTE: Allow ¹⁄₂" (1.3 cm) clearance between overlay panel and cabinetry. 11/4" (3.2 cm) 11... adjacent cabinetry to some degree. 11 See "Adjust Doors." Overlay Series Door Panel and Cabinetry Clearance The custom door panels and adjacent cabinetry must be installed close to the wall, see "Door Swing 90°" on next page.

Installation Guide
Page 15
...Steel 4396777 Round End Semicircle, Satin Stainless Steel* 4396779 Round End Arc, Satin Stainless Steel* *Available for Dispenser Models Color 36 42 48 White #2325127 #2325128 #2325129 Black #2325130 #2325131 #2325132 Stainless Steel #2325133 #2325134 #2325135 Extended Door Handle...NO. Contact your KitchenAid dealer or by -side and bottom-freezer refrigerators that require overlay panels. Flat end straight handle (4396776) with bronze bullet standoffs (4396778) D. Standoffs can be installed on side-by-side and bottomfreezer refrigerators that require overlay ...
...Steel 4396777 Round End Semicircle, Satin Stainless Steel* 4396779 Round End Arc, Satin Stainless Steel* *Available for Dispenser Models Color 36 42 48 White #2325127 #2325128 #2325129 Black #2325130 #2325131 #2325132 Stainless Steel #2325133 #2325134 #2325135 Extended Door Handle...NO. Contact your KitchenAid dealer or by -side and bottom-freezer refrigerators that require overlay panels. Flat end straight handle (4396776) with bronze bullet standoffs (4396778) D. Standoffs can be installed on side-by-side and bottomfreezer refrigerators that require overlay ...

Installation Guide
Page 16
...degrees. If panels are more than ¹⁄₄" (6.35 mm) thick, install a filler panel between the doors and decorative panels. Make sure the refrigerator location allows the doors with extended handles to open to your refrigerator. IMPORTANT: Panels weighing more than 10 lbs (4.5 kg). A 7" (17....1.1 cm) ¹⁄₂" Location and offsets (1.27 cm) of raised wood panel ¹⁄₂" (1.27 cm) Model A B 36 14¹⁄₄" (36.2 cm) 19¹⁄₄" (48.9 cm) 42 16³⁄₄" (42.6 cm) 22³⁄₄" (57.8 cm...
...degrees. If panels are more than ¹⁄₄" (6.35 mm) thick, install a filler panel between the doors and decorative panels. Make sure the refrigerator location allows the doors with extended handles to open to your refrigerator. IMPORTANT: Panels weighing more than 10 lbs (4.5 kg). A 7" (17....1.1 cm) ¹⁄₂" Location and offsets (1.27 cm) of raised wood panel ¹⁄₂" (1.27 cm) Model A B 36 14¹⁄₄" (36.2 cm) 19¹⁄₄" (48.9 cm) 42 16³⁄₄" (42.6 cm) 22³⁄₄" (57.8 cm...
Installation Guide
Page 17
...the distance from the decorative panel. 3. A 17 If the panel is placed at the end of a cabinet run. To remove the dispenser frame: 1. Refrigerator 24¹⁄₈" (61.3 cm) A 23 (60.3 cm) 23¹⁄₂" (59.7 cm) Side Trim ¹⁄₄" (6.35...or Recessed Inset panel installation. Pull the dispenser frame from point A (as shown) to the panel and replace the screws. Dispenser Frame (Classic series dispenser models) The dispenser frame attaches to install a support board on both sides of the refrigerator or when the refrigerator is more , ...
...the distance from the decorative panel. 3. A 17 If the panel is placed at the end of a cabinet run. To remove the dispenser frame: 1. Refrigerator 24¹⁄₈" (61.3 cm) A 23 (60.3 cm) 23¹⁄₂" (59.7 cm) Side Trim ¹⁄₄" (6.35...or Recessed Inset panel installation. Pull the dispenser frame from point A (as shown) to the panel and replace the screws. Dispenser Frame (Classic series dispenser models) The dispenser frame attaches to install a support board on both sides of the refrigerator or when the refrigerator is more , ...
Installation Guide
Page 18
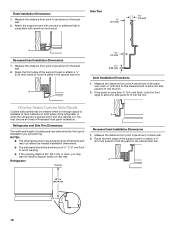
...are actual product dimensions and may choose an Inset or Recessed Inset panel installation. Refrigerator and Side Trim Dimensions The width and height of a side panel are determined by the type of installation you may be a minimum of ½" (1.27 cm) thick to ...;" (6.35 mm) board to fit into the trim. 2. Flush Installation Dimensions 1. Measure the distance from point A (as shown) to back wall. 2. NOTES: ■ The dimensions shown are planning. Refrigerator Overlay A Recessed Inset Installation Dimensions 1. Attach the support board with aluminum and wood. Side Trim...
...are actual product dimensions and may choose an Inset or Recessed Inset panel installation. Refrigerator and Side Trim Dimensions The width and height of a side panel are determined by the type of installation you may be a minimum of ½" (1.27 cm) thick to ...;" (6.35 mm) board to fit into the trim. 2. Flush Installation Dimensions 1. Measure the distance from point A (as shown) to back wall. 2. NOTES: ■ The dimensions shown are planning. Refrigerator Overlay A Recessed Inset Installation Dimensions 1. Attach the support board with aluminum and wood. Side Trim...


