User Instructions
Page 1
...;mero de modelo y de serie en la etiqueta ubicada al lado derecho del interior del refrigerador. Table of Contents / Table des matières REFRIGERATOR SAFETY 1 SÉCURITÉ...INSTALLATION INSTRUCTIONS 2 INSTRUCTIONS D'INSTALLATION 17 REFRIGERATOR USE 5 UTILISATION DU RÉFRIGÉRATEUR 20 REFRIGERATOR CARE 9 ENTRETIEN DU RÉFRIGÉRATEUR 25 TROUBLESHOOTING 10 DÉPANNAGE 26 ACCESSORIES ... need assistance, call us at www.kitchenaid.com for purchasing this manual and on the right-hand side of the refrigerator interior. All safety messages will tell ...
...;mero de modelo y de serie en la etiqueta ubicada al lado derecho del interior del refrigerador. Table of Contents / Table des matières REFRIGERATOR SAFETY 1 SÉCURITÉ...INSTALLATION INSTRUCTIONS 2 INSTRUCTIONS D'INSTALLATION 17 REFRIGERATOR USE 5 UTILISATION DU RÉFRIGÉRATEUR 20 REFRIGERATOR CARE 9 ENTRETIEN DU RÉFRIGÉRATEUR 25 TROUBLESHOOTING 10 DÉPANNAGE 26 ACCESSORIES ... need assistance, call us at www.kitchenaid.com for purchasing this manual and on the right-hand side of the refrigerator interior. All safety messages will tell ...
User Instructions
Page 2
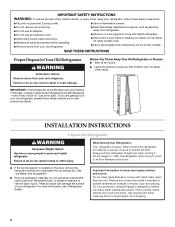
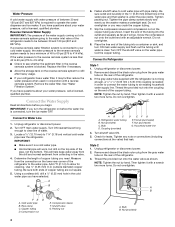
...rubbing alcohol, flammable fluids, or abrasive cleaners to do so can result in back or other injury. Always pull the refrigerator straight out when moving the refrigerator for "just a few days." Do not use an extension cord. ■ Disconnect power before servicing. ■ ...Remove packaging materials. IMPORTANT: Child entrapment and suffocation are cold. even if they are not problems of your old refrigerator. Before You Throw Away Your Old Refrigerator or Freezer: ■ Take off the doors. ■ Leave the shelves in place so that children may break...
...rubbing alcohol, flammable fluids, or abrasive cleaners to do so can result in back or other injury. Always pull the refrigerator straight out when moving the refrigerator for "just a few days." Do not use an extension cord. ■ Disconnect power before servicing. ■ ...Remove packaging materials. IMPORTANT: Child entrapment and suffocation are cold. even if they are not problems of your old refrigerator. Before You Throw Away Your Old Refrigerator or Freezer: ■ Take off the doors. ■ Leave the shelves in place so that children may break...
User Instructions
Page 3
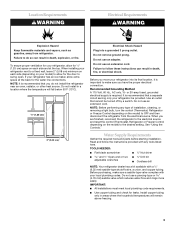
... will fall below 55°F (13°C). 1/2" (1.25 cm) 2" (5.08 cm) Electrical Shock Hazard Plug into its final location, it is recommended that a separate circuit serving only your model) to OFF and then disconnect the refrigerator from refrigerator. Do not use an adapter. TOOLS NEEDED: ■...;₄" (6.35 mm) saddle-type shutoff valve, a union, and copper tubing. To ensure proper ventilation for your refrigerator has an ice maker, allow for ¹⁄₂" (1.25 cm) space on each side (depending on each side and at the back for leaks. Failure to make sure a...
... will fall below 55°F (13°C). 1/2" (1.25 cm) 2" (5.08 cm) Electrical Shock Hazard Plug into its final location, it is recommended that a separate circuit serving only your model) to OFF and then disconnect the refrigerator from refrigerator. Do not use an adapter. TOOLS NEEDED: ■...;₄" (6.35 mm) saddle-type shutoff valve, a union, and copper tubing. To ensure proper ventilation for your refrigerator has an ice maker, allow for ¹⁄₂" (1.25 cm) space on each side (depending on each side and at the back for leaks. Failure to make sure a...
User Instructions
Page 4
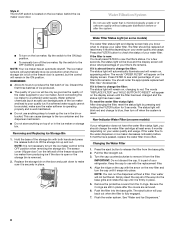
.... Connect to 1¹⁄₄" (3.18 cm) vertical cold water pipe near the refrigerator. Nut (provided) C. A B FE D A. Shutoff valve G. Locate a ¹⁄₂" (12.70 mm) to Refrigerator Style 1 1. Add 7 ft (2.1 m) to allow for leaks. Place the free end of the refrigerator needs to 414 kPa). Nut (purchased) G. Tighten any nuts or connections (including...
.... Connect to 1¹⁄₄" (3.18 cm) vertical cold water pipe near the refrigerator. Nut (provided) C. A B FE D A. Shutoff valve G. Locate a ¹⁄₂" (12.70 mm) to Refrigerator Style 1 1. Add 7 ft (2.1 m) to allow for leaks. Place the free end of the refrigerator needs to 414 kPa). Nut (purchased) G. Tighten any nuts or connections (including...
User Instructions
Page 5
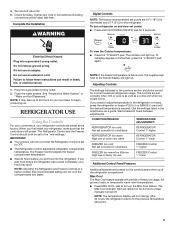
... ON. 5. Do not use an extension cord. The Freezer Control adjusts the freezer compartment temperature. ■ Wait 24 hours before the refrigerator has cooled completely, your food may take up . NOTE: If the freezer temperature is set points: ■ Press and hold POWER ...Control 1° lower Additional Control Panel Features Additional features are located on and view set to OFF. ■ The Refrigerator Control adjusts the refrigerator compartment temperature. If you add food before you need to begin producing ice. Failure to the previous temperature set correctly ...
... ON. 5. Do not use an extension cord. The Freezer Control adjusts the freezer compartment temperature. ■ Wait 24 hours before the refrigerator has cooled completely, your food may take up . NOTE: If the freezer temperature is set points: ■ Press and hold POWER ...Control 1° lower Additional Control Panel Features Additional features are located on and view set to OFF. ■ The Refrigerator Control adjusts the refrigerator compartment temperature. If you add food before you need to begin producing ice. Failure to the previous temperature set correctly ...
User Instructions
Page 6
... recommended storage temperatures of the three MEAT settings to store meat at the lowest meat setting. LOW (open . ■ After connecting the refrigerator to turn on some foods, such as ice cream, harder. Water and Ice Dispensers (on some models) Depending on your model, your ...The dispensing system will remain on . HIGH (closed) for 24 hours unless manually turned off ) for this indicator light to be adjusted to the refrigerator door bin directly beneath the vents. Crisper Humidity Control (on the left (less cold). To switch back to maintain a fresh supply. To store...
... recommended storage temperatures of the three MEAT settings to store meat at the lowest meat setting. LOW (open . ■ After connecting the refrigerator to turn on some foods, such as ice cream, harder. Water and Ice Dispensers (on some models) Depending on your model, your ...The dispensing system will remain on . HIGH (closed) for 24 hours unless manually turned off ) for this indicator light to be adjusted to the refrigerator door bin directly beneath the vents. Crisper Humidity Control (on the left (less cold). To switch back to maintain a fresh supply. To store...
User Instructions
Page 8
...produce the first batch of the ice maker and lead to the OFF position when removing the storage bin. NOTE: It is part of your refrigerator. Press FILTER to change your water quality and usage. If it is time to see what percentage of your filter's life remains. Non-... some models) If your water filter. NOTE: Your ice maker has an automatic shutoff. Water Filter Status Light (on the left wall of your refrigerator does not have passed, replace the water filter more often. The ice maker sensors will automatically stop ice production when the ice storage bin is...
...produce the first batch of the ice maker and lead to the OFF position when removing the storage bin. NOTE: It is part of your refrigerator. Press FILTER to change your water quality and usage. If it is time to see what percentage of your filter's life remains. Non-... some models) If your water filter. NOTE: Your ice maker has an automatic shutoff. Water Filter Status Light (on the left wall of your refrigerator does not have passed, replace the water filter more often. The ice maker sensors will automatically stop ice production when the ice storage bin is...

User Instructions
Page 9
... Not all bulbs will transfer to ensure maximum efficiency. All other harsh cleaning tools. 1. Replacement bulbs are available from your refrigerator. Remove light shield when applicable. Replace light shield when applicable. 5. If the environment is particularly greasy or dusty, or..., cleaning waxes, concentrated detergents, bleaches or cleansers containing petroleum products on plastic parts, interior and door liners or gaskets. Unplug refrigerator or disconnect power. 2. Remove light bulb and replace with a soft brush to eliminate odors. IMPORTANT: Because air circulates between ...
... Not all bulbs will transfer to ensure maximum efficiency. All other harsh cleaning tools. 1. Replacement bulbs are available from your refrigerator. Remove light shield when applicable. Replace light shield when applicable. 5. If the environment is particularly greasy or dusty, or..., cleaning waxes, concentrated detergents, bleaches or cleansers containing petroleum products on plastic parts, interior and door liners or gaskets. Unplug refrigerator or disconnect power. 2. Remove light bulb and replace with a soft brush to eliminate odors. IMPORTANT: Because air circulates between ...
User Instructions
Page 10
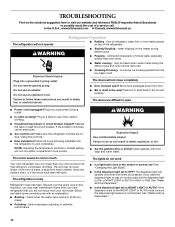
..."Water and Ice Dispensers." ■ Is the dispenser light set the dispenser light to OFF? In the U.S.A., www.kitchenaid.com In Canada, www.kitchenaid.ca The refrigerator will not close completely Do not remove ground prong. ■ Door blocked open ■ Power cord unplugged? Plug in... the correct position. Allow 24 hours following installation for the refrigerator to this reduction, you did not notice from items...
..."Water and Ice Dispensers." ■ Is the dispenser light set the dispenser light to OFF? In the U.S.A., www.kitchenaid.com In Canada, www.kitchenaid.ca The refrigerator will not close completely Do not remove ground prong. ■ Door blocked open ■ Power cord unplugged? Plug in... the correct position. Allow 24 hours following installation for the refrigerator to this reduction, you did not notice from items...
User Instructions
Page 11
...production to begin . Use warm water to remove the minerals. ■ Is there a water filter installed on the refrigerator? Failure to enter refrigerator. Allows warm air to do so can decrease water pressure. Minimize door openings and keep doors fully closed . New ...hours for the surrounding conditions? See "Water Supply Requirements" in 24 hours. Contributes to normal temperature. ■ Controls set correctly for refrigerator to return to moisture buildup. ■ Door(s) opened often or left open ? See "Using the Controls." This can result in too...
...production to begin . Use warm water to remove the minerals. ■ Is there a water filter installed on the refrigerator? Failure to enter refrigerator. Allows warm air to do so can decrease water pressure. Minimize door openings and keep doors fully closed . New ...hours for the surrounding conditions? See "Water Supply Requirements" in 24 hours. Contributes to normal temperature. ■ Controls set correctly for refrigerator to return to moisture buildup. ■ Door(s) opened often or left open ? See "Using the Controls." This can result in too...
User Instructions
Page 12
... New installation? The filter may not be clogged or incorrectly installed. ■ Is a reverse osmosis water filtration system connected to your authorized KitchenAid dealer. Water is not cool enough NOTE: Water from the dispenser. Flush the water system. The dispenser water is leaking from the dispenser ... Requirements." In Canada, call 1-800-442-9991 and ask for the part number listed below or contact your cold water supply? Connect refrigerator to a cold water pipe? Allow 24 hours for the water supply to cool completely. ■ Recently dispensed large amount of water after...
... New installation? The filter may not be clogged or incorrectly installed. ■ Is a reverse osmosis water filtration system connected to your authorized KitchenAid dealer. Water is not cool enough NOTE: Water from the dispenser. Flush the water system. The dispenser water is leaking from the dispenser ... Requirements." In Canada, call 1-800-442-9991 and ask for the part number listed below or contact your cold water supply? Connect refrigerator to a cold water pipe? Allow 24 hours for the water supply to cool completely. ■ Recently dispensed large amount of water after...
User Instructions
Page 15
...This major appliance is operated and maintained according to instructions attached to or furnished with the product, KitchenAid will pay for replacement or repair of the refrigerator/freezer cavity liner (including labor costs) if the part cracks due to defective materials or workmanship. ... water filter: 30 day limited warranty on the right-hand side of the refrigerator interior. Repairs when your correspondence. If you can find your complete model number ready. KITCHENAID® REFRIGERATOR WARRANTY ONE YEAR LIMITED WARRANTY For one year from the date of purchase, when...
...This major appliance is operated and maintained according to instructions attached to or furnished with the product, KitchenAid will pay for replacement or repair of the refrigerator/freezer cavity liner (including labor costs) if the part cracks due to defective materials or workmanship. ... water filter: 30 day limited warranty on the right-hand side of the refrigerator interior. Repairs when your correspondence. If you can find your complete model number ready. KITCHENAID® REFRIGERATOR WARRANTY ONE YEAR LIMITED WARRANTY For one year from the date of purchase, when...
Parts Diagram
Page 1
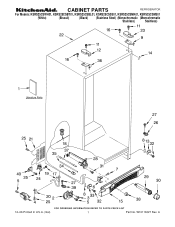
W10116327 Rev. A CABINET PARTS REFRIGERATOR For Models: KSRS25CSWH01, KSRS25CSBT01, KSRS25CSBL01, KSRS25CSSS01, KSRS25CSMK01, KSRS25CSMS01 (White) (Biscuit) (Black) (Stainless Steel) (Monochromatic (Monochromatic Stainless) Stainless) 12−06 Printed In U.S.A. (mat) 1 Part No.
W10116327 Rev. A CABINET PARTS REFRIGERATOR For Models: KSRS25CSWH01, KSRS25CSBT01, KSRS25CSBL01, KSRS25CSSS01, KSRS25CSMK01, KSRS25CSMS01 (White) (Biscuit) (Black) (Stainless Steel) (Monochromatic (Monochromatic Stainless) Stainless) 12−06 Printed In U.S.A. (mat) 1 Part No.
Parts Diagram
Page 4
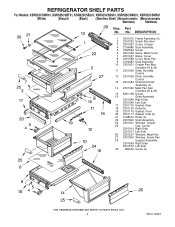
REFRIGERATOR SHELF PARTS For Models: KSRS25CSWH01, KSRS25CSBT01, KSRS25CSBL01, KSRS25CSSS01, KSRS25CSMK01, KSRS25CSMS01 (White) (Biscuit) (Black) (Stainless Steel) (Monochromatic (Monochromatic Stainless) Stainless) Illus. Part No. No. DESCRIPTION 1 ... Gasket, Rear 18 2301126 Deflector 19 2301116 Gasket, Front 20 2301117 Gasket, Side (2) 21 2188212 Roller (2) 22 2301566 Shelf Assembly 24 2301001 Window, Crisper 25 Cap, Corner 2301016 Right Side 2301017 Left Side 26 2301227 Window, Meat Pan 27 2301006 Window, Snack Pan 29 Support Assembly 2301569 Right Side 2301570...
REFRIGERATOR SHELF PARTS For Models: KSRS25CSWH01, KSRS25CSBT01, KSRS25CSBL01, KSRS25CSSS01, KSRS25CSMK01, KSRS25CSMS01 (White) (Biscuit) (Black) (Stainless Steel) (Monochromatic (Monochromatic Stainless) Stainless) Illus. Part No. No. DESCRIPTION 1 ... Gasket, Rear 18 2301126 Deflector 19 2301116 Gasket, Front 20 2301117 Gasket, Side (2) 21 2188212 Roller (2) 22 2301566 Shelf Assembly 24 2301001 Window, Crisper 25 Cap, Corner 2301016 Right Side 2301017 Left Side 26 2301227 Window, Meat Pan 27 2301006 Window, Snack Pan 29 Support Assembly 2301569 Right Side 2301570...
Parts Diagram
Page 9
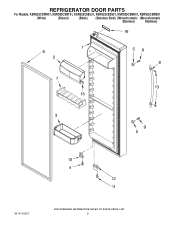
REFRIGERATOR DOOR PARTS For Models: KSRS25CSWH01, KSRS25CSBT01, KSRS25CSBL01, KSRS25CSSS01, KSRS25CSMK01, KSRS25CSMS01 (White) (Biscuit) (Black) (Stainless Steel) (Monochromatic (Monochromatic Stainless) Stainless) W10116327 9
REFRIGERATOR DOOR PARTS For Models: KSRS25CSWH01, KSRS25CSBT01, KSRS25CSBL01, KSRS25CSSS01, KSRS25CSMK01, KSRS25CSMS01 (White) (Biscuit) (Black) (Stainless Steel) (Monochromatic (Monochromatic Stainless) Stainless) W10116327 9
Parts Diagram
Page 10
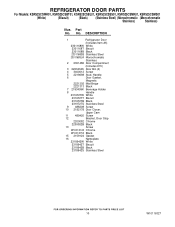
... PARTS For Models: KSRS25CSWH01, KSRS25CSBT01, KSRS25CSBL01, KSRS25CSSS01, KSRS25CSMK01, KSRS25CSMS01 (White) (Biscuit) (Black) (Stainless Steel) (Monochromatic (Monochromatic Stainless) Stainless) Illus. DESCRIPTION 1 Refrigerator Door (Includes Item #6) 2301168W White 2301168T Biscuit 2301168B Black 2301168SB Stainless Steel 2301168SUA Monochromatic Stainless 2 2301486 Door Compartment (Includes #15) 3 2223434K Door Bin (4) 4 3400012 Screw 5 ...
... PARTS For Models: KSRS25CSWH01, KSRS25CSBT01, KSRS25CSBL01, KSRS25CSSS01, KSRS25CSMK01, KSRS25CSMS01 (White) (Biscuit) (Black) (Stainless Steel) (Monochromatic (Monochromatic Stainless) Stainless) Illus. DESCRIPTION 1 Refrigerator Door (Includes Item #6) 2301168W White 2301168T Biscuit 2301168B Black 2301168SB Stainless Steel 2301168SUA Monochromatic Stainless 2 2301486 Door Compartment (Includes #15) 3 2223434K Door Bin (4) 4 3400012 Screw 5 ...
Parts Diagram
Page 18
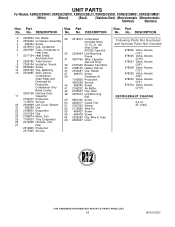
... 52 2172840 Wire Tie 22 2188823 Evaporator 53 489427 Screw 23 2161324 Clip 55 489478 Screw 24 2188874 Motor, Fan 59 2208280 Clip, Wire & Tube 25 1105523 Tray, Evaporator 63 2305227 Union 26 2310229 Harness, Unit 27 Drier 2319825 Production 2317845 Service Illus. No. No. Part No. DESCRIPTION Illus. No. ...Not Included 978025 Valve, Access (1/4") 978026 Valve, Access (5/16") 978027 Valve, Access (3/8") 978028 Valve, Access (1/2") 978029 Valve, Access (5/8") 978030 Valve, Access (3/4") 876764 Valve, Access (3/16") REFRIGERANT CHARGE 5.0 oz. (R−134A) 18 W10116327
... 52 2172840 Wire Tie 22 2188823 Evaporator 53 489427 Screw 23 2161324 Clip 55 489478 Screw 24 2188874 Motor, Fan 59 2208280 Clip, Wire & Tube 25 1105523 Tray, Evaporator 63 2305227 Union 26 2310229 Harness, Unit 27 Drier 2319825 Production 2317845 Service Illus. No. No. Part No. DESCRIPTION Illus. No. ...Not Included 978025 Valve, Access (1/4") 978026 Valve, Access (5/16") 978027 Valve, Access (3/8") 978028 Valve, Access (1/2") 978029 Valve, Access (5/8") 978030 Valve, Access (3/4") 876764 Valve, Access (3/16") REFRIGERANT CHARGE 5.0 oz. (R−134A) 18 W10116327


