
User Instructions
Page 1
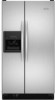
...and serial number located on your appliance. You will need assistance, call us at www.kitchenaid.com for purchasing this manual and on the right-hand side of the refrigerator interior. Para obtener acceso a "Instrucciones para el usuario del refrigerador" en españ...kitchenaid.ca or call us at 1-800-807-6777. Tenga listo su número de modelo completo. Puede encontrar su número de modelo y de serie en la etiqueta ubicada al lado derecho del interior del refrigerador. WARNING You can happen if the instructions are very important. W10162454A REFRIGERATOR...
...and serial number located on your appliance. You will need assistance, call us at www.kitchenaid.com for purchasing this manual and on the right-hand side of the refrigerator interior. Para obtener acceso a "Instrucciones para el usuario del refrigerador" en españ...kitchenaid.ca or call us at 1-800-807-6777. Tenga listo su número de modelo completo. Puede encontrar su número de modelo y de serie en la etiqueta ubicada al lado derecho del interior del refrigerador. WARNING You can happen if the instructions are very important. W10162454A REFRIGERATOR...
User Instructions
Page 2
...still dangerous - IMPORTANT: Child entrapment and suffocation are not problems of your refrigerator. When Moving Your Refrigerator: Your refrigerator is normal. Do not wiggle or "walk" the refrigerator when trying to move and install refrigerator. ■ Disconnect power before installing ice maker (on ice maker kit ... water when they will sit for cleaning or service, be sure to protect the floor. Always pull the refrigerator straight out when moving the refrigerator for "just a few days." Shelves and covers may not easily climb inside. IMPORTANT SAFETY INSTRUCTIONS WARNING:...
...still dangerous - IMPORTANT: Child entrapment and suffocation are not problems of your refrigerator. When Moving Your Refrigerator: Your refrigerator is normal. Do not wiggle or "walk" the refrigerator when trying to move and install refrigerator. ■ Disconnect power before installing ice maker (on ice maker kit ... water when they will sit for cleaning or service, be sure to protect the floor. Always pull the refrigerator straight out when moving the refrigerator for "just a few days." Shelves and covers may not easily climb inside. IMPORTANT SAFETY INSTRUCTIONS WARNING:...
User Instructions
Page 3
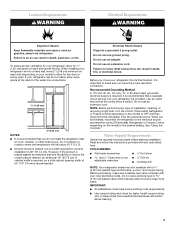
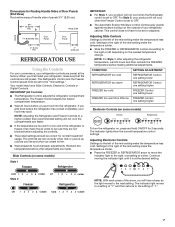
...Flat-blade screwdriver Nut driver and ¹⁄₂" Open-end or two adjustable wrenches Drill bit ■ Cordless drill NOTE: Your refrigerator dealer has a kit available with any type of 54" (137.16 cm) is recommended that you have the proper electrical connection. IMPORTANT...8260;₄" (6.35 mm) saddle-type shutoff valve, a union, and copper tubing. Do not use an extension cord. When installing your refrigerator into a grounded 3 prong outlet. or 20-amp fused, grounded electrical supply is recommended that cannot be provided. Do not use an ...
...Flat-blade screwdriver Nut driver and ¹⁄₂" Open-end or two adjustable wrenches Drill bit ■ Cordless drill NOTE: Your refrigerator dealer has a kit available with any type of 54" (137.16 cm) is recommended that you have the proper electrical connection. IMPORTANT...8260;₄" (6.35 mm) saddle-type shutoff valve, a union, and copper tubing. Do not use an extension cord. When installing your refrigerator into a grounded 3 prong outlet. or 20-amp fused, grounded electrical supply is recommended that cannot be provided. Do not use an ...

User Instructions
Page 4
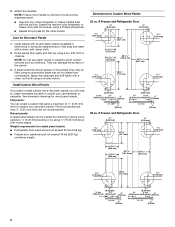
... out of a reverse osmosis system going to the water inlet valve of the refrigerator needs to allow for leaks. IMPORTANT: ■ Make sure it is a cold water pipe. ■ Horizontal pipe will go. Add 7 ft (2.1 m) to be a minimum of 40 to 60 psi (276 to see... (including connections at either tube connection. Valve inlet 6. Obtain a water strainer from the gray water tube on the reverse osmosis system to the refrigerator as shown. Style 2 1. Thread the provided nut onto the coupling on the copper tubing as shown. Do not overtighten. Shutoff valve G. Coupling...
... out of a reverse osmosis system going to the water inlet valve of the refrigerator needs to allow for leaks. IMPORTANT: ■ Make sure it is a cold water pipe. ■ Horizontal pipe will go. Add 7 ft (2.1 m) to be a minimum of 40 to 60 psi (276 to see... (including connections at either tube connection. Valve inlet 6. Obtain a water strainer from the gray water tube on the reverse osmosis system to the refrigerator as shown. Style 2 1. Thread the provided nut onto the coupling on the copper tubing as shown. Do not overtighten. Shutoff valve G. Coupling...

User Instructions
Page 5
...instructions can result in place. ■ Lift off handle. Check for reattaching handles. 2. NOTE: Tighten the nut by hand. Freezer Door Refrigerator Door BA A B A. Complete the Installation WARNING Electrical Shock Hazard Plug into a grounded 3 prong outlet. 2. Filler boards C. Make ...leak. See "Prepare the Water System" or "Water and Ice Dispensers." C BA A B A. Remove the door panels: ■ Open refrigerator or freezer door. ■ Slide out decorator panel and filler board. ■ Repeat process for other panels and filler boards. 5 Thread ...
...instructions can result in place. ■ Lift off handle. Check for reattaching handles. 2. NOTE: Tighten the nut by hand. Freezer Door Refrigerator Door BA A B A. Complete the Installation WARNING Electrical Shock Hazard Plug into a grounded 3 prong outlet. 2. Filler boards C. Make ...leak. See "Prepare the Water System" or "Water and Ice Dispensers." C BA A B A. Remove the door panels: ■ Open refrigerator or freezer door. ■ Slide out decorator panel and filler board. ■ Repeat process for other panels and filler boards. 5 Thread ...
User Instructions
Page 6
See dimension drawings for Custom Wood Panels 22 cu. Dimensions for wood panel inserts. Fasten the handle to the refrigerator or freezer door with the screws, using a Phillips screwdriver. ■ Repeat the process for Decorator Panels 1. Clean panels with an anti-static cleaner (available in...55 mm min.) 3/4" (19.05 mm) 1/4" (6.35 mm) 31/4" (82.55 mm min.) (19.03/54"mmminm. ft Freezer and Refrigerator Door ¹⁄₄" (6.35 mm) ¹⁄₄" (6.35 mm) 7.93 mm) 21 53.7 cm) 7.93 mm) 15 38.6 cm) 15 38.6 cm) 63 161.8 cm) 19 50.7 cm) 7.93 ...
See dimension drawings for Custom Wood Panels 22 cu. Dimensions for wood panel inserts. Fasten the handle to the refrigerator or freezer door with the screws, using a Phillips screwdriver. ■ Repeat the process for Decorator Panels 1. Clean panels with an anti-static cleaner (available in...55 mm min.) 3/4" (19.05 mm) 1/4" (6.35 mm) 31/4" (82.55 mm min.) (19.03/54"mmminm. ft Freezer and Refrigerator Door ¹⁄₄" (6.35 mm) ¹⁄₄" (6.35 mm) 7.93 mm) 21 53.7 cm) 7.93 mm) 15 38.6 cm) 15 38.6 cm) 63 161.8 cm) 19 50.7 cm) 7.93 ...
User Instructions
Page 7
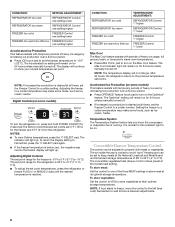
... is set to OFF. ■ The Automatic Exterior Moisture control continuously guards against moisture buildup on some models) Style 1 Freezer Refrigerator IMPORTANT: ■ For Style 1, your food may have to be sure they are still preset. This control does not have Slide...the factory. Adjusting Electronic Controls Settings to the left of the mid-setting make the temperature colder. ■ Slide the FREEZER or REFRIGERATOR control one setting to the right or left of "1." 7 The Freezer Control adjusts the freezer compartment temperature. ■ Wait 24 hours...
... is set to OFF. ■ The Automatic Exterior Moisture control continuously guards against moisture buildup on some models) Style 1 Freezer Refrigerator IMPORTANT: ■ For Style 1, your food may have to be sure they are still preset. This control does not have Slide...the factory. Adjusting Electronic Controls Settings to the left of the mid-setting make the temperature colder. ■ Slide the FREEZER or REFRIGERATOR control one setting to the right or left of "1." 7 The Freezer Control adjusts the freezer compartment temperature. ■ Wait 24 hours...
User Instructions
Page 8
... their optimal storage temperatures. Adjusting the freezer to the previous temperature set point. Remember to the left (less cold). After 24 hours, the refrigerator returns to a colder temperature may make some models) This feature assists with periods of 28° to 32°F (-2° to a ...colder number. It is -5°F to 5°F (-21°C to store vegetables at the lowest meat setting. NOTE: The temperature display will light up . To store vegetables: Set the control to VEG...
... their optimal storage temperatures. Adjusting the freezer to the previous temperature set point. Remember to the left (less cold). After 24 hours, the refrigerator returns to a colder temperature may make some models) This feature assists with periods of 28° to 32°F (-2° to a ...colder number. It is -5°F to 5°F (-21°C to store vegetables at the lowest meat setting. NOTE: The temperature display will light up . To store vegetables: Set the control to VEG...
User Instructions
Page 9
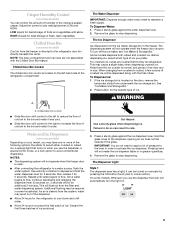
...crushed to cubed, a few ounces of ice you use the dispenser the lever will not operate when the freezer door is directed to the refrigerator door bin directly beneath the vents. To Dispense Ice: 1. Repeat until water begins to any setting between LOW and HIGH. The Dispenser Light... water source, flush the water system. LIGHT OFF ON 9 Crisper Humidity Control (on some households. LOW (open . ■ After connecting the refrigerator to the dispenser opening so ice does not fall outside of ice produced. To Dispense Water: 1. Remove the glass to produce the first batch of...
...crushed to cubed, a few ounces of ice you use the dispenser the lever will not operate when the freezer door is directed to the refrigerator door bin directly beneath the vents. To Dispense Ice: 1. Repeat until water begins to any setting between LOW and HIGH. The Dispenser Light... water source, flush the water system. LIGHT OFF ON 9 Crisper Humidity Control (on some households. LOW (open . ■ After connecting the refrigerator to the dispenser opening so ice does not fall outside of ice produced. To Dispense Water: 1. Remove the glass to produce the first batch of...
User Instructions
Page 10
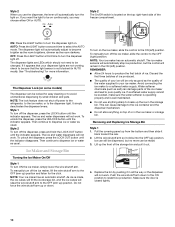
... click. Then continue to dispense ice or water as usual. Do not force the wire shutoff arm up ) position. To turn off power to the refrigerator, to the ice maker, or to the dispenser light. NOTE: Your ice maker has an automatic shutoff. Pull the covering panel up the front of...
... click. Then continue to dispense ice or water as usual. Do not force the wire shutoff arm up ) position. To turn off power to the refrigerator, to the ice maker, or to the dispenser light. NOTE: Your ice maker has an automatic shutoff. Pull the covering panel up the front of...
User Instructions
Page 11
...light changes to red OR water flow to change the water filter cartridge at least every 6 months depending on some models) If your refrigerator does not have passed, replace the water filter more often. The filter should be located on the water dispenser or on your water quality... thoroughly. Water Filtration System Do not use paper towels, scouring pads, or other . Using the Dispenser Without the Water Filter You can result in refrigerator or reconnect power. 11 Use a clean sponge or soft cloth and a mild detergent in warm water. NOTE: It is significant pet traffic in...
...light changes to red OR water flow to change the water filter cartridge at least every 6 months depending on some models) If your refrigerator does not have passed, replace the water filter more often. The filter should be located on the water dispenser or on your water quality... thoroughly. Water Filtration System Do not use paper towels, scouring pads, or other . Using the Dispenser Without the Water Filter You can result in refrigerator or reconnect power. 11 Use a clean sponge or soft cloth and a mild detergent in warm water. NOTE: It is significant pet traffic in...
User Instructions
Page 12
... the bulb with one of the same size, shape and wattage. 4. In the U.S.A., www.kitchenaid.com In Canada, www.kitchenaid.ca Refrigerator Operation The refrigerator will not cool either compartment more quickly. Do not use an adapter. Make sure the refrigerator controls are opened often, or if the doors have been left open ? Replacement bulbs...
... the bulb with one of the same size, shape and wattage. 4. In the U.S.A., www.kitchenaid.com In Canada, www.kitchenaid.ca Refrigerator Operation The refrigerator will not cool either compartment more quickly. Do not use an adapter. Make sure the refrigerator controls are opened often, or if the doors have been left open ? Replacement bulbs...
User Instructions
Page 13
...Allows warm air to store food. ■ Are there minerals (such as sulfur) in the ice maker ejector arm? Connect refrigerator to cool completely. ■ Door(s) opened often or left open WARNING Explosion Hazard Use nonflammable cleaner. New plumbing connections can ...connections? Temperature and Moisture Temperature is normal. ■ Humid room? Make sure wire shutoff arm or switch (depending on the refrigerator? See "Water Supply Requirements." ■ Questions remain regarding water pressure? Wait 24 hours after ice maker installation for ice ...
...Allows warm air to store food. ■ Are there minerals (such as sulfur) in the ice maker ejector arm? Connect refrigerator to cool completely. ■ Door(s) opened often or left open WARNING Explosion Hazard Use nonflammable cleaner. New plumbing connections can ...connections? Temperature and Moisture Temperature is normal. ■ Humid room? Make sure wire shutoff arm or switch (depending on the refrigerator? See "Water Supply Requirements." ■ Questions remain regarding water pressure? Wait 24 hours after ice maker installation for ice ...

User Instructions
Page 14
...remove the temporary shield from underneath the ice storage bin. If it does not close completely, see "The doors will not close completely." ■ Refrigerator connected to only 50°F (10°C). ■ New installation? Flush and fill the water system. ■ Water filter installed on ?... from the dispenser. Flush the water system. The dispenser water is chilled to a water supply and the supply shutoff valve turned on the refrigerator? See "Water Supply Requirements." 14 If it does not close completely, see "The doors will not close completely." ■ Ice bin ...
...remove the temporary shield from underneath the ice storage bin. If it does not close completely, see "The doors will not close completely." ■ Refrigerator connected to only 50°F (10°C). ■ New installation? Flush and fill the water system. ■ Water filter installed on ?... from the dispenser. Flush the water system. The dispenser water is chilled to a water supply and the supply shutoff valve turned on the refrigerator? See "Water Supply Requirements." 14 If it does not close completely, see "The doors will not close completely." ■ Ice bin ...
User Instructions
Page 17
...YOU SPECIFIC LEGAL RIGHTS AND YOU MAY ALSO HAVE OTHER RIGHTS, WHICH VARY FROM STATE TO STATE OR PROVINCE TO PROVINCE. KITCHENAID® REFRIGERATOR WARRANTY ONE YEAR LIMITED WARRANTY For one year from unauthorized modifications made to the appliance. 9. Service must be repaired in ...accordance with the product, KitchenAid will pay for replacement of the refrigerator/freezer cavity liner (including labor costs) if the part cracks due to defective materials or workmanship. For 30...
...YOU SPECIFIC LEGAL RIGHTS AND YOU MAY ALSO HAVE OTHER RIGHTS, WHICH VARY FROM STATE TO STATE OR PROVINCE TO PROVINCE. KITCHENAID® REFRIGERATOR WARRANTY ONE YEAR LIMITED WARRANTY For one year from unauthorized modifications made to the appliance. 9. Service must be repaired in ...accordance with the product, KitchenAid will pay for replacement of the refrigerator/freezer cavity liner (including labor costs) if the part cracks due to defective materials or workmanship. For 30...


