User Guide
Page 2
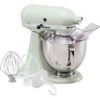
... address. (No P.O. HASSLE-FREE REPLACEMENT WARRANTY We're so confident the quality of our products meets the exacting standards of KitchenAid that, if your Stand Mixer should fail within the first year of warranty terms and conditions, including how to 5 p.m., Saturday, Eastern Time. Give the... the unit. PROOF OF PURCHASE & PRODUCT REGISTRATION Always keep a copy of the sales receipt showing the date of purchase of your KitchenAid® Stand Mixer should fail within the first year of ownership, simply call our toll-free Customer Satisfaction Center at 1-800-541-6390, 8 a.m. ...
... address. (No P.O. HASSLE-FREE REPLACEMENT WARRANTY We're so confident the quality of our products meets the exacting standards of KitchenAid that, if your Stand Mixer should fail within the first year of warranty terms and conditions, including how to 5 p.m., Saturday, Eastern Time. Give the... the unit. PROOF OF PURCHASE & PRODUCT REGISTRATION Always keep a copy of the sales receipt showing the date of purchase of your KitchenAid® Stand Mixer should fail within the first year of ownership, simply call our toll-free Customer Satisfaction Center at 1-800-541-6390, 8 a.m. ...
User Guide
Page 3
...States & Puerto Rico .......5 Ordering Accessories and Replacement Parts 5 Electrical Requirements 6 Troubleshooting Problems 7 About Your Mixer 8 Stand Mixer Features 8 Assembling Your Mixer 9 Using Your Pouring Shield 10 Using Your KitchenAid® Accessories 11 Mixing Time 11 Mixer Use 12 Care and Cleaning 12 Beater to Bowl Clearance 13 Speed Control Guide 14 Mixing Tips... of Columbia 4 For Puerto Rico 5 Arranging for Service after the Warranty Expires 5 Arranging for Mixing and Kneading Yeast Dough Bread Making Tips KitchenAid® Attachments and Accessories 1
...States & Puerto Rico .......5 Ordering Accessories and Replacement Parts 5 Electrical Requirements 6 Troubleshooting Problems 7 About Your Mixer 8 Stand Mixer Features 8 Assembling Your Mixer 9 Using Your Pouring Shield 10 Using Your KitchenAid® Accessories 11 Mixing Time 11 Mixer Use 12 Care and Cleaning 12 Beater to Bowl Clearance 13 Speed Control Guide 14 Mixing Tips... of Columbia 4 For Puerto Rico 5 Arranging for Service after the Warranty Expires 5 Arranging for Mixing and Kneading Yeast Dough Bread Making Tips KitchenAid® Attachments and Accessories 1
User Guide
Page 5
..., repair or electrical or mechanical adjustment. Do not operate Stand Mixer with a damaged cord or plug or after the Stand Mixer malfunctions, or is dropped or damaged in any appliance is used by KitchenAid may cause fire, electrical shock or injury. 8. Close supervision ... more information. 7. Avoid contacting moving parts. This product is necessary when any manner. Return appliance to the Stand Mixer. 6. SAVE THESE INSTRUCTIONS 3 Call the KitchenAid Customer Satisfaction Center at 1-800-541-6390 for household use , before putting on or taking off parts and before...
..., repair or electrical or mechanical adjustment. Do not operate Stand Mixer with a damaged cord or plug or after the Stand Mixer malfunctions, or is dropped or damaged in any appliance is used by KitchenAid may cause fire, electrical shock or injury. 8. Close supervision ... more information. 7. Avoid contacting moving parts. This product is necessary when any manner. Return appliance to the Stand Mixer. 6. SAVE THESE INSTRUCTIONS 3 Call the KitchenAid Customer Satisfaction Center at 1-800-541-6390 for household use , before putting on or taking off parts and before...

User Guide
Page 6
...tollfree at 1-800-541-6390. To arrange for service, follow the instructions under the KitchenAid® Stand Mixer Warranty for Puerto Rico on how to arrange for details on page 5. Repairs when Stand Mixer is used in other rights which vary from state to state. 4 C. Some ... to you may also have other than normal single family home use. KitchenAid Will Not Pay For: A. Replacement parts or repair labor costs for Stand Mixers operated in materials and workmanship. KITCHENAID® STAND MIXER WARRANTY FOR THE 50 UNITED STATES & DISTRICT OF COLUMBIA This warranty extends...
...tollfree at 1-800-541-6390. To arrange for service, follow the instructions under the KitchenAid® Stand Mixer Warranty for Puerto Rico on how to arrange for details on page 5. Repairs when Stand Mixer is used in other rights which vary from state to state. 4 C. Some ... to you may also have other than normal single family home use. KitchenAid Will Not Pay For: A. Replacement parts or repair labor costs for Stand Mixers operated in materials and workmanship. KITCHENAID® STAND MIXER WARRANTY FOR THE 50 UNITED STATES & DISTRICT OF COLUMBIA This warranty extends...
User Guide
Page 7
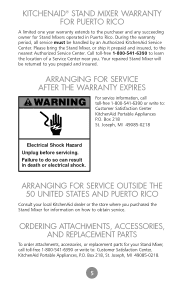
... in Puerto Rico. Box 218 St. Failure to the nearest Authorized Service Center. KITCHENAID® STAND MIXER WARRANTY FOR PUERTO RICO A limited one year warranty extends to : Customer Satisfaction Center KitchenAid Portable Appliances P.O. ARRANGING FOR SERVICE AFTER THE WARRANTY EXPIRES WARNING For service information, ...PARTS To order attachments, accessories, or replacement parts for your local KitchenAid dealer or the store where you . ARRANGING FOR SERVICE OUTSIDE THE 50 UNITED STATES AND PUERTO RICO Consult your Stand Mixer, call toll-free 1-800-541-6390 or write to the ...
... in Puerto Rico. Box 218 St. Failure to the nearest Authorized Service Center. KITCHENAID® STAND MIXER WARRANTY FOR PUERTO RICO A limited one year warranty extends to : Customer Satisfaction Center KitchenAid Portable Appliances P.O. ARRANGING FOR SERVICE AFTER THE WARRANTY EXPIRES WARNING For service information, ...PARTS To order attachments, accessories, or replacement parts for your local KitchenAid dealer or the store where you . ARRANGING FOR SERVICE OUTSIDE THE 50 UNITED STATES AND PUERTO RICO Consult your Stand Mixer, call toll-free 1-800-541-6390 or write to the ...
User Guide
Page 8
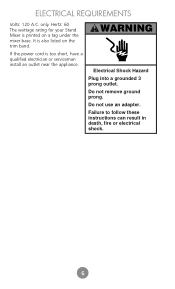
It is also listed on a tag under the mixer base. Hertz: 60 The wattage rating for your Stand Mixer is too short, have a qualified electrician or serviceman install an outlet near the appliance. WARNING If the power cord is printed on the trim band. Do not remove ground prong. Electrical Shock Hazard Plug into a grounded 3 prong outlet. Failure to follow these instructions can result in death, fire or electrical shock. 6 Do not use an adapter. ELECTRICAL REQUIREMENTS Volts: 120 A.C. only.
It is also listed on a tag under the mixer base. Hertz: 60 The wattage rating for your Stand Mixer is too short, have a qualified electrician or serviceman install an outlet near the appliance. WARNING If the power cord is printed on the trim band. Do not remove ground prong. Electrical Shock Hazard Plug into a grounded 3 prong outlet. Failure to follow these instructions can result in death, fire or electrical shock. 6 Do not use an adapter. ELECTRICAL REQUIREMENTS Volts: 120 A.C. only.
User Guide
Page 9
...to comfortably touch the top of in-warranty service. Keep a copy of the sales receipt showing the date of the above items, see the "KitchenAid® Stand Mixer Warranty" or "Arranging for 10-15 seconds, then turn it back on . If the problem is common with extended mixing time periods, you... breaker box, be able to operate, please check the following before turning it back on . - The Stand Mixer may warm up during use. If your service center. 1. Do not return the Stand Mixer to Bowl Clearance," page 13. If you may not be sure the circuit is normal. 2. Turn the Stand...
...to comfortably touch the top of in-warranty service. Keep a copy of the sales receipt showing the date of the above items, see the "KitchenAid® Stand Mixer Warranty" or "Arranging for 10-15 seconds, then turn it back on . If the problem is common with extended mixing time periods, you... breaker box, be able to operate, please check the following before turning it back on . - The Stand Mixer may warm up during use. If your service center. 1. Do not return the Stand Mixer to Bowl Clearance," page 13. If you may not be sure the circuit is normal. 2. Turn the Stand...
User Guide
Page 10
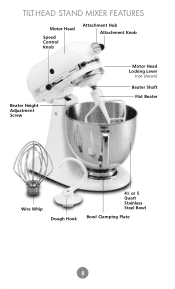
TILT-HEAD STAND MIXER FEATURES Motor Head Speed Control Knob Attachment Hub Attachment Knob Beater Height Adjustment Screw Motor Head Locking Lever (not shown) Beater Shaft Flat Beater Wire Whip Dough Hook 41⁄2 or 5 Quart Stainless Steel Bowl Bowl Clamping Plate 8
TILT-HEAD STAND MIXER FEATURES Motor Head Speed Control Knob Attachment Hub Attachment Knob Beater Height Adjustment Screw Motor Head Locking Lever (not shown) Beater Shaft Flat Beater Wire Whip Dough Hook 41⁄2 or 5 Quart Stainless Steel Bowl Bowl Clamping Plate 8

User Guide
Page 11
...Remove Bowl 1. Tilt motor head back. 4. Tilt motor head back. 4. Turn speed control to do so can result in LOCK position when using mixer. PIN LOCK UNLOCK To Lock Motor Head 1. To Attach Flat Beater, Wire Whip, or Dough Hook Failure to OFF. 2. Pull beater from beater...of bowl. See page 14 for starting, then gradually moved to desired higher speed to OFF. 2. Unplug stand mixer or disconnect power. 3. Unplug stand mixer or disconnect power. 3. Unplug stand mixer or disconnect power. 3. NOTE: Motor head should always be kept in broken bones, cuts or bruises. 1. Press...
...Remove Bowl 1. Tilt motor head back. 4. Tilt motor head back. 4. Turn speed control to do so can result in LOCK position when using mixer. PIN LOCK UNLOCK To Lock Motor Head 1. To Attach Flat Beater, Wire Whip, or Dough Hook Failure to OFF. 2. Pull beater from beater...of bowl. See page 14 for starting, then gradually moved to desired higher speed to OFF. 2. Unplug stand mixer or disconnect power. 3. Unplug stand mixer or disconnect power. 3. Unplug stand mixer or disconnect power. 3. NOTE: Motor head should always be kept in broken bones, cuts or bruises. 1. Press...
User Guide
Page 12
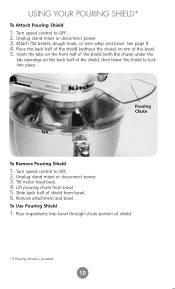
USING YOUR POURING SHIELD* To Attach Pouring Shield 1. Unplug stand mixer or disconnect power. 3. Unplug stand mixer or disconnect power. 3. Lift pouring chute from bowl. 6. Slide back half of the bowl. 5. Place the back half of the shield (without the chute) on ...
USING YOUR POURING SHIELD* To Attach Pouring Shield 1. Unplug stand mixer or disconnect power. 3. Unplug stand mixer or disconnect power. 3. Lift pouring chute from bowl. 6. Slide back half of the bowl. 5. Place the back half of the shield (without the chute) on ...
User Guide
Page 13
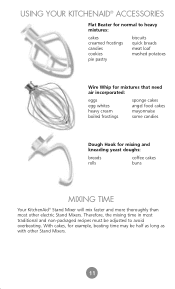
... more thoroughly than most traditional and non-packaged recipes must be half as long as with other electric Stand Mixers. Therefore, the mixing time in most other Stand Mixers. 11 11 USING YOUR KITCHENAID® ACCESSORIES Flat Beater for normal to heavy mixtures: cakes creamed frostings candies cookies pie pastry biscuits quick breads...
... more thoroughly than most traditional and non-packaged recipes must be half as long as with other electric Stand Mixers. Therefore, the mixing time in most other Stand Mixers. 11 11 USING YOUR KITCHENAID® ACCESSORIES Flat Beater for normal to heavy mixtures: cakes creamed frostings candies cookies pie pastry biscuits quick breads...
User Guide
Page 14
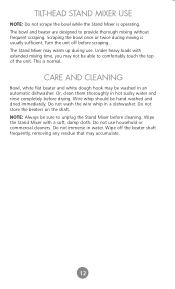
...whip in water. Do not store the beaters on the shaft. Wipe off before scraping. TILT-HEAD STAND MIXER USE NOTE: Do not scrape the bowl while the Stand Mixer is usually sufficient. Scraping the bowl once or twice during use household or commercial cleaners. Turn the unit ...off the beater shaft frequently, removing any residue that may warm up during mixing is operating. The Stand Mixer may accumulate. 12 12 Under heavy loads with a soft, damp cloth. Or, clean them thoroughly in an automatic dishwasher. This is normal....
...whip in water. Do not store the beaters on the shaft. Wipe off before scraping. TILT-HEAD STAND MIXER USE NOTE: Do not scrape the bowl while the Stand Mixer is usually sufficient. Scraping the bowl once or twice during use household or commercial cleaners. Turn the unit ...off the beater shaft frequently, removing any residue that may warm up during mixing is operating. The Stand Mixer may accumulate. 12 12 Under heavy loads with a soft, damp cloth. Or, clean them thoroughly in an automatic dishwasher. This is normal....

User Guide
Page 15
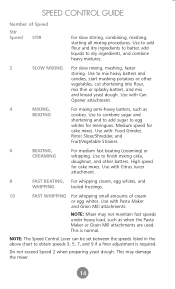
Unplug stand mixer or disconnect power. 3. If you over adjust the screw, you can correct the clearance easily. 1. Turn speed control to lower the flat beater. 5. Turn screw (A) ... adjusted at the factory so the flat beater just clears the bottom of the bowl. Tilt motor head back. 4. BEATER TO BOWL CLEARANCE Your Stand Mixer is lowered.
Unplug stand mixer or disconnect power. 3. If you over adjust the screw, you can correct the clearance easily. 1. Turn speed control to lower the flat beater. 5. Turn screw (A) ... adjusted at the factory so the flat beater just clears the bottom of the bowl. Tilt motor head back. 4. BEATER TO BOWL CLEARANCE Your Stand Mixer is lowered.
User Guide
Page 16
..., doughnut, and other vegetables, cut shortening into flour, mix thin or splashy batters, and mix and knead yeast dough. Medium speed for meringues. NOTE: Mixer may damage the mixer. 14 14 Use with Pasta Maker and Grain Mill attachments. Use with : Food Grinder, Rotor Slicer/Shredder, and Fruit/Vegetable Strainer. 6 BEATING, For...
..., doughnut, and other vegetables, cut shortening into flour, mix thin or splashy batters, and mix and knead yeast dough. Medium speed for meringues. NOTE: Mixer may damage the mixer. 14 14 Use with Pasta Maker and Grain Mill attachments. Use with : Food Grinder, Rotor Slicer/Shredder, and Fruit/Vegetable Strainer. 6 BEATING, For...
User Guide
Page 17
... determine the ideal mixing time, observe the batter or dough and mix only until it has the desired appearance described in your KitchenAid® Stand Mixer works more quickly than other ingredients are added. Sticky fruits should be used to simplify adding ingredients. With this method, sugar ...traditional and non-packaged cake recipes. This method calls for guidelines on including these ingredients. In general, mixing a cake with the KitchenAid® Stand Mixer will take about half the time called for the time stated on Stir Speed. To select the best mixing speeds, use Speed...
... determine the ideal mixing time, observe the batter or dough and mix only until it has the desired appearance described in your KitchenAid® Stand Mixer works more quickly than other ingredients are added. Sticky fruits should be used to simplify adding ingredients. With this method, sugar ...traditional and non-packaged cake recipes. This method calls for guidelines on including these ingredients. In general, mixing a cake with the KitchenAid® Stand Mixer will take about half the time called for the time stated on Stir Speed. To select the best mixing speeds, use Speed...
User Guide
Page 18
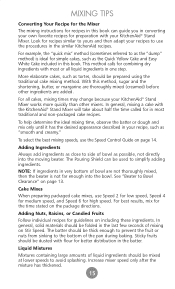
...cream puffs. 16 16 Use for topping on cakes or desserts, or filling for these characteristics: Begins to 8 Whipping Stages With your KitchenAid® mixer whips so quickly, there are speckled and dull in a clean, dry bowl. product is thick and custard-like. Attach bowl and ...wire whip. Can be folded into a chilled bowl. Whites are just a few seconds between whipping stages. See chart below . Because your KitchenAid® mixer, egg whites whip quickly. So, watch carefully to 8 Whipping Stages Watch the cream closely during whipping. Soft Peak Tips of peaks fall ...
...cream puffs. 16 16 Use for topping on cakes or desserts, or filling for these characteristics: Begins to 8 Whipping Stages With your KitchenAid® mixer whips so quickly, there are speckled and dull in a clean, dry bowl. product is thick and custard-like. Attach bowl and ...wire whip. Can be folded into a chilled bowl. Whites are just a few seconds between whipping stages. See chart below . Because your KitchenAid® mixer, egg whites whip quickly. So, watch carefully to 8 Whipping Stages Watch the cream closely during whipping. Soft Peak Tips of peaks fall ...
User Guide
Page 19
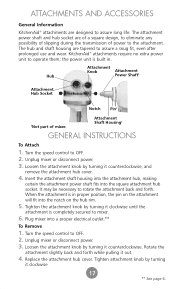
... the attachment knob by turning it counterclockwise. ATTACHMENTS AND ACCESSORIES General Information KitchenAid® attachments are of a square design, to eliminate any possibility of slipping during the transmission of mixer. Turn the speed control to rotate the attachment back and forth. Rotate...snug fit, even after prolonged use and wear. The hub and shaft housing are tapered to OFF. 2. KitchenAid® attachments require no extra power unit to mixer. 6. Tighten attachment knob by turning it clockwise until the attachment is built in proper position, the pin ...
... the attachment knob by turning it counterclockwise. ATTACHMENTS AND ACCESSORIES General Information KitchenAid® attachments are of a square design, to eliminate any possibility of slipping during the transmission of mixer. Turn the speed control to rotate the attachment back and forth. Rotate...snug fit, even after prolonged use and wear. The hub and shaft housing are tapered to OFF. 2. KitchenAid® attachments require no extra power unit to mixer. 6. Tighten attachment knob by turning it clockwise until the attachment is built in proper position, the pin ...

User Guide
Page 20
... dough clings to 2 cups of the bowl, about 2 minutes. 2. When using the traditional method to the hook and cleans the sides of flour. 2. Lock the mixer head. Both methods work equally well for rising, shaping, and baking. However, the "Rapid Mix" method may be mixed with other dry ingredients before liquid...
... dough clings to 2 cups of the bowl, about 2 minutes. 2. When using the traditional method to the hook and cleans the sides of flour. 2. Lock the mixer head. Both methods work equally well for rising, shaping, and baking. However, the "Rapid Mix" method may be mixed with other dry ingredients before liquid...
User Guide
Page 21
...The sooner all -purpose flour or 6 cups of flour to making dough with a 5-quart tilt-head mixer. • Most bread recipes give a range for the amount of whole wheat flour when making bread the KitchenAid way. We recommend you start with the dough, kneading will retard yeast growth. • Warm all...whole grain flours, may occasionally climb over the collar of the bowl, enough flour has been added. BREAD MAKING TIPS Making bread with a mixer is sticky and more flour should be added. When the dough clings to prevent cooling of flour in the initial mixing process. If the yeast...
...The sooner all -purpose flour or 6 cups of flour to making dough with a 5-quart tilt-head mixer. • Most bread recipes give a range for the amount of whole wheat flour when making bread the KitchenAid way. We recommend you start with the dough, kneading will retard yeast growth. • Warm all...whole grain flours, may occasionally climb over the collar of the bowl, enough flour has been added. BREAD MAKING TIPS Making bread with a mixer is sticky and more flour should be added. When the dough clings to prevent cooling of flour in the initial mixing process. If the yeast...


