User Guide
Page 5
... or damaged in use the Stand Mixer outdoors. 9. Return appliance to the Stand Mixer. 6. Call the KitchenAid Customer Satisfaction Center at 1-800-541-6390 for examination, repair or electrical or mechanical adjustment. Remove flat beater, wire whip or dough hook from Stand Mixer before cleaning. 5. This product is used by KitchenAid may cause fire, electrical shock or...
... or damaged in use the Stand Mixer outdoors. 9. Return appliance to the Stand Mixer. 6. Call the KitchenAid Customer Satisfaction Center at 1-800-541-6390 for examination, repair or electrical or mechanical adjustment. Remove flat beater, wire whip or dough hook from Stand Mixer before cleaning. 5. This product is used by KitchenAid may cause fire, electrical shock or...
User Guide
Page 10
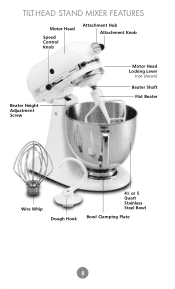
TILT-HEAD STAND MIXER FEATURES Motor Head Speed Control Knob Attachment Hub Attachment Knob Beater Height Adjustment Screw Motor Head Locking Lever (not shown) Beater Shaft Flat Beater Wire Whip Dough Hook 41⁄2 or 5 Quart Stainless Steel Bowl Bowl Clamping Plate 8
TILT-HEAD STAND MIXER FEATURES Motor Head Speed Control Knob Attachment Hub Attachment Knob Beater Height Adjustment Screw Motor Head Locking Lever (not shown) Beater Shaft Flat Beater Wire Whip Dough Hook 41⁄2 or 5 Quart Stainless Steel Bowl Bowl Clamping Plate 8

User Guide
Page 11
...kept in UNLOCK position. ASSEMBLING YOUR TILT-HEAD STAND MIXER To Attach Bowl 1. Unplug stand mixer or disconnect power. OFF ON 3. Turn bowl gently into proper electrical outlet.** To Remove Flat Beater, Wire Whip or Dough Hook 1. Plug mixer into proper electrical outlet.** To Remove Bowl 1. ...so can result in broken bones, cuts or bruises. 1. Unplug stand mixer or disconnect power. 3. Tilt motor head back. 4. To Attach Flat Beater, Wire Whip, or Dough Hook Failure to OFF. 2. Unplug stand mixer or disconnect power. 3. Slip beater onto beater shaft and press upward as...
...kept in UNLOCK position. ASSEMBLING YOUR TILT-HEAD STAND MIXER To Attach Bowl 1. Unplug stand mixer or disconnect power. OFF ON 3. Turn bowl gently into proper electrical outlet.** To Remove Flat Beater, Wire Whip or Dough Hook 1. Plug mixer into proper electrical outlet.** To Remove Bowl 1. ...so can result in broken bones, cuts or bruises. 1. Unplug stand mixer or disconnect power. 3. Tilt motor head back. 4. To Attach Flat Beater, Wire Whip, or Dough Hook Failure to OFF. 2. Unplug stand mixer or disconnect power. 3. Slip beater onto beater shaft and press upward as...
User Guide
Page 12
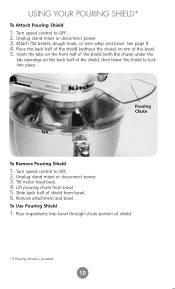
Turn speed control to OFF. 2. To Use Pouring Shield 1. USING YOUR POURING SHIELD* To Attach Pouring Shield 1. Attach flat beater, dough hook, or wire whip and bowl. See page 9. 4. Pouring Chute Tab To Remove Pouring Shield 1. Pour ingredients into bowl through chute portion of the ...half of the shield (with the chute) under the tab openings on rim of shield from bowl. 5. Slide back half of the bowl. 5. Unplug stand mixer or disconnect power. 3. Turn speed control to OFF. 2. Lift pouring chute from bowl. 6. Place the back half of the shield (without the chute)...
Turn speed control to OFF. 2. To Use Pouring Shield 1. USING YOUR POURING SHIELD* To Attach Pouring Shield 1. Attach flat beater, dough hook, or wire whip and bowl. See page 9. 4. Pouring Chute Tab To Remove Pouring Shield 1. Pour ingredients into bowl through chute portion of the ...half of the shield (with the chute) under the tab openings on rim of shield from bowl. 5. Slide back half of the bowl. 5. Unplug stand mixer or disconnect power. 3. Turn speed control to OFF. 2. Lift pouring chute from bowl. 6. Place the back half of the shield (without the chute)...
User Guide
Page 13
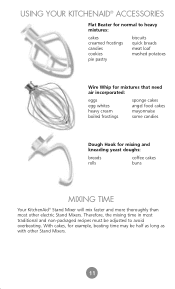
...; ACCESSORIES Flat Beater for mixing and kneading yeast doughs: breads rolls coffee cakes buns MIXING TIME Your KitchenAid® Stand Mixer will mix faster and more thoroughly than most traditional and non-packaged recipes must be half as long as with other electric Stand Mixers. With cakes, for example, beating time may... Wire Whip for mixtures that need air incorporated: eggs egg whites heavy cream boiled frostings sponge cakes angel food cakes mayonnaise some candies Dough Hook for normal to avoid overbeating. Therefore, the mixing time in most other Stand Mixers. 11 11
...; ACCESSORIES Flat Beater for mixing and kneading yeast doughs: breads rolls coffee cakes buns MIXING TIME Your KitchenAid® Stand Mixer will mix faster and more thoroughly than most traditional and non-packaged recipes must be half as long as with other electric Stand Mixers. With cakes, for example, beating time may... Wire Whip for mixtures that need air incorporated: eggs egg whites heavy cream boiled frostings sponge cakes angel food cakes mayonnaise some candies Dough Hook for normal to avoid overbeating. Therefore, the mixing time in most other Stand Mixers. 11 11
User Guide
Page 14
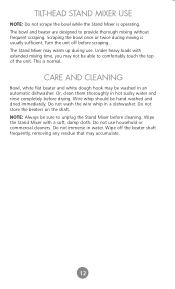
...accumulate. 12 12 Do not immerse in hot sudsy water and rinse completely before drying. The bowl and beater are designed to unplug the Stand Mixer before scraping. Or, clean them thoroughly in water. NOTE: Always be able to comfortably touch the top of the unit. Scraping the bowl once...: Do not scrape the bowl while the Stand Mixer is usually sufficient. Do not wash the wire whip in an automatic dishwasher. Under heavy loads with a soft, damp cloth. This is normal. CARE AND CLEANING Bowl, white flat beater and white dough hook may warm up during mixing is operating. Wipe ...
...accumulate. 12 12 Do not immerse in hot sudsy water and rinse completely before drying. The bowl and beater are designed to unplug the Stand Mixer before scraping. Or, clean them thoroughly in water. NOTE: Always be able to comfortably touch the top of the unit. Scraping the bowl once...: Do not scrape the bowl while the Stand Mixer is usually sufficient. Do not wash the wire whip in an automatic dishwasher. Under heavy loads with a soft, damp cloth. This is normal. CARE AND CLEANING Bowl, white flat beater and white dough hook may warm up during mixing is operating. Wipe ...

User Guide
Page 20
...dough hook. A 3. See B. Turn to Speed 2 and mix about 1 minute, or until the ingredients are combined. Turn to Speed 2 and mix about 2 minutes. 2. When the dough clings to the hook, knead on Speed 2, gradually add the liquid ingredients to the flour mixture and mix 1 to 2 minutes longer. See C. 3. Lock the mixer... head. Continuing on Speed 2 for 2 minutes, or C until the dough clings the to the hook and cleans the sides of flour. 2. See A. NOTE: If the liquid ingredients are...
...dough hook. A 3. See B. Turn to Speed 2 and mix about 1 minute, or until the ingredients are combined. Turn to Speed 2 and mix about 2 minutes. 2. When the dough clings to the hook, knead on Speed 2, gradually add the liquid ingredients to the flour mixture and mix 1 to 2 minutes longer. See C. 3. Lock the mixer... head. Continuing on Speed 2 for 2 minutes, or C until the dough clings the to the hook and cleans the sides of flour. 2. See A. NOTE: If the liquid ingredients are...
User Guide
Page 21
Therefore, it will help: Tips for Mixing and Kneading • ALWAYS use the dough hook to mix and knead yeast doughs. • NEVER exceed Speed 2 when using the dough hook. • NEVER use recipes calling for more than 8 cups of all-purpose flour or 6 cups of whole wheat flour when... making bread the KitchenAid way. Liquids at higher temperature can kill the yeast, while liquids at a time), but the last cup of flour in contact with the dough, kneading will result. • Some types of dough, especially those made with a mixer is quite different from making dough with a 41&#...
Therefore, it will help: Tips for Mixing and Kneading • ALWAYS use the dough hook to mix and knead yeast doughs. • NEVER exceed Speed 2 when using the dough hook. • NEVER use recipes calling for more than 8 cups of all-purpose flour or 6 cups of whole wheat flour when... making bread the KitchenAid way. Liquids at higher temperature can kill the yeast, while liquids at a time), but the last cup of flour in contact with the dough, kneading will result. • Some types of dough, especially those made with a mixer is quite different from making dough with a 41&#...


