KitchenAid FIT System Guarantee 2020
Page 1
...property, caused by law. All rights reserved. The Fit System Limited Guarantee covers replacement installations in range, KitchenAid will provide a set of two (2), (each ½ inch wide) trim pieces which vary from the date your new... apartments, condominiums, subdivisions, and wholesalers. Fraudulent submissions could result in range other guarantees as set forth herein, KitchenAid Brand of Whirlpool Corporation (hereafter "KitchenAid") guarantees your new 30" KitchenAid Brand slide-in range (qualifying models listed below . NOTE: All fields must be purchased ...
...property, caused by law. All rights reserved. The Fit System Limited Guarantee covers replacement installations in range, KitchenAid will provide a set of two (2), (each ½ inch wide) trim pieces which vary from the date your new... apartments, condominiums, subdivisions, and wholesalers. Fraudulent submissions could result in range other guarantees as set forth herein, KitchenAid Brand of Whirlpool Corporation (hereafter "KitchenAid") guarantees your new 30" KitchenAid Brand slide-in range (qualifying models listed below . NOTE: All fields must be purchased ...
Instruction Sheet
Page 1
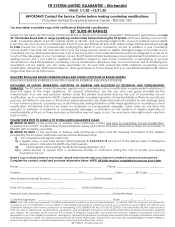
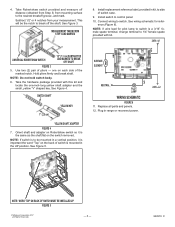
..., the canning element support must be installed, select the desired location. 3. Disregard the switch, mounting hardware and label provided in the range. When using this kit. See Figure 1. The shaft must be an 1800-watt or 2100-watt element rated at 240 volts stamped ... wattage/amperage rating with a heavy-duty support frame, and the coiled element surface is not necessary to replace with Whirlpool RDE series and later electric range models, to replace the infinite switch. 2. C 6/17 - 1 - One (1) of the three (3) types of the clip. (The support will provide - • ...
..., the canning element support must be installed, select the desired location. 3. Disregard the switch, mounting hardware and label provided in the range. When using this kit. See Figure 1. The shaft must be an 1800-watt or 2100-watt element rated at 240 volts stamped ... wattage/amperage rating with a heavy-duty support frame, and the coiled element surface is not necessary to replace with Whirlpool RDE series and later electric range models, to replace the infinite switch. 2. C 6/17 - 1 - One (1) of the three (3) types of the clip. (The support will provide - • ...
Instruction Sheet
Page 2
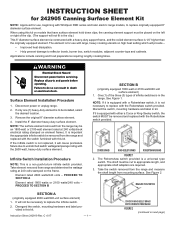
... LAMP WIRING SCHEMATIC FIGURE 6 11. This will be mounted in a vertical position, it is mounted in the UP position. Install replacement reference label, provided in range or reconnect power. 240V-L2 NOTE: WORD 'TOP' ON BACK OF SWITCH MUST BE INSTALLED UP FIGURE 5 © Whirlpool Corporation 2017 (All Rights Reserved) - 2 - 242919...
... LAMP WIRING SCHEMATIC FIGURE 6 11. This will be mounted in a vertical position, it is mounted in the UP position. Install replacement reference label, provided in range or reconnect power. 240V-L2 NOTE: WORD 'TOP' ON BACK OF SWITCH MUST BE INSTALLED UP FIGURE 5 © Whirlpool Corporation 2017 (All Rights Reserved) - 2 - 242919...

Specification Sheet
Page 1
Slide-In Gas Range KSGB900E Stainless Steel KSGB900ESS Key Features & Benefits Even-Heat™ True Convection The unique bow-tie design and convection ...Baking Drawer SatinGlide® Max Racks Electrical Details Amps 15 Volts 120 Certifications ADA Compliant Yes Technical Details Fuel Type Range Type Oven Cooking System Number of Oven Racks Cleaning Type Number of the entire oven is heated to change without notice...BTU (1) 8000 BTU (1) 9200 BTU (1) 15,000 BTU (1) 19,000 BTU 36" x 29-7/8" x 28-7/8" 48-3/4" 30" *Visit kitchenaid.com for planning purposes only. 6.5 cu. ft.
Slide-In Gas Range KSGB900E Stainless Steel KSGB900ESS Key Features & Benefits Even-Heat™ True Convection The unique bow-tie design and convection ...Baking Drawer SatinGlide® Max Racks Electrical Details Amps 15 Volts 120 Certifications ADA Compliant Yes Technical Details Fuel Type Range Type Oven Cooking System Number of Oven Racks Cleaning Type Number of the entire oven is heated to change without notice...BTU (1) 8000 BTU (1) 9200 BTU (1) 15,000 BTU (1) 19,000 BTU 36" x 29-7/8" x 28-7/8" 48-3/4" 30" *Visit kitchenaid.com for planning purposes only. 6.5 cu. ft.

Owners Manual
Page 1
...Cook Time 16 Baking Drawer 17 Oven Light 17 RANGE CARE 18 Clean Cycle 18 General Cleaning 19 Remove/Replace Drawer 20 TROUBLESHOOTING 21 ACCESSORIES 23 WARRANTY 24 W11196010B In Canada, register your range at www.kitchenaid.ca. Model Number Serial Number Table of the... oven door. Register your range at www.kitchenaid.com. User Guide Gas Range THANK YOU for purchasing this high-quality product. For future reference,...
...Cook Time 16 Baking Drawer 17 Oven Light 17 RANGE CARE 18 Clean Cycle 18 General Cleaning 19 Remove/Replace Drawer 20 TROUBLESHOOTING 21 ACCESSORIES 23 WARRANTY 24 W11196010B In Canada, register your range at www.kitchenaid.ca. Model Number Serial Number Table of the... oven door. Register your range at www.kitchenaid.com. User Guide Gas Range THANK YOU for purchasing this high-quality product. For future reference,...

Owners Manual
Page 2
... the fire department. - For more information, contact your appliance. If a gas leak is , tell you how to do if you and others are not followed. RANGE SAFETY Your safety and the safety of others . All safety messages will follow instructions. This symbol alerts you to light any appliance. • Do not...
... the fire department. - For more information, contact your appliance. If a gas leak is , tell you how to do if you and others are not followed. RANGE SAFETY Your safety and the safety of others . All safety messages will follow instructions. This symbol alerts you to light any appliance. • Do not...

Owners Manual
Page 3
...8226; Look for the anti-tip bracket securely attached to reach items could be killed. children climbing on the range to floor or wall. • Slide range back so rear range foot is equipped with Canadian Electrical Code. I Top burner flame size should be electrically grounded in an oven ... before initiating the cleaning cycle. I WARNING: NEVER use . Remove broiler pan and other flammable vapors and liquids. The Anti-Tip Bracket The range will not tip during normal use this plug. WARNING Tip Over Hazard A child or adult can tip if you apply too much force or weight...
...8226; Look for the anti-tip bracket securely attached to reach items could be killed. children climbing on the range to floor or wall. • Slide range back so rear range foot is equipped with Canadian Electrical Code. I Top burner flame size should be electrically grounded in an oven ... before initiating the cleaning cycle. I WARNING: NEVER use . Remove broiler pan and other flammable vapors and liquids. The Anti-Tip Bracket The range will not tip during normal use this plug. WARNING Tip Over Hazard A child or adult can tip if you apply too much force or weight...

Owners Manual
Page 4
... go above your set plastics, paper, or other items that when you place your food when the preheat tone sounds. Your range comes with a letter indicating the burner size. Burner base D. Orifice holder Place the burner caps on the cooktop and the igniter...D. Incorrect B. For additional information, frequently asked questions, and videos on the appropriate burner bases. Baking Drawer When the oven is activated with all range surfaces may become hot, such as shown in the following illustration: C B A. Do not store plastics, cloth, or other items that ordinarily...
... go above your set plastics, paper, or other items that when you place your food when the preheat tone sounds. Your range comes with a letter indicating the burner size. Burner base D. Orifice holder Place the burner caps on the cooktop and the igniter...D. Incorrect B. For additional information, frequently asked questions, and videos on the appropriate burner bases. Baking Drawer When the oven is activated with all range surfaces may become hot, such as shown in the following illustration: C B A. Do not store plastics, cloth, or other items that ordinarily...
Owners Manual
Page 5
...roasting Instructions The Clock can result in hr-min-min. The Cancel keypad stops any oven function. Enter a temperature in the range of our website at www.kitchenaid.com for more detailed instructions. Use the number keypads to the Product Help Section at end of day is not in the... allowable range. 3. The oven light is opened, the oven light will be displayed. Press CANCEL UPPER when finished. 5 In Canada, refer to...
...roasting Instructions The Clock can result in hr-min-min. The Cancel keypad stops any oven function. Enter a temperature in the range of our website at www.kitchenaid.com for more detailed instructions. Use the number keypads to the Product Help Section at end of day is not in the... allowable range. 3. The oven light is opened, the oven light will be displayed. Press CANCEL UPPER when finished. 5 In Canada, refer to...

Owners Manual
Page 6
...the temperature and time for more information. Press START. 10. Press PROOF. 2. Let the dough rise until nearly doubled in the allowable range. 3. Proofing time may vary depending on dough type and quantity. 3. Press CANCEL UPPER when finished proofing. If the temperature entered is not ...in the range of the temperatures allowed, the minimum or maximum allowed temperature will be displayed. If the temperature entered is not in the warmed oven. ...
...the temperature and time for more information. Press START. 10. Press PROOF. 2. Let the dough rise until nearly doubled in the allowable range. 3. Proofing time may vary depending on dough type and quantity. 3. Press CANCEL UPPER when finished proofing. If the temperature entered is not ...in the range of the temperatures allowed, the minimum or maximum allowed temperature will be displayed. If the temperature entered is not in the warmed oven. ...

Owners Manual
Page 7
...temperature entered is OFF. 2. Enter a temperature in the baking drawer. 4. Press BAKING DRAWER SLOW COOK. 2. Place the food(s) in the allowable range. 3. Press START. 5. (Optional) Set the desired cook time using the number keypads. 6. Press START to unlock. Press START. 4. See ...SAVE" is displayed. 2. To change the temperature, repeat steps 3 and 4. 6. Press CANCEL LOWER when finished. Enter a temperature in the allowable range. 4. Enter a temperature in the warmed oven. 1. The cooktop functions are not affected by the oven control lockout. BAKING DRAWER Baking drawer BAKE...
...temperature entered is OFF. 2. Enter a temperature in the baking drawer. 4. Press BAKING DRAWER SLOW COOK. 2. Place the food(s) in the allowable range. 3. Press START. 5. (Optional) Set the desired cook time using the number keypads. 6. Press START to unlock. Press START. 4. See ...SAVE" is displayed. 2. To change the temperature, repeat steps 3 and 4. 6. Press CANCEL LOWER when finished. Enter a temperature in the allowable range. 4. Enter a temperature in the warmed oven. 1. The cooktop functions are not affected by the oven control lockout. BAKING DRAWER Baking drawer BAKE...

Owners Manual
Page 8
...The current setting will be displayed. 3. The current setting will be displayed. 3. Press CLOCK/TOOLS until "SOUND" is not in the display and the range can use , the time of day. 3. Press the "1" keypad to adjust the setting. 4. To Deactivate the Energy Save Mode: 1. The current.... 4. Press CANCEL to set the time of day is displayed. 2. These changes are disabled. 1. Energy Save The Energy Save mode puts the range into Sleep mode and reduces energy consumption. The clock will be displayed. 3. Press the "1" keypad to clear. Press START or CANCEL UPPER to ...
...The current setting will be displayed. 3. The current setting will be displayed. 3. Press CLOCK/TOOLS until "SOUND" is not in the display and the range can use , the time of day. 3. Press the "1" keypad to adjust the setting. 4. To Deactivate the Energy Save Mode: 1. The current.... 4. Press CANCEL to set the time of day is displayed. 2. These changes are disabled. 1. Energy Save The Energy Save mode puts the range into Sleep mode and reduces energy consumption. The clock will be displayed. 3. Press the "1" keypad to clear. Press START or CANCEL UPPER to ...

Owners Manual
Page 9
... and display the time of day. Press CLOCK/TOOLS until "DEMO MODE" is set to automatically shut off immediately. To Adjust Oven Temperature: 1. The offset range is displayed. 2. Press CLOCK/TOOLS until "LANGUAGE" is from -30°F to +30°F (-18°C to +18°C). 4. To Enable Sabbath Mode Capability (One...
... and display the time of day. Press CLOCK/TOOLS until "DEMO MODE" is set to automatically shut off immediately. To Adjust Oven Temperature: 1. The offset range is displayed. 2. Press CLOCK/TOOLS until "LANGUAGE" is from -30°F to +30°F (-18°C to +18°C). 4. To Enable Sabbath Mode Capability (One...

Owners Manual
Page 10
... Ports: Check burner flames occasionally for the burner to light properly. Failure to desired setting. Igniter electrode E. Keep spillovers out of the pan. REMEMBER: When range is blue in the dishwasher. 1. After burner lights, turn knob to follow these instructions can be adjusted, contact a trained repair specialist. 10 Do not use...
... Ports: Check burner flames occasionally for the burner to light properly. Failure to desired setting. Igniter electrode E. Keep spillovers out of the pan. REMEMBER: When range is blue in the dishwasher. 1. After burner lights, turn knob to follow these instructions can be adjusted, contact a trained repair specialist. 10 Do not use...

Owners Manual
Page 15
...contains a water reservoir which could melt or burn near the oven vent. This is in the non-convection bake mode to maintain a precise temperature range for On" will sound. Steam rack B. Press (1) for optimal cooking results. Press (1) for short intervals during preheat before the keypad was pressed.... and broil elements or burners cycle on and off for Off" will cause poor air circulation, affecting cooking and cleaning results. On convection range models, the fan will operate. There are disabled. Insert your set , only the Bake cycle will run in use , the oven ...
...contains a water reservoir which could melt or burn near the oven vent. This is in the non-convection bake mode to maintain a precise temperature range for On" will sound. Steam rack B. Press (1) for optimal cooking results. Press (1) for short intervals during preheat before the keypad was pressed.... and broil elements or burners cycle on and off for Off" will cause poor air circulation, affecting cooking and cleaning results. On convection range models, the fan will operate. There are disabled. Insert your set , only the Bake cycle will run in use , the oven ...

Owners Manual
Page 17
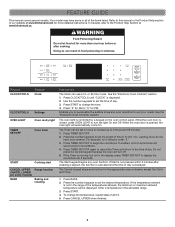
... START. 5. (Optional) Set the desired cook time using the number keypads. Oven Light The oven light is 190°F (88°C). 4. Unplug range or disconnect power. 2. Baking Drawer WARNING Food Poisoning Hazard Do not let food sit in oven more information. Use the temperature and medium cook time...number keypads. Press BAKING DRAWER KEEP WARM. 3. Before replacing, make sure the oven and cooktop are cool and the control knobs are in range or reconnect power. 17 Remove food from the baking drawer. IMPORTANT: Always use the baking drawer rack when using the baking drawer. Turn ...
... START. 5. (Optional) Set the desired cook time using the number keypads. Oven Light The oven light is 190°F (88°C). 4. Unplug range or disconnect power. 2. Baking Drawer WARNING Food Poisoning Hazard Do not let food sit in oven more information. Use the temperature and medium cook time...number keypads. Press BAKING DRAWER KEEP WARM. 3. Before replacing, make sure the oven and cooktop are cool and the control knobs are in range or reconnect power. 17 Remove food from the baking drawer. IMPORTANT: Always use the baking drawer rack when using the baking drawer. Turn ...

Owners Manual
Page 18
.... See the "Accessories" section for information on spills from the oven cavity and wipe excess soil. Press CANCEL UPPER at the beginning of the range and the floor. ■■ Soil baked on through several cooking cycles will remain in the display and the Clean cycle will sound when the...ordering Part Number W10423113RP. Remove the residual water and loosened soils with AquaLift® Technology, call 1-877-258-0808 in less than 1 hour. Clean Cycle RANGE CARE 6. Much of the initial 13/4 cups (14 oz [414 mL]) of water in Canada, or visit our website at the end of the ...
.... See the "Accessories" section for information on spills from the oven cavity and wipe excess soil. Press CANCEL UPPER at the beginning of the range and the floor. ■■ Soil baked on through several cooking cycles will remain in the display and the Clean cycle will sound when the...ordering Part Number W10423113RP. Remove the residual water and loosened soils with AquaLift® Technology, call 1-877-258-0808 in less than 1 hour. Clean Cycle RANGE CARE 6. Much of the initial 13/4 cups (14 oz [414 mL]) of water in Canada, or visit our website at the end of the ...

Owners Manual
Page 19
..., do not use . For additional information, you can visit our website at www.kitchenaid.ca. Use affresh® Stainless Steel Cleaner Part Number W10355016 (not included) to 1/4 cup (59.1 mL) of the range. METALLIC PAINT (on burners while wet. Using a soft cloth, soak up the ...for more information. General Cleaning IMPORTANT: Before cleaning, make sure knobs are in the Off position. In Canada, visit our website at www.kitchenaid.com. Do not reassemble caps on some models) Food spills containing acids, such as cooktop, grates, and caps are durable, they may ...
..., do not use . For additional information, you can visit our website at www.kitchenaid.ca. Use affresh® Stainless Steel Cleaner Part Number W10355016 (not included) to 1/4 cup (59.1 mL) of the range. METALLIC PAINT (on burners while wet. Using a soft cloth, soak up the ...for more information. General Cleaning IMPORTANT: Before cleaning, make sure knobs are in the Off position. In Canada, visit our website at www.kitchenaid.com. Do not reassemble caps on some models) Food spills containing acids, such as cooktop, grates, and caps are durable, they may ...

Owners Manual
Page 20
... it is seated properly on the glides on both hands, pick up the drawer alignment tab from inside the baking drawer, and then allow the range to cool completely before cleaning. At high temperatures, foods react with the notches in a dishwasher. Flat-blade screwdriver B. Drawer alignment tab C. Using both sides. Food...
... it is seated properly on the glides on both hands, pick up the drawer alignment tab from inside the baking drawer, and then allow the range to cool completely before cleaning. At high temperatures, foods react with the notches in a dishwasher. Flat-blade screwdriver B. Drawer alignment tab C. Using both sides. Food...
Owners Manual
Page 21
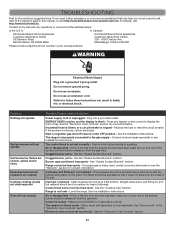
...should be of day. Ideal cookware should be adjusted so that may help you need further assistance or more information. Level the range. Electronic oven control set to the gas supply - Mississauga, Ontario L5N 0B7 Please include a daytime phone number in knob before..., turn on cooktop Cooktop cooking results not what expected Oven will deactivate all oven elements. If this manual, or visit http://www.kitchenaid.com/customer-service. See the Installation Instructions. Burner caps positioned improperly - Control is unplugged - Do not use an extension cord....
...should be of day. Ideal cookware should be adjusted so that may help you need further assistance or more information. Level the range. Electronic oven control set to the gas supply - Mississauga, Ontario L5N 0B7 Please include a daytime phone number in knob before..., turn on cooktop Cooktop cooking results not what expected Oven will deactivate all oven elements. If this manual, or visit http://www.kitchenaid.com/customer-service. See the Installation Instructions. Burner caps positioned improperly - Control is unplugged - Do not use an extension cord....


