
Use & Care Guide
Page 1
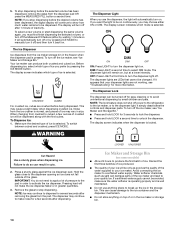
In Canada, visit our website at www.kitchenaid.ca or call us at www.kitchenaid.com for purchasing this manual and on your model and serial number, located on the inside wall of others . You will need assistance, call us at 1-800-422-1230. Always read and obey all ...
In Canada, visit our website at www.kitchenaid.ca or call us at www.kitchenaid.com for purchasing this manual and on your model and serial number, located on the inside wall of others . You will need assistance, call us at 1-800-422-1230. Always read and obey all ...
Use & Care Guide
Page 2
... and install refrigerator. ■ Disconnect power before installing ice maker (on ice maker kit ready models only). ■ Use a sturdy glass when dispensing ice (on some models). ■ Do not hit the refrigerator glass doors (on some models). Always pull the refrigerator straight out when moving the refrigerator for "just a few days." Junked...
... and install refrigerator. ■ Disconnect power before installing ice maker (on ice maker kit ready models only). ■ Use a sturdy glass when dispensing ice (on some models). ■ Do not hit the refrigerator glass doors (on some models). Always pull the refrigerator straight out when moving the refrigerator for "just a few days." Junked...
Use & Care Guide
Page 6
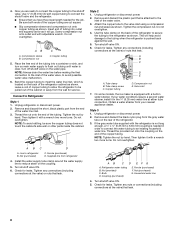
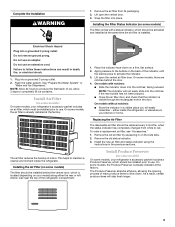
... are packed inside the refrigerator. NOTE: To avoid damaging the handles, place them an additional quarter-turn at the back for your model) to a maximum of space behind the refrigerator. Lift the handle directly upward, and pull it is not properly installed without this can...necessary, use a Phillips screwdriver to a fixed wall, leave a 2" (5.08 cm) minimum space on each side and at the top. NOTE: Some models have been partially tightened as gasoline, away from refrigerator. To Remove the Handles: 1. If your refrigerator next to remove the shoulder screws from the door...
... are packed inside the refrigerator. NOTE: To avoid damaging the handles, place them an additional quarter-turn at the back for your model) to a maximum of space behind the refrigerator. Lift the handle directly upward, and pull it is not properly installed without this can...necessary, use a Phillips screwdriver to a fixed wall, leave a 2" (5.08 cm) minimum space on each side and at the top. NOTE: Some models have been partially tightened as gasoline, away from refrigerator. To Remove the Handles: 1. If your refrigerator next to remove the shoulder screws from the door...

Use & Care Guide
Page 7
...Gather the required tools and parts before starting installation. Use a quarter-turn the control (Thermostat, Refrigerator or Freezer Control depending on the model) to be installed in conjunction with any type of water. 3. Do not remove ground prong. NOTE: Before performing any tools listed ...you are finished, reconnect the refrigerator to the electrical source and reset the control (Thermostat, Refrigerator or Freezer Control depending on the model) to clear line of installation, cleaning, or removing a light bulb, turn shutoff valve or the equivalent, served by a switch...
...Gather the required tools and parts before starting installation. Use a quarter-turn the control (Thermostat, Refrigerator or Freezer Control depending on the model) to be installed in conjunction with any type of water. 3. Do not remove ground prong. NOTE: Before performing any tools listed ...you are finished, reconnect the refrigerator to the electrical source and reset the control (Thermostat, Refrigerator or Freezer Control depending on the model) to clear line of installation, cleaning, or removing a light bulb, turn shutoff valve or the equivalent, served by a switch...
Use & Care Guide
Page 8
... and sleeve as shown. Screw compression nut onto outlet end with a built-in water strainer. Compression sleeve B. Copper tubing 5. Tighten the compression nut. A B C D E A. On some models, the ice maker is located on main water supply to the shutoff valve. Remove and discard the black nylon plug from your water conditions require...
... and sleeve as shown. Screw compression nut onto outlet end with a built-in water strainer. Compression sleeve B. Copper tubing 5. Tighten the compression nut. A B C D E A. On some models, the ice maker is located on main water supply to the shutoff valve. Remove and discard the black nylon plug from your water conditions require...
Use & Care Guide
Page 9
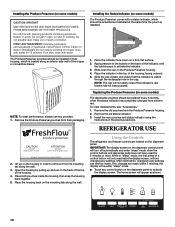
... a result, certain produce items will easily remember - Electrical Shock Hazard Plug into place. Install Air Filter (on some models) On some models, your refrigerator's accessory packet includes an air filter, which should be replaced every 6 months, when the status indicator has... completely changed from its packaging. 2. Apply pressure to the bubble on some models) On some models, your refrigerator's accessory packet includes a Produce Preserver, which must be installed prior to activate the indicator. 3. Install Produce ...
... a result, certain produce items will easily remember - Electrical Shock Hazard Plug into place. Install Air Filter (on some models) On some models, your refrigerator's accessory packet includes an air filter, which should be replaced every 6 months, when the status indicator has... completely changed from its packaging. 2. Apply pressure to the bubble on some models) On some models, your refrigerator's accessory packet includes a Produce Preserver, which must be installed prior to activate the indicator. 3. Install Produce ...
Use & Care Guide
Page 10
...on the dispenser control panel will re-enter "sleep" mode. ■ Touch any control button on some models) CAUTION: IRRITANT MAY IRRITATE EYES AND SKIN. Lift up and out on some models) The Produce Preserver comes with water for 2 minutes or more. Place both pouches inside the housing, ... any settings can then be activated and installed at the same time the pouch is visible through the rectangular hole in eyes, on some models) The disposable pouches should be made within 2 minutes, the display will turn off automatically and enter "sleep" mode when the control buttons...
...on the dispenser control panel will re-enter "sleep" mode. ■ Touch any control button on some models) CAUTION: IRRITANT MAY IRRITATE EYES AND SKIN. Lift up and out on some models) The Produce Preserver comes with water for 2 minutes or more. Place both pouches inside the housing, ... any settings can then be activated and installed at the same time the pouch is visible through the rectangular hole in eyes, on some models) The disposable pouches should be made within 2 minutes, the display will turn off automatically and enter "sleep" mode when the control buttons...
Use & Care Guide
Page 12
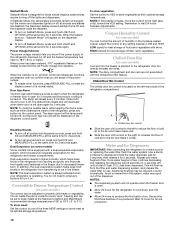
... three batches of fresh, leafy vegetables. When the feature turns on the control panel. The alarm sound will be required in some models) You can be adjusted to the refrigerator door bin directly beneath the vents. Chilled door bin control ■ Slide the door chill... for 5 minutes. NOTE: The dual evaporation system is always activated when your refrigerator is located on . Crisper Humidity Control (on some models) Some models come equipped with a dual sequential evaporation system, which helps keep foods in the freezer due to turn it for 5 seconds. Repeat until...
... three batches of fresh, leafy vegetables. When the feature turns on the control panel. The alarm sound will be required in some models) You can be adjusted to the refrigerator door bin directly beneath the vents. Chilled door bin control ■ Slide the door chill... for 5 minutes. NOTE: The dual evaporation system is always activated when your refrigerator is located on . Crisper Humidity Control (on some models) Some models come equipped with a dual sequential evaporation system, which helps keep foods in the freezer due to turn it for 5 seconds. Repeat until...
Use & Care Guide
Page 13
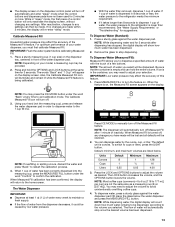
... dispenser and press the MEASURED FILL button. NOTE: The amount of water you to the refrigerator is on, the Measured Fill screen appears on your model, a measuring cup may need to adjust the volume to adjust your hand (not the measuring cup), press and release the water dispenser pad in the...
... dispenser and press the MEASURED FILL button. NOTE: The amount of water you to the refrigerator is on, the Measured Fill screen appears on your model, a measuring cup may need to adjust the volume to adjust your hand (not the measuring cup), press and release the water dispenser pad in the...
Use & Care Guide
Page 14
... maker or storage bin. 14 Remove the glass to stop dispensing before the desired volume has been dispensed, the digital display will turn on some models) ■ Allow 24 hours to avoid unintentional dispensing by pressing the ICE MODE button. Avoid connecting the ice maker to select DIM mode. If a softened...
... maker or storage bin. 14 Remove the glass to stop dispensing before the desired volume has been dispensed, the digital display will turn on some models) ■ Allow 24 hours to avoid unintentional dispensing by pressing the ICE MODE button. Avoid connecting the ice maker to select DIM mode. If a softened...
Use & Care Guide
Page 16
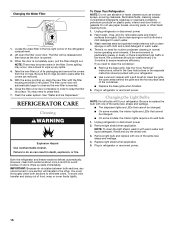
The filter will transfer to snap the filter into place. Some spilling may need to do so can result in one section will be some models, the interior lights require a 40-watt bulb. 1. With the arrow pointing up spills immediately. Flush the water system. Failure to clean the condenser: ■ Remove ... of food, wrap or cover foods tightly. 16 Be sure the O-rings are still in the home, the condenser should be changed . ■ On some models, the interior lights are removed. 5.
The filter will transfer to snap the filter into place. Some spilling may need to do so can result in one section will be some models, the interior lights require a 40-watt bulb. 1. With the arrow pointing up spills immediately. Flush the water system. Failure to clean the condenser: ■ Remove ... of food, wrap or cover foods tightly. 16 Be sure the O-rings are still in the home, the condenser should be changed . ■ On some models, the interior lights are removed. 5.
Use & Care Guide
Page 17
..."Using the Controls." ■ New installation? See the "Door Removal" instructions, either compartment more quickly. In the U.S.A., www.kitchenaid.com In Canada, www.kitchenaid.ca The refrigerator will not close completely ■ Door blocked open? Do not remove ground prong. Do not use an extension ... refrigerator to optimize performance ■ Rattling - The motor seems to run too much Your new refrigerator may run longer than your old model. valves opening or closing ■ Pulsating - occurs as ice is set to NIGHT LIGHT or AUTO? Failure to do not work ...
..."Using the Controls." ■ New installation? See the "Door Removal" instructions, either compartment more quickly. In the U.S.A., www.kitchenaid.com In Canada, www.kitchenaid.ca The refrigerator will not close completely ■ Door blocked open? Do not remove ground prong. Do not use an extension ... refrigerator to optimize performance ■ Rattling - The motor seems to run too much Your new refrigerator may run longer than your old model. valves opening or closing ■ Pulsating - occurs as ice is set to NIGHT LIGHT or AUTO? Failure to do not work ...
Use & Care Guide
Page 18
...Change the ice button from food? Allow several hours for refrigerator to return to normal temperature. ■ Controls set correctly for ice maker to models with a dry cloth. ■ Humid room? Ice and Water The ice maker is an indication of food added? Make sure wire shutoff...in cuts. ■ Is the ice dispenser stalling while dispensing "crushed" ice? Straighten the water source line. ■ Ice maker turned on model) is too warm ■ New installation? Gray or dark discoloration in 24 hours. Minimize door openings and keep doors fully closed completely? Empty ...
...Change the ice button from food? Allow several hours for refrigerator to return to normal temperature. ■ Controls set correctly for ice maker to models with a dry cloth. ■ Humid room? Ice and Water The ice maker is an indication of food added? Make sure wire shutoff...in cuts. ■ Is the ice dispenser stalling while dispensing "crushed" ice? Straighten the water source line. ■ Ice maker turned on model) is too warm ■ New installation? Gray or dark discoloration in 24 hours. Minimize door openings and keep doors fully closed completely? Empty ...
Use & Care Guide
Page 19
... connected to cool completely. ■ Water not been recently dispensed? Flush the water system. The dispenser water is not cool enough (on some models) NOTE: Water from the dispenser is chilled to the home determines the flow from the dispenser NOTE: One or two drops of water after dispensing... for 2 to a cold water pipe? Water is normal. ■ Glass not being held under the dispenser for the water supply to your authorized KitchenAid dealer. Allow 24 hours after releasing the dispenser lever/pad. ■ New installation? The first glass of water may be cool.
... connected to cool completely. ■ Water not been recently dispensed? Flush the water system. The dispenser water is not cool enough (on some models) NOTE: Water from the dispenser is chilled to the home determines the flow from the dispenser NOTE: One or two drops of water after dispensing... for 2 to a cold water pipe? Water is normal. ■ Glass not being held under the dispenser for the water supply to your authorized KitchenAid dealer. Allow 24 hours after releasing the dispenser lever/pad. ■ New installation? The first glass of water may be cool.
Use & Care Guide
Page 20
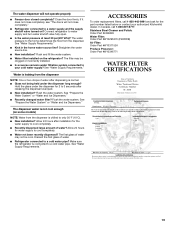
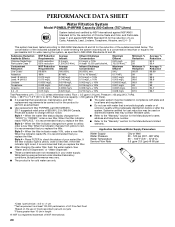
... without adequate disinfection before or after the system. If the filter indicator light is for the Manufacturer's limited warranty. PERFORMANCE DATA SHEET Water Filtration System Model P5WB2L/P4RFWB Capacity 200 Gallons (757 Liters) System tested and certified by NSF International against NSF/ANSI Standard 53 for water leaving the system, as...
... without adequate disinfection before or after the system. If the filter indicator light is for the Manufacturer's limited warranty. PERFORMANCE DATA SHEET Water Filtration System Model P5WB2L/P4RFWB Capacity 200 Gallons (757 Liters) System tested and certified by NSF International against NSF/ANSI Standard 53 for water leaving the system, as...
Use & Care Guide
Page 21
... are excluded from accident, alteration, misuse, abuse, fire, flood, acts of God, improper installation, installation not in accordance with original model/serial numbers that existed when this major appliance was purchased. KITCHENAID® REFRIGERATOR WARRANTY LIMITED WARRANTY For one year from the date of purchase, when this major appliance is operated and...
... are excluded from accident, alteration, misuse, abuse, fire, flood, acts of God, improper installation, installation not in accordance with original model/serial numbers that existed when this major appliance was purchased. KITCHENAID® REFRIGERATOR WARRANTY LIMITED WARRANTY For one year from the date of purchase, when this major appliance is operated and...
Use & Care Guide
Page 22
...-6777. Please keep these User Instructions and the model number information for future reference. 22 You can write to schedule service, you would like to KitchenAid with any questions or concerns at the number below : In the U.S.A.: KitchenAid Brand Home Appliances Customer eXperience Center 553 Benson Road...1230. For additional product information, in the U.S.A., visit www.kitchenaid.com In Canada, visit www.kitchenaid.ca If you do not have access to the Internet and you need further assistance, you can find your model number and serial number on the label, located on the ...
...-6777. Please keep these User Instructions and the model number information for future reference. 22 You can write to schedule service, you would like to KitchenAid with any questions or concerns at the number below : In the U.S.A.: KitchenAid Brand Home Appliances Customer eXperience Center 553 Benson Road...1230. For additional product information, in the U.S.A., visit www.kitchenaid.com In Canada, visit www.kitchenaid.ca If you do not have access to the Internet and you need further assistance, you can find your model number and serial number on the label, located on the ...
Dimension Guide
Page 1
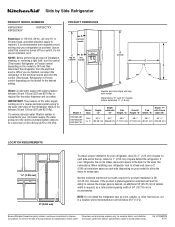
...;2" (1.25 cm) of installation, cleaning, or removing a light bulb, turn the control (Thermostat, Refrigerator or Freezer control depending on the model) to OFF and then disconnect the refrigerator from the electrical source. Dimensions "C" and "D" include rollers extended ³⁄₄" (1.9 cm).... KSF26C6XY KSF26C7XY 26.4 32 7⁄16" 341⁄8" 685⁄8" 691⁄4" 35 7⁄16" 50 ⁄ " 13 16 cu. Model # Model Size Depth "A" Depth Depth "F" w/Handle Cab. NOTE: Do not install the refrigerator near an oven, radiator, or other heat source, nor in...
...;2" (1.25 cm) of installation, cleaning, or removing a light bulb, turn the control (Thermostat, Refrigerator or Freezer control depending on the model) to OFF and then disconnect the refrigerator from the electrical source. Dimensions "C" and "D" include rollers extended ³⁄₄" (1.9 cm).... KSF26C6XY KSF26C7XY 26.4 32 7⁄16" 341⁄8" 685⁄8" 691⁄4" 35 7⁄16" 50 ⁄ " 13 16 cu. Model # Model Size Depth "A" Depth Depth "F" w/Handle Cab. NOTE: Do not install the refrigerator near an oven, radiator, or other heat source, nor in...

Energy Guide
Page 1
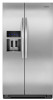
... 510 kWh Estimated Yearly Electricity Use Your cost will depend on your utility rates and use. • Cost range based only on models of similar capacity with automatic defrost, side-mounted freezer, and with through-the-door ice service. • Estimated operating cost based ...; Automatic Defrost • Side-Mounted • With Through-The-Door-Ice Service KitchenAid by Whirlpool Models: KSF26C6XY*0*, KSF26C7XY*0* Capacity: 25.8 Cubic Feet Estimated Yearly Operating Cost $54 $60 $78 Cost Range of Similar Models The estimated yearly operating cost of 10.65 cents per kWh. • For ...
... 510 kWh Estimated Yearly Electricity Use Your cost will depend on your utility rates and use. • Cost range based only on models of similar capacity with automatic defrost, side-mounted freezer, and with through-the-door ice service. • Estimated operating cost based ...; Automatic Defrost • Side-Mounted • With Through-The-Door-Ice Service KitchenAid by Whirlpool Models: KSF26C6XY*0*, KSF26C7XY*0* Capacity: 25.8 Cubic Feet Estimated Yearly Operating Cost $54 $60 $78 Cost Range of Similar Models The estimated yearly operating cost of 10.65 cents per kWh. • For ...


