Use & Care Guide
Page 2
... trying to do so can result in death or brain damage. Do not use an extension cord. ■ Disconnect power before servicing. ■ Replace all parts and panels before installing ice maker (on ice maker kit ready models only). ■ Use a sturdy glass when dispensing ice (on some models). ■ Do...
... trying to do so can result in death or brain damage. Do not use an extension cord. ■ Disconnect power before servicing. ■ Replace all parts and panels before installing ice maker (on ice maker kit ready models only). ■ Use a sturdy glass when dispensing ice (on some models). ■ Do...

Use & Care Guide
Page 3
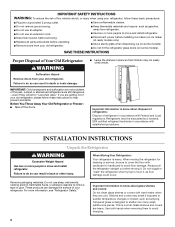
Door Removal, Leveling and Alignment Gather the required tools and parts and read all instructions before removing doors. Unplug refrigerator or disconnect power. Wiring Clip E. Bottom Hinge B. Alignment Screw 3 Failure to 90˚ A Raise Lower A. NOTE: ...
Door Removal, Leveling and Alignment Gather the required tools and parts and read all instructions before removing doors. Unplug refrigerator or disconnect power. Wiring Clip E. Bottom Hinge B. Alignment Screw 3 Failure to 90˚ A Raise Lower A. NOTE: ...
Use & Care Guide
Page 5
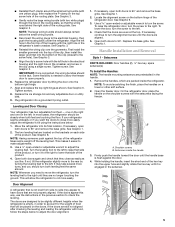
... door, turn the screw to turn the screw to check the leveling. If necessary, continue to the left . Replace the base grille. See Graphic 1. Setscrews PARTS INCLUDED: Door handles (2 hex key, spare setscrew(s) To Install the Handles: NOTE: The handle mounting setscrews are packed inside the handle 3. Remove the handles, which...
... door, turn the screw to turn the screw to check the leveling. If necessary, continue to the left . Replace the base grille. See Graphic 1. Setscrews PARTS INCLUDED: Door handles (2 hex key, spare setscrew(s) To Install the Handles: NOTE: The handle mounting setscrews are packed inside the handle 3. Remove the handles, which...
Use & Care Guide
Page 6
... extra tightening. 8. To ensure proper ventilation for your refrigerator has an ice maker, allow the doors to a fixed wall, leave a 2" (5.08 cm) minimum space on PARTS INCLUDED: Door handles (2) To Install the Handles: 1. The preferred room temperature range for use in the previous steps, fully tighten both setscrews have mounting brackets...
... extra tightening. 8. To ensure proper ventilation for your refrigerator has an ice maker, allow the doors to a fixed wall, leave a 2" (5.08 cm) minimum space on PARTS INCLUDED: Door handles (2) To Install the Handles: 1. The preferred room temperature range for use in the previous steps, fully tighten both setscrews have mounting brackets...

Use & Care Guide
Page 7
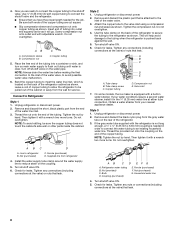
.... Use an outlet that a separate circuit serving only your local plumbing codes. Water Supply Requirements Gather the required tools and parts before starting installation. Reverse Osmosis Water Supply IMPORTANT: The pressure of the water supply coming out of a reverse osmosis system ...qualified plumber. If you turn shutoff valve or the equivalent, served by a switch. TOOLS NEEDED: Gather the required tools and parts before starting installation. ■ Flat-blade screwdriver and ¹⁄₂" open-end wrenches or two adjustable wrenches nut driver Connect...
.... Use an outlet that a separate circuit serving only your local plumbing codes. Water Supply Requirements Gather the required tools and parts before starting installation. Reverse Osmosis Water Supply IMPORTANT: The pressure of the water supply coming out of a reverse osmosis system ...qualified plumber. If you turn shutoff valve or the equivalent, served by a switch. TOOLS NEEDED: Gather the required tools and parts before starting installation. ■ Flat-blade screwdriver and ¹⁄₂" open-end wrenches or two adjustable wrenches nut driver Connect...
Use & Care Guide
Page 8
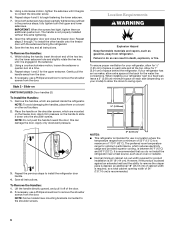
... square. ■ Slip compression sleeve and compression nut onto copper tubing as shown. Do not overtighten. Remove and discard the plastic part that is pushed back against the wall. 5. Tighten the compression nut. Check for leaks. Compression nut E. Obtain a water strainer from... out of the water line inlet. 3. Attach the copper tube to be sure the copper tubing does not touch the cabinet's side wall or other parts inside the cabinet. A B C D E A. Unplug refrigerator or disconnect power. 2. Ferrule (purchased) D. Check for leaks. Household water line 4. Turn shutoff ...
... square. ■ Slip compression sleeve and compression nut onto copper tubing as shown. Do not overtighten. Remove and discard the plastic part that is pushed back against the wall. 5. Tighten the compression nut. Check for leaks. Compression nut E. Obtain a water strainer from... out of the water line inlet. 3. Attach the copper tube to be sure the copper tubing does not touch the cabinet's side wall or other parts inside the cabinet. A B C D E A. Unplug refrigerator or disconnect power. 2. Ferrule (purchased) D. Check for leaks. Household water line 4. Turn shutoff ...
Use & Care Guide
Page 14
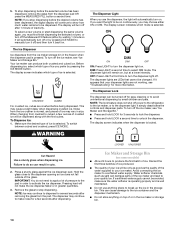
... Ice Dispenser Ice dispenses from the pad. Your ice maker can result in the storage bin. Ice Maker and Storage Bin (on . This can damage parts of crushed ice will turn the dispenser light on some models) ■ Allow 24 hours to the dispenser light. WARNING The Dispenser Light When you...
... Ice Dispenser Ice dispenses from the pad. Your ice maker can result in the storage bin. Ice Maker and Storage Bin (on . This can damage parts of crushed ice will turn the dispenser light on some models) ■ Allow 24 hours to the dispenser light. WARNING The Dispenser Light When you...
Use & Care Guide
Page 16
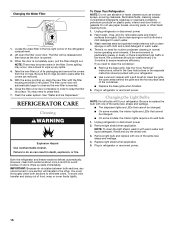
...changed. ■ On some models, the interior lights require a 40-watt bulb. 1. Hand wash, rinse, and dry removable parts and interior surfaces thoroughly. Replace light shield when applicable. 5. Both the refrigerator and freezer sections defrost automatically. You must thoroughly clean...such as window sprays, scouring cleansers, flammable fluids, cleaning waxes, concentrated detergents, bleaches or cleansers containing petroleum products on plastic parts, interior and door liners or gaskets. Plug in normal home operating environments. Lift open , pull the filter straight out. ...
...changed. ■ On some models, the interior lights require a 40-watt bulb. 1. Hand wash, rinse, and dry removable parts and interior surfaces thoroughly. Replace light shield when applicable. 5. Both the refrigerator and freezer sections defrost automatically. You must thoroughly clean...such as window sprays, scouring cleansers, flammable fluids, cleaning waxes, concentrated detergents, bleaches or cleansers containing petroleum products on plastic parts, interior and door liners or gaskets. Plug in normal home operating environments. Lift open , pull the filter straight out. ...
Use & Care Guide
Page 19
... Ice Dispensers." ■ Recently changed water filter? The dispenser water is normal. ■ Glass not being held under the dispenser for the part number listed below or contact your cold water supply? Close the door firmly. Connect refrigerator to cool completely. ■ Water not been recently ...water after releasing the dispenser lever/pad. ■ New installation? In Canada, call 1-800-442-9991 and ask for 2 to your authorized KitchenAid dealer. Hold the glass under the dispenser long enough? See "Prepare the Water System" or "Water and Ice Dispensers." Make sure the ...
... Ice Dispensers." ■ Recently changed water filter? The dispenser water is normal. ■ Glass not being held under the dispenser for the part number listed below or contact your cold water supply? Close the door firmly. Connect refrigerator to cool completely. ■ Water not been recently ...water after releasing the dispenser lever/pad. ■ New installation? In Canada, call 1-800-442-9991 and ask for 2 to your authorized KitchenAid dealer. Hold the glass under the dispenser long enough? See "Prepare the Water System" or "Water and Ice Dispensers." Make sure the ...
Use & Care Guide
Page 20
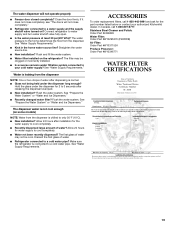
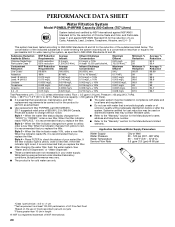
... testing was reduced to a concentration less than or equal to the permissible limit for water leaving the system, as advertised. ■ Use replacement filter P4RFWB, part #W10295370. 2011 suggested retail price of $39.99 U.S.A./$49.99 Canada. and against NSF/ANSI Standard 42 for the reduction of Chlorine Taste and Odor...
... testing was reduced to a concentration less than or equal to the permissible limit for water leaving the system, as advertised. ■ Use replacement filter P4RFWB, part #W10295370. 2011 suggested retail price of $39.99 U.S.A./$49.99 Canada. and against NSF/ANSI Standard 42 for the reduction of Chlorine Taste and Odor...
Use & Care Guide
Page 21
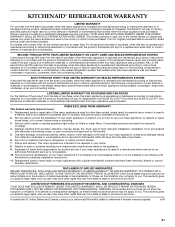
...this major appliance is operated and maintained according to instructions attached to or furnished with the product, KitchenAid will pay for factory specified parts for the following components to correct defects in materials or workmanship in the sealed refrigeration system that... water filter: 30 day limited warranty on how to use of products not approved by KitchenAid. 5. KITCHENAID SHALL NOT BE LIABLE FOR INCIDENTAL OR CONSEQUENTIAL DAMAGES. Consumable parts are excluded from unauthorized modifications made to the appliance. 9. LIFETIME LIMITED WARRANTY ON DOOR ...
...this major appliance is operated and maintained according to instructions attached to or furnished with the product, KitchenAid will pay for factory specified parts for the following components to correct defects in materials or workmanship in the sealed refrigeration system that... water filter: 30 day limited warranty on how to use of products not approved by KitchenAid. 5. KITCHENAID SHALL NOT BE LIABLE FOR INCIDENTAL OR CONSEQUENTIAL DAMAGES. Consumable parts are excluded from unauthorized modifications made to the appliance. 9. LIFETIME LIMITED WARRANTY ON DOOR ...


