
Installation Guide
Page 2
...wrench s Two adjustable wrenches s ³⁄₈" and ¹⁄₂" socket wrenches PARTS NEEDED: s Your refrigerator dealer has a kit available with homeowner. A. REFRIGERATOR SAFETY Your safety and the safety of injury, and tell you what the potential hazard is, tell you how to ...a ¹⁄₄" (6.35 mm) saddle-type shutoff valve, a union, and copper tubing. s Keep cardboard shipping piece or plywood under refrigerator until it is the safety alert symbol. s Or you may vary based on the model 2 All safety messages will tell you what can purchase ...
...wrench s Two adjustable wrenches s ³⁄₈" and ¹⁄₂" socket wrenches PARTS NEEDED: s Your refrigerator dealer has a kit available with homeowner. A. REFRIGERATOR SAFETY Your safety and the safety of injury, and tell you what the potential hazard is, tell you how to ...a ¹⁄₄" (6.35 mm) saddle-type shutoff valve, a union, and copper tubing. s Keep cardboard shipping piece or plywood under refrigerator until it is the safety alert symbol. s Or you may vary based on the model 2 All safety messages will tell you what can purchase ...

Installation Guide
Page 3
...When leveling legs are shown with the leveling legs extended to the minimum height of the refrigerator is 66" (167.7 cm) long. Side View s Height dimensions are fully extended to 1" (25 mm) below the refrigerator, add ³⁄₄" (19 mm) to the back of ¹⁄₄"... (6.35 mm) below the refrigerator. s The water line attached to the height dimensions. 35 90.6 cm) Model Size 23' (654 L) 25' (694 L) 3⁵⁄₈" (9.2 cm) Height A 64⁷⁄₈" (164.8 cm) 67³⁄₄"...
...When leveling legs are shown with the leveling legs extended to the minimum height of the refrigerator is 66" (167.7 cm) long. Side View s Height dimensions are fully extended to 1" (25 mm) below the refrigerator, add ³⁄₄" (19 mm) to the back of ¹⁄₄"... (6.35 mm) below the refrigerator. s The water line attached to the height dimensions. 35 90.6 cm) Model Size 23' (654 L) 25' (694 L) 3⁵⁄₈" (9.2 cm) Height A 64⁷⁄₈" (164.8 cm) 67³⁄₄"...

Installation Guide
Page 4
... cm) A 16¹⁄₂" (42 cm) Explosion Hazard Keep flammable materials and vapors, such as a freestanding refrigerator. NOTES: s The cabinet depth refrigerator can be installed into its final location, it . Failure to a GFCI (Ground Fault Circuit Interrupter) protected outlet, nuisance ...result in a location where the temperature will fall below the refrigerator. s Minimum fixed wall position is required. s If you move your refrigerator be 69¹⁄₈" (175.6 cm). Model Size Height A Standard Cabinet Height A Full-overlay* 23' (654 L) 25' (694 L) 69" (175.3...
... cm) A 16¹⁄₂" (42 cm) Explosion Hazard Keep flammable materials and vapors, such as a freestanding refrigerator. NOTES: s The cabinet depth refrigerator can be installed into its final location, it . Failure to a GFCI (Ground Fault Circuit Interrupter) protected outlet, nuisance ...result in a location where the temperature will fall below the refrigerator. s Minimum fixed wall position is required. s If you move your refrigerator be 69¹⁄₈" (175.6 cm). Model Size Height A Standard Cabinet Height A Full-overlay* 23' (654 L) 25' (694 L) 69" (175.3...

Installation Guide
Page 5
... information to remove skids. Find a ¹⁄₂" (12.70 mm) to the desired setting. When you have questions about your refrigerator before starting installation. TOOLS NEEDED: s Flat-blade screwdriver s ¹⁄₄" Drill bit s and ¹⁄₂" Open-end or...reverse osmosis system going to the water inlet valve of installation, cleaning, or removing a light bulb, turn the control (Thermostat, Refrigerator or Freezer Control depending on the top side of your water pressure, call a licensed, qualified plumber. s All four leveling legs...
... information to remove skids. Find a ¹⁄₂" (12.70 mm) to the desired setting. When you have questions about your refrigerator before starting installation. TOOLS NEEDED: s Flat-blade screwdriver s ¹⁄₄" Drill bit s and ¹⁄₂" Open-end or...reverse osmosis system going to the water inlet valve of installation, cleaning, or removing a light bulb, turn the control (Thermostat, Refrigerator or Freezer Control depending on the top side of your water pressure, call a licensed, qualified plumber. s All four leveling legs...

Installation Guide
Page 6
...Connect Water Supply Style 1 - Before attaching copper tubing to an existing household water line. If the gray water tube supplied with pipe clamp. Refrigerator water tubing B. Check for leaks. Compression nut E. Be sure outlet end is needed in the water pipe and that leak. Fasten shutoff valve... allow for leaks around the saddle valve. Obtain a water strainer from the connection on the end of the refrigerator to secure the tubing to get rid of the refrigerator. 3. A G B C FE D A. Turn shutoff valve ON. 7. Add 7 ft (2.1 m) to connect the copper tubing. 6.
...Connect Water Supply Style 1 - Before attaching copper tubing to an existing household water line. If the gray water tube supplied with pipe clamp. Refrigerator water tubing B. Check for leaks. Compression nut E. Be sure outlet end is needed in the water pipe and that leak. Fasten shutoff valve... allow for leaks around the saddle valve. Obtain a water strainer from the connection on the end of the refrigerator to secure the tubing to get rid of the refrigerator. 3. A G B C FE D A. Turn shutoff valve ON. 7. Add 7 ft (2.1 m) to connect the copper tubing. 6.

Installation Guide
Page 7
... the top of the grille toward you may contain filterable cysts. 2. Check for leaks. Move the switch to produce the first batch of the refrigerator. Nut (provided) 6. Plug in the horizontal position. Do not use an extension cord. Do not use an adapter. Use a sturdy container ... door and turn on the rear of your model, you . A B A. Bulb B. Failure to follow the steps below to make sure that is in Refrigerator WARNING Electrical Shock Hazard Plug into a bucket to get rid of any nuts or connections (including connections at least 2 qt (1.9 L) of the dispenser. 3....
... the top of the grille toward you may contain filterable cysts. 2. Check for leaks. Move the switch to produce the first batch of the refrigerator. Nut (provided) 6. Plug in the horizontal position. Do not use an extension cord. Do not use an adapter. Use a sturdy container ... door and turn on the rear of your model, you . A B A. Bulb B. Failure to follow the steps below to make sure that is in Refrigerator WARNING Electrical Shock Hazard Plug into a bucket to get rid of any nuts or connections (including connections at least 2 qt (1.9 L) of the dispenser. 3....

Installation Guide
Page 8
...at the top and bottom. s For full-overlay cabinets, leave ¹⁄₄" (6.35 mm) gap between the refrigerator's top hinges and the cabinets. Front of the refrigerator. Check to make it snaps into a grounded 3 prong outlet. Turn water supply line valve to 90°. 2. Flush... height adjustment bolt. Complete Installation 1. Top hinges B. Check that the compressor is operating properly and that the cabinet doors above the refrigerator. Rear leveling bolt (top) B. Use a ¹⁄₂" (12.70 mm) socket wrench to ON position. The bolt head will continue ...
...at the top and bottom. s For full-overlay cabinets, leave ¹⁄₄" (6.35 mm) gap between the refrigerator's top hinges and the cabinets. Front of the refrigerator. Check to make it snaps into a grounded 3 prong outlet. Turn water supply line valve to 90°. 2. Flush... height adjustment bolt. Complete Installation 1. Top hinges B. Check that the compressor is operating properly and that the cabinet doors above the refrigerator. Rear leveling bolt (top) B. Use a ¹⁄₂" (12.70 mm) socket wrench to ON position. The bolt head will continue ...
User Instructions
Page 1
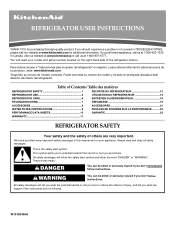
...800-807-6777. W10162436A Puede encontrar su número de modelo y de serie en la etiqueta ubicada al lado derecho del interior del refrigerador. This is... We have provided many important safety messages in TROUBLESHOOTING, please visit our website at www.kitchenaid.com for purchasing this manual and on the right-hand side of others . These words...201;ES SUR LA PERFORMANCE ...........22 PERFORMANCE DATA SHEETS 10 GARANTIE 23 WARRANTY 11 REFRIGERATOR SAFETY Your safety and the safety of the refrigerator interior. Always read and obey all safety messages. If you and...
...800-807-6777. W10162436A Puede encontrar su número de modelo y de serie en la etiqueta ubicada al lado derecho del interior del refrigerador. This is... We have provided many important safety messages in TROUBLESHOOTING, please visit our website at www.kitchenaid.com for purchasing this manual and on the right-hand side of others . These words...201;ES SUR LA PERFORMANCE ...........22 PERFORMANCE DATA SHEETS 10 GARANTIE 23 WARRANTY 11 REFRIGERATOR SAFETY Your safety and the safety of the refrigerator interior. Always read and obey all safety messages. If you and...
User Instructions
Page 2
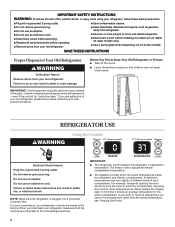
...are still preset to help prevent accidents. Failure to room-temperature air. Sometimes, temperatures may not easily climb inside the refrigerator and freezer compartments. If you set for the compartment rather than the actual temperature, see "Viewing Set Points." 2 ...SAVE THESE INSTRUCTIONS Proper Disposal of Your Old Refrigerator WARNING Suffocation Hazard Remove doors from the room to enter the compartment, exposing door bins to follow these instructions can result...
...are still preset to help prevent accidents. Failure to room-temperature air. Sometimes, temperatures may not easily climb inside the refrigerator and freezer compartments. If you set for the compartment rather than the actual temperature, see "Viewing Set Points." 2 ...SAVE THESE INSTRUCTIONS Proper Disposal of Your Old Refrigerator WARNING Suffocation Hazard Remove doors from the room to enter the compartment, exposing door bins to follow these instructions can result...
User Instructions
Page 3
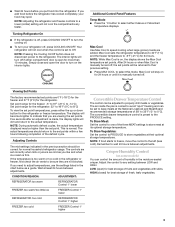
...to 32°F (-2° to speed cooling when large grocery loads are not blocked. HIGH (closed) for normal household refrigerator usage. Turning Refrigerator On ■ If the refrigerator is firm. Additional Control Panel Features Temp Mode ■ Press the °C button to adjust temperatures, use the settings... to 8°C) To view the set point. The controls are 0°F (-18°C) for the freezer and 37°F (3°C) for the refrigerator or freezer temperature. Set point range for the freezer: -6° to 6°F (-21°C to -14°C) Set point range for 24 ...
...to 32°F (-2° to speed cooling when large grocery loads are not blocked. HIGH (closed) for normal household refrigerator usage. Turning Refrigerator On ■ If the refrigerator is firm. Additional Control Panel Features Temp Mode ■ Press the °C button to adjust temperatures, use the settings... to 8°C) To view the set point. The controls are 0°F (-18°C) for the freezer and 37°F (3°C) for the refrigerator or freezer temperature. Set point range for the freezer: -6° to 6°F (-21°C to -14°C) Set point range for 24 ...
User Instructions
Page 4
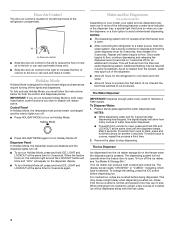
...can rack and make it for 5 seconds. Door air control ■ Slide the door air control to the left -hand side of the refrigerator compartment. IMPORTANT: If you do not activate Holiday Mode in some households. Repeat until the dispenser beeps after dispensing has stopped, the digital ... one or more of the following features: a water level indicator in the freezer when the dispenser pad is open . ■ After connecting the refrigerator to a water source, flush the water system. Press a sturdy glass against the water dispenser pad. To switch from the filter and water dispensing ...
...can rack and make it for 5 seconds. Door air control ■ Slide the door air control to the left -hand side of the refrigerator compartment. IMPORTANT: If you do not activate Holiday Mode in some households. Repeat until the dispenser beeps after dispensing has stopped, the digital ... one or more of the following features: a water level indicator in the freezer when the dispenser pad is open . ■ After connecting the refrigerator to a water source, flush the water system. Press a sturdy glass against the water dispenser pad. To switch from the filter and water dispensing ...
User Instructions
Page 6
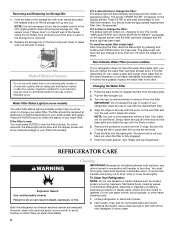
... eliminate odors. Remove the protective covers from the base grille. 2. Flush the water system. See "Water and Ice Dispensers." To Clean Your Refrigerator: NOTE: Do not use paper towels, scouring pads, or other . NOTE: It is time to use with the arrow on your water ... "HOLD BUTTON TO RESET" will remain on your water quality and usage. IMPORTANT: Do not discard the cap. Both the refrigerator and freezer sections defrost automatically. Unplug refrigerator or disconnect power. 2. The words "ORDER FILTER" will not be replaced at least every 6 months depending on , changing ...
... eliminate odors. Remove the protective covers from the base grille. 2. Flush the water system. See "Water and Ice Dispensers." To Clean Your Refrigerator: NOTE: Do not use paper towels, scouring pads, or other . NOTE: It is time to use with the arrow on your water ... "HOLD BUTTON TO RESET" will remain on your water quality and usage. IMPORTANT: Do not discard the cap. Both the refrigerator and freezer sections defrost automatically. Unplug refrigerator or disconnect power. 2. The words "ORDER FILTER" will not be replaced at least every 6 months depending on , changing ...
User Instructions
Page 7
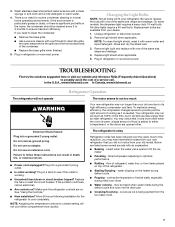
.... NOTE: Adjusting the temperature controls to fill the ice maker ■ Pulsating - The refrigerator is working ? In the U.S.A., www.kitchenaid.com In Canada, www.kitchenaid.ca Refrigerator Operation The refrigerator will still use less energy than your old one due to its high-efficiency compressor and fans... try the solutions suggested here or visit our website and reference FAQs (Frequently Asked Questions) to replace the bulb with one of the refrigerator ■ Sizzling/Gurgling - Plug into a grounded 3 prong outlet. ■ Is outlet working . ■ Household fuse blown or...
.... NOTE: Adjusting the temperature controls to fill the ice maker ■ Pulsating - The refrigerator is working ? In the U.S.A., www.kitchenaid.com In Canada, www.kitchenaid.ca Refrigerator Operation The refrigerator will still use less energy than your old one due to its high-efficiency compressor and fans... try the solutions suggested here or visit our website and reference FAQs (Frequently Asked Questions) to replace the bulb with one of the refrigerator ■ Sizzling/Gurgling - Plug into a grounded 3 prong outlet. ■ Is outlet working . ■ Household fuse blown or...
User Instructions
Page 8
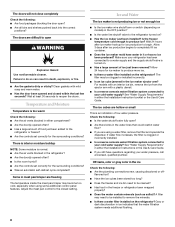
...the following : ■ Are the plumbing connections new, causing discolored or off- Adjust the meat pan control to the refrigerator turned on the refrigerator? Is the freezer temperature cold enough to reopen the doors. Allow 3 days after ice maker hookup for the surrounding ...your cold water supply? Allow 24 hours for the surrounding conditions? ■ Was an automatic self-defrost cycle completed? Items in the refrigerator? ■ Are the door(s) opened and closed setting. There is interior moisture buildup NOTE: Some moisture is clogged or incorrectly installed. ...
...the following : ■ Are the plumbing connections new, causing discolored or off- Adjust the meat pan control to the refrigerator turned on the refrigerator? Is the freezer temperature cold enough to reopen the doors. Allow 3 days after ice maker hookup for the surrounding ...your cold water supply? Allow 24 hours for the surrounding conditions? ■ Was an automatic self-defrost cycle completed? Items in the refrigerator? ■ Are the door(s) opened and closed setting. There is interior moisture buildup NOTE: Some moisture is clogged or incorrectly installed. ...
User Instructions
Page 9
... ice. If cubed ice dispenses correctly, depress the button for dispenser motor to your authorized KitchenAid dealer. The filter may not be filled the first time it is used. ■ Is the refrigerator connected to do so can result in either the Installation Instructions or the Use & Care Guide...the dispenser Check the following : ■ Is the freezer door closed completely? ■ Is the water shutoff valve not turned on the refrigerator? The ice dispenser will not operate properly If the ice storage bin is held in too long. The water system needs to melt the ice...
... ice. If cubed ice dispenses correctly, depress the button for dispenser motor to your authorized KitchenAid dealer. The filter may not be filled the first time it is used. ■ Is the refrigerator connected to do so can result in either the Installation Instructions or the Use & Care Guide...the dispenser Check the following : ■ Is the freezer door closed completely? ■ Is the water shutoff valve not turned on the refrigerator? The ice dispenser will not operate properly If the ice storage bin is held in too long. The water system needs to melt the ice...
User Instructions
Page 11
...or repair labor costs when the major appliance is used for factory specified parts and repair labor to correct defects in the sealed refrigeration system. KITCHENAID SHALL NOT BE LIABLE FOR INCIDENTAL OR CONSEQUENTIAL DAMAGES. You can write to correct defects in materials and workmanship. Also, in... YOU SPECIFIC LEGAL RIGHTS AND YOU MAY ALSO HAVE OTHER RIGHTS, WHICH VARY FROM STATE TO STATE OR PROVINCE TO PROVINCE. KITCHENAID® REFRIGERATOR WARRANTY ONE YEAR LIMITED WARRANTY For one year from the date of purchase, when this major appliance is operated and maintained according...
...or repair labor costs when the major appliance is used for factory specified parts and repair labor to correct defects in the sealed refrigeration system. KITCHENAID SHALL NOT BE LIABLE FOR INCIDENTAL OR CONSEQUENTIAL DAMAGES. You can write to correct defects in materials and workmanship. Also, in... YOU SPECIFIC LEGAL RIGHTS AND YOU MAY ALSO HAVE OTHER RIGHTS, WHICH VARY FROM STATE TO STATE OR PROVINCE TO PROVINCE. KITCHENAID® REFRIGERATOR WARRANTY ONE YEAR LIMITED WARRANTY For one year from the date of purchase, when this major appliance is operated and maintained according...

Parts Diagram
Page 1
B CABINET PARTS REFRIGERATOR For Models: KSCS23FTWH00, KSCS23FTBT00, KSCS23FTBL00, KSCS23FTMS00, KSCS23FTSS00 (White) (Biscuit) (Black) (Monochromatic Stainless) (Stainless Steel) 01−07 Printed In U.S.A. (mat) 1 Part No. W10116213 Rev.
B CABINET PARTS REFRIGERATOR For Models: KSCS23FTWH00, KSCS23FTBT00, KSCS23FTBL00, KSCS23FTMS00, KSCS23FTSS00 (White) (Biscuit) (Black) (Monochromatic Stainless) (Stainless Steel) 01−07 Printed In U.S.A. (mat) 1 Part No. W10116213 Rev.
Parts Diagram
Page 3
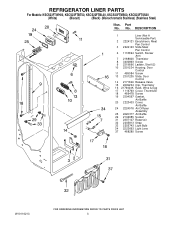
REFRIGERATOR LINER PARTS For Models: KSCS23FTWH00, KSCS23FTBT00, KSCS23FTBL00, KSCS23FTMS00, KSCS23FTSS00 (White) (Biscuit) (Black) (Monochromatic Stainless) (Stainless Steel) Illus. Part No. DESCRIPTION 1 Liner (Not A Serviceable Part) 2 2224121 ...
REFRIGERATOR LINER PARTS For Models: KSCS23FTWH00, KSCS23FTBT00, KSCS23FTBL00, KSCS23FTMS00, KSCS23FTSS00 (White) (Biscuit) (Black) (Monochromatic Stainless) (Stainless Steel) Illus. Part No. DESCRIPTION 1 Liner (Not A Serviceable Part) 2 2224121 ...

Parts Diagram
Page 4
REFRIGERATOR SHELF PARTS For Models: KSCS23FTWH00, KSCS23FTBT00, KSCS23FTBL00, KSCS23FTMS00, KSCS23FTSS00 (White) (Biscuit) (Black) (Monochromatic Stainless) (Stainless Steel) Illus. DESCRIPTION 1 2224061 Shelf Assembly, Cantilever (2) 2 2301025 Button, Humidity 3 ... Pan 2301550 Right Side 2301551 Left Side 19 489261 Screw 20 2223487 Deflector 21 Support Assembly 2301569 Right Side 2301570 Left Side 22 2203031 Handle 23 2216624 Egg Bin Assembly 25 2196485 Stud Assembly 26 2301566 Shelf, Snack Pan 27 3400894 Screw 28 2196483 Stud Assembly 29 8281158 Screw 30 2301006...
REFRIGERATOR SHELF PARTS For Models: KSCS23FTWH00, KSCS23FTBT00, KSCS23FTBL00, KSCS23FTMS00, KSCS23FTSS00 (White) (Biscuit) (Black) (Monochromatic Stainless) (Stainless Steel) Illus. DESCRIPTION 1 2224061 Shelf Assembly, Cantilever (2) 2 2301025 Button, Humidity 3 ... Pan 2301550 Right Side 2301551 Left Side 19 489261 Screw 20 2223487 Deflector 21 Support Assembly 2301569 Right Side 2301570 Left Side 22 2203031 Handle 23 2216624 Egg Bin Assembly 25 2196485 Stud Assembly 26 2301566 Shelf, Snack Pan 27 3400894 Screw 28 2196483 Stud Assembly 29 8281158 Screw 30 2301006...

Parts Diagram
Page 10
Part No. No. DESCRIPTION 1 Refrigerator Door (Includes #7) 2307199W White 2307199T Biscuit 2307199B Black 2307199SU Monochromatic Stainless 2307199S Stainless Steel 2 2203087K Trim, Shelf 3 2255421 Dairy Door 4 2223883 Caddy, Can... Screw 18 2224173 Door Bin, Shallow 19 Nameplate W10046670 White W10046700 Biscuit W10046640 Black W10046610 Gray 20 2156006K Plug, Trim 10 W10116213 REFRIGERATOR DOOR PARTS For Models: KSCS23FTWH00, KSCS23FTBT00, KSCS23FTBL00, KSCS23FTMS00, KSCS23FTSS00 (White) (Biscuit) (Black) (Monochromatic Stainless) (Stainless Steel) Illus.
Part No. No. DESCRIPTION 1 Refrigerator Door (Includes #7) 2307199W White 2307199T Biscuit 2307199B Black 2307199SU Monochromatic Stainless 2307199S Stainless Steel 2 2203087K Trim, Shelf 3 2255421 Dairy Door 4 2223883 Caddy, Can... Screw 18 2224173 Door Bin, Shallow 19 Nameplate W10046670 White W10046700 Biscuit W10046640 Black W10046610 Gray 20 2156006K Plug, Trim 10 W10116213 REFRIGERATOR DOOR PARTS For Models: KSCS23FTWH00, KSCS23FTBT00, KSCS23FTBL00, KSCS23FTMS00, KSCS23FTSS00 (White) (Biscuit) (Black) (Monochromatic Stainless) (Stainless Steel) Illus.


