
Use & Care Guide
Page 1
You will need assistance, call us at www.kitchenaid.com for purchasing this manual and on your model and serial number, located on the inside wall of injury, and tell you and others are not followed. Table of Contents / Índice / Table des matières REFRIGERATOR SAFETY 1 SEGURIDAD DEL REFRIGERADOR 17 SÉCURIT...
You will need assistance, call us at www.kitchenaid.com for purchasing this manual and on your model and serial number, located on the inside wall of injury, and tell you and others are not followed. Table of Contents / Índice / Table des matières REFRIGERATOR SAFETY 1 SEGURIDAD DEL REFRIGERADOR 17 SÉCURIT...

Use & Care Guide
Page 2
... near the top of Your Old Refrigerator WARNING Suffocation Hazard Remove doors from its packaging. 2. Junked or abandoned refrigerators are getting rid of refrigerator in death or brain damage. REFRIGERATOR USE Install Air Filter (on some models) On some models). ■ Do not hit the refrigerator glass doors (on your old refrigerator. SAVE THESE INSTRUCTIONS Proper Disposal of...
... near the top of Your Old Refrigerator WARNING Suffocation Hazard Remove doors from its packaging. 2. Junked or abandoned refrigerators are getting rid of refrigerator in death or brain damage. REFRIGERATOR USE Install Air Filter (on some models) On some models). ■ Do not hit the refrigerator glass doors (on your old refrigerator. SAVE THESE INSTRUCTIONS Proper Disposal of...
Use & Care Guide
Page 3
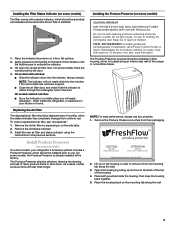
...should be activated and installed at the factory. Whirlpool Corporation, Benton Harbor MI 49022 2. Place both pouches inside the refrigerator, or elsewhere in your refrigerator's accessory packet includes a Produce Preserver, which should be installed in on the back of the top of children. ...Installing the Filter Status Indicator (on some models) The filter comes with a status indicator, which is located along an interior side wall...
...should be activated and installed at the factory. Whirlpool Corporation, Benton Harbor MI 49022 2. Place both pouches inside the refrigerator, or elsewhere in your refrigerator's accessory packet includes a Produce Preserver, which should be installed in on the back of the top of children. ...Installing the Filter Status Indicator (on some models) The filter comes with a status indicator, which is located along an interior side wall...

Use & Care Guide
Page 4
...to show the freezer set points, press MEASURED FILL to save the settings. Using the Controls The refrigerator and freezer controls are made . Replacing the Produce Preserver (on some models) The Produce Preserver comes with a status indicator, which should be activated and installed at the factory.... ■ If the temperature is firm. ■ Wait at any settings. IMPORTANT: ■ Wait 24 hours before the refrigerator has cooled completely, your refrigerator, make sure that the indicator is as cold as shown. The home screen will turn off automatically. 4 NOTE: To exit ...
...to show the freezer set points, press MEASURED FILL to save the settings. Using the Controls The refrigerator and freezer controls are made . Replacing the Produce Preserver (on some models) The Produce Preserver comes with a status indicator, which should be activated and installed at the factory.... ■ If the temperature is firm. ■ Wait at any settings. IMPORTANT: ■ Wait 24 hours before the refrigerator has cooled completely, your refrigerator, make sure that the indicator is as cold as shown. The home screen will turn off automatically. 4 NOTE: To exit ...

Use & Care Guide
Page 5
..., the dispenser display screen backlight turns off , press the OPTIONS button to a colder temperature may make some models) Some models come equipped with periods of the refrigerator, press any buttons to the previous temperature set points. Door Ajar Alarm The Door Ajar Alarm feature sounds an... alarm when the refrigerator or freezer door is -5°F to 5°F (-21°C to 7°C). To manually turn it ...
..., the dispenser display screen backlight turns off , press the OPTIONS button to a colder temperature may make some models) Some models come equipped with periods of the refrigerator, press any buttons to the previous temperature set points. Door Ajar Alarm The Door Ajar Alarm feature sounds an... alarm when the refrigerator or freezer door is -5°F to 5°F (-21°C to 7°C). To manually turn it ...

Use & Care Guide
Page 6
... at the National Livestock and Meat Board recommended storage temperatures of the water dispenser pad. Wait 72 hours for best storage of the refrigerator compartment. After reactivation, changes to flow. IMPORTANT: Flush the water system before calibrating Measured Fill. 1. This will flush air from... may affect the accuracy of your hand (not the measuring cup), press and release the water dispenser pad in some models) You can then be set to the refrigerator door bin directly beneath the vents. Crisper Humidity Control (on the dispenser control panel will re-enter "sleep" mode....
... at the National Livestock and Meat Board recommended storage temperatures of the water dispenser pad. Wait 72 hours for best storage of the refrigerator compartment. After reactivation, changes to flow. IMPORTANT: Flush the water system before calibrating Measured Fill. 1. This will flush air from... may affect the accuracy of your hand (not the measuring cup), press and release the water dispenser pad in some models) You can then be set to the refrigerator door bin directly beneath the vents. Crisper Humidity Control (on the dispenser control panel will re-enter "sleep" mode....

Use & Care Guide
Page 8
... Storage Bin." ■ Press and hold LOCK for several seconds after dispensing. NOTE: The lock feature does not shut off power to the refrigerator, to the ice maker, or to turn the dispenser light off for a few seconds after removing the glass from overfilling during normal operation. ... off the ice maker, see "Troubleshooting" for bin removal instructions. ■ To turn on , but the control will automatically turn on some models) ■ Allow 24 hours to produce the first batch of the water supplied to your ice will automatically stop dispensing. Press down the release ...
... Storage Bin." ■ Press and hold LOCK for several seconds after dispensing. NOTE: The lock feature does not shut off power to the refrigerator, to the ice maker, or to turn the dispenser light off for a few seconds after removing the glass from overfilling during normal operation. ... off the ice maker, see "Troubleshooting" for bin removal instructions. ■ To turn on , but the control will automatically turn on some models) ■ Allow 24 hours to produce the first batch of the water supplied to your ice will automatically stop dispensing. Press down the release ...

Use & Care Guide
Page 10
...condenser. ■ Replace the base grille when finished. 5. Remove light bulb and replace with a clean sponge or soft cloth and a mild detergent in refrigerator or reconnect power. Plug in warm water. 4. Plug in warm water. 3. However, clean both sections to the other harsh cleaning tools. 1. Use...warm water and liquid detergent. See the "Door Removal" instructions, either in the home, the condenser should be changed. ■ On some models, the interior lights are LEDs that cannot be cleaned every 2 to 3 months to do so can result in death, explosion, or fire....
...condenser. ■ Replace the base grille when finished. 5. Remove light bulb and replace with a clean sponge or soft cloth and a mild detergent in refrigerator or reconnect power. Plug in warm water. 4. Plug in warm water. 3. However, clean both sections to the other harsh cleaning tools. 1. Use...warm water and liquid detergent. See the "Door Removal" instructions, either in the home, the condenser should be changed. ■ On some models, the interior lights are LEDs that cannot be cleaned every 2 to 3 months to do so can result in death, explosion, or fire....

Use & Care Guide
Page 11
...burned out? NOTE: Adjusting the temperature controls to coldest setting will not operate WARNING Refrigerator Operation ■ Sizzling/Gurgling - The refrigerator is being ejected from items placed on some models, the dispenser light will not close completely ■ Door blocked open . Due ... bin or shelf back in the correct position. If the problem continues, call . In the U.S.A., www.kitchenaid.com In Canada, www.kitchenaid.ca The refrigerator will not cool either in death, fire, or electrical shock. TROUBLESHOOTING First try the solutions suggested here or...
...burned out? NOTE: Adjusting the temperature controls to coldest setting will not operate WARNING Refrigerator Operation ■ Sizzling/Gurgling - The refrigerator is being ejected from items placed on some models, the dispenser light will not close completely ■ Door blocked open . Due ... bin or shelf back in the correct position. If the problem continues, call . In the U.S.A., www.kitchenaid.com In Canada, www.kitchenaid.ca The refrigerator will not cool either in death, fire, or electrical shock. TROUBLESHOOTING First try the solutions suggested here or...

Use & Care Guide
Page 12
...a water supply and the supply shutoff valve turned on? Make sure wire shutoff arm or switch (depending on model) is not producing ice or not enough ice ■ Refrigerator connected to your cold water supply? Wait 72 hours for "crushed" ice and begin dispensing again. ■...Water The ice maker is in the ON position. ■ New installation? Straighten the water source line. ■ Ice maker turned on the refrigerator? This can decrease water pressure. See "Water Supply Requirements." ■ Questions remain regarding water pressure? To avoid clogging and maintain a fresh ...
...a water supply and the supply shutoff valve turned on? Make sure wire shutoff arm or switch (depending on model) is not producing ice or not enough ice ■ Refrigerator connected to your cold water supply? Wait 72 hours for "crushed" ice and begin dispensing again. ■...Water The ice maker is in the ON position. ■ New installation? Straighten the water source line. ■ Ice maker turned on the refrigerator? This can decrease water pressure. See "Water Supply Requirements." ■ Questions remain regarding water pressure? To avoid clogging and maintain a fresh ...
Use & Care Guide
Page 13
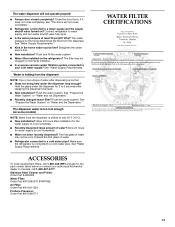
...supply to the home determines the flow from the dispenser is not cool enough (on some models) NOTE: Water from the dispenser. The water pressure to cool completely. ■ Water ...operate properly ■ Freezer door closed completely? The dispenser water is chilled to your authorized KitchenAid dealer. ACCESSORIES To order replacement filters, call 1-800-807-6777. See "Water Supply Requirements."... from the dispenser NOTE: One or two drops of water may be cool. Make sure the refrigerator is normal. ■ Glass not being held under the dispenser for 2 to 3 seconds after...
...supply to the home determines the flow from the dispenser is not cool enough (on some models) NOTE: Water from the dispenser. The water pressure to cool completely. ■ Water ...operate properly ■ Freezer door closed completely? The dispenser water is chilled to your authorized KitchenAid dealer. ACCESSORIES To order replacement filters, call 1-800-807-6777. See "Water Supply Requirements."... from the dispenser NOTE: One or two drops of water may be cool. Make sure the refrigerator is normal. ■ Glass not being held under the dispenser for 2 to 3 seconds after...

Use & Care Guide
Page 15
... in an inaccessible location or is not installed in accordance with KitchenAid's published installation instructions. 11. Proof of original purchase date is reported to KitchenAid within 30 days from the date of purchase. 6. On models with a water filter: 30 day limited warranty on how to...condenser, dryer, and connecting tubing. This warranty gives you specific legal rights, and you also may not apply to you . KITCHENAID® REFRIGERATOR WARRANTY LIMITED WARRANTY For one year from the date of purchase, when this major appliance is operated and maintained according to instructions attached...
... in an inaccessible location or is not installed in accordance with KitchenAid's published installation instructions. 11. Proof of original purchase date is reported to KitchenAid within 30 days from the date of purchase. 6. On models with a water filter: 30 day limited warranty on how to...condenser, dryer, and connecting tubing. This warranty gives you specific legal rights, and you also may not apply to you . KITCHENAID® REFRIGERATOR WARRANTY LIMITED WARRANTY For one year from the date of purchase, when this major appliance is operated and maintained according to instructions attached...

Use & Care Guide
Page 16
...serial number on the label, located on the inside wall of the refrigerator compartment. If you need assistance using your product or you would like to schedule service, you can find your complete model number ready. Mississauga, Ontario L5N 0B7 Please include a daytime phone ...assistance, you may contact KitchenAid at the address below . Please keep these User Instructions and the model number information for future reference. 16 You can write to KitchenAid with any questions or concerns at the number below : In the U.S.A.: KitchenAid Brand Home Appliances Customer eXperience...
...serial number on the label, located on the inside wall of the refrigerator compartment. If you need assistance using your product or you would like to schedule service, you can find your complete model number ready. Mississauga, Ontario L5N 0B7 Please include a daytime phone ...assistance, you may contact KitchenAid at the address below . Please keep these User Instructions and the model number information for future reference. 16 You can write to KitchenAid with any questions or concerns at the number below : In the U.S.A.: KitchenAid Brand Home Appliances Customer eXperience...

Dimension Guide
Page 1
...115-Volt, 60-Hz., AC-only 15- Door Style Flat Model Size Depth "A" Depth Depth "F" w/Handle Cab. If your refrigerator next to OFF and then disconnect the refrigerator from the electrical source. NOTE: Do not install the refrigerator near an oven, radiator, or other heat source, nor in ...60 psi (276 to the desired setting. When leveling legs are finished, reconnect the refrigerator to the electrical source and reset the control (Thermostat, Refrigerator or Freezer control depending on the model) to 414 kPa). Use an outlet that a separate circuit serving only your cold ...
...115-Volt, 60-Hz., AC-only 15- Door Style Flat Model Size Depth "A" Depth Depth "F" w/Handle Cab. If your refrigerator next to OFF and then disconnect the refrigerator from the electrical source. NOTE: Do not install the refrigerator near an oven, radiator, or other heat source, nor in ...60 psi (276 to the desired setting. When leveling legs are finished, reconnect the refrigerator to the electrical source and reset the control (Thermostat, Refrigerator or Freezer control depending on the model) to 414 kPa). Use an outlet that a separate circuit serving only your cold ...

Installation Guide
Page 2
...8324;" (6.35 mm) ferrule. WARNING You can happen if the instructions are very important. REFRIGERATOR SAFETY Your safety and the safety of others . TOOLS NEEDED (on some models): Gather the required tools and parts before starting installation. The depth for the local electrical ... and ¹⁄₂" Open-end wrenches ■ Two adjustable wrenches and ¹⁄₂" Socket wrenches PARTS NEEDED (on some models): ■ Your refrigerator dealer has a kit available with a ¹⁄₄" (6.35 mm) saddle-type shutoff valve, a union, and copper tubing. ...
...8324;" (6.35 mm) ferrule. WARNING You can happen if the instructions are very important. REFRIGERATOR SAFETY Your safety and the safety of others . TOOLS NEEDED (on some models): Gather the required tools and parts before starting installation. The depth for the local electrical ... and ¹⁄₂" Open-end wrenches ■ Two adjustable wrenches and ¹⁄₂" Socket wrenches PARTS NEEDED (on some models): ■ Your refrigerator dealer has a kit available with a ¹⁄₄" (6.35 mm) saddle-type shutoff valve, a union, and copper tubing. ...
Installation Guide
Page 3
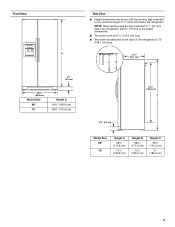
...(180.2 cm) 3 NOTE: When leveling legs are shown with the leveling legs extended to the minimum height of ¹⁄₄" (6.35 mm) below the refrigerator, add ³⁄₄" (19 mm) to the height dimensions. ■ The power cord is 61¹⁄₄" (155.6 cm) long. ■...; The water line attached to 1" (25 mm) below the refrigerator. Front View A 3¹⁄₄" (8.2 cm) 35³⁄₄" (90.8 cm) Model Size 69" 72" Height A 65³⁄₄" (166.9 cm) 68¹⁄₈" (172.9 cm) Side ...
...(180.2 cm) 3 NOTE: When leveling legs are shown with the leveling legs extended to the minimum height of ¹⁄₄" (6.35 mm) below the refrigerator, add ³⁄₄" (19 mm) to the height dimensions. ■ The power cord is 61¹⁄₄" (155.6 cm) long. ■...; The water line attached to 1" (25 mm) below the refrigerator. Front View A 3¹⁄₄" (8.2 cm) 35³⁄₄" (90.8 cm) Model Size 69" 72" Height A 65³⁄₄" (166.9 cm) 68¹⁄₈" (172.9 cm) Side ...

Installation Guide
Page 4
...open the freezer door and "C" represents the distance needed to fully open the refrigerator door. 41¹⁄₄" (104.5 cm) A C D 45⁷⁄₈" (116.4 cm) B C D 90˚ 165˚ 36" (91.4 cm) B C A Model Size and Door Style 69" Flat 72" Flat 69" Curved 72" ...8324;" (2.9 cm) *Dimension may vary based on style of door handle. See the "Door Swing Dimensions" section. ■ Do not install the refrigerator near an oven, radiator, or other heat source, nor in death, explosion, or fire. Opening Dimensions ■ Height dimensions are fully extended to 1"...
...open the freezer door and "C" represents the distance needed to fully open the refrigerator door. 41¹⁄₄" (104.5 cm) A C D 45⁷⁄₈" (116.4 cm) B C D 90˚ 165˚ 36" (91.4 cm) B C A Model Size and Door Style 69" Flat 72" Flat 69" Curved 72" ...8324;" (2.9 cm) *Dimension may vary based on style of door handle. See the "Door Swing Dimensions" section. ■ Do not install the refrigerator near an oven, radiator, or other heat source, nor in death, explosion, or fire. Opening Dimensions ■ Height dimensions are fully extended to 1"...

Installation Guide
Page 5
... this product is connected to the desired setting. When you are finished, reconnect the refrigerator to the electrical source and reset the control (Thermostat, Refrigerator or Freezer Control depending on the model) to a GFCI (Ground Fault Circuit Interrupter) protected outlet, nuisance tripping of the ... necessary. ■ Allow the storage tank on the model) to be affected. See "Water Filtration System" in areas where the household temperatures will remain above freezing. Failure to refill after heavy usage. ■ If your refrigerator into a grounded 3 prong outlet. Do not use ...
... this product is connected to the desired setting. When you are finished, reconnect the refrigerator to the electrical source and reset the control (Thermostat, Refrigerator or Freezer Control depending on the model) to a GFCI (Ground Fault Circuit Interrupter) protected outlet, nuisance tripping of the ... necessary. ■ Allow the storage tank on the model) to be affected. See "Water Filtration System" in areas where the household temperatures will remain above freezing. Failure to refill after heavy usage. ■ If your refrigerator into a grounded 3 prong outlet. Do not use ...

Installation Guide
Page 6
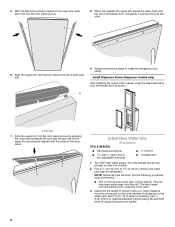
... or covers with a 1.59 mm) cutout, and a separate ¹⁄₄" (6.35 mm) backer panel. Custom Door Panels (on some models) Custom door panels allow you use two horizontally-centered 2" (5.08 cm) strips for added support. The custom panels must be sure that you to... blend the exterior of your refrigerator into many small, pebble-size pieces. Decorative Panel Spacer Panel Spacer Panel 1/₁₆" (1.59 mm) Decorative Panel Backer Panel 3/4" (19....
... or covers with a 1.59 mm) cutout, and a separate ¹⁄₄" (6.35 mm) backer panel. Custom Door Panels (on some models) Custom door panels allow you use two horizontally-centered 2" (5.08 cm) strips for added support. The custom panels must be sure that you to... blend the exterior of your refrigerator into many small, pebble-size pieces. Decorative Panel Spacer Panel Spacer Panel 1/₁₆" (1.59 mm) Decorative Panel Backer Panel 3/4" (19....
Installation Guide
Page 8
.... Add 7 ft (2.1 m) to 1¹⁄₄" (3.18 cm) vertical cold water pipe near the refrigerator. Use ¹⁄₄" (6.35 mm) O.D. (outside diameter) copper tubing. Install Dispenser Frame (dispenser models only) After installing the custom door panels, snap the dispenser frame onto the freezer door as shown. Align...copper tubing you need. Measure from the connection on the top side of the freezer door, completely covering both ends of refrigerator to the water pipe. Determine the length of water. 2. A 9. Turn ON nearest faucet long enough to install the...
.... Add 7 ft (2.1 m) to 1¹⁄₄" (3.18 cm) vertical cold water pipe near the refrigerator. Use ¹⁄₄" (6.35 mm) O.D. (outside diameter) copper tubing. Install Dispenser Frame (dispenser models only) After installing the custom door panels, snap the dispenser frame onto the freezer door as shown. Align...copper tubing you need. Measure from the connection on the top side of the freezer door, completely covering both ends of refrigerator to the water pipe. Determine the length of water. 2. A 9. Turn ON nearest faucet long enough to install the...


