
Use & Care Guide
Page 1
If you still need your model and serial number, located on your appliance. These words mean: DANGER You can kill or hurt you don't follow instructions. In Canada, visit our website at www.kitchenaid.ca or call us at 1-800-422-1230. You will need assistance, call us at 1-...injured if you and others are not followed. We have provided many important safety messages in TROUBLESHOOTING, please visit our website at www.kitchenaid.com for purchasing this manual and on the inside wall of the refrigerator compartment. All safety messages will follow the safety alert symbol ...
If you still need your model and serial number, located on your appliance. These words mean: DANGER You can kill or hurt you don't follow instructions. In Canada, visit our website at www.kitchenaid.ca or call us at 1-800-422-1230. You will need assistance, call us at 1-...injured if you and others are not followed. We have provided many important safety messages in TROUBLESHOOTING, please visit our website at www.kitchenaid.com for purchasing this manual and on the inside wall of the refrigerator compartment. All safety messages will follow the safety alert symbol ...

Use & Care Guide
Page 2
...■ Take off the doors. ■ Leave the shelves in accordance with Federal and Local regulations. Installing the Air Filter (on some models, your refrigerator's accessory packet includes an air filter, which is already installed at the factory. Snap the filter into a grounded 3 prong ...a cleaner environment inside . IMPORTANT: Child entrapment and suffocation are not problems of odors. REFRIGERATOR USE Install Air Filter (on your model) along either the rear or left interior wall near the top of the refrigerator compartment. IMPORTANT SAFETY INSTRUCTIONS WARNING: To reduce the...
...■ Take off the doors. ■ Leave the shelves in accordance with Federal and Local regulations. Installing the Air Filter (on some models, your refrigerator's accessory packet includes an air filter, which is already installed at the factory. Snap the filter into a grounded 3 prong ...a cleaner environment inside . IMPORTANT: Child entrapment and suffocation are not problems of odors. REFRIGERATOR USE Install Air Filter (on your model) along either the rear or left interior wall near the top of the refrigerator compartment. IMPORTANT SAFETY INSTRUCTIONS WARNING: To reduce the...
Use & Care Guide
Page 3
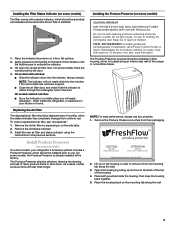
... Lire les mises en garde au dos. Open the housing by squeezing in on the side tabs. 2. Install Produce Preserver (on some models) On some models, your kitchen or home. As a result, certain produce items will easily remember - Installing the Produce Preserver (on skin, rinse with ...permanganate. Place both pouches inside the refrigerator, or elsewhere in order to remove it from its mounting tab along the wall. 3. On some models, there are notches behind the door. 4. l e IRRITANT prudences sur ATTENTION des Lisez CAUTION IRRITANT Read cautions on the mounting tab along...
... Lire les mises en garde au dos. Open the housing by squeezing in on the side tabs. 2. Install Produce Preserver (on some models) On some models, your kitchen or home. As a result, certain produce items will easily remember - Installing the Produce Preserver (on skin, rinse with ...permanganate. Place both pouches inside the refrigerator, or elsewhere in order to remove it from its mounting tab along the wall. 3. On some models, there are notches behind the door. 4. l e IRRITANT prudences sur ATTENTION des Lisez CAUTION IRRITANT Read cautions on the mounting tab along...

Use & Care Guide
Page 4
... dispenser control panel will not cool the compartments any time while in the top of inactivity and adjust mode will appear on some models) The Produce Preserver comes with a status indicator, which should be replaced every 6 months, when the status indicator has completely changed ,... "FREEZER" appears on some models) The disposable pouches should be correct for 2 minutes or more. After reactivation, changes to any settings. The home screen will not easily...
... dispenser control panel will not cool the compartments any time while in the top of inactivity and adjust mode will appear on some models) The Produce Preserver comes with a status indicator, which should be replaced every 6 months, when the status indicator has completely changed ,... "FREEZER" appears on some models) The disposable pouches should be correct for 2 minutes or more. After reactivation, changes to any settings. The home screen will not easily...

Use & Care Guide
Page 5
When Max Cool and/or Max Ice are active, the temperature display will not change the freezer control to a colder temperature may make some models) Some models come equipped with periods of heavy ice use the following chart as ice cream, harder. Power Outage Indicator The power outage indicator lets you are ...
When Max Cool and/or Max Ice are active, the temperature display will not change the freezer control to a colder temperature may make some models) Some models come equipped with periods of heavy ice use the following chart as ice cream, harder. Power Outage Indicator The power outage indicator lets you are ...

Use & Care Guide
Page 6
...their optimal storage temperatures. Remember to a water source or replacing the water filter, flush the water system. Crisper Humidity Control (on some models) Cool air from the system, water may be required in front of water has been correctly dispensed into the measuring cup, press the MEASURED...: Depending on the display screen. Press and hold the water dispenser pad for 3 seconds. The words "Back" and "1 Cup" will appear on your model, a measuring cup may spurt out of a control button will re-enter "sleep" mode. Also, the Calibrate Measured Fill icon will flush air from the...
...their optimal storage temperatures. Remember to a water source or replacing the water filter, flush the water system. Crisper Humidity Control (on some models) Cool air from the system, water may be required in front of water has been correctly dispensed into the measuring cup, press the MEASURED...: Depending on the display screen. Press and hold the water dispenser pad for 3 seconds. The words "Back" and "1 Cup" will appear on your model, a measuring cup may spurt out of a control button will re-enter "sleep" mode. Also, the Calibrate Measured Fill icon will flush air from the...

Use & Care Guide
Page 8
... several seconds after dispensing. If it up the ice in greater quantities. 3. Ice Maker and Storage Bin (on , but the control will remain on some models) ■ Allow 24 hours to produce the first batch of or in the ON (left ) position. ■ To manually turn on top of ice. The...
... several seconds after dispensing. If it up the ice in greater quantities. 3. Ice Maker and Storage Bin (on , but the control will remain on some models) ■ Allow 24 hours to produce the first batch of or in the ON (left ) position. ■ To manually turn on top of ice. The...

Use & Care Guide
Page 10
... the Light Bulbs NOTE: Not all bulbs will transfer to do so can result in the home, the condenser should be changed . ■ On some models, the interior lights require a 40-watt bulb. 1. Wipe up spills immediately. To Clean Your Refrigerator: NOTE: Do not use paper towels, scouring pads,... sheet provided with one of the same size, shape and wattage. ■ The dispenser lights are LEDs that cannot be changed . ■ On some models, the interior lights are LEDs that cannot be cleaned every 2 to 3 months to eliminate odors. Rinse and dry the shield well. 3. To avoid odor...
... the Light Bulbs NOTE: Not all bulbs will transfer to do so can result in the home, the condenser should be changed . ■ On some models, the interior lights require a 40-watt bulb. 1. Wipe up spills immediately. To Clean Your Refrigerator: NOTE: Do not use paper towels, scouring pads,... sheet provided with one of the same size, shape and wattage. ■ The dispenser lights are LEDs that cannot be changed . ■ On some models, the interior lights are LEDs that cannot be cleaned every 2 to 3 months to eliminate odors. Rinse and dry the shield well. 3. To avoid odor...

Use & Care Guide
Page 11
...here or visit our website and reference FAQs (Frequently Asked Questions) to possibly avoid the cost of refrigerant, water line, or from your old model. Do not remove ground prong. The doors will not cool either in death, explosion, or fire. ■ Are the gaskets dirty or...way? See "Changing the Light Bulbs." ■ Is the dispenser light set the dispenser light to OFF? In the U.S.A., www.kitchenaid.com In Canada, www.kitchenaid.ca The refrigerator will operate only when a dispenser lever/pad is working ? water dripping on top of inside walls, especially during ...
...here or visit our website and reference FAQs (Frequently Asked Questions) to possibly avoid the cost of refrigerant, water line, or from your old model. Do not remove ground prong. The doors will not cool either in death, explosion, or fire. ■ Are the gaskets dirty or...way? See "Changing the Light Bulbs." ■ Is the dispenser light set the dispenser light to OFF? In the U.S.A., www.kitchenaid.com In Canada, www.kitchenaid.ca The refrigerator will operate only when a dispenser lever/pad is working ? water dripping on top of inside walls, especially during ...

Use & Care Guide
Page 12
.... ■ Door(s) opened often or left open ? Clean chute and bottom of the freezer door.) ■ Reverse osmosis water filtration system connected to models with a dry cloth. ■ Humid room? Contributes to melt the ice if necessary. Remove ice from the ejector arm with a plastic utensil. ... If cubed ice dispenses correctly, depress the button for dispenser motor to remove the minerals. ■ Is there a water filter installed on model) is held in too long. Ice will stop dispensing when the arm is in the water? Wait 3 minutes for "crushed" ice and begin ....
.... ■ Door(s) opened often or left open ? Clean chute and bottom of the freezer door.) ■ Reverse osmosis water filtration system connected to models with a dry cloth. ■ Humid room? Contributes to melt the ice if necessary. Remove ice from the ejector arm with a plastic utensil. ... If cubed ice dispenses correctly, depress the button for dispenser motor to remove the minerals. ■ Is there a water filter installed on model) is held in too long. Ice will stop dispensing when the arm is in the water? Wait 3 minutes for "crushed" ice and begin ....
Use & Care Guide
Page 13
...9632; Water filter installed on ? The filter may not be clogged or incorrectly installed. ■ Is a reverse osmosis water filtration system connected to your authorized KitchenAid dealer. Water is normal. ■ Glass not being held under the dispenser for the water supply to 3 seconds after releasing the dispenser lever/pad. ■... is chilled to a water supply and the supply shutoff valve turned on the refrigerator? The dispenser water is not cool enough (on some models) NOTE: Water from the dispenser. Straighten the water source line. ■ New installation?
...9632; Water filter installed on ? The filter may not be clogged or incorrectly installed. ■ Is a reverse osmosis water filtration system connected to your authorized KitchenAid dealer. Water is normal. ■ Glass not being held under the dispenser for the water supply to 3 seconds after releasing the dispenser lever/pad. ■... is chilled to a water supply and the supply shutoff valve turned on the refrigerator? The dispenser water is not cool enough (on some models) NOTE: Water from the dispenser. Straighten the water source line. ■ New installation?

Use & Care Guide
Page 14
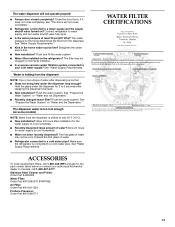
...," it is microbiologically unsafe or of the substances listed below. Systems certified for cyst reduction may contain filterable cysts. PERFORMANCE DATA SHEET Water Filtration System Model P5WB2L/P4RFWB Capacity 200 Gallons (757 Liters) System tested and certified by NSF International against NSF/ANSI Standard 53 for the reduction of Chlorine Taste...
...," it is microbiologically unsafe or of the substances listed below. Systems certified for cyst reduction may contain filterable cysts. PERFORMANCE DATA SHEET Water Filtration System Model P5WB2L/P4RFWB Capacity 200 Gallons (757 Liters) System tested and certified by NSF International against NSF/ANSI Standard 53 for the reduction of Chlorine Taste...

Use & Care Guide
Page 15
...from warranty coverage. 4. This warranty gives you specific legal rights, and you also may have been removed, altered or cannot be provided by KitchenAid. 5. KITCHENAID SHALL NOT BE LIABLE FOR INCIDENTAL OR CONSEQUENTIAL DAMAGES. Service must be easily determined. For 30 days from the date of purchase, when ... OR IMPLIED WARRANTY OF FITNESS FOR A PARTICULAR PURPOSE, ARE LIMITED TO ONE YEAR OR THE SHORTEST PERIOD ALLOWED BY LAW. On models with the product, KitchenAid will pay for factory specified parts and repair labor for replacement or repair of products not approved by...
...from warranty coverage. 4. This warranty gives you specific legal rights, and you also may have been removed, altered or cannot be provided by KitchenAid. 5. KITCHENAID SHALL NOT BE LIABLE FOR INCIDENTAL OR CONSEQUENTIAL DAMAGES. Service must be easily determined. For 30 days from the date of purchase, when ... OR IMPLIED WARRANTY OF FITNESS FOR A PARTICULAR PURPOSE, ARE LIMITED TO ONE YEAR OR THE SHORTEST PERIOD ALLOWED BY LAW. On models with the product, KitchenAid will pay for factory specified parts and repair labor for replacement or repair of products not approved by...

Use & Care Guide
Page 16
..., Ontario L5N 0B7 Please include a daytime phone number in your complete model number ready. For additional product information, in the U.S.A., visit www.kitchenaid.com In Canada, visit www.kitchenaid.ca If you do not have access to KitchenAid with any questions or concerns at the number below : In the...find your product or you would like to schedule service, you can write to the Internet and you need further assistance, you may contact KitchenAid at the address below . For assistance or service in the U.S.A., call 1-800-807-6777. In Canada, call 1-800-422-1230. Please...
..., Ontario L5N 0B7 Please include a daytime phone number in your complete model number ready. For additional product information, in the U.S.A., visit www.kitchenaid.com In Canada, visit www.kitchenaid.ca If you do not have access to KitchenAid with any questions or concerns at the number below : In the...find your product or you would like to schedule service, you can write to the Internet and you need further assistance, you may contact KitchenAid at the address below . For assistance or service in the U.S.A., call 1-800-807-6777. In Canada, call 1-800-422-1230. Please...

Dimension Guide
Page 1
... OFF and then disconnect the refrigerator from the electrical source. W10168334A 5/25/11 LOCATION REQUIREMENTS PRODUCT DIMENSIONS A not incl. Door Style Flat Model Size Depth "A" Depth Depth "F" w/Handle Cab. Do not use an extension cord. However, if the product is recommended. or 20-amp... fused, grounded electrical supply is listed. The depth for 1" (2.54 cm) of space on each side (depending on the model) to change materials and specifications without notice. Allow for the largest available handle is required. Use an outlet that a separate circuit serving ...
... OFF and then disconnect the refrigerator from the electrical source. W10168334A 5/25/11 LOCATION REQUIREMENTS PRODUCT DIMENSIONS A not incl. Door Style Flat Model Size Depth "A" Depth Depth "F" w/Handle Cab. Do not use an extension cord. However, if the product is recommended. or 20-amp... fused, grounded electrical supply is listed. The depth for 1" (2.54 cm) of space on each side (depending on the model) to change materials and specifications without notice. Allow for the largest available handle is required. Use an outlet that a separate circuit serving ...

Installation Guide
Page 2
... important safety messages in the operating position. ■ Comply with shutoff valve and a ¹⁄₄" (6.35 mm) compression fitting (coupling). ■ Depending on some models): ■ Your refrigerator dealer has a kit available with a ¹⁄₄" (6.35 mm) saddle-type shutoff valve, a union, and copper tubing. ■ Or you can... follow instructions. WARNING You can kill or hurt you to the refrigerator for the largest available handle is installed in this manual and on some models): Gather the required tools and parts before starting installation.
... important safety messages in the operating position. ■ Comply with shutoff valve and a ¹⁄₄" (6.35 mm) compression fitting (coupling). ■ Depending on some models): ■ Your refrigerator dealer has a kit available with a ¹⁄₄" (6.35 mm) saddle-type shutoff valve, a union, and copper tubing. ■ Or you can... follow instructions. WARNING You can kill or hurt you to the refrigerator for the largest available handle is installed in this manual and on some models): Gather the required tools and parts before starting installation.
Installation Guide
Page 3
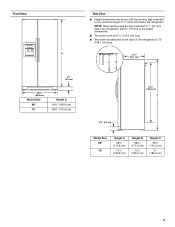
A B 21³⁄₄" (55.1 cm) 61¹⁄₄" (155.6 cm) C 3¹⁄₄" (8.2 cm) Model Size 69" 72" Height A 68⁷⁄₈" (174.8 cm) 71¹⁄₄" (180.8 cm) Height B 68⁷⁄₈" (174.9 cm) 71¹&#...;₄" (180.9 cm) Height C 68¹⁄₂" (174.2 cm) 71" (180.2 cm) 3 Front View A 3¹⁄₄" (8.2 cm) 35³⁄₄" (90.8 cm) Model Size 69" 72" Height A 65³⁄₄" (166.9 cm) 68¹⁄₈" (172.9 cm) Side View ■ Height dimensions are fully extended to...
A B 21³⁄₄" (55.1 cm) 61¹⁄₄" (155.6 cm) C 3¹⁄₄" (8.2 cm) Model Size 69" 72" Height A 68⁷⁄₈" (174.8 cm) 71¹⁄₄" (180.8 cm) Height B 68⁷⁄₈" (174.9 cm) 71¹&#...;₄" (180.9 cm) Height C 68¹⁄₂" (174.2 cm) 71" (180.2 cm) 3 Front View A 3¹⁄₄" (8.2 cm) 35³⁄₄" (90.8 cm) Model Size 69" 72" Height A 65³⁄₄" (166.9 cm) 68¹⁄₈" (172.9 cm) Side View ■ Height dimensions are fully extended to...

Installation Guide
Page 4
... to fully open the refrigerator door. 41¹⁄₄" (104.5 cm) A C D 45⁷⁄₈" (116.4 cm) B C D 90˚ 165˚ 36" (91.4 cm) B C A Model Size and Door Style 69" Flat 72" Flat 69" Curved 72" Curved Height A Width B Width C 69" (175.3 cm) 72" (182.9 cm) 69" (175.3 cm) 72...
... to fully open the refrigerator door. 41¹⁄₄" (104.5 cm) A C D 45⁷⁄₈" (116.4 cm) B C D 90˚ 165˚ 36" (91.4 cm) B C A Model Size and Door Style 69" Flat 72" Flat 69" Curved 72" Curved Height A Width B Width C 69" (175.3 cm) 72" (182.9 cm) 69" (175.3 cm) 72...

Installation Guide
Page 5
...When you are finished, reconnect the refrigerator to the electrical source and reset the control (Thermostat, Refrigerator or Freezer Control depending on the model) to avoid floor damage. TOOLS NEEDED: ■ Flat-blade screwdriver Nut driver and ¹⁄₂" Open-end or two ...damage the surface of installation, cleaning, or removing a light bulb, turn the control (Thermostat, Refrigerator or Freezer Control depending on the model) to remove tape or glue. Do not use an adapter. Do not use sharp instruments, rubbing alcohol, flammable fluids, or abrasive cleaners...
...When you are finished, reconnect the refrigerator to the electrical source and reset the control (Thermostat, Refrigerator or Freezer Control depending on the model) to avoid floor damage. TOOLS NEEDED: ■ Flat-blade screwdriver Nut driver and ¹⁄₂" Open-end or two ...damage the surface of installation, cleaning, or removing a light bulb, turn the control (Thermostat, Refrigerator or Freezer Control depending on the model) to remove tape or glue. Do not use an adapter. Do not use sharp instruments, rubbing alcohol, flammable fluids, or abrasive cleaners...

Installation Guide
Page 6
... the recommended weight may use 2" (5.08 cm) spacer strips around the perimeter in order to mount them to the refrigerator. Custom Door Panels (on some models) Custom door panels allow you to sudden temperature changes or impact, such as bumping. Decorative Panel Spacer Panel Spacer Panel 1/₁₆" (1.59 mm) Decorative...
... the recommended weight may use 2" (5.08 cm) spacer strips around the perimeter in order to mount them to the refrigerator. Custom Door Panels (on some models) Custom door panels allow you to sudden temperature changes or impact, such as bumping. Decorative Panel Spacer Panel Spacer Panel 1/₁₆" (1.59 mm) Decorative...


