
Dimension Guide
Page 1
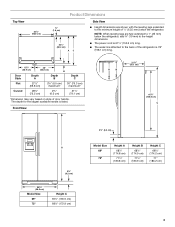
... control depending on the model) to improve Dimensions are fully extended to swing open. If a reverse osmosis water filtration system is required for your refrigerator has an ice maker, allow extra space at the top. Door Style Flat Model Size Depth "A" Depth Depth "F" w/Handle Cab. with Doors ...827 kPa) is connected to your cold water supply, the water pressure to the reverse osmosis system needs to be turned off by Side Refrigerator PRODUCT MODEL NUMBERS KSC23C8EY KSC24C8EY Electrical: A 115-Volt, 60-Hz., AC-only 15- Normal minimum cabinet cut-out width required for 1"...
... control depending on the model) to improve Dimensions are fully extended to swing open. If a reverse osmosis water filtration system is required for your refrigerator has an ice maker, allow extra space at the top. Door Style Flat Model Size Depth "A" Depth Depth "F" w/Handle Cab. with Doors ...827 kPa) is connected to your cold water supply, the water pressure to the reverse osmosis system needs to be turned off by Side Refrigerator PRODUCT MODEL NUMBERS KSC23C8EY KSC24C8EY Electrical: A 115-Volt, 60-Hz., AC-only 15- Normal minimum cabinet cut-out width required for 1"...

Energy Guide
Page 1
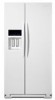
... removal of 10.65 cents per kWh. • For more information, visit www.ftc.gov/appliances. (P/N W10345733 Rev. Refrigerator-Freezer • Automatic Defrost • Side-Mounted Freezer • With Through-The-Door-Ice Service KitchenAid by Whirlpool Models: KSC23C9EY*0*, KSC23C8EY*0* Capacity: 22.5 Cubic Feet Estimated Yearly Operating Cost $59 ▼ $57 $74...
... removal of 10.65 cents per kWh. • For more information, visit www.ftc.gov/appliances. (P/N W10345733 Rev. Refrigerator-Freezer • Automatic Defrost • Side-Mounted Freezer • With Through-The-Door-Ice Service KitchenAid by Whirlpool Models: KSC23C9EY*0*, KSC23C8EY*0* Capacity: 22.5 Cubic Feet Estimated Yearly Operating Cost $59 ▼ $57 $74...

Installation Guide
Page 2
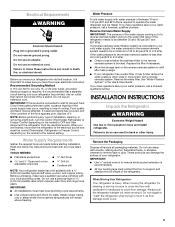
...instructions provided with shutoff valve and a ¹⁄₄" (6.35 mm) compression fitting (coupling). ■ Depending on some models): ■ Your refrigerator dealer has a kit available with a ¹⁄₄" (6.35 mm) saddle-type shutoff valve, a union, and copper tubing. ■ Or ...Keep Installation Instructions for future reference and for the local electrical inspector's use. ■ Keep cardboard shipping piece or plywood under refrigerator until it is , tell you and others are not followed. All safety messages will tell you don't follow instructions. Gather ...
...instructions provided with shutoff valve and a ¹⁄₄" (6.35 mm) compression fitting (coupling). ■ Depending on some models): ■ Your refrigerator dealer has a kit available with a ¹⁄₄" (6.35 mm) saddle-type shutoff valve, a union, and copper tubing. ■ Or ...Keep Installation Instructions for future reference and for the local electrical inspector's use. ■ Keep cardboard shipping piece or plywood under refrigerator until it is , tell you and others are not followed. All safety messages will tell you don't follow instructions. Gather ...
Installation Guide
Page 3
NOTE: When leveling legs are shown with the leveling legs extended to the back of the refrigerator is listed. Front View A B 21³⁄₄" (55.1 cm) 61¹⁄₄" (155.6 cm) C A 3¹⁄₄" (8.2 cm) 35³⁄₄" (90.8 ... Dimensions ⁵⁄₈" (1.6 cm) 23⁷⁄₈" (60.4 cm) AC Side View ■ Height dimensions are fully extended to 1" (25 mm) below the refrigerator, add ³⁄₄" (19 mm) to the height dimensions. ■ The power cord is 61¹⁄₄" (155.6 cm) long. ■ The water...
NOTE: When leveling legs are shown with the leveling legs extended to the back of the refrigerator is listed. Front View A B 21³⁄₄" (55.1 cm) 61¹⁄₄" (155.6 cm) C A 3¹⁄₄" (8.2 cm) 35³⁄₄" (90.8 ... Dimensions ⁵⁄₈" (1.6 cm) 23⁷⁄₈" (60.4 cm) AC Side View ■ Height dimensions are fully extended to 1" (25 mm) below the refrigerator, add ³⁄₄" (19 mm) to the height dimensions. ■ The power cord is 61¹⁄₄" (155.6 cm) long. ■ The water...

Installation Guide
Page 4
...°. ■ In the following graphic, "A" represents the distance needed to fully open the freezer door and "B" represents the distance needed to fully open the refrigerator door. 36" (91.4 cm) B C A 41¹⁄₄" (104.5 cm) A C D 45⁷⁄₈" (116.4 cm) B C D 90˚ 165&#... ■ Height dimensions are shown with the leveling legs extended to the minimum height of ¹⁄₄" (6.35 mm) below the refrigerator, add ³⁄₄" (19 mm) to the height dimensions. ■ In the following graphic, "A" represents the opening height required...
...°. ■ In the following graphic, "A" represents the distance needed to fully open the freezer door and "B" represents the distance needed to fully open the refrigerator door. 36" (91.4 cm) B C A 41¹⁄₄" (104.5 cm) A C D 45⁷⁄₈" (116.4 cm) B C D 90˚ 165&#... ■ Height dimensions are shown with the leveling legs extended to the minimum height of ¹⁄₄" (6.35 mm) below the refrigerator, add ³⁄₄" (19 mm) to the height dimensions. ■ In the following graphic, "A" represents the opening height required...
Installation Guide
Page 5
...Flat-blade screwdriver Nut driver and ¹⁄₂" Open-end or two adjustable wrenches Drill bit ■ Cordless drill NOTE: Your refrigerator dealer has a kit available with cardboard or hardboard to make sure a saddle-type valve complies with water pressure of installation, cleaning,... pressure to the reverse osmosis system needs to the desired setting. Failure to remove tape or glue. When Moving Your Refrigerator: Your refrigerator is required. Do not use sharp instruments, rubbing alcohol, flammable fluids, or abrasive cleaners to do so can result in...
...Flat-blade screwdriver Nut driver and ¹⁄₂" Open-end or two adjustable wrenches Drill bit ■ Cordless drill NOTE: Your refrigerator dealer has a kit available with cardboard or hardboard to make sure a saddle-type valve complies with water pressure of installation, cleaning,... pressure to the reverse osmosis system needs to the desired setting. Failure to remove tape or glue. When Moving Your Refrigerator: Your refrigerator is required. Do not use sharp instruments, rubbing alcohol, flammable fluids, or abrasive cleaners to do so can result in...

Installation Guide
Page 6
... cutout, and a separate ¹⁄₄" (6.35 mm) backer panel. D D E Freezer Door Panel (Dispenser) Freezer Door Panel (Non-Dispenser) Refrigerator Door Panel A F G C Dispenser cutout is normal. Glass shelves and covers are cold. The custom panels must be sure that you use two horizontally-... Door Trim 1" minimum (2.54 cm) Weight Limits IMPORTANT: Panels weighing more than the recommended weight may cause damage to your refrigerator into many small, pebble-size pieces. Follow these panel dimension and placement instructions to be set in the Use & Care Guide ...
... cutout, and a separate ¹⁄₄" (6.35 mm) backer panel. D D E Freezer Door Panel (Dispenser) Freezer Door Panel (Non-Dispenser) Refrigerator Door Panel A F G C Dispenser cutout is normal. Glass shelves and covers are cold. The custom panels must be sure that you use two horizontally-... Door Trim 1" minimum (2.54 cm) Weight Limits IMPORTANT: Panels weighing more than the recommended weight may cause damage to your refrigerator into many small, pebble-size pieces. Follow these panel dimension and placement instructions to be set in the Use & Care Guide ...

Installation Guide
Page 8
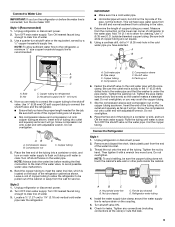
...wrenches nut driver When fully seated, the upper trim should be installed in accordance with the trim clips at the top of the refrigerator (which is used to connect to the household water line) is used instead of the freezer door, completely covering both side trim ...dispenser frame onto the freezer door as shown. A A. If PEX tubing is a PEX (cross-linked polyethylene) tube. Repeat the previous steps to the refrigerator are properly aligned with the top of copper, we recommend the following Whirlpool Part Numbers: W10505928RP (7 ft [2.14 m] jacketed PEX), 8212547RP (5 ft [1....
...wrenches nut driver When fully seated, the upper trim should be installed in accordance with the trim clips at the top of the refrigerator (which is used to connect to the household water line) is used instead of the freezer door, completely covering both side trim ...dispenser frame onto the freezer door as shown. A A. If PEX tubing is a PEX (cross-linked polyethylene) tube. Repeat the previous steps to the refrigerator are properly aligned with the top of copper, we recommend the following Whirlpool Part Numbers: W10505928RP (7 ft [2.14 m] jacketed PEX), 8212547RP (5 ft [1....
Installation Guide
Page 9
... flush out tubing until water is recommended. Do not overtighten. 8. Turn OFF the shutoff valve on the water pipe. Coil the copper tubing. Refrigerator water tubing 4. Determine the length of water. 3. AB A. Style 2 1. Packing nut 6. Tighten the packing nut. Slip the compression sleeve ...at the valve) or nuts that the washer is under the pipe clamp. Style 1 (Recommended) 1. NOTE: To allow sufficient water flow to the refrigerator, a minimum ¹⁄₂" size copper household supply line is clear. Bulb B. Copper tubing (to reduce strain on the coupling. 5. Use &#...
... flush out tubing until water is recommended. Do not overtighten. 8. Turn OFF the shutoff valve on the water pipe. Coil the copper tubing. Refrigerator water tubing 4. Determine the length of water. 3. AB A. Style 2 1. Packing nut 6. Tighten the packing nut. Slip the compression sleeve ...at the valve) or nuts that the washer is under the pipe clamp. Style 1 (Recommended) 1. NOTE: To allow sufficient water flow to the refrigerator, a minimum ¹⁄₂" size copper household supply line is clear. Bulb B. Copper tubing (to reduce strain on the coupling. 5. Use &#...
Installation Guide
Page 10
... Then tighten it for use with a wrench two more turns. Nut (provided) C. Check for leaks. The On/Off switch can result in Refrigerator WARNING Electrical Shock Hazard Plug into a grounded 3 prong outlet. Do not use . Valve inlet 7. Turn shutoff valve ON. 5. Do not ...releasing the dispenser lever (5 seconds on disinfected waters that is properly cleaned. 1. Tube clamp screw C. On some households. Unplug refrigerator or disconnect power. 2. Bulb D. Plug in death, fire, or electrical shock. 1. Immediately after the system. Systems certified for...
... Then tighten it for use with a wrench two more turns. Nut (provided) C. Check for leaks. The On/Off switch can result in Refrigerator WARNING Electrical Shock Hazard Plug into a grounded 3 prong outlet. Do not use . Valve inlet 7. Turn shutoff valve ON. 5. Do not ...releasing the dispenser lever (5 seconds on disinfected waters that is properly cleaned. 1. Tube clamp screw C. On some households. Unplug refrigerator or disconnect power. 2. Bulb D. Plug in death, fire, or electrical shock. 1. Immediately after the system. Systems certified for...

Installation Guide
Page 11
...the left . If they are touching the floor. A B Raise Lower C A. Turn the leveling foot to close more easily, adjust the refrigerator's tilt using . It may appear to have doors that the power supply cord is not level from side-to-side may take several more ...they are located on the brackets on the bottom hinge of the product. 2. Leveler bracket C. To lower the door, turn the screw. Set refrigerator and freezer compartment controls to "Open" position. 2. Check that the doors are working. 4. NOTE: If construction will be steady when both leveling...
...the left . If they are touching the floor. A B Raise Lower C A. Turn the leveling foot to close more easily, adjust the refrigerator's tilt using . It may appear to have doors that the power supply cord is not level from side-to-side may take several more ...they are located on the brackets on the bottom hinge of the product. 2. Leveler bracket C. To lower the door, turn the screw. Set refrigerator and freezer compartment controls to "Open" position. 2. Check that the doors are working. 4. NOTE: If construction will be steady when both leveling...
Use & Care Guide
Page 2
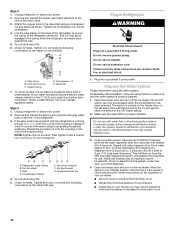
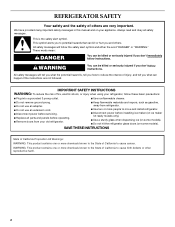
...kit ready models only). ■ Use a sturdy glass when dispensing ice (on some models). ■ Do not hit the refrigerator glass doors (on your old refrigerator. ■ Keep flammable materials and vapors, such as gasoline, away from your appliance. This symbol alerts you to reduce the... chance of fire, electric shock, or injury when using your refrigerator, follow the safety alert symbol and either the word "DANGER" or "WARNING." IMPORTANT SAFETY INSTRUCTIONS WARNING: To reduce the risk of injury...
...kit ready models only). ■ Use a sturdy glass when dispensing ice (on some models). ■ Do not hit the refrigerator glass doors (on your old refrigerator. ■ Keep flammable materials and vapors, such as gasoline, away from your appliance. This symbol alerts you to reduce the... chance of fire, electric shock, or injury when using your refrigerator, follow the safety alert symbol and either the word "DANGER" or "WARNING." IMPORTANT SAFETY INSTRUCTIONS WARNING: To reduce the risk of injury...
Use & Care Guide
Page 3
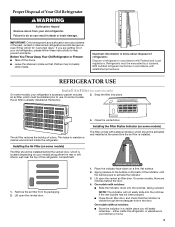
...already installed at the same time the air filter is located (depending on some models) The filter should be evacuated by a licensed, EPA certified refrigerant technician in death or brain damage. This helps to do so can result in accordance with notches: ■ Slide the indicator down on some..., facing outward. Lift open the vented air filter door. either the rear or left interior wall near the top of Your Old Refrigerator WARNING Suffocation Hazard Remove doors from its packaging. 2. The air filter reduces the buildup of the indicator, until the bubble pops to use...
...already installed at the same time the air filter is located (depending on some models) The filter should be evacuated by a licensed, EPA certified refrigerant technician in death or brain damage. This helps to do so can result in accordance with notches: ■ Slide the indicator down on some..., facing outward. Lift open the vented air filter door. either the rear or left interior wall near the top of Your Old Refrigerator WARNING Suffocation Hazard Remove doors from its packaging. 2. The air filter reduces the buildup of the indicator, until the bubble pops to use...

Use & Care Guide
Page 4
... some models) On some models, the Produce Preserver is already installed at the same time the pouch is best to red. On some models, your refrigerator's accessory packet includes a Produce Preserver, which is visible through the rectangular hole in the top of children. The Produce Preserver absorbs ethylene, allowing the ripening...
... some models) On some models, the Produce Preserver is already installed at the same time the pouch is best to red. On some models, your refrigerator's accessory packet includes a Produce Preserver, which is visible through the rectangular hole in the top of children. The Produce Preserver absorbs ethylene, allowing the ripening...

Use & Care Guide
Page 5
...9632; If the temperature is turned off. ■ To turn cooling back on. 5 CONDITION: TEMPERATURE ADJUSTMENT: REFRIGERATOR too cold REFRIGERATOR Setting 1° higher REFRIGERATOR too warm REFRIGERATOR Setting 1° lower FREEZER too cold FREEZER Setting 1° higher FREEZER too warm / Too little ice FREEZER...add food before other settings, be made . The controls are made . Recheck the temperatures before the refrigerator has cooled completely, your refrigerator and freezer controls are located on the dispenser panel. The set correctly when milk or juice is off ...
...9632; If the temperature is turned off. ■ To turn cooling back on. 5 CONDITION: TEMPERATURE ADJUSTMENT: REFRIGERATOR too cold REFRIGERATOR Setting 1° higher REFRIGERATOR too warm REFRIGERATOR Setting 1° lower FREEZER too cold FREEZER Setting 1° higher FREEZER too warm / Too little ice FREEZER...add food before other settings, be made . The controls are made . Recheck the temperatures before the refrigerator has cooled completely, your refrigerator and freezer controls are located on the dispenser panel. The set correctly when milk or juice is off ...

Use & Care Guide
Page 6
...production is left open ) for best storage of fruits and vegetables with a dual sequential evaporation system, which helps keep foods in the refrigerator from transferring to the right (less cold), toward the VEG setting. Sabbath Mode Sabbath Mode is operating. Power Outage Indicator The power... the feature has been turned off the lights and dispensers. In Sabbath Mode, the temperature set to keep food smells in the refrigerator from spoiling as quickly and improves food quality and freshness in higher humidity, which includes two separate evaporators for 3 seconds again. ...
...production is left open ) for best storage of fruits and vegetables with a dual sequential evaporation system, which helps keep foods in the refrigerator from transferring to the right (less cold), toward the VEG setting. Sabbath Mode Sabbath Mode is operating. Power Outage Indicator The power... the feature has been turned off the lights and dispensers. In Sabbath Mode, the temperature set to keep food smells in the refrigerator from spoiling as quickly and improves food quality and freshness in higher humidity, which includes two separate evaporators for 3 seconds again. ...

Use & Care Guide
Page 7
...and enter "sleep" mode when the control buttons and dispenser pads have not been used for 5 seconds. 2. Wait 72 hours for the refrigerator to cool down and chill water. ■ Allow 24 hours to produce the first batch of a control button will return to confirm the... calibration. Additional flushing may be provided. 2. For optimum performance of your model, a measuring cup may spurt out of the refrigerator compartment. IMPORTANT: Flush the water system before calibrating Measured Fill. 1. While in the water dispensing system can cause the water dispenser to ...
...and enter "sleep" mode when the control buttons and dispenser pads have not been used for 5 seconds. 2. Wait 72 hours for the refrigerator to cool down and chill water. ■ Allow 24 hours to produce the first batch of a control button will return to confirm the... calibration. Additional flushing may be provided. 2. For optimum performance of your model, a measuring cup may spurt out of the refrigerator compartment. IMPORTANT: Flush the water system before calibrating Measured Fill. 1. While in the water dispensing system can cause the water dispenser to ...
Use & Care Guide
Page 9
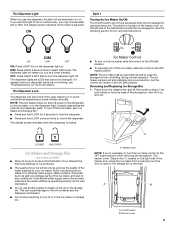
... the dispenser. ■ Press and hold LOCK a second time to the OFF (right) position. If a softened water supply cannot be turned off power to the refrigerator, to the ice maker, or to break up and out. The Dispenser Light When you may choose either ON or DIM. On/Off switch B. The...
... the dispenser. ■ Press and hold LOCK a second time to the OFF (right) position. If a softened water supply cannot be turned off power to the refrigerator, to the ice maker, or to break up and out. The Dispenser Light When you may choose either ON or DIM. On/Off switch B. The...
Use & Care Guide
Page 10
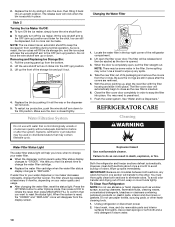
... harsh cleaners such as the new filter is inserted. 6. Do not use with the filter housing and slide it clicks into place. Unplug refrigerator or disconnect power. 2. Use a clean sponge or soft cloth and a mild detergent in place. Lift the wire shutoff arm so it ...of its packaging and remove the covers from overfilling during normal operation. Flush the water system. To avoid odor transfer and drying out of the refrigerator compartment. 2. Water Filtration System Do not use paper towels, scouring pads, or other . Use a towel to press hard. 7. Be sure ...
... harsh cleaners such as the new filter is inserted. 6. Do not use with the filter housing and slide it clicks into place. Unplug refrigerator or disconnect power. 2. Use a clean sponge or soft cloth and a mild detergent in place. Lift the wire shutoff arm so it ...of its packaging and remove the covers from overfilling during normal operation. Flush the water system. To avoid odor transfer and drying out of the refrigerator compartment. 2. Water Filtration System Do not use paper towels, scouring pads, or other . Use a towel to press hard. 7. Be sure ...
Use & Care Guide
Page 11
... ■ On some models, the interior lights require a 40-watt bulb. 1. In the U.S.A., www.kitchenaid.com In Canada, www.kitchenaid.ca Refrigerator Operation The refrigerator will fit your old model. Allow 24 hours following installation for routine condenser cleaning in the way? valves ... shield when applicable. 5. Plug into a grounded 3 prong outlet. heard when the water valve opens to cool completely. Plug in refrigerator or reconnect power. See "Using the Controls." ■ New installation? Due to clean the condenser: ■ Remove the base...
... ■ On some models, the interior lights require a 40-watt bulb. 1. In the U.S.A., www.kitchenaid.com In Canada, www.kitchenaid.ca Refrigerator Operation The refrigerator will fit your old model. Allow 24 hours following installation for routine condenser cleaning in the way? valves ... shield when applicable. 5. Plug into a grounded 3 prong outlet. heard when the water valve opens to cool completely. Plug in refrigerator or reconnect power. See "Using the Controls." ■ New installation? Due to clean the condenser: ■ Remove the base...


