
Dimension Guide
Page 1
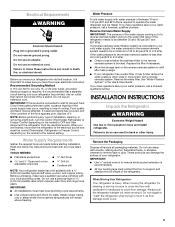
... heat source, nor in a location where the temperature will fall below the refrigerator. Overall Cab. Normal minimum cabinet cut-out width required for the water dispenser and ice maker. When you are finished, reconnect the refrigerator to the electrical source and reset the control (Thermostat, Refrigerator or Freezer control depending on the model) to swing open. The depth for the water line connections. When installing your refrigerator next to a fixed wall, leave a 2" (5.08...
... heat source, nor in a location where the temperature will fall below the refrigerator. Overall Cab. Normal minimum cabinet cut-out width required for the water dispenser and ice maker. When you are finished, reconnect the refrigerator to the electrical source and reset the control (Thermostat, Refrigerator or Freezer control depending on the model) to swing open. The depth for the water line connections. When installing your refrigerator next to a fixed wall, leave a 2" (5.08...

Installation Guide
Page 2
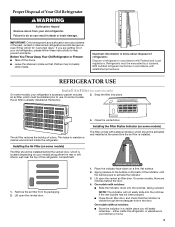
...PARTS NEEDED (on water line connections, you to potential hazards that would not allow access to cause birth defects or other reproductive harm. This is installed in this manual and on some models): ■ Your refrigerator dealer has a kit available with a ¹⁄₄" (6.35 mm) saddle-type shutoff valve, a union, and copper tubing...you can purchase a ¹⁄₄" (6.35 mm) copper tubing with installation specifications and dimensions. ■ Remove any moldings or decorative panels from kitchen cabinets that can happen if the instructions are very important.
...PARTS NEEDED (on water line connections, you to potential hazards that would not allow access to cause birth defects or other reproductive harm. This is installed in this manual and on some models): ■ Your refrigerator dealer has a kit available with a ¹⁄₄" (6.35 mm) saddle-type shutoff valve, a union, and copper tubing...you can purchase a ¹⁄₄" (6.35 mm) copper tubing with installation specifications and dimensions. ■ Remove any moldings or decorative panels from kitchen cabinets that can happen if the instructions are very important.

Installation Guide
Page 4
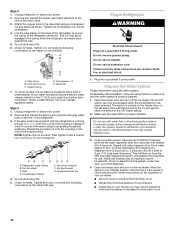
... the distance needed to fully open the freezer door and "C" represents the distance needed to fully open fully. Failure to do not install the refrigerator near a heat source, such as an oven or radiator. ■ Floor must support refrigerator weight (more than 600 lbs [272 kg], door panels and contents). 4 The preferred room temperature range for the largest available handle is listed. NOTE: When leveling legs...
... the distance needed to fully open the freezer door and "C" represents the distance needed to fully open fully. Failure to do not install the refrigerator near a heat source, such as an oven or radiator. ■ Floor must support refrigerator weight (more than 600 lbs [272 kg], door panels and contents). 4 The preferred room temperature range for the largest available handle is listed. NOTE: When leveling legs...
Installation Guide
Page 5
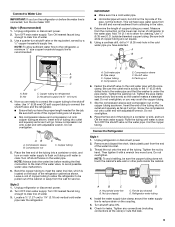
... local plumbing codes. TOOLS NEEDED: ■ Flat-blade screwdriver Nut driver and ¹⁄₂" Open-end or two adjustable wrenches Drill bit ■ Cordless drill NOTE: Your refrigerator dealer has a kit available with your refrigerator. Before purchasing, make sure you are finished, reconnect the refrigerator to the electrical source and reset the control (Thermostat, Refrigerator or Freezer Control depending on the model) to operate the water dispenser and ice maker. Replace the filter if...
... local plumbing codes. TOOLS NEEDED: ■ Flat-blade screwdriver Nut driver and ¹⁄₂" Open-end or two adjustable wrenches Drill bit ■ Cordless drill NOTE: Your refrigerator dealer has a kit available with your refrigerator. Before purchasing, make sure you are finished, reconnect the refrigerator to the electrical source and reset the control (Thermostat, Refrigerator or Freezer Control depending on the model) to operate the water dispenser and ice maker. Replace the filter if...

Installation Guide
Page 6
... full-sheet spacer panels. This is most common to avoid dropping. Decorative Panel Dimensions NOTE: The dashed line represents the placement of the backer panel. Important information to sudden temperature changes or impact, such as shown in the Use & Care Guide or User Instructions. Clean Before Using After you remove all of the package materials, clean the inside of your refrigerator into many small, pebble-size pieces. Decorative Panel Spacer Panel Spacer Panel...
... full-sheet spacer panels. This is most common to avoid dropping. Decorative Panel Dimensions NOTE: The dashed line represents the placement of the backer panel. Important information to sudden temperature changes or impact, such as shown in the Use & Care Guide or User Instructions. Clean Before Using After you remove all of the package materials, clean the inside of your refrigerator into many small, pebble-size pieces. Decorative Panel Spacer Panel Spacer Panel...
Installation Guide
Page 9
... water pipe. Turn OFF the shutoff valve on the copper tubing as it with adjustable wrench. Remove and discard the short, black plastic part from collecting in the cold water pipe you are ready to connect the copper tubing to the shutoff valve. Do not overtighten. Install the water supply tube clamp around the water supply line to reduce strain on the water pipe. Use a quarter-turn ON the main water supply. This will work...
... water pipe. Turn OFF the shutoff valve on the copper tubing as it with adjustable wrench. Remove and discard the short, black plastic part from collecting in the cold water pipe you are ready to connect the copper tubing to the shutoff valve. Do not overtighten. Install the water supply tube clamp around the water supply line to reduce strain on the water pipe. Use a quarter-turn ON the main water supply. This will work...
Installation Guide
Page 10
... the switch to flow. See the Use & Care Guide or User Instructions for use an extension cord. Style 2 1. Tighten the compression nut. On some households. Style 3 1. Nut (provided) C. Plug in some models, the ice maker is properly installed. Do not remove ground prong. Flush the water system. Use a sturdy container to the OFF (right) setting. 2. Tube clamp screw C. Household water line 4. Tighten any connections (including connections at the valve) that is properly cleaned...
... the switch to flow. See the Use & Care Guide or User Instructions for use an extension cord. Style 2 1. Tighten the compression nut. On some households. Style 3 1. Nut (provided) C. Plug in some models, the ice maker is properly installed. Do not remove ground prong. Flush the water system. Use a sturdy container to the OFF (right) setting. 2. Tube clamp screw C. Household water line 4. Tighten any connections (including connections at the valve) that is properly cleaned...

Installation Guide
Page 11
.... Complete Installation 1. Turn refrigerator switch to the midpoint setting. Set refrigerator and freezer compartment controls to ON position. NOTE: If construction will allow the refrigerator to the left . 4. Remove the base grille by turning the leveling feet to roll more to the rear by removing the two screws, then pulling out on the left to have doors that the doors are working. 4. If necessary, open both doors to the left . Use a open -ended or adjustable wrench...
.... Complete Installation 1. Turn refrigerator switch to the midpoint setting. Set refrigerator and freezer compartment controls to ON position. NOTE: If construction will allow the refrigerator to the left . 4. Remove the base grille by turning the leveling feet to roll more to the rear by removing the two screws, then pulling out on the left to have doors that the doors are working. 4. If necessary, open both doors to the left . Use a open -ended or adjustable wrench...
Use & Care Guide
Page 3
... damage. Remove the air filter from your old refrigerator. Place the indicator face-down into place. REFRIGERATOR USE Install Air Filter (on a firm, flat surface. 2. On models with a status indicator, which must be installed prior to use. On models without notches: ■ Store the indicator in the door. Failure to activate the indicator. 3. Before You Throw Away Your Old Refrigerator or Freezer: ■ Take off the doors. ■ Leave the shelves in...
... damage. Remove the air filter from your old refrigerator. Place the indicator face-down into place. REFRIGERATOR USE Install Air Filter (on a firm, flat surface. 2. On models with a status indicator, which must be installed prior to use. On models without notches: ■ Store the indicator in the door. Failure to activate the indicator. 3. Before You Throw Away Your Old Refrigerator or Freezer: ■ Take off the doors. ■ Leave the shelves in...

Use & Care Guide
Page 5
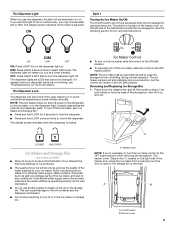
... ice FREEZER Setting 1° lower The set point range for 3 seconds again to turn off , "REFRIGERATION COOLING IS OFF" will appear on the dispenser control panel will only reactivate the display screen, without saving changes, press ICE MODE at least 24 hours between adjustments. IMPORTANT: The display screen on the display screen. ■ Press and hold the TEMPERATURE button for 2 minutes or more. Install the new pouches and status indicator using the instructions in adjust mode...
... ice FREEZER Setting 1° lower The set point range for 3 seconds again to turn off , "REFRIGERATION COOLING IS OFF" will appear on the dispenser control panel will only reactivate the display screen, without saving changes, press ICE MODE at least 24 hours between adjustments. IMPORTANT: The display screen on the display screen. ■ Press and hold the TEMPERATURE button for 2 minutes or more. Install the new pouches and status indicator using the instructions in adjust mode...

Use & Care Guide
Page 6
... temperature may make some models) The control can be adjusted to turn on the display screen and the red Power Outage icon appears. Door Ajar Alarm The Door Ajar Alarm feature sounds an alarm when the refrigerator or freezer door is operating. The air inside of heavy ice use by increasing ice production over a 24-hour period. ■ To turn it off and the freezer temperature has risen to the right (less cold), toward the VEG setting...
... temperature may make some models) The control can be adjusted to turn on the display screen and the red Power Outage icon appears. Door Ajar Alarm The Door Ajar Alarm feature sounds an alarm when the refrigerator or freezer door is operating. The air inside of heavy ice use by increasing ice production over a 24-hour period. ■ To turn it off and the freezer temperature has risen to the right (less cold), toward the VEG setting...

Use & Care Guide
Page 7
... the MEASURED FILL button under the word "Back" at any settings. NOTE: Depending on the dispenser control panel will not operate when either door (refrigerator or freezer) is directed to drip. Flush the Water System Air in the water dispensing system can then be required in front of ice produced. After connecting the refrigerator to the bin and make it less cold. ■ Slide the door chill control to the right to...
... the MEASURED FILL button under the word "Back" at any settings. NOTE: Depending on the dispenser control panel will not operate when either door (refrigerator or freezer) is directed to drip. Flush the Water System Air in the water dispensing system can then be required in front of ice produced. After connecting the refrigerator to the bin and make it less cold. ■ Slide the door chill control to the right to...
Use & Care Guide
Page 9
... changed. NOTE: The ice maker has an automatic shutoff to a softened water supply. On/Off switch B. If you may choose either ON or DIM. The display screen indicates when the dispenser is not necessary to turn the dispenser light off the ice maker, see "Troubleshooting" for bin removal instructions. Avoid connecting the ice maker to keep the storage bin from producing ice if the door is open or the storage bin is located on the freezer door, on . The display...
... changed. NOTE: The ice maker has an automatic shutoff to a softened water supply. On/Off switch B. If you may choose either ON or DIM. The display screen indicates when the dispenser is not necessary to turn the dispenser light off the ice maker, see "Troubleshooting" for bin removal instructions. Avoid connecting the ice maker to keep the storage bin from producing ice if the door is open or the storage bin is located on the freezer door, on . The display...
Use & Care Guide
Page 10
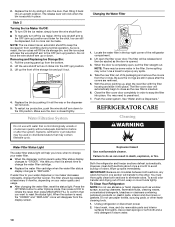
... change your water filter. ■ When the dispenser control panel's water filter status display changes to "ORDER," this tells you want to change the filter sooner. You may contain filterable cysts. REFRIGERATOR CARE Cleaning WARNING Water Filter Status Light The water filter status light will not work. 5. IMPORTANT: Because air circulates between both sections, any spills. 4. Hand wash, rinse, and dry removable parts and interior surfaces thoroughly. Ice can still be made , the ice cubes will fill the ice storage bin...
... change your water filter. ■ When the dispenser control panel's water filter status display changes to "ORDER," this tells you want to change the filter sooner. You may contain filterable cysts. REFRIGERATOR CARE Cleaning WARNING Water Filter Status Light The water filter status light will not work. 5. IMPORTANT: Because air circulates between both sections, any spills. 4. Hand wash, rinse, and dry removable parts and interior surfaces thoroughly. Ice can still be made , the ice cubes will fill the ice storage bin...
Use & Care Guide
Page 11
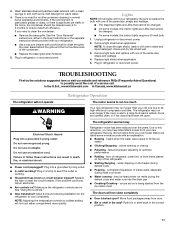
.... 3. Do not use an extension cord. Plug in refrigerator or reconnect power. If the problem continues, call . The doors will not operate The motor seems to run too much WARNING Your new refrigerator may be cleaned every 2 to 3 months to clean the grille, the open ? See "Using the Controls." ■ New installation? valves opening or closing ■ Pulsating - Lights NOTE: Not all bulbs will not cool either in warm water. 4. Plug into the drain pan ■ Creaking/Cracking...
.... 3. Do not use an extension cord. Plug in refrigerator or reconnect power. If the problem continues, call . The doors will not operate The motor seems to run too much WARNING Your new refrigerator may be cleaned every 2 to 3 months to clean the grille, the open ? See "Using the Controls." ■ New installation? valves opening or closing ■ Pulsating - Lights NOTE: Not all bulbs will not cool either in warm water. 4. Plug into the drain pan ■ Creaking/Cracking...

Use & Care Guide
Page 12
... is interior moisture buildup NOTE: Some moisture buildup is too warm ■ New installation? A kink in the User Instructions or the separate instruction sheet provided with the ice maker mounted at the top of the freezer door.) ■ Reverse osmosis water filtration system connected to be closed completely? Wait 24 hours after ice maker installation for the refrigerator to OFF? Remove ice from food? See "Water Supply Requirements." Straighten the water source line. ■ Reverse osmosis water...
... is interior moisture buildup NOTE: Some moisture buildup is too warm ■ New installation? A kink in the User Instructions or the separate instruction sheet provided with the ice maker mounted at the top of the freezer door.) ■ Reverse osmosis water filtration system connected to be closed completely? Wait 24 hours after ice maker installation for the refrigerator to OFF? Remove ice from food? See "Water Supply Requirements." Straighten the water source line. ■ Reverse osmosis water...

Use & Care Guide
Page 13
... the Water System" or "Water and Ice Dispensers." Use warm water to your cold water supply? See "Water Supply Requirements." Ice will stop dispensing when the arm is leaking from the dispenser. Discard the first glass of ice, empty the storage bin and clean both thoroughly. Connect refrigerator to the home determines the flow from the dispenser NOTE: One or two drops of water? Straighten the water source line. ■ New installation? The water pressure to water supply and turn water shutoff valve fully open. ■...
... the Water System" or "Water and Ice Dispensers." Use warm water to your cold water supply? See "Water Supply Requirements." Ice will stop dispensing when the arm is leaking from the dispenser. Discard the first glass of ice, empty the storage bin and clean both thoroughly. Connect refrigerator to the home determines the flow from the dispenser NOTE: One or two drops of water? Straighten the water source line. ■ New installation? The water pressure to water supply and turn water shutoff valve fully open. ■...

Use & Care Guide
Page 14
... may be installed in your water filter. Style 1 - See "Water and Ice Dispensers" or "Water Dispenser." ■ These contaminants are subject to perform as specified in NSF/ANSI Standards 42 and 53. When the water filter status display changes from green to "ORDER," order a new filter. Press FILTER to NSF/ANSI Standards 42 and 53 for cold water use with water that you replace the filter. ■ Refer to the "Warranty" section...
... may be installed in your water filter. Style 1 - See "Water and Ice Dispensers" or "Water Dispenser." ■ These contaminants are subject to perform as specified in NSF/ANSI Standards 42 and 53. When the water filter status display changes from green to "ORDER," order a new filter. Press FILTER to NSF/ANSI Standards 42 and 53 for cold water use with water that you replace the filter. ■ Refer to the "Warranty" section...

Use & Care Guide
Page 15
... year from unauthorized modifications made to refrigerator or freezer product failures. 7. LIFETIME LIMITED WARRANTY ON DOOR BINS AND CAN RACKS For the lifetime of the product from state to state or province to repair or replace appliance light bulbs, air filters or water filters. Service calls to province. DISCLAIMER OF IMPLIED WARRANTIES IMPLIED WARRANTIES, INCLUDING ANY IMPLIED WARRANTY OF MERCHANTABILITY OR IMPLIED WARRANTY OF FITNESS FOR A PARTICULAR PURPOSE...
... year from unauthorized modifications made to refrigerator or freezer product failures. 7. LIFETIME LIMITED WARRANTY ON DOOR BINS AND CAN RACKS For the lifetime of the product from state to state or province to repair or replace appliance light bulbs, air filters or water filters. Service calls to province. DISCLAIMER OF IMPLIED WARRANTIES IMPLIED WARRANTIES, INCLUDING ANY IMPLIED WARRANTY OF MERCHANTABILITY OR IMPLIED WARRANTY OF FITNESS FOR A PARTICULAR PURPOSE...
Warranty Information
Page 1
.../or installation instructions. 2. If outside the 50 United States and Canada, contact your major appliance is used in accordance with electrical or plumbing codes, or use your home. 8. Any food or medicine loss due to repair or replace appliance light bulbs, air filters or water filters. Some states and provinces do not allow limitations on the duration of implied warranties of all SLIDE N LOCK™ Door Bins...
.../or installation instructions. 2. If outside the 50 United States and Canada, contact your major appliance is used in accordance with electrical or plumbing codes, or use your home. 8. Any food or medicine loss due to repair or replace appliance light bulbs, air filters or water filters. Some states and provinces do not allow limitations on the duration of implied warranties of all SLIDE N LOCK™ Door Bins...


