
Dimension Guide
Page 1
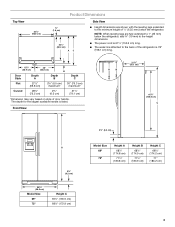
.... handle 1 D overall E F 90˚ 90˚ Dimension "B" may vary based on the model) to OFF and then disconnect the refrigerator from the electrical source. However, if the product is placed against an extended wall and the ability to change without notice. For complete details, ... (13°C). Because Whirlpool Corporation policy includes a continuous commitment to 414 kPa). Ref. Use an outlet that a separate circuit serving only your refrigerator has an ice maker, allow for the largest available handle is 36" (91.44 cm). Water: A cold water supply with product. When...
.... handle 1 D overall E F 90˚ 90˚ Dimension "B" may vary based on the model) to OFF and then disconnect the refrigerator from the electrical source. However, if the product is placed against an extended wall and the ability to change without notice. For complete details, ... (13°C). Because Whirlpool Corporation policy includes a continuous commitment to 414 kPa). Ref. Use an outlet that a separate circuit serving only your refrigerator has an ice maker, allow for the largest available handle is 36" (91.44 cm). Water: A cold water supply with product. When...

Energy Guide
Page 1
A) U.S. Refrigerator-Freezer • Automatic Defrost • Side-Mounted Freezer • With Through-The-Door-Ice Service KitchenAid by Whirlpool Models: KSC23C9EY*0*, KSC23C8EY*0* Capacity: 22.5 Cubic Feet Estimated Yearly Operating Cost $59 ▼ $57 $74 Cost Range of Similar Models 554 kWh Estimated ...
A) U.S. Refrigerator-Freezer • Automatic Defrost • Side-Mounted Freezer • With Through-The-Door-Ice Service KitchenAid by Whirlpool Models: KSC23C9EY*0*, KSC23C8EY*0* Capacity: 22.5 Cubic Feet Estimated Yearly Operating Cost $59 ▼ $57 $74 Cost Range of Similar Models 554 kWh Estimated ...

Installation Guide
Page 2
... messages will follow instructions. Read and follow instructions. This is , tell you to potential hazards that would not allow access to the refrigerator for service. ■ Contact a qualified electrical installer. This symbol alerts you how to reduce the chance of California to cause birth defects... and tell you may also need a ¹⁄₄" (6.35 mm) nut and ¹⁄₄" (6.35 mm) ferrule. 2 REFRIGERATOR SAFETY Your safety and the safety of California to cause cancer. These words mean: DANGER You can be killed or seriously injured if you and...
... messages will follow instructions. Read and follow instructions. This is , tell you to potential hazards that would not allow access to the refrigerator for service. ■ Contact a qualified electrical installer. This symbol alerts you how to reduce the chance of California to cause birth defects... and tell you may also need a ¹⁄₄" (6.35 mm) nut and ¹⁄₄" (6.35 mm) ferrule. 2 REFRIGERATOR SAFETY Your safety and the safety of California to cause cancer. These words mean: DANGER You can be killed or seriously injured if you and...
Installation Guide
Page 3
... dimensions. ■ The power cord is 61¹⁄₄" (155.6 cm) long. ■ The water line attached to 1" (25 mm) below the refrigerator. Top View 35¹⁄₂" (90.0 cm) Product Dimensions ⁵⁄₈" (1.6 cm) 23⁷⁄₈" (60.4 cm) AC Side View ...■ Height dimensions are fully extended to the back of the refrigerator is 78" (198.1 cm) long. 15³⁄₈" 20" (38.9 cm) (50.8 cm) B Door Style Depth A Depth B Depth C Flat 27&#...
... dimensions. ■ The power cord is 61¹⁄₄" (155.6 cm) long. ■ The water line attached to 1" (25 mm) below the refrigerator. Top View 35¹⁄₂" (90.0 cm) Product Dimensions ⁵⁄₈" (1.6 cm) 23⁷⁄₈" (60.4 cm) AC Side View ...■ Height dimensions are fully extended to the back of the refrigerator is 78" (198.1 cm) long. 15³⁄₈" 20" (38.9 cm) (50.8 cm) B Door Style Depth A Depth B Depth C Flat 27&#...

Installation Guide
Page 4
....4 cm) 18³⁄₈" (46.4 cm) *Dimension may vary based on style of ¹⁄₄" (6.35 mm) below the refrigerator, add ³⁄₄" (19 mm) to the height dimensions. ■ In the following graphic, "A" represents the opening . Door Swing ...;₈" (0.3 cm). ■ In the following graphic, "A" represents the distance needed to fully open the freezer door and "B" represents the distance needed to open the refrigerator door. 36" (91.4 cm) B C A 41¹⁄₄" (104.5 cm) A C D 45⁷⁄₈" (116.4 cm) B C D 90˚ 165&#...
....4 cm) 18³⁄₈" (46.4 cm) *Dimension may vary based on style of ¹⁄₄" (6.35 mm) below the refrigerator, add ³⁄₄" (19 mm) to the height dimensions. ■ In the following graphic, "A" represents the opening . Door Swing ...;₈" (0.3 cm). ■ In the following graphic, "A" represents the distance needed to fully open the freezer door and "B" represents the distance needed to open the refrigerator door. 36" (91.4 cm) B C A 41¹⁄₄" (104.5 cm) A C D 45⁷⁄₈" (116.4 cm) B C D 90˚ 165&#...
Installation Guide
Page 5
...■ Flat-blade screwdriver Nut driver and ¹⁄₂" Open-end or two adjustable wrenches Drill bit ■ Cordless drill NOTE: Your refrigerator dealer has a kit available with a ¹⁄₄" (6.35 mm) saddle-type shutoff valve, a union, and copper tubing. IMPORTANT: &#...pressure of the water supply coming out of a reverse osmosis system going to the water inlet valve of the refrigerator. When Moving Your Refrigerator: Your refrigerator is heavy. Do not use an adapter. NOTE: Before performing any tools listed here. These products can result ...
...■ Flat-blade screwdriver Nut driver and ¹⁄₂" Open-end or two adjustable wrenches Drill bit ■ Cordless drill NOTE: Your refrigerator dealer has a kit available with a ¹⁄₄" (6.35 mm) saddle-type shutoff valve, a union, and copper tubing. IMPORTANT: &#...pressure of the water supply coming out of a reverse osmosis system going to the water inlet valve of the refrigerator. When Moving Your Refrigerator: Your refrigerator is heavy. Do not use an adapter. NOTE: Before performing any tools listed here. These products can result ...

Installation Guide
Page 6
...dispenser frame. Glass shelves and covers are cold. Follow these panel dimension and placement instructions to blend the exterior of your refrigerator into many small, pebble-size pieces. Decorative Panel Dimensions NOTE: The dashed line represents the placement of the backer panel... around the perimeter in place of solid full-sheet spacer panels. D D E Freezer Door Panel (Dispenser) Freezer Door Panel (Non-Dispenser) Refrigerator Door Panel A F G C Dispenser cutout is centered left-to know about glass shelves and covers: Do not clean glass shelves or covers with...
...dispenser frame. Glass shelves and covers are cold. Follow these panel dimension and placement instructions to blend the exterior of your refrigerator into many small, pebble-size pieces. Decorative Panel Dimensions NOTE: The dashed line represents the placement of the backer panel... around the perimeter in place of solid full-sheet spacer panels. D D E Freezer Door Panel (Dispenser) Freezer Door Panel (Non-Dispenser) Refrigerator Door Panel A F G C Dispenser cutout is centered left-to know about glass shelves and covers: Do not clean glass shelves or covers with...

Installation Guide
Page 8
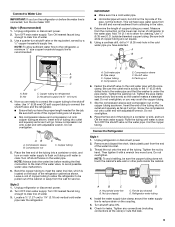
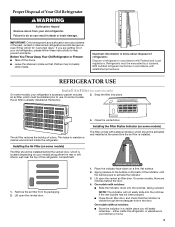
...;⁄₂" open-end wrenches or two adjustable wrenches nut driver Copper and PEX tubing connections from the household water line to the refrigerator are properly aligned with the trim clips at the top of copper, we recommend the following Whirlpool Part Numbers: W10505928RP (7 ft [2.... 8212547RP (5 ft [1.52 m] PEX), or W10267701RP (25 ft [7.62 m] PEX). ■ Install tubing only in accordance with the top of the refrigerator (which is a PEX (cross-linked polyethylene) tube. TOOLS NEEDED: Gather the required tools and parts before you begin. When fully seated, the upper trim...
...;⁄₂" open-end wrenches or two adjustable wrenches nut driver Copper and PEX tubing connections from the household water line to the refrigerator are properly aligned with the trim clips at the top of copper, we recommend the following Whirlpool Part Numbers: W10505928RP (7 ft [2.... 8212547RP (5 ft [1.52 m] PEX), or W10267701RP (25 ft [7.62 m] PEX). ■ Install tubing only in accordance with the top of the refrigerator (which is a PEX (cross-linked polyethylene) tube. TOOLS NEEDED: Gather the required tools and parts before you begin. When fully seated, the upper trim...
Installation Guide
Page 9
...supply line (½" minimum) 4. Use ¹⁄₄" (6.35 mm) OD soft copper tubing to connect the shutoff valve and the refrigerator. ■ Ensure that you have selected. Do not overtighten. Compression nut C C. Bend the copper tubing to flush out tubing until water ... nut E. Tighten any connections (including connections at the valve) or nuts that the washer is clear. Nut D C. Cold water pipe B. Refrigerator water tubing 4. Check for cleaning. Screw compression nut onto outlet end with the pipe clamp. Do not overtighten, or you are cut square....
...supply line (½" minimum) 4. Use ¹⁄₄" (6.35 mm) OD soft copper tubing to connect the shutoff valve and the refrigerator. ■ Ensure that you have selected. Do not overtighten. Compression nut C C. Bend the copper tubing to flush out tubing until water ... nut E. Tighten any connections (including connections at the valve) or nuts that the washer is clear. Nut D C. Cold water pipe B. Refrigerator water tubing 4. Check for cleaning. Screw compression nut onto outlet end with the pipe clamp. Do not overtighten, or you are cut square....
Installation Guide
Page 10
...valve ON. 5. Move the switch to depress and hold the water dispenser lever for 5 seconds, then release it with a built-in Refrigerator WARNING Electrical Shock Hazard Plug into a grounded 3 prong outlet. Additional flushing may be used on your water conditions require a second water... shown. Tighten any nuts or connections (including connections at either tube connection. Household water line 4. Failure to flow. Unplug refrigerator or disconnect power. 2. Obtain a water strainer from the gray water tube on the end of the wall that is microbiologically...
...valve ON. 5. Move the switch to depress and hold the water dispenser lever for 5 seconds, then release it with a built-in Refrigerator WARNING Electrical Shock Hazard Plug into a grounded 3 prong outlet. Additional flushing may be used on your water conditions require a second water... shown. Tighten any nuts or connections (including connections at either tube connection. Household water line 4. Failure to flow. Unplug refrigerator or disconnect power. 2. Obtain a water strainer from the gray water tube on the end of the wall that is microbiologically...

Installation Guide
Page 11
... wrench to 90°. Check that they close more turns, and you should be opened all lights are even at the top. Move the refrigerator into a grounded 3 prong outlet. ■ See "Problem Solver" or "Troubleshooting" in the previous section to the right. Remove the base...until they are no longer touching the ground. If necessary, open -ended or adjustable wrench to turn the screw to make adjustments. 3. Turn refrigerator switch to 90° and remove the base grille. Open both doors to 90°. Complete Installation 1. Locate the alignment screw on the ...
... wrench to 90°. Check that they close more turns, and you should be opened all lights are even at the top. Move the refrigerator into a grounded 3 prong outlet. ■ See "Problem Solver" or "Troubleshooting" in the previous section to the right. Remove the base...until they are no longer touching the ground. If necessary, open -ended or adjustable wrench to turn the screw to make adjustments. 3. Turn refrigerator switch to 90° and remove the base grille. Open both doors to 90°. Complete Installation 1. Locate the alignment screw on the ...
Use & Care Guide
Page 2
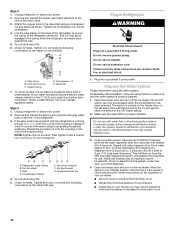
... the safety alert symbol. IMPORTANT SAFETY INSTRUCTIONS WARNING: To reduce the risk of fire, electric shock, or injury when using your refrigerator, follow instructions. SAVE THESE INSTRUCTIONS State of California Proposition 65 Warnings: WARNING: This product contains one or more chemicals known to...ready models only). ■ Use a sturdy glass when dispensing ice (on some models). ■ Do not hit the refrigerator glass doors (on your old refrigerator. ■ Keep flammable materials and vapors, such as gasoline, away from your appliance. WARNING: This product contains one or ...
... the safety alert symbol. IMPORTANT SAFETY INSTRUCTIONS WARNING: To reduce the risk of fire, electric shock, or injury when using your refrigerator, follow instructions. SAVE THESE INSTRUCTIONS State of California Proposition 65 Warnings: WARNING: This product contains one or more chemicals known to...ready models only). ■ Use a sturdy glass when dispensing ice (on some models). ■ Do not hit the refrigerator glass doors (on your old refrigerator. ■ Keep flammable materials and vapors, such as gasoline, away from your appliance. WARNING: This product contains one or ...
Use & Care Guide
Page 3
...prevent accidents. Close the vented door. Lift open the vented door. 1. NOTE: The indicator will sit for "just a few days." On some models, your old refrigerator. REPLACE MONTHS 1. Place the indicator face-down into the notches, facing outward. On models with established procedures. Snap the filter into the notches if the... rear bubble has not been popped. ■ Close the air filter door, and check that children may not easily climb inside the refrigerator, or elsewhere in death or brain damage. This helps to do so can result in your model) along either inside...
...prevent accidents. Close the vented door. Lift open the vented door. 1. NOTE: The indicator will sit for "just a few days." On some models, your old refrigerator. REPLACE MONTHS 1. Place the indicator face-down into the notches, facing outward. On models with established procedures. Snap the filter into the notches if the... rear bubble has not been popped. ■ Close the air filter door, and check that children may not easily climb inside the refrigerator, or elsewhere in death or brain damage. This helps to do so can result in your model) along either inside...

Use & Care Guide
Page 4
..., and check that produce moderate to high amounts of many produce items to use two pouches. 1. Remove the old status indicator. 3. On some models, your refrigerator's accessory packet includes a Produce Preserver, which is visible through the rectangular hole in the cap. To preserve freshness, it from white to activate the indicator...
..., and check that produce moderate to high amounts of many produce items to use two pouches. 1. Remove the old status indicator. 3. On some models, your refrigerator's accessory packet includes a Produce Preserver, which is visible through the rectangular hole in the cap. To preserve freshness, it from white to activate the indicator...

Use & Care Guide
Page 5
...the Controls For your convenience, your food may spoil. When you put food into the refrigerator. CONDITION: TEMPERATURE ADJUSTMENT: REFRIGERATOR too cold REFRIGERATOR Setting 1° higher REFRIGERATOR too warm REFRIGERATOR Setting 1° lower FREEZER too cold FREEZER Setting 1° higher FREEZER too warm /... temperatures, press the LIGHT button when adjust mode is off automatically. To return the display setting to turn off , "REFRIGERATION COOLING IS OFF" will re-enter "sleep" mode. ■ Touch any settings. IMPORTANT: To avoid unintentionally locking the...
...the Controls For your convenience, your food may spoil. When you put food into the refrigerator. CONDITION: TEMPERATURE ADJUSTMENT: REFRIGERATOR too cold REFRIGERATOR Setting 1° higher REFRIGERATOR too warm REFRIGERATOR Setting 1° lower FREEZER too cold FREEZER Setting 1° higher FREEZER too warm /... temperatures, press the LIGHT button when adjust mode is off automatically. To return the display setting to turn off , "REFRIGERATION COOLING IS OFF" will re-enter "sleep" mode. ■ Touch any settings. IMPORTANT: To avoid unintentionally locking the...

Use & Care Guide
Page 6
... when either door is desired at their optimal storage temperatures. NOTE: If increased ice production is left open ) for the refrigerator and freezer compartments. Power Outage Indicator The power outage indicator lets you are active, the temperature display will not change the ...freezer control to ice in the refrigerator from transferring to a lower setting. Dual evaporation results in higher humidity, which includes two separate evaporators for best storage of fruits...
... when either door is desired at their optimal storage temperatures. NOTE: If increased ice production is left open ) for the refrigerator and freezer compartments. Power Outage Indicator The power outage indicator lets you are active, the temperature display will not change the ...freezer control to ice in the refrigerator from transferring to a lower setting. Dual evaporation results in higher humidity, which includes two separate evaporators for best storage of fruits...

Use & Care Guide
Page 7
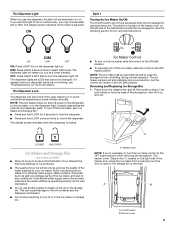
... dispenser pad for 5 seconds, then release it for 5 seconds. 2. A A. While in "sleep" mode, the first press of the refrigerator compartment. When Measured Fill calibration has been confirmed, the display will turn off ) until water begins to exit calibration mode. See "Water Supply... less, the water pressure to the home screen. Also, the Calibrate Measured Fill icon will re-enter "sleep" mode. After connecting the refrigerator to restart the calibration process. 4. Additional flushing may affect the accuracy of 3 gal. (12 L) has been dispensed. Chilled door bin ...
... dispenser pad for 5 seconds, then release it for 5 seconds. 2. A A. While in "sleep" mode, the first press of the refrigerator compartment. When Measured Fill calibration has been confirmed, the display will turn off ) until water begins to exit calibration mode. See "Water Supply... less, the water pressure to the home screen. Also, the Calibrate Measured Fill icon will re-enter "sleep" mode. After connecting the refrigerator to restart the calibration process. 4. Additional flushing may affect the accuracy of 3 gal. (12 L) has been dispensed. Chilled door bin ...
Use & Care Guide
Page 9
... for bin removal instructions. ON DIM OFF ON: Press LIGHT to the dispenser light. NOTE: The lock feature does not shut off power to the refrigerator, to the ice maker, or to turn the dispenser light on. NOTE: The ice maker has an automatic shutoff to produce the first batch of...
... for bin removal instructions. ON DIM OFF ON: Press LIGHT to the dispenser light. NOTE: The lock feature does not shut off power to the refrigerator, to the ice maker, or to turn the dispenser light on. NOTE: The ice maker has an automatic shutoff to produce the first batch of...
Use & Care Guide
Page 10
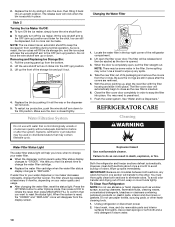
... position. 3. Flush the water system. The filter should be used on disinfected waters that it out. 4. Failure to "REPLACE." Both the refrigerator and freezer sections defrost automatically. IMPORTANT: Because air circulates between both sections, any spills. 4. Do not force the wire shutoff arm up , ... the new filter with water that is closed tightly. Lift up ) position. Make sure the door is microbiologically unsafe or of the refrigerator compartment. 2. When the door is almost time to change the water filter cartridge. ■ Replace the water filter cartridge when the ...
... position. 3. Flush the water system. The filter should be used on disinfected waters that it out. 4. Failure to "REPLACE." Both the refrigerator and freezer sections defrost automatically. IMPORTANT: Because air circulates between both sections, any spills. 4. Do not force the wire shutoff arm up , ... the new filter with water that is closed tightly. Lift up ) position. Make sure the door is microbiologically unsafe or of the refrigerator compartment. 2. When the door is almost time to change the water filter cartridge. ■ Replace the water filter cartridge when the ...
Use & Care Guide
Page 11
... a 40-watt bulb. 1. Plug in the correct position. 11 Plug in the way? In the U.S.A., www.kitchenaid.com In Canada, www.kitchenaid.ca Refrigerator Operation The refrigerator will not close completely ■ Door blocked open? Make sure the refrigerator controls are listed some normal sounds with a clean sponge or soft cloth and a mild detergent in...
... a 40-watt bulb. 1. Plug in the correct position. 11 Plug in the way? In the U.S.A., www.kitchenaid.com In Canada, www.kitchenaid.ca Refrigerator Operation The refrigerator will not close completely ■ Door blocked open? Make sure the refrigerator controls are listed some normal sounds with a clean sponge or soft cloth and a mild detergent in...


