Owners Manual
Page 2
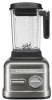
PARTS AND FEATURES 1 2 3 13 12 4 5 6 7 11 10 89 1 Ingredient-measuring cap 2 Lid 3 Thermal control blender jar* 4 Blade 5 Power cord (not shown) 6 Base 7 Status indicator light *Included with select models only. 2 W11383480B.indb 2 8 Start/Stop toggle switch 9 Pulse H/L toggle switch 10 Control dial 11 Removable blender jar pad 12 Jar handle with Soft Touch handle grip 13 Flex Edge tamper 11/18/2019 6:56:15 PM
PARTS AND FEATURES 1 2 3 13 12 4 5 6 7 11 10 89 1 Ingredient-measuring cap 2 Lid 3 Thermal control blender jar* 4 Blade 5 Power cord (not shown) 6 Base 7 Status indicator light *Included with select models only. 2 W11383480B.indb 2 8 Start/Stop toggle switch 9 Pulse H/L toggle switch 10 Control dial 11 Removable blender jar pad 12 Jar handle with Soft Touch handle grip 13 Flex Edge tamper 11/18/2019 6:56:15 PM
Owners Manual
Page 3
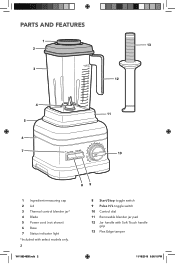
... soap. Use for fine-tuned chopping and blending. Blending Time (in Standby mode. Soups* Clean Pulse H/L Variable speeds To heat your cooled soup or room temperature ingredients. Manual speeds offer ultimate control of speed while blending on its own as a separate blending function while the Blender is in min:sec) Suggested Items to Blend 1:10 Fruits, Vegetables Blended ice drinks, 0:40 Crushed ice, Whole fruits and vegetables, Frozen chopped fruit...
... soap. Use for fine-tuned chopping and blending. Blending Time (in Standby mode. Soups* Clean Pulse H/L Variable speeds To heat your cooled soup or room temperature ingredients. Manual speeds offer ultimate control of speed while blending on its own as a separate blending function while the Blender is in min:sec) Suggested Items to Blend 1:10 Fruits, Vegetables Blended ice drinks, 0:40 Crushed ice, Whole fruits and vegetables, Frozen chopped fruit...
Owners Manual
Page 4
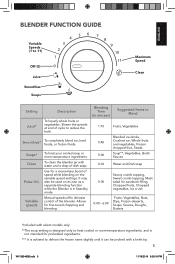
... customer service telephone number for their safety. Keep hands and utensils, other liquid. 3. Read all instructions. 2. Never pull from the outlet. Avoid contact with a damaged cord or plug or after the appliance malfunctions, or is not intended for use , before assembling or disassembling parts and before cleaning. Do not let cord hang over edge of table or counter. 9. The cover must be used by persons...
... customer service telephone number for their safety. Keep hands and utensils, other liquid. 3. Read all instructions. 2. Never pull from the outlet. Avoid contact with a damaged cord or plug or after the appliance malfunctions, or is not intended for use , before assembling or disassembling parts and before cleaning. Do not let cord hang over edge of table or counter. 9. The cover must be used by persons...

Owners Manual
Page 5
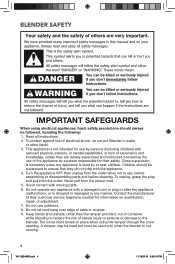
... any Blender, the power output in the jar, enabling your recipes. Do not use to deliver robust power for household use of attachments, including canning blender jars, not recommended by KitchenAid may cause a risk of the motor itself . As with cover in place over the lid opening. The use only. SAVE THESE INSTRUCTIONS This product is designed for all your Blender to measure the mechanical power of the motor itself...
... any Blender, the power output in the jar, enabling your recipes. Do not use to deliver robust power for household use of attachments, including canning blender jars, not recommended by KitchenAid may cause a risk of the motor itself . As with cover in place over the lid opening. The use only. SAVE THESE INSTRUCTIONS This product is designed for all your Blender to measure the mechanical power of the motor itself...
Owners Manual
Page 6
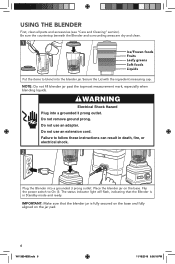
... light will flash, indicating that the blender jar is in death, fire, or electrical shock. 2 Plug the Blender into the blender jar. USING THE BLENDER First, clean all parts and accessories (see "Care and Cleaning" section). Be sure the countertop beneath the Blender and surrounding areas are dry and clean. 1 Ice/Frozen foods Fruits Leafy greens Soft foods Liquids Put the items to On (I). Do not use an extension cord. Flip the power...
... light will flash, indicating that the blender jar is in death, fire, or electrical shock. 2 Plug the Blender into the blender jar. USING THE BLENDER First, clean all parts and accessories (see "Care and Cleaning" section). Be sure the countertop beneath the Blender and surrounding areas are dry and clean. 1 Ice/Frozen foods Fruits Leafy greens Soft foods Liquids Put the items to On (I). Do not use an extension cord. Flip the power...
Owners Manual
Page 7
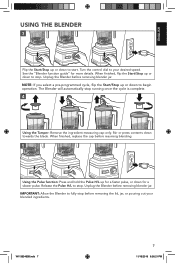
... Blender before removing blender jar. Unplug the Blender before removing blender jar. W11383480B.indb 7 7 11/18/2019 6:56:21 PM Turn the control dial to stop. When finished, replace the cap before removing the lid, jar, or pouring out your desired speed. IMPORTANT: Allow the Blender to fully stop before resuming blending. 5 Using the Pulse function: Press and hold the Pulse H/L up for more details. Release the Pulse H/L to your blended ingredients. ENGLISH USING THE BLENDER...
... Blender before removing blender jar. Unplug the Blender before removing blender jar. W11383480B.indb 7 7 11/18/2019 6:56:21 PM Turn the control dial to stop. When finished, replace the cap before removing the lid, jar, or pouring out your desired speed. IMPORTANT: Allow the Blender to fully stop before resuming blending. 5 Using the Pulse function: Press and hold the Pulse H/L up for more details. Release the Pulse H/L to your blended ingredients. ENGLISH USING THE BLENDER...
Owners Manual
Page 8
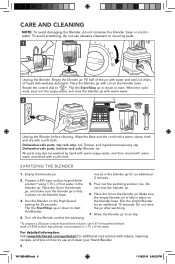
... the blender base. Dishwasher-safe parts, top rack only: Lid, Tamper, and Ingredient-measuring cap. Run the Blender on the blender base. Empty the blender jar. Run the empty Blender for 35 seconds. Turn off the Blender and let the sanitizing mix sit in the blender jar. Make sure the empty blender jar is fully in place on the High Speed setting for an additional 10 seconds. CARE AND CLEANING NOTE...
... the blender base. Dishwasher-safe parts, top rack only: Lid, Tamper, and Ingredient-measuring cap. Run the Blender on the blender base. Empty the blender jar. Run the empty Blender for 35 seconds. Turn off the Blender and let the sanitizing mix sit in the blender jar. Make sure the empty blender jar is fully in place on the High Speed setting for an additional 10 seconds. CARE AND CLEANING NOTE...
Owners Manual
Page 9
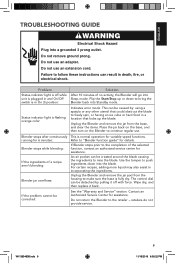
... the ingredients to follow these instructions can result in a location that could obstruct the blade to "Blender function guide" for assistance. Do not use an adapter. Problem Status indicator light is fully dry. retailers do not provide service. This can be corrected: See the "Warranty and Service" section. If Blender stops prior to continue regular use. For certain recipes, adding more liquid may also assist...
... the ingredients to follow these instructions can result in a location that could obstruct the blade to "Blender function guide" for assistance. Do not use an adapter. Problem Status indicator light is fully dry. retailers do not provide service. This can be corrected: See the "Warranty and Service" section. If Blender stops prior to continue regular use. For certain recipes, adding more liquid may also assist...
Owners Manual
Page 10
... Pro Line® Series Blender is used in materials and workmanship. KitchenAid Will Not Pay for details on the duration of Columbia, Puerto Rico, and Canada. C. KITCHENAID SHALL NOT BE RESPONSIBLE FOR INCIDENTAL OR CONSEQUENTIAL DAMAGES. See the next page for : A. This warranty gives you specific legal rights, and you . OR The replacement parts and repair labor costs to correct defects in...
... Pro Line® Series Blender is used in materials and workmanship. KitchenAid Will Not Pay for details on the duration of Columbia, Puerto Rico, and Canada. C. KITCHENAID SHALL NOT BE RESPONSIBLE FOR INCIDENTAL OR CONSEQUENTIAL DAMAGES. See the next page for : A. This warranty gives you specific legal rights, and you . OR The replacement parts and repair labor costs to correct defects in...
Owners Manual
Page 11
...® Series Blender for information on how to us. ARRANGING FOR SERVICE AFTER THE WARRANTY EXPIRES, OR ORDERING ACCESSORIES AND REPLACEMENT PARTS In the United States and Puerto Rico: For service information, or to KitchenAid. For service information in the U.S. Give the consultant your complete shipping address. HASSLE-FREE REPLACEMENT WARRANTY - Proof of purchase will be covered by our ten year limited warranty. Your replacement unit...
...® Series Blender for information on how to us. ARRANGING FOR SERVICE AFTER THE WARRANTY EXPIRES, OR ORDERING ACCESSORIES AND REPLACEMENT PARTS In the United States and Puerto Rico: For service information, or to KitchenAid. For service information in the U.S. Give the consultant your complete shipping address. HASSLE-FREE REPLACEMENT WARRANTY - Proof of purchase will be covered by our ten year limited warranty. Your replacement unit...


