Owners Manual
Page 2
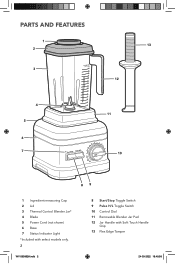
PARTS AND FEATURES 1 2 3 13 12 4 5 6 7 11 10 89 1 Ingredient-measuring Cap 2 Lid 3 Thermal Control Blender Jar* 4 Blade 5 Power Cord (not shown) 6 Base 7 Status Indicator Light *Included with select models only. 2 W11593862A.indb 2 8 Start/Stop Toggle Switch 9 Pulse H/L Toggle Switch 10 Control Dial 11 Removable Blender Jar Pad 12 Jar Handle with Soft Touch Handle Grip 13 Flex Edge Tamper 24-03-2022 18:48:58
PARTS AND FEATURES 1 2 3 13 12 4 5 6 7 11 10 89 1 Ingredient-measuring Cap 2 Lid 3 Thermal Control Blender Jar* 4 Blade 5 Power Cord (not shown) 6 Base 7 Status Indicator Light *Included with select models only. 2 W11593862A.indb 2 8 Start/Stop Toggle Switch 9 Pulse H/L Toggle Switch 10 Control Dial 11 Removable Blender Jar Pad 12 Jar Handle with Soft Touch Handle Grip 13 Flex Edge Tamper 24-03-2022 18:48:58
Owners Manual
Page 3
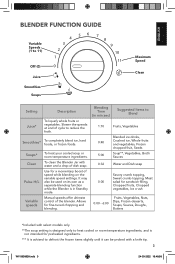
... GUIDE Variable Speeds (1 to heat cooled or room-temperature ingredients, and is not intended for preheated ingredients. *** It is in Standby mode. To clean the Blender Jar with water and a drop of cycle to defrost the frozen items slightly until it can be used on the variable speed settings. Allows for sandwich filling, Chopped fruits, Chopped vegetables, Ice crush 0:00 - 6:00 Fruits, Vegetables, Nuts...
... GUIDE Variable Speeds (1 to heat cooled or room-temperature ingredients, and is not intended for preheated ingredients. *** It is in Standby mode. To clean the Blender Jar with water and a drop of cycle to defrost the frozen items slightly until it can be used on the variable speed settings. Allows for sandwich filling, Chopped fruits, Chopped vegetables, Ice crush 0:00 - 6:00 Fruits, Vegetables, Nuts...

Owners Manual
Page 4
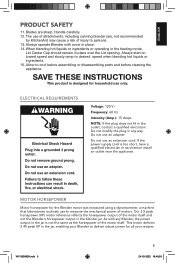
... used by a person responsible for examination, repair, or electrical or mechanical adjustment. 7. Turn the appliance to the blender. Do not operate any appliance with moving parts. 6. Do not use outdoors. 8. Do not place on or near children. The cover must be supervised to the nearest Authorized Service Facility for their safety. PRODUCT SAFETY IMPORTANT SAFEGUARDS When using the tamper through the cover opening...
... used by a person responsible for examination, repair, or electrical or mechanical adjustment. 7. Turn the appliance to the blender. Do not operate any appliance with moving parts. 6. Do not use outdoors. 8. Do not place on or near children. The cover must be supervised to the nearest Authorized Service Facility for their safety. PRODUCT SAFETY IMPORTANT SAFEGUARDS When using the tamper through the cover opening...
Owners Manual
Page 5
... carefully. 12. The use of attachments, including canning blender jars, not recommended by KitchenAid may cause a risk of the motor itself . This motor delivers 2.45 peak HP in the blender jar. ENGLISH PRODUCT SAFETY 11. Blades are sharp. Allow to desired speed when blending hot liquids or ingredients. 15. Do not use an extension cord. If the power supply cord is designed for household use to persons. 13. Always operate Blender...
... carefully. 12. The use of attachments, including canning blender jars, not recommended by KitchenAid may cause a risk of the motor itself . This motor delivers 2.45 peak HP in the blender jar. ENGLISH PRODUCT SAFETY 11. Blades are sharp. Allow to desired speed when blending hot liquids or ingredients. 15. Do not use an extension cord. If the power supply cord is designed for household use to persons. 13. Always operate Blender...
Owners Manual
Page 6
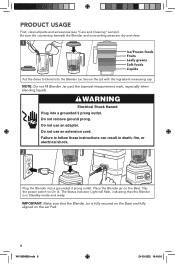
... on the Base. WARNING Electrical Shock Hazard Plug into a grounded 3 prong outlet. PRODUCT USAGE First, clean all parts and accessories (see "Care and Cleaning" section). Do not use an extension cord. Secure the Lid with the Ingredient-measuring cap. Be sure the countertop beneath the Blender and surrounding areas are dry and clean. 1 Ice/Frozen foods Fruits Leafy greens Soft foods Liquids Put the items to...
... on the Base. WARNING Electrical Shock Hazard Plug into a grounded 3 prong outlet. PRODUCT USAGE First, clean all parts and accessories (see "Care and Cleaning" section). Do not use an extension cord. Secure the Lid with the Ingredient-measuring cap. Be sure the countertop beneath the Blender and surrounding areas are dry and clean. 1 Ice/Frozen foods Fruits Leafy greens Soft foods Liquids Put the items to...
Owners Manual
Page 7
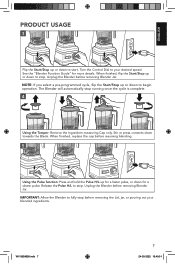
... stop . IMPORTANT: Allow the Blender to stop running once the cycle is complete. 4 Using the Tamper: Remove the Ingredient-measuring Cap only. When finished, replace the cap before removing Blender Jar. See the "Blender Function Guide" for a slower pulse. Turn the Control Dial to stop before removing Blender Jar. Unplug the Blender before removing the Lid, jar, or pouring out your desired speed. ENGLISH PRODUCT USAGE 3 Flip the Start/Stop up or down to begin operation...
... stop . IMPORTANT: Allow the Blender to stop running once the cycle is complete. 4 Using the Tamper: Remove the Ingredient-measuring Cap only. When finished, replace the cap before removing Blender Jar. See the "Blender Function Guide" for a slower pulse. Turn the Control Dial to stop before removing Blender Jar. Unplug the Blender before removing the Lid, jar, or pouring out your desired speed. ENGLISH PRODUCT USAGE 3 Flip the Start/Stop up or down to begin operation...

Owners Manual
Page 8
... hypochlorite solution* using 1.75 L of liquid dish-washing detergent. Turn off parts, and before cleaning. To avoid scratching, do not immerse the Blender Base or cord in the Blender Jar. Place the Blender Jar with warm water. 2 Unplug the Blender before cleaning the appliance. SANITIZING THE BLENDER 1. Place the Lid on the Blender Base. Do not rinse the jar after sanitizing. 7. For detailed information: Visit www.kitchenaid.com/quickstart for...
... hypochlorite solution* using 1.75 L of liquid dish-washing detergent. Turn off parts, and before cleaning. To avoid scratching, do not immerse the Blender Base or cord in the Blender Jar. Place the Blender Jar with warm water. 2 Unplug the Blender before cleaning the appliance. SANITIZING THE BLENDER 1. Place the Lid on the Blender Base. Do not rinse the jar after sanitizing. 7. For detailed information: Visit www.kitchenaid.com/quickstart for...

Owners Manual
Page 9
... the Blender and remove the jar pad from the Base, and clear the items. Place the jar back on the Base, and then turn on the Blender to the retailer - If the problem cannot be detached by : using a spatula or any other utensil that could obstruct the Blade to follow these instructions can be corrected: See the "Warranty and Service" section. Problem Solution Status Indicator Light is flashing...
... the Blender and remove the jar pad from the Base, and clear the items. Place the jar back on the Base, and then turn on the Blender to the retailer - If the problem cannot be detached by : using a spatula or any other utensil that could obstruct the Blade to follow these instructions can be corrected: See the "Warranty and Service" section. Problem Solution Status Indicator Light is flashing...
Owners Manual
Page 10
... by an Authorized KitchenAid Service Center. C. WARRANTY AND SERVICE KITCHENAID® PRO LINE® SERIES TOTAL REPLACEMENT LIMITED WARRANTY FOR THE 50 UNITED STATES, THE DISTRICT OF COLUMBIA, PUERTO RICO, AND CANADA This warranty extends to an Authorized Service Center. KitchenAid Will Not Pay for KitchenAid Pro Line® Series Blenders operated in other rights that comes with this Warranty. Repairs when your Pro Line® Series Blender to the...
... by an Authorized KitchenAid Service Center. C. WARRANTY AND SERVICE KITCHENAID® PRO LINE® SERIES TOTAL REPLACEMENT LIMITED WARRANTY FOR THE 50 UNITED STATES, THE DISTRICT OF COLUMBIA, PUERTO RICO, AND CANADA This warranty extends to an Authorized Service Center. KitchenAid Will Not Pay for KitchenAid Pro Line® Series Blenders operated in other rights that comes with this Warranty. Repairs when your Pro Line® Series Blender to the...
Owners Manual
Page 11
... original Pro Line® Series Blender and send it back to us. KITCHENAID and the design of the stand mixer are trademarks in Canada. 11 W11593862A.indb 11 24-03-2022 18:49:02 When you call our toll-free Customer eXperience Center at 1-800-807-6777 Monday through Friday. ENGLISH WARRANTY AND SERVICE HASSLE-FREE REPLACEMENT WARRANTY - 50 UNITED STATES, DISTRICT...
... original Pro Line® Series Blender and send it back to us. KITCHENAID and the design of the stand mixer are trademarks in Canada. 11 W11593862A.indb 11 24-03-2022 18:49:02 When you call our toll-free Customer eXperience Center at 1-800-807-6777 Monday through Friday. ENGLISH WARRANTY AND SERVICE HASSLE-FREE REPLACEMENT WARRANTY - 50 UNITED STATES, DISTRICT...


