Owners Manual
Page 2
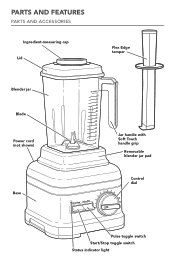
PARTS AND FEATURES PARTS AND ACCESSORIES Ingredient-measuring cap Lid Flex Edge tamper Blender jar Blade Power cord (not shown) Base Jar handle with Soft Touch handle grip Removable blender jar pad Control dial Pulse toggle switch Start/Stop toggle switch Status indicator light
PARTS AND FEATURES PARTS AND ACCESSORIES Ingredient-measuring cap Lid Flex Edge tamper Blender jar Blade Power cord (not shown) Base Jar handle with Soft Touch handle grip Removable blender jar pad Control dial Pulse toggle switch Start/Stop toggle switch Status indicator light
Owners Manual
Page 3
...Blender in use outdoors. 8. Close supervision is necessary when any manner. Do not operate the Blender with moving parts. 6. Do not let cord hang over edge of table or counter. This symbol alerts you to potential hazards that can be killed or seriously injured if you don't immediately follow instructions...: DANGER You can happen if the instructions are very important. Avoid contact with a damaged cord or plug or after appliance malfunctions, or is , tell you how to the nearest Authorized Service Center for examination, repair, or electrical or mechanical adjustment. 7....
...Blender in use outdoors. 8. Close supervision is necessary when any manner. Do not operate the Blender with moving parts. 6. Do not let cord hang over edge of table or counter. This symbol alerts you to potential hazards that can be killed or seriously injured if you don't immediately follow instructions...: DANGER You can happen if the instructions are very important. Avoid contact with a damaged cord or plug or after appliance malfunctions, or is , tell you how to the nearest Authorized Service Center for examination, repair, or electrical or mechanical adjustment. 7....
Owners Manual
Page 4
... not fit in place over the lid opening. Handle carefully. 11. Do not remove ground prong. Do not use of attachments, including canning blender jars, not recommended by KitchenAid may be used, but must be used only when the Blender is too short, have a qualified electrician or serviceman install an outlet near the appliance. If the power supply cord is not running. 10. As with cover in...
... not fit in place over the lid opening. Handle carefully. 11. Do not remove ground prong. Do not use of attachments, including canning blender jars, not recommended by KitchenAid may be used, but must be used only when the Blender is too short, have a qualified electrician or serviceman install an outlet near the appliance. If the power supply cord is not running. 10. As with cover in...
Owners Manual
Page 5
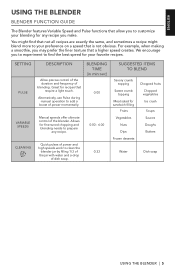
... the jar with water and a drop of power momentarily. Alternatively, use Pulse during manual operation to add a boost of dish soap. ENGLISH USING THE BLENDER BLENDER FUNCTION GUIDE The Blender features Variable Speed and Pulse functions that allow you to customize your preference on a speed that is not obvious. You might find the best speed for sandwich filling Fruits Vegetables Nuts Dips Frozen desserts Chopped fruits Chopped vegetables Ice crush Soups Sauces...
... the jar with water and a drop of power momentarily. Alternatively, use Pulse during manual operation to add a boost of dish soap. ENGLISH USING THE BLENDER BLENDER FUNCTION GUIDE The Blender features Variable Speed and Pulse functions that allow you to customize your preference on a speed that is not obvious. You might find the best speed for sandwich filling Fruits Vegetables Nuts Dips Frozen desserts Chopped fruits Chopped vegetables Ice crush Soups Sauces...
Owners Manual
Page 6
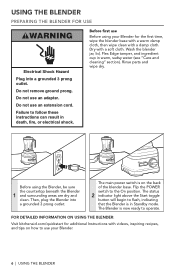
... operate. Wash the blender jar, lid, Flex Edge tamper, and ingredient cup in death, fire, or electrical shock. Flip the POWER switch to use Before using the Blender, be sure the countertop beneath the Blender 1 and surrounding areas are dry and clean. The status 2 indicator light above the Start toggle button will begin to flash, indicating that the Blender is now ready to follow these instructions...
... operate. Wash the blender jar, lid, Flex Edge tamper, and ingredient cup in death, fire, or electrical shock. Flip the POWER switch to use Before using the Blender, be sure the countertop beneath the Blender 1 and surrounding areas are dry and clean. The status 2 indicator light above the Start toggle button will begin to flash, indicating that the Blender is now ready to follow these instructions...
Owners Manual
Page 7
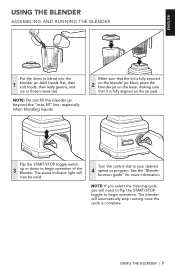
... indicator light will automatically stop running once the cycle is fully secured 2 on the base, making sure that the lid is complete. Next, place the blender jar on the blender jar. USING THE BLENDER | 7 NOTE: Do not fill the blender jar beyond the "max fill" line, especially when blending liquids. ENGLISH USING THE BLENDER ASSEMBLING AND RUNNING THE BLENDER Put the items to your desired 4 speed or program. Turn the...
... indicator light will automatically stop running once the cycle is fully secured 2 on the base, making sure that the lid is complete. Next, place the blender jar on the blender jar. USING THE BLENDER | 7 NOTE: Do not fill the blender jar beyond the "max fill" line, especially when blending liquids. ENGLISH USING THE BLENDER ASSEMBLING AND RUNNING THE BLENDER Put the items to your desired 4 speed or program. Turn the...
Owners Manual
Page 8
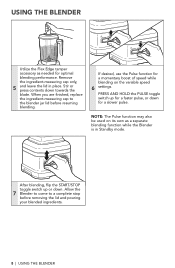
... variable speed 6 settings. After blending, flip the START/STOP toggle switch up for a faster pulse, or down for a slower pulse. Remove the ingredient-measuring cap only, 5 and leave the lid in Standby mode. If desired, use the Pulse function for optimal blending performance. Allow the 7 Blender to come to the blender jar lid before removing the lid and pouring your blended ingredients. 8 | USING THE BLENDER USING THE BLENDER Utilize the Flex Edge tamper accessory...
... variable speed 6 settings. After blending, flip the START/STOP toggle switch up for a faster pulse, or down for a slower pulse. Remove the ingredient-measuring cap only, 5 and leave the lid in Standby mode. If desired, use the Pulse function for optimal blending performance. Allow the 7 Blender to come to the blender jar lid before removing the lid and pouring your blended ingredients. 8 | USING THE BLENDER USING THE BLENDER Utilize the Flex Edge tamper accessory...
Owners Manual
Page 9
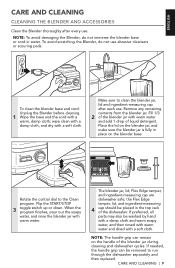
... separately and then replaced. CARE AND CLEANING | 9 If preferred, all parts may also be removed to the Clean program. Make sure to clean the blender jar, lid and ingredient-measuring cap after every use . The blender jar, lid, Flex Edge tamper, and ingredient-measuring cap are dishwasher safe; To avoid scratching the Blender, do not immerse the blender base or cord in the top rack of the blender jar during cleaning and dishwasher cycles...
... separately and then replaced. CARE AND CLEANING | 9 If preferred, all parts may also be removed to the Clean program. Make sure to clean the blender jar, lid and ingredient-measuring cap after every use . The blender jar, lid, Flex Edge tamper, and ingredient-measuring cap are dishwasher safe; To avoid scratching the Blender, do not immerse the blender base or cord in the top rack of the blender jar during cleaning and dishwasher cycles...
Owners Manual
Page 10
... not provide service. 10 | TROUBLESHOOTING You can be caused by: using a spatula in the blender jar that locks up the blade or having an ice cube or hard food in a location that does not work, stop the Blender, remove the blender jar from the blender jar: • Unplug the Blender. If the Blender stops in error mode. For certain recipes, try adding more liquid. 5. Dry each part thoroughly, and then re-install the jar pad...
... not provide service. 10 | TROUBLESHOOTING You can be caused by: using a spatula in the blender jar that locks up the blade or having an ice cube or hard food in a location that does not work, stop the Blender, remove the blender jar from the blender jar: • Unplug the Blender. If the Blender stops in error mode. For certain recipes, try adding more liquid. 5. Dry each part thoroughly, and then re-install the jar pad...
Owners Manual
Page 11
OR The replacement parts and repair labor costs to arrange for replacement, or call the Customer eXperience Center toll-free at 1-800-832-7173. KitchenAid Will Not Pay for service or repair of Columbia, Puerto Rico, and Canada. KITCHENAID SHALL NOT BE RESPONSIBLE FOR INCIDENTAL OR CONSEQUENTIAL DAMAGES. WARRANTY AND SERVICE | 11 See the next page for KitchenAid Pro Line® Series Blender operated in this limitation may not...
OR The replacement parts and repair labor costs to arrange for replacement, or call the Customer eXperience Center toll-free at 1-800-832-7173. KitchenAid Will Not Pay for service or repair of Columbia, Puerto Rico, and Canada. KITCHENAID SHALL NOT BE RESPONSIBLE FOR INCIDENTAL OR CONSEQUENTIAL DAMAGES. WARRANTY AND SERVICE | 11 See the next page for KitchenAid Pro Line® Series Blender operated in this limitation may not...
Owners Manual
Page 12
... your original Pro Line® Series Blender and send it back to KitchenAid. ARRANGING FOR SERVICE AFTER THE WARRANTY EXPIRES, OR ORDERING ACCESSORIES AND REPLACEMENT PARTS In the United States and Puerto Rico: For service information, or to order accessories or replacement parts, call toll-free at 1-800-832-7173 Monday through Friday. For service information in Canada: Call toll-free 1-800-807-6777. When you...
... your original Pro Line® Series Blender and send it back to KitchenAid. ARRANGING FOR SERVICE AFTER THE WARRANTY EXPIRES, OR ORDERING ACCESSORIES AND REPLACEMENT PARTS In the United States and Puerto Rico: For service information, or to order accessories or replacement parts, call toll-free at 1-800-832-7173 Monday through Friday. For service information in Canada: Call toll-free 1-800-807-6777. When you...


