
Use & Care Guide
Page 1
5 SPEED VITESSE VELOCIDAD BLENDER Instructions and Recipes MÉLANGEUR INSTRUCTIONS ET RECETTES LICUADORA INSTRUCCIONES Y RECETAS KSB560, KSB580 U.S.A./É.-U./EE.UU.: 1-800-541-6390 Canada/Canadá: 1-800-807-6777 W10386798A KitchenAid.com KitchenAid.ca ® FOR THE WAY IT'S MADE.™
5 SPEED VITESSE VELOCIDAD BLENDER Instructions and Recipes MÉLANGEUR INSTRUCTIONS ET RECETTES LICUADORA INSTRUCCIONES Y RECETAS KSB560, KSB580 U.S.A./É.-U./EE.UU.: 1-800-541-6390 Canada/Canadá: 1-800-807-6777 W10386798A KitchenAid.com KitchenAid.ca ® FOR THE WAY IT'S MADE.™

Use & Care Guide
Page 4
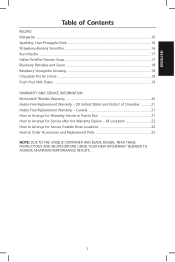
... Proof of Purchase & Product Registration Card Inside Front Cover Blender Safety ...3 Important Safeguards ...4 Electrical Requirements 5 FEATURES AND OPERATION Blender Features ...6 Preparing the Blender for Use 8 Before First Use ...8 Blender Assembly ...8 Using the Blender ...9 Before Use ...9 Operating the Blender 9 Crush Ice Feature ...9 Pulse Mode Feature 10 Ingredient Cap ...10 Soft Start™ Blending Feature 10 Speed Control Guide ...11 CARE AND CLEANING Cleaning the Blender ...12 Troubleshooting ...13 BLENDER TIPS Quick Tips...14 How To ...14 Continued on...
... Proof of Purchase & Product Registration Card Inside Front Cover Blender Safety ...3 Important Safeguards ...4 Electrical Requirements 5 FEATURES AND OPERATION Blender Features ...6 Preparing the Blender for Use 8 Before First Use ...8 Blender Assembly ...8 Using the Blender ...9 Before Use ...9 Operating the Blender 9 Crush Ice Feature ...9 Pulse Mode Feature 10 Ingredient Cap ...10 Soft Start™ Blending Feature 10 Speed Control Guide ...11 CARE AND CLEANING Cleaning the Blender ...12 Troubleshooting ...13 BLENDER TIPS Quick Tips...14 How To ...14 Continued on...
Use & Care Guide
Page 5
... ...........21 Hassle-Free Replacement Warranty - Canada 21 How to Arrange for Service after the Warranty Expires - All Locations 22 How to Arrange for Service Outside these Locations 22 How to Arrange for Warranty Service in Puerto Rico 21 How to Order Accessories and Replacement Parts 22 NOTE: Due To The Unique Container And Blade Design, Read These Instructions and Recipes Before Using Your New KitchenAid® Blender To Achieve Maximum...
... ...........21 Hassle-Free Replacement Warranty - Canada 21 How to Arrange for Service after the Warranty Expires - All Locations 22 How to Arrange for Service Outside these Locations 22 How to Arrange for Warranty Service in Puerto Rico 21 How to Order Accessories and Replacement Parts 22 NOTE: Due To The Unique Container And Blade Design, Read These Instructions and Recipes Before Using Your New KitchenAid® Blender To Achieve Maximum...

Use & Care Guide
Page 7
... operate Blender with moving parts. 6. Save These Instructions 4 Avoid contact with cover in use, before putting on or taking off parts, and before cleaning. 5. When blending hot liquids, remove center piece of table or counter. 9. A scraper may cause a risk of electrical shock, do not put Blender in water or other liquid. 3. Do not let cord hang over edge of two-piece cover. 14. Keep hands and...
... operate Blender with moving parts. 6. Save These Instructions 4 Avoid contact with cover in use, before putting on or taking off parts, and before cleaning. 5. When blending hot liquids, remove center piece of table or counter. 9. A scraper may cause a risk of electrical shock, do not put Blender in water or other liquid. 3. Do not let cord hang over edge of two-piece cover. 14. Keep hands and...
Use & Care Guide
Page 8
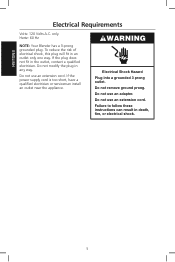
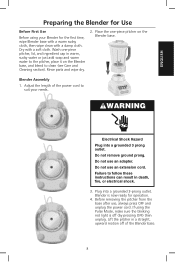
..., fire, or electrical shock. 5 Do not remove ground prong. Failure to follow these instructions can result in the outlet, contact a qualified electrician. To reduce the risk of electrical shock, this plug will fit in any way. If the power supply cord is too short, have a qualified electrician or serviceman install an outlet near the appliance. WARNING...
..., fire, or electrical shock. 5 Do not remove ground prong. Failure to follow these instructions can result in the outlet, contact a qualified electrician. To reduce the risk of electrical shock, this plug will fit in any way. If the power supply cord is too short, have a qualified electrician or serviceman install an outlet near the appliance. WARNING...
Use & Care Guide
Page 9
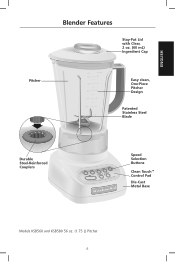
ENGLISH Blender Features Stay-Put Lid with Clear, 2 oz. (60 mL) Ingredient Cap Pitcher Easy clean, One-Piece Pitcher Design Patented Stainless Steel Blade Durable Steel-Reinforced Couplers Speed Selection Buttons Clean Touch™ Control Pad Die-Cast Metal Base Models KSB560 and KSB580 56 oz. (1.75 L) Pitcher 6
ENGLISH Blender Features Stay-Put Lid with Clear, 2 oz. (60 mL) Ingredient Cap Pitcher Easy clean, One-Piece Pitcher Design Patented Stainless Steel Blade Durable Steel-Reinforced Couplers Speed Selection Buttons Clean Touch™ Control Pad Die-Cast Metal Base Models KSB560 and KSB580 56 oz. (1.75 L) Pitcher 6

Use & Care Guide
Page 10
... and allows hands-free operation. Pitcher is coated for silky smoothies. Intelli-Speed™ Motor Control Exclusive Intelli-Speed™ control automatically works to trap ingredients. The PULSE MODE works with all blending tasks - Smooth control pad has no crevices or cracks to keep speed constant - Pitcher [Models KSB560 and KSB580] One-piece 56 oz. (1.75 L) capacity clear, pitcher is achieved without removing the blade and other parts. Pitcher handle...
... and allows hands-free operation. Pitcher is coated for silky smoothies. Intelli-Speed™ Motor Control Exclusive Intelli-Speed™ control automatically works to trap ingredients. The PULSE MODE works with all blending tasks - Smooth control pad has no crevices or cracks to keep speed constant - Pitcher [Models KSB560 and KSB580] One-piece 56 oz. (1.75 L) capacity clear, pitcher is achieved without removing the blade and other parts. Pitcher handle...
Use & Care Guide
Page 11
... suit your Blender for the first time, wipe Blender base with a warm sudsy cloth, then wipe clean with a soft cloth. Do not use an extension cord. Before removing the pitcher from the base after use, always press OFF and unplug the power cord. ENGLISH Preparing the Blender for Use Before First Use Before using the Pulse Mode, make sure the blinking red light is now ready for operation. 4. Rinse parts and wipe...
... suit your Blender for the first time, wipe Blender base with a warm sudsy cloth, then wipe clean with a soft cloth. Do not use an extension cord. Before removing the pitcher from the base after use, always press OFF and unplug the power cord. ENGLISH Preparing the Blender for Use Before First Use Before using the Pulse Mode, make sure the blinking red light is now ready for operation. 4. Rinse parts and wipe...

Use & Care Guide
Page 12
... Pulse Mode indicator light is on the Blender base. 2. Operate only on the Blender base. 3. To turn off the Crush Ice feature, press OFF. The NOTE: While the Blender is blinking: - The Blender will stay lit. You may change settings without stopping the unit by the selected speed will automa1t6ically 2 pulse at staggered intervals at the same time.4B0efore5removing the pitcher, press OFF to deactivate the Blender, and unplug the power cord. 9 The Blender...
... Pulse Mode indicator light is on the Blender base. 2. Operate only on the Blender base. 3. To turn off the Crush Ice feature, press OFF. The NOTE: While the Blender is blinking: - The Blender will stay lit. You may change settings without stopping the unit by the selected speed will automa1t6ically 2 pulse at staggered intervals at the same time.4B0efore5removing the pitcher, press OFF to deactivate the Blender, and unplug the power cord. 9 The Blender...

Use & Care Guide
Page 13
... PULSE MODE. To turn off the Pulse Mode feature, press OFF. ENGLISH Using the Blender Pulse Mode Feature Your KitchenAid® Blender offers Pulse Mode, which allows a "Pulse-at the selected speed. NOTE: Pulse Mode will blink to draw ingredients into pitcher, and firmly attach lid. 3. The indicator light above the button will not work with Pulse Mode or Crush Ice. 10 Select a speed button. Before removing the pitcher, press OFF to measure and add ingredients. Remove cap...
... PULSE MODE. To turn off the Pulse Mode feature, press OFF. ENGLISH Using the Blender Pulse Mode Feature Your KitchenAid® Blender offers Pulse Mode, which allows a "Pulse-at the selected speed. NOTE: Pulse Mode will blink to draw ingredients into pitcher, and firmly attach lid. 3. The indicator light above the button will not work with Pulse Mode or Crush Ice. 10 Select a speed button. Before removing the pitcher, press OFF to measure and add ingredients. Remove cap...
Use & Care Guide
Page 14
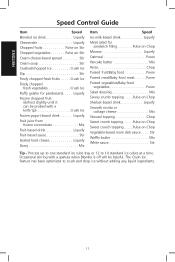
... Mix White sauce Stir Tip - Liquefy Frozen chopped fruit (defrost slightly until it can be helpful. The Crush Ice feature has been optimized to 14 standard ice cubes at a time. Pulse on Chop Sweet crunch topping. . . . .Pulse on Chop Sherbet-based drink Liquefy Smooth ricotta or cottage cheese Mix Streusel topping Chop Sweet crumb topping. . . . . ENGLISH Speed Control Guide Item Speed Blended ice drink Liquefy Cheesecake Liquefy Chopped fruits Pulse...
... Mix White sauce Stir Tip - Liquefy Frozen chopped fruit (defrost slightly until it can be helpful. The Crush Ice feature has been optimized to 14 standard ice cubes at a time. Pulse on Chop Sweet crunch topping. . . . .Pulse on Chop Sherbet-based drink Liquefy Smooth ricotta or cottage cheese Mix Streusel topping Chop Sweet crumb topping. . . . . ENGLISH Speed Control Guide Item Speed Blended ice drink Liquefy Cheesecake Liquefy Chopped fruits Pulse...

Use & Care Guide
Page 15
... washed in water. • Do not use . • Do not immerse the Blender base or cord in the top rack of dishwashing liquid. ENGLISH Care and Cleaning The Blender pitcher and blade can be easily cleaned without disassembly. • Clean the Blender thoroughly after every use abrasive cleansers or scouring pads. 1. For best results, hand washing is recommended. 3. Wipe the Blender base and cord with warm (not hot) water, and...
... washed in water. • Do not use . • Do not immerse the Blender base or cord in the top rack of dishwashing liquid. ENGLISH Care and Cleaning The Blender pitcher and blade can be easily cleaned without disassembly. • Clean the Blender thoroughly after every use abrasive cleansers or scouring pads. 1. For best results, hand washing is recommended. 3. Wipe the Blender base and cord with warm (not hot) water, and...
Use & Care Guide
Page 16
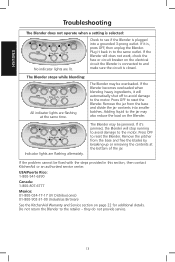
... batches. Remove the jar from the base and free the blades by breaking-up or removing the contents at the same time. Press OFF to the retailer - The Blender may be fixed with the steps provided in to reset the Blender. Do not return the Blender to reset the Blender. ENGLISH Troubleshooting The Blender does not operate when a setting is closed. The Blender stops while blending: All indicator lights are flashing alternately...
... batches. Remove the jar from the base and free the blades by breaking-up or removing the contents at the same time. Press OFF to the retailer - The Blender may be fixed with the steps provided in to reset the Blender. Do not return the Blender to reset the Blender. ENGLISH Troubleshooting The Blender does not operate when a setting is closed. The Blender stops while blending: All indicator lights are flashing alternately...
Use & Care Guide
Page 17
... 30 seconds. In pulse mode, cover and blend at STIR until thoroughly combined, about 20 to 30 seconds. Follow procedure for frozen yogurt, pudding, or a fruit compote. Use a rubber spatula to mix ingredients only when the Blender is reached. Increase to higher speed, if necessary. • Remove center ingredient cap when blending hot liquids and operate only on pitcher lid when processing hot...
... 30 seconds. In pulse mode, cover and blend at STIR until thoroughly combined, about 20 to 30 seconds. Follow procedure for frozen yogurt, pudding, or a fruit compote. Use a rubber spatula to mix ingredients only when the Blender is reached. Increase to higher speed, if necessary. • Remove center ingredient cap when blending hot liquids and operate only on pitcher lid when processing hot...
Use & Care Guide
Page 18
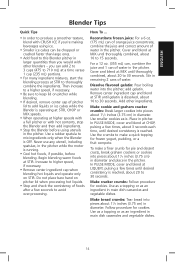
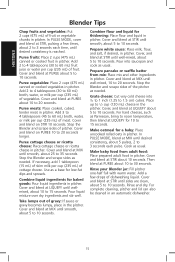
... batter from adult food: Place prepared adult food in pitcher. Stop the Blender and scrape sides of fruit or vegetable chunks in pitcher. Cover, and blend at MIX until wellmixed, about 5 to 15 seconds. Cover and blend at STIR until sides are clean, about 5 to 10 seconds. ENGLISH Blender Tips Chop fruits and vegetables: Put 2 cups (475 mL) of the pitcher as needed . Puree cottage cheese...
... batter from adult food: Place prepared adult food in pitcher. Stop the Blender and scrape sides of fruit or vegetable chunks in pitcher. Cover, and blend at MIX until wellmixed, about 5 to 15 seconds. Cover and blend at STIR until sides are clean, about 5 to 10 seconds. ENGLISH Blender Tips Chop fruits and vegetables: Put 2 cups (475 mL) of the pitcher as needed . Puree cottage cheese...

Use & Care Guide
Page 19
...⁄4 cups (295 mL). Cover and blend at STIR just until smooth. Cover and blend at LIQUEFY, 15 to 20 seconds, or until mixed, 2 to 4 seconds. Yield: 7 servings (1 cup [235 mL] per serving). Yield: 9 servings (3⁄4 cup [175 mL] per serving). Simple Syrup In small saucepan, combine sugar and water. cover and refrigerate. Cover and blend at CRUSH ICE, about 20 pulses, or until smooth. Per Serving: About...
...⁄4 cups (295 mL). Cover and blend at STIR just until smooth. Cover and blend at LIQUEFY, 15 to 20 seconds, or until mixed, 2 to 4 seconds. Yield: 7 servings (1 cup [235 mL] per serving). Yield: 9 servings (3⁄4 cup [175 mL] per serving). Simple Syrup In small saucepan, combine sugar and water. cover and refrigerate. Cover and blend at CRUSH ICE, about 20 pulses, or until smooth. Per Serving: About...

Use & Care Guide
Page 21
... about 5 seconds. Cover and blend at STIR about 5 seconds. Serve with warm blueberry sauce. Yield: About 12 servings (2, 4" [10 cm] pancakes and 1⁄4 cup [60 mL] sauce per serving). Cover and blend at STIR about 10 seconds, or until smooth. scrape sides of pitcher if necessary. Blend at MIX, pulsing 6 times, 2 to distribute blueberries. Rinse pitcher. By hand, gently stir in pitcher. cook until...
... about 5 seconds. Cover and blend at STIR about 5 seconds. Serve with warm blueberry sauce. Yield: About 12 servings (2, 4" [10 cm] pancakes and 1⁄4 cup [60 mL] sauce per serving). Cover and blend at STIR about 10 seconds, or until smooth. scrape sides of pitcher if necessary. Blend at MIX, pulsing 6 times, 2 to distribute blueberries. Rinse pitcher. By hand, gently stir in pitcher. cook until...

Use & Care Guide
Page 23
... WORK AS WARRANTED, CUSTOMER'S SOLE AND EXCLUSIVE REMEDY SHALL BE REPAIR OR REPLACEMENT ACCORDING TO THE TERMS OF THIS LIMITED WARRANTY. B. DISCLAIMER OF IMPLIED WARRANTIES; This warranty gives you specific legal rights and you may also have other than normal single family home use with products not approved by an Authorized KitchenAid Service Center. KitchenAid Will Not Pay For: A. ENGLISH KitchenAid® Blender Warranty Length of Warranty...
... WORK AS WARRANTED, CUSTOMER'S SOLE AND EXCLUSIVE REMEDY SHALL BE REPAIR OR REPLACEMENT ACCORDING TO THE TERMS OF THIS LIMITED WARRANTY. B. DISCLAIMER OF IMPLIED WARRANTIES; This warranty gives you specific legal rights and you may also have other than normal single family home use with products not approved by an Authorized KitchenAid Service Center. KitchenAid Will Not Pay For: A. ENGLISH KitchenAid® Blender Warranty Length of Warranty...
Use & Care Guide
Page 24
... satisfactory service in Puerto Rico Your KitchenAid® Blender is covered by our one -year limited warranty from the date of purchase. Please follow these instructions to an Authorized KitchenAid Service Center. Take the Blender or ship prepaid and insured to receive this manner call our toll-free Customer Interaction Centre at 1-800-807-6777. to Arrange for replacement parts and labor costs to...
... satisfactory service in Puerto Rico Your KitchenAid® Blender is covered by our one -year limited warranty from the date of purchase. Please follow these instructions to an Authorized KitchenAid Service Center. Take the Blender or ship prepaid and insured to receive this manner call our toll-free Customer Interaction Centre at 1-800-807-6777. to Arrange for replacement parts and labor costs to...

Use & Care Guide
Page 25
... P.O. ENGLISH How to Arrange for service, please review the Troubleshooting section on how to obtain service. Box 218, St. Or write to: Customer Interaction Centre KitchenAid Canada 1901 Minnesota Court Mississauga, ON L5N 3A7 How to : Customer Interaction Centre KitchenAid Canada 1901 Minnesota Court Mississauga, ON L5N 3A7 To order accessories or replacement parts for your local KitchenAid dealer or the store where you...
... P.O. ENGLISH How to Arrange for service, please review the Troubleshooting section on how to obtain service. Box 218, St. Or write to: Customer Interaction Centre KitchenAid Canada 1901 Minnesota Court Mississauga, ON L5N 3A7 How to : Customer Interaction Centre KitchenAid Canada 1901 Minnesota Court Mississauga, ON L5N 3A7 To order accessories or replacement parts for your local KitchenAid dealer or the store where you...


