Instruction Manual
Page 4
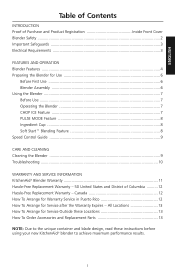
... Accessories and Replacement Parts 13 NOTE: Due to the unique container and blade design, read these instructions before using your new KitchenAid® blender to achieve maximum ...Blender Features ...4 Preparing the Blender for Use 6 Before First Use ...6 Blender Assembly 6 Using the Blender ...7 Before Use ...7 Operating the Blender 7 CHOP ICE Feature 7 PULSE MODE Feature 8 Ingredient Cup ...8 Soft Start™ Blending Feature 8 Speed Control Guide ...9 CARE AND CLEANING Cleaning the Blender ...9 Troubleshooting ...10 WARRANTY AND SERVICE INFORMATION KitchenAid® Blender...
... Accessories and Replacement Parts 13 NOTE: Due to the unique container and blade design, read these instructions before using your new KitchenAid® blender to achieve maximum ...Blender Features ...4 Preparing the Blender for Use 6 Before First Use ...6 Blender Assembly 6 Using the Blender ...7 Before Use ...7 Operating the Blender 7 CHOP ICE Feature 7 PULSE MODE Feature 8 Ingredient Cup ...8 Soft Start™ Blending Feature 8 Speed Control Guide ...9 CARE AND CLEANING Cleaning the Blender ...9 Troubleshooting ...10 WARRANTY AND SERVICE INFORMATION KitchenAid® Blender...

Instruction Manual
Page 6
... or mechanical adjustment. 7. Do not use , before putting on or taking off parts, and before cleaning. 5. Do not use an adapter. Failure to persons. 13. To reduce the risk of electrical shock, do not put blender in any appliance is too short, have a qualified electrician or serviceman install an ...severe injury to persons or damage to reduce the risk of table or counter. 9. If the power supply cord is used by KitchenAid may be used only when the blender is necessary when any way. Do not use an extension cord. Do not use only. Handle carefully. 11. When blending ...
... or mechanical adjustment. 7. Do not use , before putting on or taking off parts, and before cleaning. 5. Do not use an adapter. Failure to persons. 13. To reduce the risk of electrical shock, do not put blender in any appliance is too short, have a qualified electrician or serviceman install an ...severe injury to persons or damage to reduce the risk of table or counter. 9. If the power supply cord is used by KitchenAid may be used only when the blender is necessary when any way. Do not use an extension cord. Do not use only. Handle carefully. 11. When blending ...
Instruction Manual
Page 8
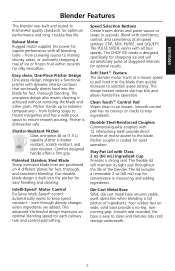
... uniformly chopping a tray of motor power to extreme temperatures - Pitcher coupler is achieved without removing the blade and other parts. The flexible lid will automatically pulse at staggered intervals for fast, thorough blending. Die-Cast Metal Base Solid, die-...different planes for easy handling and cleaning. ENGLISH Blender Features This blender was built and tested to KitchenAid quality standards for quiet operation. Pitcher is easy to ensure smooth pouring. Intelli-Speed® Motor Control Exclusive Intelli-Speed® control automatically works to trap ingredients. The...
... uniformly chopping a tray of motor power to extreme temperatures - Pitcher coupler is achieved without removing the blade and other parts. The flexible lid will automatically pulse at staggered intervals for fast, thorough blending. Die-Cast Metal Base Solid, die-...different planes for easy handling and cleaning. ENGLISH Blender Features This blender was built and tested to KitchenAid quality standards for quiet operation. Pitcher is easy to ensure smooth pouring. Intelli-Speed® Motor Control Exclusive Intelli-Speed® control automatically works to trap ingredients. The...
Instruction Manual
Page 9
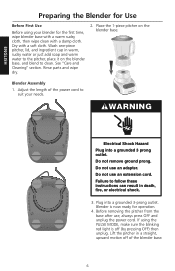
... Hazard Plug into a grounded 3-prong outlet. Before removing the pitcher from the base after use an extension cord. Plug into a grounded 3 prong outlet. Blender is off of the power cord to follow these instructions can result in a straight, upward motion off (by pressing OFF) then unplug. Dry with a...PULSE MODE, make sure the blinking red light is now ready for the first time, wipe blender base with a warm sudsy cloth, then wipe clean with a soft cloth. See "Care and Cleaning" section. Rinse parts and wipe dry. 2. Do not remove ground prong. If using your needs. Adjust the ...
... Hazard Plug into a grounded 3-prong outlet. Before removing the pitcher from the base after use an extension cord. Plug into a grounded 3 prong outlet. Blender is off of the power cord to follow these instructions can result in a straight, upward motion off (by pressing OFF) then unplug. Dry with a...PULSE MODE, make sure the blinking red light is now ready for the first time, wipe blender base with a warm sudsy cloth, then wipe clean with a soft cloth. See "Care and Cleaning" section. Rinse parts and wipe dry. 2. Do not remove ground prong. If using your needs. Adjust the ...

Instruction Manual
Page 12
...on Mix Sweet crunch topping. . . . . . Place the lid on the pitcher, press the STIR speed setting, and run the blender for 5 to crush and chop ice without disassembly. • Clean the blender thoroughly after every use abrasive cleansers or scouring pads. 1. Rinse the pitcher with a spatula will be easily ...Pulse on Stir Cream cheese-based spread Stir Cream soup Stir Crushed/Chopped Ice Chop Ice Dip Stir Finely chopped fresh fruits . . . . . These parts can be washed in warm soapy water, then rinse and dry thoroughly. Wipe the blender base and cord with a soft cloth.
...on Mix Sweet crunch topping. . . . . . Place the lid on the pitcher, press the STIR speed setting, and run the blender for 5 to crush and chop ice without disassembly. • Clean the blender thoroughly after every use abrasive cleansers or scouring pads. 1. Rinse the pitcher with a spatula will be easily ...Pulse on Stir Cream cheese-based spread Stir Cream soup Stir Crushed/Chopped Ice Chop Ice Dip Stir Finely chopped fresh fruits . . . . . These parts can be washed in warm soapy water, then rinse and dry thoroughly. Wipe the blender base and cord with a soft cloth.
Instruction Manual
Page 14
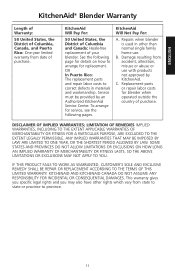
... MAY NOT APPLY TO YOU. See the following page for details on how to province. 11 KitchenAid Will Not Pay For: A. Replacement parts or repair labor costs for blender when operated outside the country of your blender. Repairs when blender is used in materials and workmanship. C. LIMITATION OF REMEDIES IMPLIED WARRANTIES, INCLUDING TO THE EXTENT...
... MAY NOT APPLY TO YOU. See the following page for details on how to province. 11 KitchenAid Will Not Pay For: A. Replacement parts or repair labor costs for blender when operated outside the country of your blender. Repairs when blender is used in materials and workmanship. C. LIMITATION OF REMEDIES IMPLIED WARRANTIES, INCLUDING TO THE EXTENT...

Instruction Manual
Page 15
...defects in this quality service. In the carton include your original blender returned to us at: Customer eXperience Centre KitchenAid Canada 1901 Minnesota Court Mississauga, ON L5N 3A7 How To Arrange for replacement parts and labor costs to receive this manner call our toll-free Customer... Satisfaction Center at 1-800-807-6777. Your replacement blender will arrange to deliver an...
...defects in this quality service. In the carton include your original blender returned to us at: Customer eXperience Centre KitchenAid Canada 1901 Minnesota Court Mississauga, ON L5N 3A7 How To Arrange for replacement parts and labor costs to receive this manner call our toll-free Customer... Satisfaction Center at 1-800-807-6777. Your replacement blender will arrange to deliver an...

Instruction Manual
Page 16
... 1901 Minnesota Court Mississauga, ON L5N 3A7 How To Arrange for information on how to : Customer eXperience Centre KitchenAid Canada 1901 Minnesota Court Mississauga, ON L5N 3A7 To order accessories or replacement parts for your blender in the 50 United States, District of Columbia, and Puerto Rico, call toll-free 1-800-807-6777...
... 1901 Minnesota Court Mississauga, ON L5N 3A7 How To Arrange for information on how to : Customer eXperience Centre KitchenAid Canada 1901 Minnesota Court Mississauga, ON L5N 3A7 To order accessories or replacement parts for your blender in the 50 United States, District of Columbia, and Puerto Rico, call toll-free 1-800-807-6777...


