
Quick Start Guide
Page 1
Used under license in Canada. GET BLENDING DISCOVER MORE AT KITCHENAID.COM/QUICKSTART For exciting recipes, demo videos, product registration, and more - All rights reserved. our quick start page has what you need to help you get the most from your new product. RECIPES GUIDES VIDEOS SUPPORT REGISTER KitchenAid.com | KitchenAid.ca | USA: 1.800.541.6390 | Canada: 1.800.807.6777 W11333855B KSB40**, 7KSB40** 05/2019 ®/™ ©2019 KitchenAid.
Used under license in Canada. GET BLENDING DISCOVER MORE AT KITCHENAID.COM/QUICKSTART For exciting recipes, demo videos, product registration, and more - All rights reserved. our quick start page has what you need to help you get the most from your new product. RECIPES GUIDES VIDEOS SUPPORT REGISTER KitchenAid.com | KitchenAid.ca | USA: 1.800.541.6390 | Canada: 1.800.807.6777 W11333855B KSB40**, 7KSB40** 05/2019 ®/™ ©2019 KitchenAid.
Quick Start Guide
Page 2
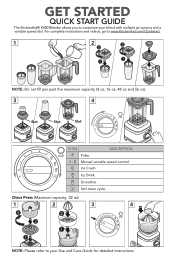
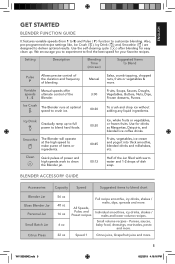
GET STARTED QUICK START GUIDE The KitchenAid® K400 Blender allows you to customize your Use and Care Guide for detailed instructions. For complete instructions and videos, go to your blend with multiple jar options and a variable speed dial. Ice Crush. Citrus Press (Maximum capacity: 32 oz) 1 2 3 4 3 2 2 1 3 4 5 2 1 o P 1 NOTE: Please refer to www.KitchenAid.com/Quickstart. 1 2 2 2 8oOzU=N1CCESup 48 oz 44 oz 40 oz 36 oz 32...
GET STARTED QUICK START GUIDE The KitchenAid® K400 Blender allows you to customize your Use and Care Guide for detailed instructions. For complete instructions and videos, go to your blend with multiple jar options and a variable speed dial. Ice Crush. Citrus Press (Maximum capacity: 32 oz) 1 2 3 4 3 2 2 1 3 4 5 2 1 o P 1 NOTE: Please refer to www.KitchenAid.com/Quickstart. 1 2 2 2 8oOzU=N1CCESup 48 oz 44 oz 40 oz 36 oz 32...

Owners Manual
Page 2
... 15 1 Lid Center Cap 2 Lid with Vent Well 3 Jar (56 oz capacity) 3.1 Glass Jar**** (48 oz capacity) 4 Base 5 Control Dial 6 Reamer* 7 Pulp Strainer/Basket* 8 Juice Container* (32 oz capacity) 9 Gear Assembly* 10 Personal Jar** (16 oz capacity) 11 Blade Assembly of Personal Jar** 12 Personal Jar Easy-Drink Lid** 13 Small Batch Jar*** (6 oz capacity) 14 Blade Assembly of Small Batch Jar*** 15 Small Batch Jar Lid*** 16 Tamper***** 17 START/STOP button ( ) with LED ring * Accessories only...
... 15 1 Lid Center Cap 2 Lid with Vent Well 3 Jar (56 oz capacity) 3.1 Glass Jar**** (48 oz capacity) 4 Base 5 Control Dial 6 Reamer* 7 Pulp Strainer/Basket* 8 Juice Container* (32 oz capacity) 9 Gear Assembly* 10 Personal Jar** (16 oz capacity) 11 Blade Assembly of Personal Jar** 12 Personal Jar Easy-Drink Lid** 13 Small Batch Jar*** (6 oz capacity) 14 Blade Assembly of Small Batch Jar*** 15 Small Batch Jar Lid*** 16 Tamper***** 17 START/STOP button ( ) with LED ring * Accessories only...
Owners Manual
Page 3
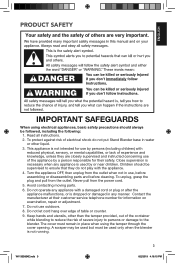
... the cover opening. Read all instructions. 2. To unplug, grasp the plug and pull from the power cord. 5. Never pull from the outlet. Contact the manufacturer at their customer service telephone number for their safety. A scraper may be used by a person responsible for information on examination, repair or adjustment. 7. To protect against risk of severe injury to persons or damage to the blender. Children...
... the cover opening. Read all instructions. 2. To unplug, grasp the plug and pull from the power cord. 5. Never pull from the outlet. Contact the manufacturer at their customer service telephone number for their safety. A scraper may be used by a person responsible for information on examination, repair or adjustment. 7. To protect against risk of severe injury to persons or damage to the blender. Children...
Owners Manual
Page 4
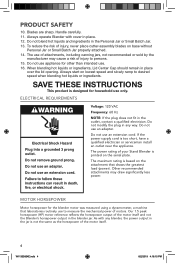
... place over the lid opening. The maximum rating is based on lowest speed and slowly ramp to desired speed when blending hot liquids or ingredients. The use only. If the power supply cord is designed for other than intended use to persons. 15. As with cover in the blender jar. SAVE THESE INSTRUCTIONS This product is too short, have a qualified electrician or serviceman install an outlet...
... place over the lid opening. The maximum rating is based on lowest speed and slowly ramp to desired speed when blending hot liquids or ingredients. The use only. If the power supply cord is designed for other than intended use to persons. 15. As with cover in the blender jar. SAVE THESE INSTRUCTIONS This product is too short, have a qualified electrician or serviceman install an outlet...
Owners Manual
Page 5
.... BLENDER ACCESSORY GUIDE Accessories Capacity Speed Suggested items to blend hard foods. To crush and chop ice without adding any liquid ingredients. Speed 1 Citrus juice, Grapefruit juice and more . Setting Description Blending Time (min:sec) Suggested Items to clean the Blender jar. 00:30 00:45 00:13 Ice, whole fruits or vegetables, or frozen fruits. Use for your favorite recipes. Use the self-cleaning cycle ( ) after blending for easy clean up to full power to blend...
.... BLENDER ACCESSORY GUIDE Accessories Capacity Speed Suggested items to blend hard foods. To crush and chop ice without adding any liquid ingredients. Speed 1 Citrus juice, Grapefruit juice and more . Setting Description Blending Time (min:sec) Suggested Items to clean the Blender jar. 00:30 00:45 00:13 Ice, whole fruits or vegetables, or frozen fruits. Use for your favorite recipes. Use the self-cleaning cycle ( ) after blending for easy clean up to full power to blend...
Owners Manual
Page 6
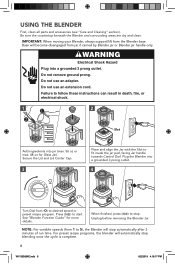
... Guide" for Glass Jar). Unplug before removing the Blender Jar. Do not use an extension cord. When finished, press ( ) to fit inside the jar pad, facing Jar handle towards Control Dial. WARNING Electrical Shock Hazard Plug into a grounded 3 prong outlet. 4 3 4 5 2 1 0 P Turn Dial from the Blender base. Do not use an adapter. Plug the Blender into a grounded 3 prong outlet. For preset recipe programs, the blender will stop . Secure the Lid and Lid Center Cap...
... Guide" for Glass Jar). Unplug before removing the Blender Jar. Do not use an extension cord. When finished, press ( ) to fit inside the jar pad, facing Jar handle towards Control Dial. WARNING Electrical Shock Hazard Plug into a grounded 3 prong outlet. 4 3 4 5 2 1 0 P Turn Dial from the Blender base. Do not use an adapter. Plug the Blender into a grounded 3 prong outlet. For preset recipe programs, the blender will stop . Secure the Lid and Lid Center Cap...
Owners Manual
Page 7
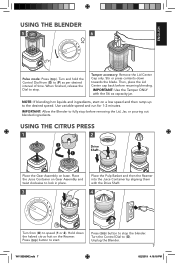
... Drive Shaft. 4 Turn from (O) to fully stop before resuming blending. IMPORTANT: Allow the Blender to (P) as per desired interval of time. USING THE CITRUS PRESS 1 2 2 1 Drive Shaft Place the Gear Assembly on the Reamer. Turn and hold the Control Dial from (O) to (O). Tamper accessory: Remove the Lid Center Cap only. Then, place the Lid Center cap back before removing the Lid, Jar, or pouring out blended ingredients. Unplug the Blender...
... Drive Shaft. 4 Turn from (O) to fully stop before resuming blending. IMPORTANT: Allow the Blender to (P) as per desired interval of time. USING THE CITRUS PRESS 1 2 2 1 Drive Shaft Place the Gear Assembly on the Reamer. Turn and hold the Control Dial from (O) to (O). Tamper accessory: Remove the Lid Center Cap only. Then, place the Lid Center cap back before removing the Lid, Jar, or pouring out blended ingredients. Unplug the Blender...
Owners Manual
Page 8
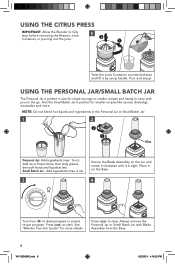
Add ice or frozen items, then leafy greens, then soft foods and liquids at last. USING THE PERSONAL JAR/SMALL BATCH JAR The Personal Jar is perfect in the Personal Jar or Small Batch Jar. 1 2 2 1 Slot Personal Jar: Add ingredients (max. 16 oz). See "Blender Function Guide" for single servings or smaller recipes and handy to carry with Blade Assembly from (O) to desired speed or preset recipe program. Small Batch Jar : Add ingredients (max. 6 oz...
Add ice or frozen items, then leafy greens, then soft foods and liquids at last. USING THE PERSONAL JAR/SMALL BATCH JAR The Personal Jar is perfect in the Personal Jar or Small Batch Jar. 1 2 2 1 Slot Personal Jar: Add ingredients (max. 16 oz). See "Blender Function Guide" for single servings or smaller recipes and handy to carry with Blade Assembly from (O) to desired speed or preset recipe program. Small Batch Jar : Add ingredients (max. 6 oz...
Owners Manual
Page 9
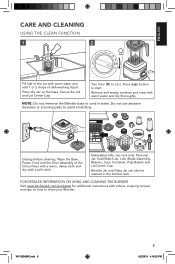
... dish-washing liquid. Dishwasher-safe, top rack only: Personal Jar, Small Batch Jar, Lids, Blade Assembly, Reamer, Juice Container, Pulp Basket and Lid Center Cap. NOTE: Do not immerse the Blender base or cord in the bottom rack. Press ( ) button to clean your Blender. Secure the Lid and Lid Center Cap. Place the Jar on how to start. Remove and empty contents and rinse with videos, inspiring recipes, and tips on the...
... dish-washing liquid. Dishwasher-safe, top rack only: Personal Jar, Small Batch Jar, Lids, Blade Assembly, Reamer, Juice Container, Pulp Basket and Lid Center Cap. NOTE: Do not immerse the Blender base or cord in the bottom rack. Press ( ) button to clean your Blender. Secure the Lid and Lid Center Cap. Place the Jar on how to start. Remove and empty contents and rinse with videos, inspiring recipes, and tips on the...
Owners Manual
Page 10
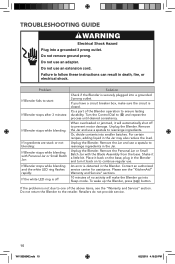
... on the base, plug in the Blender and turn it back on to follow these instructions can result in the Jar. Contact an authorized service center for assistance. Unplug the Blender. If the problem is closed. Turn the Control Dial to one of the above items, see the "KitchenAid® Warranty and Service" sections. 10 minutes of the Blender operation to the retailer. TROUBLESHOOTING GUIDE WARNING Electrical...
... on the base, plug in the Blender and turn it back on to follow these instructions can result in the Jar. Contact an authorized service center for assistance. Unplug the Blender. If the problem is closed. Turn the Control Dial to one of the above items, see the "KitchenAid® Warranty and Service" sections. 10 minutes of the Blender operation to the retailer. TROUBLESHOOTING GUIDE WARNING Electrical...
Owners Manual
Page 11
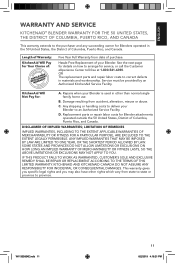
... OR FITNESS FOR A PARTICULAR PURPOSE, ARE EXCLUDED TO THE EXTENT LEGALLY PERMISSIBLE. Service must be provided by an Authorized KitchenAid Service Facility. B. D. This warranty gives you specific legal rights and you may also have other than normal single family home use. OR The replacement parts and repair labor costs to deliver your Blender is used in materials and workmanship. Length of Warranty: KitchenAid Will Pay for Blender attachments operated...
... OR FITNESS FOR A PARTICULAR PURPOSE, ARE EXCLUDED TO THE EXTENT LEGALLY PERMISSIBLE. Service must be provided by an Authorized KitchenAid Service Facility. B. D. This warranty gives you specific legal rights and you may also have other than normal single family home use. OR The replacement parts and repair labor costs to deliver your Blender is used in materials and workmanship. Length of Warranty: KitchenAid Will Pay for Blender attachments operated...
Owners Manual
Page 12
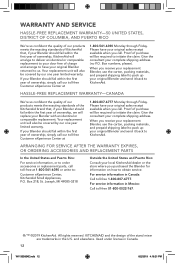
... limited warranty. HASSLE-FREE REPLACEMENT WARRANTY-CANADA We're so confident the quality of our products meets the exacting standards of the KitchenAid brand that , if your Blender should fail within the first year of ownership, simply call our toll-free Customer eXperience Center at 1-800-541-6390 Monday through Friday. ARRANGING FOR SERVICE AFTER THE WARRANTY EXPIRES, OR ORDERING ACCESSORIES AND REPLACEMENT PARTS...
... limited warranty. HASSLE-FREE REPLACEMENT WARRANTY-CANADA We're so confident the quality of our products meets the exacting standards of the KitchenAid brand that , if your Blender should fail within the first year of ownership, simply call our toll-free Customer eXperience Center at 1-800-541-6390 Monday through Friday. ARRANGING FOR SERVICE AFTER THE WARRANTY EXPIRES, OR ORDERING ACCESSORIES AND REPLACEMENT PARTS...


