Owners Manual
Page 2
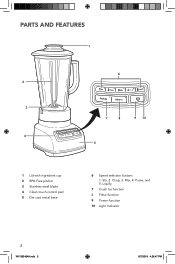
PARTS AND FEATURES 1 6 2 3 7 8 9 10 4 5 1 Lid with ingredient cup 2 BPA Free pitcher 3 Stainless steel blade 4 Clean touch control pad 5 Die-cast metal base 6 Speed selection buttons 1: Stir, 2: Chop, 3: Mix, 4: Puree, and 5: Liquify. 7 Crush Ice function 8 Pulse function 9 Power function 10 Light Indicator 2 W11382494A.indb 2 8/7/2019 4:26:47 PM
PARTS AND FEATURES 1 6 2 3 7 8 9 10 4 5 1 Lid with ingredient cup 2 BPA Free pitcher 3 Stainless steel blade 4 Clean touch control pad 5 Die-cast metal base 6 Speed selection buttons 1: Stir, 2: Chop, 3: Mix, 4: Puree, and 5: Liquify. 7 Crush Ice function 8 Pulse function 9 Power function 10 Light Indicator 2 W11382494A.indb 2 8/7/2019 4:26:47 PM
Owners Manual
Page 3
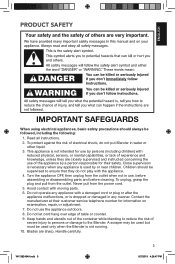
... a person responsible for their customer service telephone number for use of the appliance by or near children. A scraper may be used but must be followed, including the following: 1. Contact the manufacturer at their safety. This appliance is not intended for information on examination, repair, or adjustment. 7. To unplug, grasp the plug and pull from the power cord. 5. Do not operate...
... a person responsible for their customer service telephone number for use of the appliance by or near children. A scraper may be used but must be followed, including the following: 1. Contact the manufacturer at their safety. This appliance is not intended for information on examination, repair, or adjustment. 7. To unplug, grasp the plug and pull from the power cord. 5. Do not operate...
Owners Manual
Page 4
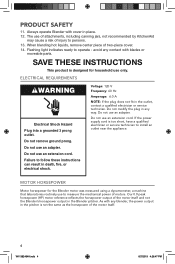
... THESE INSTRUCTIONS This product is too short, have a qualified electrician or service technician to install an outlet near the appliance. Do not use an extension cord. Failure to measure the mechanical power of two-piece cover. 14. MOTOR HORSEPOWER Motor horsepower for household use of attachments, including canning jars, not recommended by KitchenAid may cause a risk of injury to operate - When blending hot liquids, remove center piece of motors...
... THESE INSTRUCTIONS This product is too short, have a qualified electrician or service technician to install an outlet near the appliance. Do not use an extension cord. Failure to measure the mechanical power of two-piece cover. 14. MOTOR HORSEPOWER Motor horsepower for household use of attachments, including canning jars, not recommended by KitchenAid may cause a risk of injury to operate - When blending hot liquids, remove center piece of motors...

Owners Manual
Page 5
.... Remove cup and add ingredients at higher speeds with a full pitcher or with hot contents, stop the Blender and then add ingredients. Pulse, 2 Chop Cream cheese-based spread . . . . . 1 Stir Cream soup 1 Stir Crushed/chopped ice Crush Ice Dip 1 Stir Finely chopped fresh fruits. . . . Crush Ice, 5 Liquify Cheesecake 5 Liquify Chopped fruits Pulse, 2 Chop Chopped vegetables . . . . Pulse, 2 Chop Vegetable-based main dish sauce. 1 Stir Waffle batter 3 Mix White sauce 1 Stir W11382494A.indb 5 5 8/7/2019 4:26:47 PM SPEED CONTROL GUIDE Item Speed Blended ice...
.... Remove cup and add ingredients at higher speeds with a full pitcher or with hot contents, stop the Blender and then add ingredients. Pulse, 2 Chop Cream cheese-based spread . . . . . 1 Stir Cream soup 1 Stir Crushed/chopped ice Crush Ice Dip 1 Stir Finely chopped fresh fruits. . . . Crush Ice, 5 Liquify Cheesecake 5 Liquify Chopped fruits Pulse, 2 Chop Chopped vegetables . . . . Pulse, 2 Chop Vegetable-based main dish sauce. 1 Stir Waffle batter 3 Mix White sauce 1 Stir W11382494A.indb 5 5 8/7/2019 4:26:47 PM SPEED CONTROL GUIDE Item Speed Blended ice...
Owners Manual
Page 6
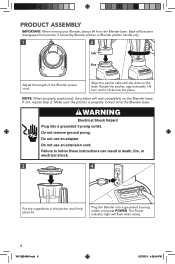
... place. Do not remove ground prong. Do not use an adapter. Rotate the pitcher, approximately 1/8 turn until it clicks into a grounded 3 prong outlet. Make sure the pitcher is properly locked onto the Blender base. The Power indicator light will become disengaged from the Blender base. NOTE: When properly positioned, the pitcher will rest completely on the base. Failure to follow these instructions can result in death...
... place. Do not remove ground prong. Do not use an adapter. Rotate the pitcher, approximately 1/8 turn until it clicks into a grounded 3 prong outlet. Make sure the pitcher is properly locked onto the Blender base. The Power indicator light will become disengaged from the Blender base. NOTE: When properly positioned, the pitcher will rest completely on the base. Failure to follow these instructions can result in death...

Owners Manual
Page 7
... Blender before removing the pitcher. W11382494A.indb 7 7 8/7/2019 4:26:48 PM The white indicator light by the selected speed will stay lit. Remove center cap and place towel over lid. IMPORTANT: If blending hot foods or liquids, do not fill to 5) button for continuous operation at that speed. ENGLISH PRODUCT ASSEMBLY 5 6 Press desired speed (1 to the top of the pitcher, and operate only on 1 Stir speed. When finished, press POWER to turn...
... Blender before removing the pitcher. W11382494A.indb 7 7 8/7/2019 4:26:48 PM The white indicator light by the selected speed will stay lit. Remove center cap and place towel over lid. IMPORTANT: If blending hot foods or liquids, do not fill to 5) button for continuous operation at that speed. ENGLISH PRODUCT ASSEMBLY 5 6 Press desired speed (1 to the top of the pitcher, and operate only on 1 Stir speed. When finished, press POWER to turn...
Owners Manual
Page 9
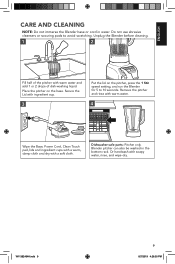
... pitcher on the pitcher, press the 1 Stir speed setting, and run the Blender for 5 to avoid scratching. Secure the Lid with warm water and add 1 or 2 drops of the pitcher with ingredient cup. 3 Put the lid on the base. Unplug the Blender before cleaning. 1 2 Fill half of dish-washing liquid. Remove the pitcher and rinse with warm water. 4 Wipe the Base, Power Cord, Clean Touch pad, lids and ingredient cups...
... pitcher on the pitcher, press the 1 Stir speed setting, and run the Blender for 5 to avoid scratching. Secure the Lid with warm water and add 1 or 2 drops of the pitcher with ingredient cup. 3 Put the lid on the base. Unplug the Blender before cleaning. 1 2 Fill half of dish-washing liquid. Remove the pitcher and rinse with warm water. 4 Wipe the Base, Power Cord, Clean Touch pad, lids and ingredient cups...

Owners Manual
Page 10
... items, see if the Blender is not due to follow these instructions can result in , but nothing happens when POWER is pressed, and all indicator lights are stuck or not blending: Solution Check to prevent motor damage. Do not return the Blender to turn off the Blender; TROUBLESHOOTING GUIDE WARNING Electrical Shock Hazard Plug into smaller batches. Do not use an extension cord. Press POWER...
... items, see if the Blender is not due to follow these instructions can result in , but nothing happens when POWER is pressed, and all indicator lights are stuck or not blending: Solution Check to prevent motor damage. Do not return the Blender to turn off the Blender; TROUBLESHOOTING GUIDE WARNING Electrical Shock Hazard Plug into smaller batches. Do not use an extension cord. Press POWER...
Owners Manual
Page 11
... any succeeding owner for Blender operated in the 50 United States, the District of purchase. Length of Warranty: KitchenAid Will Pay for Blender operated outside the 50 United States, District of your Blender to an Authorized Service Center. Hassle-Free Replacement of Columbia, Puerto Rico, and Canada. KITCHENAID AND KITCHENAID CANADA DO NOT ASSUME ANY RESPONSIBILITY FOR INCIDENTAL OR CONSEQUENTIAL DAMAGES. C. Replacement parts or repair labor costs for Your...
... any succeeding owner for Blender operated in the 50 United States, the District of purchase. Length of Warranty: KitchenAid Will Pay for Blender operated outside the 50 United States, District of your Blender to an Authorized Service Center. Hassle-Free Replacement of Columbia, Puerto Rico, and Canada. KITCHENAID AND KITCHENAID CANADA DO NOT ASSUME ANY RESPONSIBILITY FOR INCIDENTAL OR CONSEQUENTIAL DAMAGES. C. Replacement parts or repair labor costs for Your...
Owners Manual
Page 12
... follow these instructions to order accessories or replacement parts, call our toll-free Customer eXperience Centre at 1-800-541-6390 Monday through Friday. Your replacement Blender will be required to obtain service. WARRANTY AND SERVICE HASSLE-FREE REPLACEMENT WARRANTY - 50 UNITED STATES, DISTRICT OF COLUMBIA, AND PUERTO RICO We're so confident the quality of our products meets the exacting standards of KitchenAid that , if...
... follow these instructions to order accessories or replacement parts, call our toll-free Customer eXperience Centre at 1-800-541-6390 Monday through Friday. Your replacement Blender will be required to obtain service. WARRANTY AND SERVICE HASSLE-FREE REPLACEMENT WARRANTY - 50 UNITED STATES, DISTRICT OF COLUMBIA, AND PUERTO RICO We're so confident the quality of our products meets the exacting standards of KitchenAid that , if...
Owners Manual 1
Page 3
... you use 6 operating the blender Using the Blender 8 Crushing ice...9 Using PULSE mode 10 Using the Blender pitcher ingredient cup, and Soft Start blending feature....... 11 Speed control guide 11 Tips for great results Quick tips...12 How to contact you in the unlikely event of a product safety notification and assist us to ...12 CARE AND CLEANING Cleaning the Blender 13 Troubleshooting Blender does not operate when a setting is selected 14 Blender stops while blending 14 WARRANTY...15...
... you use 6 operating the blender Using the Blender 8 Crushing ice...9 Using PULSE mode 10 Using the Blender pitcher ingredient cup, and Soft Start blending feature....... 11 Speed control guide 11 Tips for great results Quick tips...12 How to contact you in the unlikely event of a product safety notification and assist us to ...12 CARE AND CLEANING Cleaning the Blender 13 Troubleshooting Blender does not operate when a setting is selected 14 Blender stops while blending 14 WARRANTY...15...
Owners Manual 1
Page 4
.... 9. Avoid contact with cover in water or other liquid. 3. Read all instructions. 2. Always operate Blender with moving parts. 6. Keep hands and utensils out of container while blending to reduce the risk of severe injury to persons or damage to the nearest Authorized Service Center for examination, repair or electrical or mechanical adjustment. 7. Blades are sharp. BLender Safety IMPORTANT SAFEGUARDS When using electrical appliances, basic...
.... 9. Avoid contact with cover in water or other liquid. 3. Read all instructions. 2. Always operate Blender with moving parts. 6. Keep hands and utensils out of container while blending to reduce the risk of severe injury to persons or damage to the nearest Authorized Service Center for examination, repair or electrical or mechanical adjustment. 7. Blades are sharp. BLender Safety IMPORTANT SAFEGUARDS When using electrical appliances, basic...
Owners Manual 1
Page 5
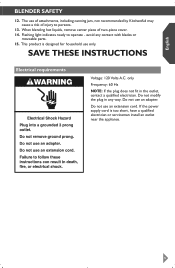
... not fit in any contact with blades or moveable parts. 15. This product is too short, have a qualified electrician or serviceman install an outlet near the appliance. 5 Do not use an extension cord. Flashing light indicates ready to persons. 13. If the power supply cord is designed for household use of attachments, including canning jars, not recommended by KitchenAid may cause a risk of two-piece cover. 14...
... not fit in any contact with blades or moveable parts. 15. This product is too short, have a qualified electrician or serviceman install an outlet near the appliance. 5 Do not use an extension cord. Flashing light indicates ready to persons. 13. If the power supply cord is designed for household use of attachments, including canning jars, not recommended by KitchenAid may cause a risk of two-piece cover. 14...
Owners Manual 1
Page 6
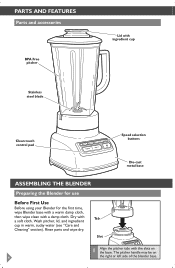
... base. Wash pitcher, lid, and ingredient cup in warm, sudsy water (see "Care and Cleaning" section). Dry with the slots on 6 the right or left side of the blender base. Parts and Features Parts and accessories BPA Free pitcher Stainless steel blade Lid with ingredient cup Clean touch control pad Speed selection buttons Die-cast metal base Assembling the blender Preparing the Blender for use Before First Use Before using your Blender for the first time, wipe Blender base...
... base. Wash pitcher, lid, and ingredient cup in warm, sudsy water (see "Care and Cleaning" section). Dry with the slots on 6 the right or left side of the blender base. Parts and Features Parts and accessories BPA Free pitcher Stainless steel blade Lid with ingredient cup Clean touch control pad Speed selection buttons Die-cast metal base Assembling the blender Preparing the Blender for use Before First Use Before using your Blender for the first time, wipe Blender base...
Owners Manual 1
Page 8
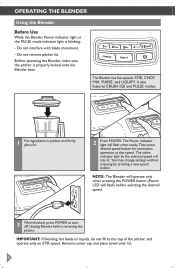
... the POWER button (Power LED will flash) before removing the pitcher. OPERATING the blender Using the Blender Before Use While the Blender Power indicator light or the PULSE mode indicator light is properly locked onto the Blender base. Do not remove pitcher lid. You may change settings without stopping by the selected speed will flash when ready. Remove center cap and place towel over lid. 8 The Blender has five speeds: STIR, CHOP, MIX, PUREE, and LIQUIFY. The white indicator light by pressing a new speed button. Then press desired speed button...
... the POWER button (Power LED will flash) before removing the pitcher. OPERATING the blender Using the Blender Before Use While the Blender Power indicator light or the PULSE mode indicator light is properly locked onto the Blender base. Do not remove pitcher lid. You may change settings without stopping by the selected speed will flash when ready. Remove center cap and place towel over lid. 8 The Blender has five speeds: STIR, CHOP, MIX, PUREE, and LIQUIFY. The white indicator light by pressing a new speed button. Then press desired speed button...

Owners Manual 1
Page 12
... pitcher while the motor is dissolved, about 4 cm in diameter and place in the pitcher. Use a rubber spatula to 15 seconds, as desired. Secure the lid, remove the center ingredient cup, and place a towel over the lid. Operate only on pitcher lid when processing hot foods or liquids. Combine flour and liquid for 10 to mix ingredients only when the Blender is off. Cover and blend...
... pitcher while the motor is dissolved, about 4 cm in diameter and place in the pitcher. Use a rubber spatula to 15 seconds, as desired. Secure the lid, remove the center ingredient cup, and place a towel over the lid. Operate only on pitcher lid when processing hot foods or liquids. Combine flour and liquid for 10 to mix ingredients only when the Blender is off. Cover and blend...
Owners Manual 1
Page 13
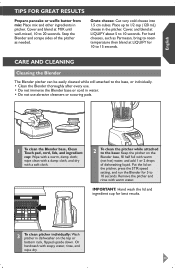
.... 13 Remove the pitcher and rinse with a warm, damp cloth; Cover, and blend at MIX until well-mixed, 10 to 20 seconds. Put the lid on the pitcher, press the STIR speed setting, and run the Blender for best results. 3 To clean pitcher individually: Wash pitcher in water. • Do not use abrasive cleansers or scouring pads. 1 To clean the Blender base, Clean Touch pad, cord, lids, and ingredient cup: Wipe...
.... 13 Remove the pitcher and rinse with a warm, damp cloth; Cover, and blend at MIX until well-mixed, 10 to 20 seconds. Put the lid on the pitcher, press the STIR speed setting, and run the Blender for best results. 3 To clean pitcher individually: Wash pitcher in water. • Do not use abrasive cleansers or scouring pads. 1 To clean the Blender base, Clean Touch pad, cord, lids, and ingredient cup: Wipe...
Owners Manual 1
Page 14
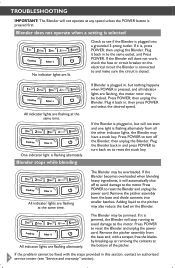
... Blender will stop running to avoid damage to see "Service and warranty" section). All indicator lights are flashing, the motor rotor may be fixed with a scraper, free the blades by breaking-up or removing the contents at any speed unless the POWER button is closed. Plug it back in ; The Blender may also reduce the load on the Blender. If the problem cannot be locked. Troubleshooting IMPORTANT: The Blender will...
... Blender will stop running to avoid damage to see "Service and warranty" section). All indicator lights are flashing, the motor rotor may be fixed with a scraper, free the blades by breaking-up or removing the contents at any speed unless the POWER button is closed. Plug it back in ; The Blender may also reduce the load on the Blender. If the problem cannot be locked. Troubleshooting IMPORTANT: The Blender will...
Owners Manual 1
Page 15
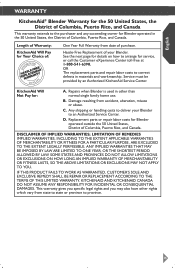
... any succeeding owner for Blender operated in the 50 United States, the District of Columbia, Puerto Rico, and Canada. OR The replacement parts and repair labor costs to arrange for : normal single family home use. KitchenAid Will A. KITCHENAID AND KITCHENAID CANADA DO NOT ASSUME ANY RESPONSIBILITY FOR INCIDENTAL OR CONSEQUENTIAL DAMAGES. LIMITATION OF REMEDIES IMPLIED WARRANTIES, INCLUDING TO THE EXTENT APPLICABLE WARRANTIES OF MERCHANTABILITY OR FITNESS FOR...
... any succeeding owner for Blender operated in the 50 United States, the District of Columbia, Puerto Rico, and Canada. OR The replacement parts and repair labor costs to arrange for : normal single family home use. KitchenAid Will A. KITCHENAID AND KITCHENAID CANADA DO NOT ASSUME ANY RESPONSIBILITY FOR INCIDENTAL OR CONSEQUENTIAL DAMAGES. LIMITATION OF REMEDIES IMPLIED WARRANTIES, INCLUDING TO THE EXTENT APPLICABLE WARRANTIES OF MERCHANTABILITY OR FITNESS FOR...
Owners Manual 1
Page 16
..., etc.). In the carton, include your local KitchenAid dealer or the store where you purchased the Blender for Service after the Warranty Expires, or Ordering Accessories and Replacement Parts In the United States and Puerto Rico: For service information, or to order accessories or replacement parts, call our toll-free Customer eXperience Centre at : Customer eXperience Centre KitchenAid Canada 200 - 6750 Century Ave. Joseph, MI 49085...
..., etc.). In the carton, include your local KitchenAid dealer or the store where you purchased the Blender for Service after the Warranty Expires, or Ordering Accessories and Replacement Parts In the United States and Puerto Rico: For service information, or to order accessories or replacement parts, call our toll-free Customer eXperience Centre at : Customer eXperience Centre KitchenAid Canada 200 - 6750 Century Ave. Joseph, MI 49085...


