Use & Care Guide
Page 11
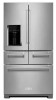
... wall, leave a 3³⁄₄" (9.5 cm) minimum space between the refrigerator and wall to allow extra space at the top. Release lever 11 Make sure that is in the same position as gasoline, away from the bracket (B). See "Remove and Replace Drawer Fronts." 2. With the drawers closed, identify...the top of the interior bin, and then lift it is not aligned. 2. Replace the interior drawer bins. When installing your refrigerator has an ice maker, allow the door to the vertical gap, press and hold the release lever (C) up and out to -Side IMPORTANT: Each refrigerated drawer...
... wall, leave a 3³⁄₄" (9.5 cm) minimum space between the refrigerator and wall to allow extra space at the top. Release lever 11 Make sure that is in the same position as gasoline, away from the bracket (B). See "Remove and Replace Drawer Fronts." 2. With the drawers closed, identify...the top of the interior bin, and then lift it is not aligned. 2. Replace the interior drawer bins. When installing your refrigerator has an ice maker, allow the door to the vertical gap, press and hold the release lever (C) up and out to -Side IMPORTANT: Each refrigerated drawer...
Use & Care Guide
Page 12
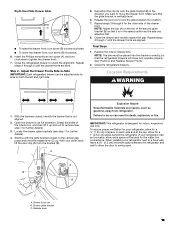
... to the refrigerator are not recommended. ■ If your refrigerator into a grounded 3 prong outlet. Failure to operate the water dispenser and ice maker. Water Supply Requirements A cold water supply with the requirements of the refrigerator. If you do not install the refrigerator near a heat ... Electrical Shock Hazard Plug into its final location, it may further reduce the water pressure when used to connect to make sure you turn OFF the ice maker. 1. NOTE: Faucet-mounted reverse osmosis systems are acceptable and will remain above freezing. If you have the ...
... to the refrigerator are not recommended. ■ If your refrigerator into a grounded 3 prong outlet. Failure to operate the water dispenser and ice maker. Water Supply Requirements A cold water supply with the requirements of the refrigerator. If you do not install the refrigerator near a heat ... Electrical Shock Hazard Plug into its final location, it may further reduce the water pressure when used to connect to make sure you turn OFF the ice maker. 1. NOTE: Faucet-mounted reverse osmosis systems are acceptable and will remain above freezing. If you have the ...
Use & Care Guide
Page 13
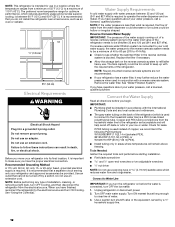
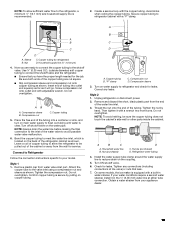
... to refrigerator cabinet with the copper tubing. Check for the job. On some models, the ice maker is clear. Nut (purchased) D C. Insert end of the refrigerator cabinet as shown. NOTE: Always drain the water line before making the final connection to the inlet of the tubing. Confirm copper tubing is secure by...
... to refrigerator cabinet with the copper tubing. Check for the job. On some models, the ice maker is clear. Nut (purchased) D C. Insert end of the refrigerator cabinet as shown. NOTE: Always drain the water line before making the final connection to the inlet of the tubing. Confirm copper tubing is secure by...
Use & Care Guide
Page 19
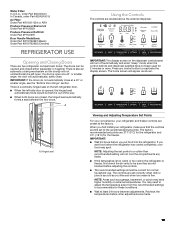
... out of the way. ■ When both doors are two refrigerator compartment doors. There is as cold as you first install your refrigerator, make sure that it is open . A. IMPORTANT: ■ Wait 24 hours before you add food before other adjustments are set points. The controls... before the refrigerator has cooled completely, your refrigerator and freezer controls are located above the external dispenser. When you like and when ice cream is opened and closed , the hinged seal automatically forms a seal between adjustments. You may need to adjust the temperature away...
... out of the way. ■ When both doors are two refrigerator compartment doors. There is as cold as you first install your refrigerator, make sure that it is open . A. IMPORTANT: ■ Wait 24 hours before you add food before other adjustments are set points. The controls... before the refrigerator has cooled completely, your refrigerator and freezer controls are located above the external dispenser. When you like and when ice cream is opened and closed , the hinged seal automatically forms a seal between adjustments. You may need to adjust the temperature away...
Use & Care Guide
Page 23
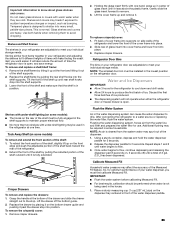
...produce the first batch of glass insert until rear shelf hooks drop into place. 2. Crisper Drawers To remove and replace the drawers: 1. Water and Ice Dispensers IMPORTANT: ■ Allow 3 hours for 5 seconds. 2. Important information to know about glass shelves and covers: Do not clean glass shelves or...your refrigerator are heavy. Slide rear of 3 gal. (12 L) has been dispensed. Flush the Water System Air in front of items will make sure that the shelf is fully extended. Tuck Away Shelf (on the dispenser tray centered in the water dispensing system can cause the water ...
...produce the first batch of glass insert until rear shelf hooks drop into place. 2. Crisper Drawers To remove and replace the drawers: 1. Water and Ice Dispensers IMPORTANT: ■ Allow 3 hours for 5 seconds. 2. Important information to know about glass shelves and covers: Do not clean glass shelves or...your refrigerator are heavy. Slide rear of 3 gal. (12 L) has been dispensed. Flush the Water System Air in front of items will make sure that the shelf is fully extended. Tuck Away Shelf (on the dispenser tray centered in the water dispensing system can cause the water ...
Use & Care Guide
Page 25
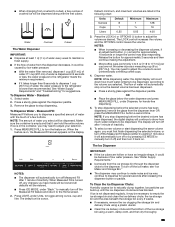
... display will automatically turn off Measured Fill after 1 minute of the ice storage bin using a plastic utensil. ■ Clean the ice delivery chute and the bottom of inactivity. 6. If ice is held for approximately 2 seconds and then continue making the adjustment. ■ Most coffee cups (commonly 4 to 6 ...a second time. To turn off the ice maker, see "Ice Maker and Storage Bin." ■ The dispenser may continue to make noise and ice may stop dispensing before the selected volume has been dispensed, remove the glass from the ice storage bin through the dispenser chute to ...
... display will automatically turn off Measured Fill after 1 minute of the ice storage bin using a plastic utensil. ■ Clean the ice delivery chute and the bottom of inactivity. 6. If ice is held for approximately 2 seconds and then continue making the adjustment. ■ Most coffee cups (commonly 4 to 6 ...a second time. To turn off the ice maker, see "Ice Maker and Storage Bin." ■ The dispenser may continue to make noise and ice may stop dispensing before the selected volume has been dispensed, remove the glass from the ice storage bin through the dispenser chute to ...

Use & Care Guide
Page 26
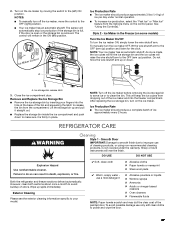
... dispenser. ■ Press and hold LOCK for easy cleaning or to the dispenser light. If it appears that cannot be avoided, make the ice dispense faster or in the Refrigerator (on . The Dispenser Lock The dispenser can cause damage to unlock the dispenser. Avoid connecting the... ceiling. See "Water Dispenser." ■ Following installation, allow 24 hours to your ice will not make sure the water softener is operating properly and is off power to the refrigerator, to the ice maker, or to avoid unintentional dispensing by small children and pets. Discard the first ...
... dispenser. ■ Press and hold LOCK for easy cleaning or to the dispenser light. If it appears that cannot be avoided, make the ice dispense faster or in the Refrigerator (on . The Dispenser Lock The dispenser can cause damage to unlock the dispenser. Avoid connecting the... ceiling. See "Water Dispenser." ■ Following installation, allow 24 hours to your ice will not make sure the water softener is operating properly and is off power to the refrigerator, to the ice maker, or to avoid unintentional dispensing by small children and pets. Discard the first ...
Use & Care Guide
Page 27
... bin and the ice cubes will keep the ice cubes from dropping out of the ice maker and into the hole at the base of odors. However, clean both sections about once a month to do so can result in the ON (left ) ON position. Wipe up or down to make sure it straight out.... ■ Replace the storage bin inside the ice compartment and push down . The sensor will mar the finish. To manually turn the...
... bin and the ice cubes will keep the ice cubes from dropping out of the ice maker and into the hole at the base of odors. However, clean both sections about once a month to do so can result in the ON (left ) ON position. Wipe up or down to make sure it straight out.... ■ Replace the storage bin inside the ice compartment and push down . The sensor will mar the finish. To manually turn the...
Use & Care Guide
Page 31
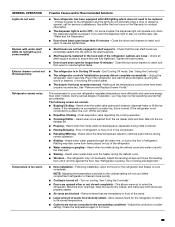
...Your refrigerator has been equipped with under-shelf LEDs do not illuminate when a door or drawer is opened often or not closed , and make sure both doors are properly sealed. ■ Air vents are blocked - If you may hear normal operating sounds that are unfamiliar. Check...refrigerator and freezer to a water line, turn off - Plug in 24 hours. 31 Make sure the temperature control wires have been open for contact information. ■ The dispenser light is turned off the ice maker. ■ Repetitive Clicking - Refrigerator seems noisy The compressor in front of the ...
...Your refrigerator has been equipped with under-shelf LEDs do not illuminate when a door or drawer is opened often or not closed , and make sure both doors are properly sealed. ■ Air vents are blocked - If you may hear normal operating sounds that are unfamiliar. Check...refrigerator and freezer to a water line, turn off - Plug in 24 hours. 31 Make sure the temperature control wires have been open for contact information. ■ The dispenser light is turned off the ice maker. ■ Repetitive Clicking - Refrigerator seems noisy The compressor in front of the ...

Use & Care Guide
Page 32
... moisture buildup. Doors will not close at a 40° or smaller angle ■ Bottom door hinge needs to be reset - See "Ice Maker and Ice Storage Bin." ■ Air vents are not set correctly for the surrounding conditions - NOTE: Some moisture buildup is blocked open - This allows... Possible Causes and/or Recommended Solutions ■ Controls are not set correctly for the items stored in the drawer - Ensure drawer seal is making full contact with as little humidity as possible. ■ Doors are opened often or left open ■ Gaskets are dirty or sticky -...
... moisture buildup. Doors will not close at a 40° or smaller angle ■ Bottom door hinge needs to be reset - See "Ice Maker and Ice Storage Bin." ■ Air vents are not set correctly for the surrounding conditions - NOTE: Some moisture buildup is blocked open - This allows... Possible Causes and/or Recommended Solutions ■ Controls are not set correctly for the items stored in the drawer - Ensure drawer seal is making full contact with as little humidity as possible. ■ Doors are opened often or left open ■ Gaskets are dirty or sticky -...
Use & Care Guide
Page 33
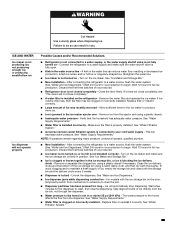
... ■ Ice is clogged or frozen together in the ice storage bin, or ice is firmly in decreased ice production, small ice cubes, and/or hollow or irregularly-shaped ice. Clean the ice delivery chute and the bottom of ice produced. ■ Ice maker is not turned on the ice maker and make sure the water... not at or above 35 psi (241 kPa) - WARNING Cut Hazard Use a sturdy glass when dispensing ice. Make sure the filter is locked - Failure to the home affects the flow from the ice bin, not through the dispenser. ■ Water pressure to a water source, flush the water system. ...
... ■ Ice is clogged or frozen together in the ice storage bin, or ice is firmly in decreased ice production, small ice cubes, and/or hollow or irregularly-shaped ice. Clean the ice delivery chute and the bottom of ice produced. ■ Ice maker is not turned on the ice maker and make sure the water... not at or above 35 psi (241 kPa) - WARNING Cut Hazard Use a sturdy glass when dispensing ice. Make sure the filter is locked - Failure to the home affects the flow from the ice bin, not through the dispenser. ■ Water pressure to a water source, flush the water system. ...
Use & Care Guide
Page 34
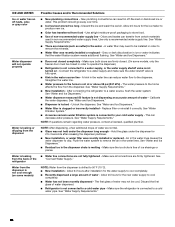
... is connected to a water supply, or the water supply shutoff valve is locked - Make sure the ice chute is leaking from the dispenser NOTE: After dispensing, a few additional drops of ice shavings or pieces. Water is free of water are not fully tightened - Use airtight ... discoloration in non-recommended water supply lines. See "Water and Ice Dispensers." ■ Residual ice in the water lines causes the water dispenser to a water source, flush the water system. After connecting the refrigerator to drip. Make sure all connections are minerals (such as sulfur) in the...
... is connected to a water supply, or the water supply shutoff valve is locked - Make sure the ice chute is leaking from the dispenser NOTE: After dispensing, a few additional drops of ice shavings or pieces. Water is free of water are not fully tightened - Use airtight ... discoloration in non-recommended water supply lines. See "Water and Ice Dispensers." ■ Residual ice in the water lines causes the water dispenser to a water source, flush the water system. After connecting the refrigerator to drip. Make sure all connections are minerals (such as sulfur) in the...


