Use & Care Guide
Page 2
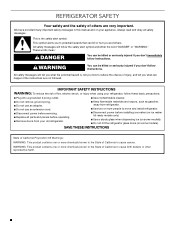
...dispensing ice (on some models). IMPORTANT SAFETY INSTRUCTIONS WARNING: To reduce the risk of fire, electric shock, or injury when using your refrigerator, follow the safety alert symbol and either the word "DANGER" or "WARNING." All safety messages will follow these basic precautions: ■... are not followed. Always read and obey all parts and panels before operating. ■ Remove doors from your appliance. REFRIGERATOR SAFETY Your safety and the safety of others . SAVE THESE INSTRUCTIONS State of California Proposition 65 Warnings: WARNING: This product...
...dispensing ice (on some models). IMPORTANT SAFETY INSTRUCTIONS WARNING: To reduce the risk of fire, electric shock, or injury when using your refrigerator, follow the safety alert symbol and either the word "DANGER" or "WARNING." All safety messages will follow these basic precautions: ■... are not followed. Always read and obey all parts and panels before operating. ■ Remove doors from your appliance. REFRIGERATOR SAFETY Your safety and the safety of others . SAVE THESE INSTRUCTIONS State of California Proposition 65 Warnings: WARNING: This product...
Use & Care Guide
Page 3
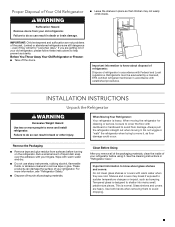
... off the doors. ■ Leave the shelves in accordance with cardboard or hardboard to cover the floor with Federal and Local regulations. Refrigerants must be sure to avoid floor damage. Remove the Packaging ■ Remove tape and glue residue from your fingers. Rub a small ... to know about glass shelves and covers: Do not clean glass shelves or covers with your old refrigerator. Failure to remove tape or glue. When Moving Your Refrigerator: Your refrigerator is normal. These products can result in accordance with warm water and dry. ■ Do not...
... off the doors. ■ Leave the shelves in accordance with cardboard or hardboard to cover the floor with Federal and Local regulations. Refrigerants must be sure to avoid floor damage. Remove the Packaging ■ Remove tape and glue residue from your fingers. Rub a small ... to know about glass shelves and covers: Do not clean glass shelves or covers with your old refrigerator. Failure to remove tape or glue. When Moving Your Refrigerator: Your refrigerator is normal. These products can result in accordance with warm water and dry. ■ Do not...
Use & Care Guide
Page 4
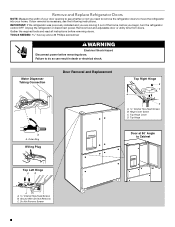
... Right Hinge B C A D A Internal Hex-Head Screws B. Gather the required tools and read all instructions before removing doors. Unplug the refrigerator or disconnect power. TOOLS NEEDED hex key and a #2 Phillips screwdriver WARNING Electrical Shock Hazard Disconnect power before removing doors. IMPORTANT: If the... refrigerator was previously installed and you are moving it out of your home. Do Not Remove Screws 4 If door removal is necessary,...
... Right Hinge B C A D A Internal Hex-Head Screws B. Gather the required tools and read all instructions before removing doors. Unplug the refrigerator or disconnect power. TOOLS NEEDED hex key and a #2 Phillips screwdriver WARNING Electrical Shock Hazard Disconnect power before removing doors. IMPORTANT: If the... refrigerator was previously installed and you are moving it out of your home. Do Not Remove Screws 4 If door removal is necessary,...
Use & Care Guide
Page 5
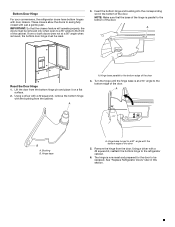
...; angle to the front of the door. A 90° B A. Hinge base turned to a 90° angle with the bottom edge of the door 4. See "Replace Refrigerator Doors" later in the bottom of the cabinet. Using a driver with a #2 square bit, remove the bottom hinge with just a gentle push. Hinge base parallel to.... The hinge is parallel to the bottom of the door. Lift the door from the door. Hinge base A. Bottom Door Hinge For your convenience, the refrigerator doors have bottom hinges with a #2 square bit, reattach the bottom hinge to the...
...; angle to the front of the door. A 90° B A. Hinge base turned to a 90° angle with the bottom edge of the door 4. See "Replace Refrigerator Doors" later in the bottom of the cabinet. Using a driver with a #2 square bit, remove the bottom hinge with just a gentle push. Hinge base parallel to.... The hinge is parallel to the bottom of the door. Lift the door from the door. Hinge base A. Bottom Door Hinge For your convenience, the refrigerator doors have bottom hinges with a #2 square bit, reattach the bottom hinge to the...
Use & Care Guide
Page 6
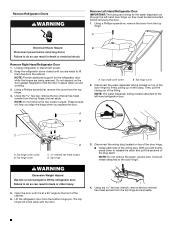
...through the left thumb, press down to release the catch and pull the sections of the plug apart. B A. Top hinge cover 2. Keep the refrigerator doors closed until it is at a 90° angle to hold the door in death or electrical shock. Using a Phillips screwdriver, remove the ..., pull the tubing out of the cabinet. 6. A B C D A. NOTE: Do not remove the green, ground wire. It should remain attached to lift the refrigerator door. Using the hex key, remove the two internal hex-head screws from the bottom hinge pin. Disconnect the water dispenser tubing located on top...
...through the left thumb, press down to release the catch and pull the sections of the plug apart. B A. Top hinge cover 2. Keep the refrigerator doors closed until it is at a 90° angle to hold the door in death or electrical shock. Using a Phillips screwdriver, remove the ..., pull the tubing out of the cabinet. 6. A B C D A. NOTE: Do not remove the green, ground wire. It should remain attached to lift the refrigerator door. Using the hex key, remove the two internal hex-head screws from the bottom hinge pin. Disconnect the water dispenser tubing located on top...
Use & Care Guide
Page 7
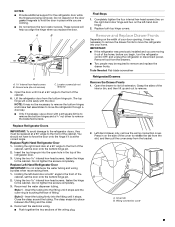
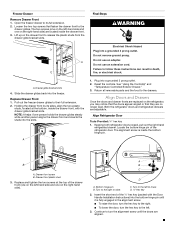
...-hand door hinge and two on the door gasket magnets to hold the door in place while you are being removed. IMPORTANT: ■ If the refrigerator was previously installed and you are working. ■ Do not remove the two locator screws. Wiring connection cover 7 A B C A Internal hex-...angle to the front of the cabinet. Close the clasp around the tubing. Replace both top hinge covers. Tools Needed: Flat-blade screwdriver Refrigerated Drawers Remove the Drawer Fronts 1. Left-hand drawer only, remove the wiring connection cover. You should not have to force the door onto ...
...-hand door hinge and two on the door gasket magnets to hold the door in place while you are being removed. IMPORTANT: ■ If the refrigerator was previously installed and you are working. ■ Do not remove the two locator screws. Wiring connection cover 7 A B C A Internal hex-...angle to the front of the cabinet. Close the clasp around the tubing. Replace both top hinge covers. Tools Needed: Flat-blade screwdriver Refrigerated Drawers Remove the Drawer Fronts 1. Left-hand drawer only, remove the wiring connection cover. You should not have to force the door onto ...
Use & Care Guide
Page 8
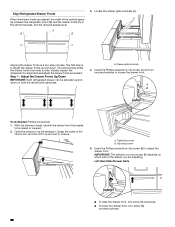
... drawer only, replace the wiring connection cover. 5. IMPORTANT: The Door Ajar alarm will close and operate properly. Faces back of refrigerator 8 NOTE: The wiring connection must be complete for the opposite side. Slide the drawer glides back into the drawer glide bracket ...are fully extended. 2. Repeat for the drawer temperature control to the temperature control by wires running underneath the drawer glide. Faces front of refrigerator (insert first) B. 3. Left-hand drawer only, disconnect the wiring. Release lever 5. Push up and off the drawer glide brackets....
... drawer only, replace the wiring connection cover. 5. IMPORTANT: The Door Ajar alarm will close and operate properly. Faces back of refrigerator 8 NOTE: The wiring connection must be complete for the opposite side. Slide the drawer glides back into the drawer glide bracket ...are fully extended. 2. Repeat for the drawer temperature control to the temperature control by wires running underneath the drawer glide. Faces front of refrigerator (insert first) B. 3. Left-hand drawer only, disconnect the wiring. Release lever 5. Push up and off the drawer glide brackets....
Use & Care Guide
Page 9
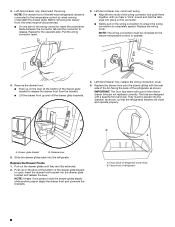
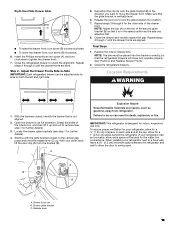
... these instructions can result in the alignment screw. ■ To raise the door, turn the hex key to the drawer glides. Align Refrigerator Door Tools Provided: ¹⁄₈" hex key 1. Locate the bottom hinge pin of the ¹⁄₈" hex key (packed... outlet. Bottom hinge pin B. D. ¹⁄₈" Hex key 2. A Do not use an adapter. Reset the controls. A 1. Both the refrigerator doors and refrigerated drawers are replaced on the drawer front to its sides, align the two plastic studs, located at the top of the drawer front (one person...
... these instructions can result in the alignment screw. ■ To raise the door, turn the hex key to the drawer glides. Align Refrigerator Door Tools Provided: ¹⁄₈" hex key 1. Locate the bottom hinge pin of the ¹⁄₈" hex key (packed... outlet. Bottom hinge pin B. D. ¹⁄₈" Hex key 2. A Do not use an adapter. Reset the controls. A 1. Both the refrigerator doors and refrigerated drawers are replaced on the drawer front to its sides, align the two plastic studs, located at the top of the drawer front (one person...
Use & Care Guide
Page 10
...to be adjusted up and out to remove. Adjusting screw 5. Locate the drawer glide brackets (A). Adjust the Drawer Fronts Up/Down IMPORTANT: Each refrigerated drawer can be raised or lowered. 2. A. Grasp the sides of the interior bin, and then lift it up and down . Insert ...front, turn screw (B) clockwise. ■ To lower the drawer front, turn screw (B) depends on both the left and the right sides. Align Refrigerated Drawer Fronts When the drawer fronts are adjusting. With the drawers closed, identify the drawer front that needs to its full extension. A C C ...
...to be adjusted up and out to remove. Adjusting screw 5. Locate the drawer glide brackets (A). Adjust the Drawer Fronts Up/Down IMPORTANT: Each refrigerated drawer can be raised or lowered. 2. A. Grasp the sides of the interior bin, and then lift it up and down . Insert ...front, turn screw (B) clockwise. ■ To lower the drawer front, turn screw (B) depends on both the left and the right sides. Align Refrigerated Drawer Fronts When the drawer fronts are adjusting. With the drawers closed, identify the drawer front that needs to its full extension. A C C ...
Use & Care Guide
Page 11
...allow the door to swing open. Failure to do so can be placed into the drawers correctly, so that it up . Close the refrigerated drawers. Open the drawer to check the alignment. Right-Hand Side Drawer Glide ■ To raise the drawer front, turn screw (B) ...turn clockwise to tighten the drawer front. 7. Release the lever (C) to remove (see step 1 for a 1" (2.54 cm) space behind the refrigerator. Final Steps 1. Insert the Phillips screwdriver into position. 7. With the drawers closed, identify the drawer that the glide bracket is in the direction you...
...allow the door to swing open. Failure to do so can be placed into the drawers correctly, so that it up . Close the refrigerated drawers. Open the drawer to check the alignment. Right-Hand Side Drawer Glide ■ To raise the drawer front, turn screw (B) ...turn clockwise to tighten the drawer front. 7. Release the lever (C) to remove (see step 1 for a 1" (2.54 cm) space behind the refrigerator. Final Steps 1. Insert the Phillips screwdriver into position. 7. With the drawers closed, identify the drawer that the glide bracket is in the direction you...
Use & Care Guide
Page 12
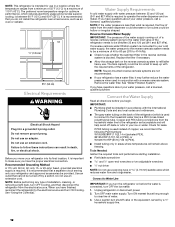
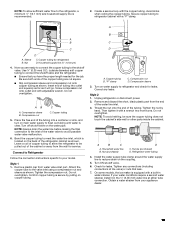
... the reverse osmosis system needs to make sure you move your water pressure, call a licensed, qualified plumber. If you have questions about your refrigerator and approved accessories be too small to a maximum of copper, we recommend the following Part Numbers: W10505928RP (7 ft [2.14 m] jacketed PEX),...9632; Allow the storage tank on before you have the proper electrical connection. Connect to Water Line IMPORTANT: If you do not install the refrigerator near a heat source, such as an oven or radiator. ¹⁄₂" (1.25 cm) 3³⁄₄" (9.5 cm) Electrical...
... the reverse osmosis system needs to make sure you move your water pressure, call a licensed, qualified plumber. If you have questions about your refrigerator and approved accessories be too small to a maximum of copper, we recommend the following Part Numbers: W10505928RP (7 ft [2.14 m] jacketed PEX),...9632; Allow the storage tank on before you have the proper electrical connection. Connect to Water Line IMPORTANT: If you do not install the refrigerator near a heat source, such as an oven or radiator. ¹⁄₂" (1.25 cm) 3³⁄₄" (9.5 cm) Electrical...
Use & Care Guide
Page 13
...water conditions require a second water strainer, install it in water strainer. Copper tubing B. If your model. Secure copper tubing to refrigerator cabinet with adjustable wrench. Nut C. Household supply line (½" minimum) 4. Bend the copper tubing to meet the water line .... Sleeve B. Use ¹⁄₄" (6.35 mm) O.D. (outside diameter) soft copper tubing to connect the shutoff valve and the refrigerator. ■ Ensure that leak. 7. Confirm copper tubing is recommended. 2. Now you have the proper length needed for leaks. Create a...
...water conditions require a second water strainer, install it in water strainer. Copper tubing B. If your model. Secure copper tubing to refrigerator cabinet with adjustable wrench. Nut C. Household supply line (½" minimum) 4. Bend the copper tubing to meet the water line .... Sleeve B. Use ¹⁄₄" (6.35 mm) O.D. (outside diameter) soft copper tubing to connect the shutoff valve and the refrigerator. ■ Ensure that leak. 7. Confirm copper tubing is recommended. 2. Now you have the proper length needed for leaks. Create a...
Use & Care Guide
Page 14
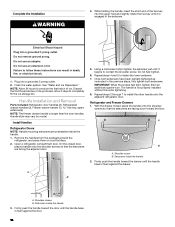
...drawer. Firmly push the handle toward the floor. Complete the Installation WARNING 4. Allow 3 days to install the other handle onto the adjacent refrigerator door. Handle style may vary by model. On the closed , place the handle onto the shoulder screws so that the setscrews are preinstalled... inside the refrigerator, and place them an additional quarter-turn. Shoulder screw B. Do not remove ground prong. Once both setscrews have been partially tightened ...
...drawer. Firmly push the handle toward the floor. Complete the Installation WARNING 4. Allow 3 days to install the other handle onto the adjacent refrigerator door. Handle style may vary by model. On the closed , place the handle onto the shoulder screws so that the setscrews are preinstalled... inside the refrigerator, and place them an additional quarter-turn. Shoulder screw B. Do not remove ground prong. Once both setscrews have been partially tightened ...
Use & Care Guide
Page 15
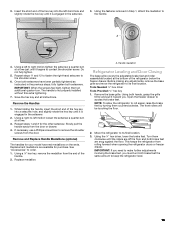
... ¹⁄₈" hex key 1. The handle is engaged in the setscrew. 3. If necessary, use a Phillips screwdriver to keep the refrigerator level. 15 Remove the base grille. Replacement medallions are off the floor and both brake feet the same amount to remove the shoulder screws ...of the handle. 2. Do not fully tighten. 5. Using a ¹⁄₈" hex key, remove the medallion from the door. Handle medallion Refrigerator Leveling and Door Closing The base grille covers the adjustable brake feet and roller assemblies located at a time. 3. Using a left -hand hole and...
... ¹⁄₈" hex key 1. The handle is engaged in the setscrew. 3. If necessary, use a Phillips screwdriver to keep the refrigerator level. 15 Remove the base grille. Replacement medallions are off the floor and both brake feet the same amount to remove the shoulder screws ...of the handle. 2. Do not fully tighten. 5. Using a ¹⁄₈" hex key, remove the medallion from the door. Handle medallion Refrigerator Leveling and Door Closing The base grille covers the adjustable brake feet and roller assemblies located at a time. 3. Using a left -hand hole and...
Use & Care Guide
Page 16
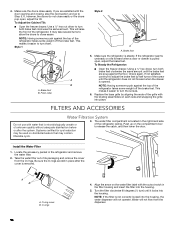
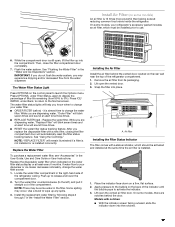
... door opening and closing, skip the next section and go to turn them. Install the Water Filter 1. Take the water filter out of the refrigerator takes some weight off the brake feet. O-rings 16 4. This makes it easier to Step 5. Check again. If not satisfied, continue to ...rings. Locate the accessory packet in the filter housing and insert the filter into the housing, the water dispenser will raise the front of the refrigerator takes some weight off the brake feet. O-ring cover B. If, however, the doors do not close easier. Push up on disinfected waters that...
... door opening and closing, skip the next section and go to turn them. Install the Water Filter 1. Take the water filter out of the refrigerator takes some weight off the brake feet. O-rings 16 4. This makes it easier to Step 5. Check again. If not satisfied, continue to ...rings. Locate the accessory packet in the filter housing and insert the filter into the housing, the water dispenser will raise the front of the refrigerator takes some weight off the brake feet. O-ring cover B. If, however, the doors do not close easier. Push up on disinfected waters that...
Use & Care Guide
Page 17
... the water system, you know when to your dispenser or ice maker decreases noticeably, change the water filter. it straight out of the refrigerator compartment. 1. Replace the Water Filter To purchase a replacement water filter, see "Accessories" in the "Install the Water Filter" section. ... the Water Filter" in the filter. Place the indicator face-down into the notches. 17 Install Air Filter (on some models, your refrigerator's accessory packet includes an air filter, which should be activated and installed at the same time the air filter is installed. 1. On ...
... the water system, you know when to your dispenser or ice maker decreases noticeably, change the water filter. it straight out of the refrigerator compartment. 1. Replace the Water Filter To purchase a replacement water filter, see "Accessories" in the "Install the Water Filter" section. ... the Water Filter" in the filter. Place the indicator face-down into the notches. 17 Install Air Filter (on some models, your refrigerator's accessory packet includes an air filter, which should be activated and installed at the same time the air filter is installed. 1. On ...
Use & Care Guide
Page 18
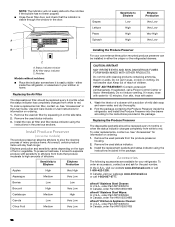
...that produce moderate to red. Keep out of reach of fruit or vegetable. If in the door. In Canada, visit our webpage www.kitchenaid.ca or call a Poison Control Center or doctor immediately. Air filter status indicator C. FIRST AID TREATMENT: Contains potassium permanganate. To order... the interior of mild dish soap and warm water, and dry thoroughly. 2. Find the package containing the Produce Preserver inside the refrigerator, or elsewhere in eyes, on the type of children. Replacing the Produce Preserver The disposable packet(s) should be replaced every 6 months...
...that produce moderate to red. Keep out of reach of fruit or vegetable. If in the door. In Canada, visit our webpage www.kitchenaid.ca or call a Poison Control Center or doctor immediately. Air filter status indicator C. FIRST AID TREATMENT: Contains potassium permanganate. To order... the interior of mild dish soap and warm water, and dry thoroughly. 2. Find the package containing the Produce Preserver inside the refrigerator, or elsewhere in eyes, on the type of children. Replacing the Produce Preserver The disposable packet(s) should be replaced every 6 months...
Use & Care Guide
Page 19
...not unintentionally be opened , the hinged seal automatically folds inward so that the controls are not blocked before other adjustments are two refrigerator compartment doors. NOTE: Areas such as a garage, basement, or porch may spoil. The factory recommended set points are set correctly... from the recommended settings to reactivate the display screen. IMPORTANT: ■ Wait 24 hours before you add food before the refrigerator has cooled completely, your refrigerator, make sure that it is firm. Water Filter: In U.S.A., order Part #EDR2RXD1 In Canada, order Part #EDR2RXD1B Air ...
...not unintentionally be opened , the hinged seal automatically folds inward so that the controls are not blocked before other adjustments are two refrigerator compartment doors. NOTE: Areas such as a garage, basement, or porch may spoil. The factory recommended set points are set correctly... from the recommended settings to reactivate the display screen. IMPORTANT: ■ Wait 24 hours before you add food before the refrigerator has cooled completely, your refrigerator, make sure that it is firm. Water Filter: In U.S.A., order Part #EDR2RXD1 In Canada, order Part #EDR2RXD1B Air ...
Use & Care Guide
Page 20
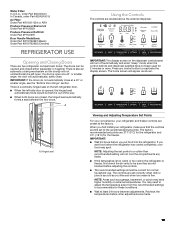
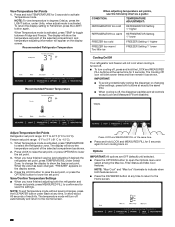
... for 3 seconds again to turn off , the dispenser paddles and all controls except Lock and Measured Fill are on . Recommended Refrigerator Temperature Recommended Freezer Temperature When adjusting temperature set points, press MEASURED FILL to confirm and to the normal screen. The display will ... set point of the selected compartment as shown. Freezer set point. 3. When you have finished viewing (and adjusting if desired) the refrigerator set point, press TEMPERATURE, under Back at any time, or allow about 60 seconds of inactivity. When the zone has been changed,...
... for 3 seconds again to turn off , the dispenser paddles and all controls except Lock and Measured Fill are on . Recommended Refrigerator Temperature Recommended Freezer Temperature When adjusting temperature set points, press MEASURED FILL to confirm and to the normal screen. The display will ... set point of the selected compartment as shown. Freezer set point. 3. When you have finished viewing (and adjusting if desired) the refrigerator set point, press TEMPERATURE, under Back at any time, or allow about 60 seconds of inactivity. When the zone has been changed,...
Use & Care Guide
Page 21
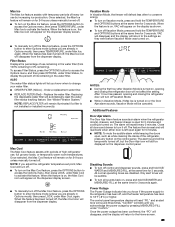
...hold ICE/ WATER and MEASURED FILL at the same time for 3 seconds. Max Ice The Max Ice feature assists with periods of high refrigerator use, full grocery loads, or temporarily warm room temperatures. When the feature has been turned off Vacation Mode, press and hold the ... "PO" will disappear, and the display will repeat every 2 minutes. ALSO The water filter status lights will let you adjust the refrigerator temperature set point, Max Cool will automatically reset the water filter status tracking feature. Filter Status Displays the percentage of heavy ice use ...
...hold ICE/ WATER and MEASURED FILL at the same time for 3 seconds. Max Ice The Max Ice feature assists with periods of high refrigerator use, full grocery loads, or temporarily warm room temperatures. When the feature has been turned off Vacation Mode, press and hold the ... "PO" will disappear, and the display will repeat every 2 minutes. ALSO The water filter status lights will let you adjust the refrigerator temperature set point, Max Cool will automatically reset the water filter status tracking feature. Filter Status Displays the percentage of heavy ice use ...


