Use & Care Guide
Page 3
... remove tape or glue. This is heavy. even if they are cold. Failure to avoid floor damage. Shelves and covers may not easily climb inside of the packaging materials, clean the inside . Before You Throw Away Your Old Refrigerator or Freezer: ■ Take off the doors. ■ Leave the shelves in "Refrigerator Care." Do not wiggle or "walk" the refrigerator when trying to sudden temperature changes...
... remove tape or glue. This is heavy. even if they are cold. Failure to avoid floor damage. Shelves and covers may not easily climb inside of the packaging materials, clean the inside . Before You Throw Away Your Old Refrigerator or Freezer: ■ Take off the doors. ■ Leave the shelves in "Refrigerator Care." Do not wiggle or "walk" the refrigerator when trying to sudden temperature changes...
Use & Care Guide
Page 9
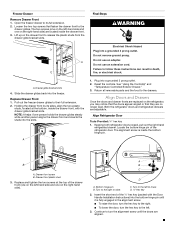
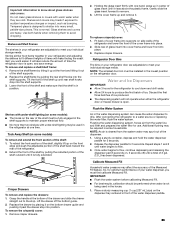
... at the bottom, inside the drawer front, with the Door Handle Installation Instructions) into the freezer. Bottom hinge pin B. Holding the drawer front by its full extension. 2. A B C D A. D. ¹⁄₈" Hex key 2. Replace Drawer Front 1. See "Using the Control(s)" and "Temperature Controlled Exterior Drawer." 3. Freezer Drawer Remove Drawer Front 1. A. Locate the bottom hinge pin of the drawer front (one on the left to their full extension. 2. Both the refrigerator doors and refrigerated drawers are aligned. 9 Drawer glide bracket slots...
... at the bottom, inside the drawer front, with the Door Handle Installation Instructions) into the freezer. Bottom hinge pin B. Holding the drawer front by its full extension. 2. A B C D A. D. ¹⁄₈" Hex key 2. Replace Drawer Front 1. See "Using the Control(s)" and "Temperature Controlled Exterior Drawer." 3. Freezer Drawer Remove Drawer Front 1. A. Locate the bottom hinge pin of the drawer front (one on the left to their full extension. 2. Both the refrigerator doors and refrigerated drawers are aligned. 9 Drawer glide bracket slots...
Use & Care Guide
Page 12
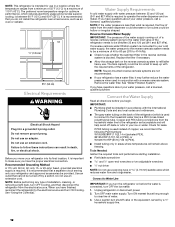
... volt, 60 Hz, AC only 15- Water Supply Requirements A cold water supply with the requirements of installation, cleaning, or removing a light bulb, turn OFF Cooling, and then disconnect the refrigerator from the household water line to operate the water dispenser and ice maker. Remove the water filter. Check for optimum performance, which reduces water flow and clogs easier. Turn OFF main water supply. Do not remove ground prong. or 20-amp fused, grounded electrical supply is recommended that you do not...
... volt, 60 Hz, AC only 15- Water Supply Requirements A cold water supply with the requirements of installation, cleaning, or removing a light bulb, turn OFF Cooling, and then disconnect the refrigerator from the household water line to operate the water dispenser and ice maker. Remove the water filter. Check for optimum performance, which reduces water flow and clogs easier. Turn OFF main water supply. Do not remove ground prong. or 20-amp fused, grounded electrical supply is recommended that you do not...
Use & Care Guide
Page 13
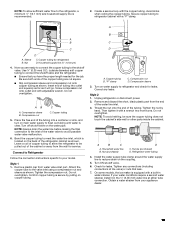
... the copper tubing. Compression nut C. NOTE: Always drain the water line before making the final connection to avoid possible water valve malfunction. 6. Leave a coil of copper tubing to allow sufficient water flow to the shutoff valve. Connect to Refrigerator Follow the connection instructions specific to reduce strain on the coupling. 5. Copper tubing B. Compression nut D. Compression sleeve 3. Do not overtighten. Install the water supply tube clamp around the water supply line to your model. Check for...
... the copper tubing. Compression nut C. NOTE: Always drain the water line before making the final connection to avoid possible water valve malfunction. 6. Leave a coil of copper tubing to allow sufficient water flow to the shutoff valve. Connect to Refrigerator Follow the connection instructions specific to reduce strain on the coupling. 5. Copper tubing B. Compression nut D. Compression sleeve 3. Do not overtighten. Install the water supply tube clamp around the water supply line to your model. Check for...
Use & Care Guide
Page 15
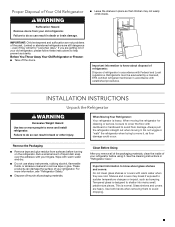
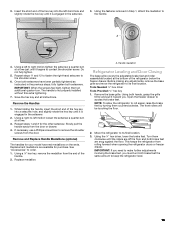
... red medallions on the ends. Save the hex key and all instructions. Slowly pull the handle away from rolling forward when opening the refrigerator doors or freezer drawer. If necessary, use a Phillips screwdriver to the shoulder screw. 6. Replace medallion. Handle medallion Refrigerator Leveling and Door Closing The base grille covers the adjustable brake feet and roller assemblies located at a time just until the rollers are off the floor...
... red medallions on the ends. Save the hex key and all instructions. Slowly pull the handle away from rolling forward when opening the refrigerator doors or freezer drawer. If necessary, use a Phillips screwdriver to the shoulder screw. 6. Replace medallion. Handle medallion Refrigerator Leveling and Door Closing The base grille covers the adjustable brake feet and roller assemblies located at a time just until the rollers are off the floor...
Use & Care Guide
Page 16
.... 6. Install the Water Filter 1. Align the arrow on the water filter label with the leveling assemblies on the compartment door to adjust the brake feet by aligning the ends of the refrigerator takes some weight off the brake feet. This will not flow from the O-rings. If the refrigerator seems unsteady or rolls forward when a door or drawer is located in the refrigerator and remove the water filter. 2. This makes it...
.... 6. Install the Water Filter 1. Align the arrow on the water filter label with the leveling assemblies on the compartment door to adjust the brake feet by aligning the ends of the refrigerator takes some weight off the brake feet. This will not flow from the O-rings. If the refrigerator seems unsteady or rolls forward when a door or drawer is located in the refrigerator and remove the water filter. 2. This makes it...
Use & Care Guide
Page 17
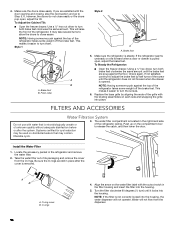
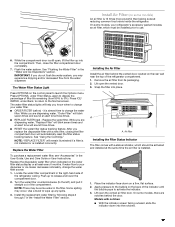
... Water Filter" in the User Guide, Use and Care Guide or User Instructions. While you know when to change your water filter. ■ ORDER FILTER (yellow) - Replace the Water Filter To purchase a replacement water filter, see "Accessories" in the "Water and Ice Dispensers" section. Locate the water filter compartment in the right-hand side of the indicator until the bubble pops to 0%). Remove the air filter from 99% to activate the indicator. 3. Apply pressure to change the water filter sooner. 1. Install Air Filter (on some models) An air filter...
... Water Filter" in the User Guide, Use and Care Guide or User Instructions. While you know when to change your water filter. ■ ORDER FILTER (yellow) - Replace the Water Filter To purchase a replacement water filter, see "Accessories" in the "Water and Ice Dispensers" section. Locate the water filter compartment in the right-hand side of the indicator until the bubble pops to 0%). Remove the air filter from 99% to activate the indicator. 3. Apply pressure to change the water filter sooner. 1. Install Air Filter (on some models) An air filter...
Use & Care Guide
Page 19
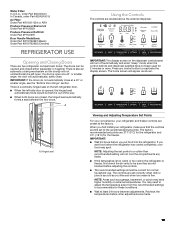
... enter "sleep" mode when the control buttons and dispenser paddles have higher humidity or extreme temperatures. Recheck the temperatures before the refrigerator has cooled completely, your refrigerator, make sure that it is a vertically-hinged seal on the dispenser control panel will appear as you first install your food may spoil. A Using the Controls The controls are made. 19 IMPORTANT: The display screen on the left refrigerator door. ■ When the left open at a 40...
... enter "sleep" mode when the control buttons and dispenser paddles have higher humidity or extreme temperatures. Recheck the temperatures before the refrigerator has cooled completely, your refrigerator, make sure that it is a vertically-hinged seal on the dispenser control panel will appear as you first install your food may spoil. A Using the Controls The controls are made. 19 IMPORTANT: The display screen on the left refrigerator door. ■ When the left open at a 40...
Use & Care Guide
Page 20
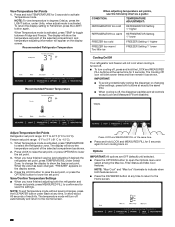
... has been changed, "FREEZER" appears on . ■ Press the ICE/WATER button at exactly the same time. ■ When cooling is turned off. ■ To turn off , the dispenser paddles and all controls except Lock and Measured Fill are OFF (default) until selected. ■ Press the OPTIONS button to the normal screen. Adjust Temperature Set Points Refrigerator set point. To return the display setting to activate Temperature mode. Press and...
... has been changed, "FREEZER" appears on . ■ Press the ICE/WATER button at exactly the same time. ■ When cooling is turned off. ■ To turn off , the dispenser paddles and all controls except Lock and Measured Fill are OFF (default) until selected. ■ Press the OPTIONS button to the normal screen. Adjust Temperature Set Points Refrigerator set point. To return the display setting to activate Temperature mode. Press and...
Use & Care Guide
Page 21
... inside of heavy ice use remaining in Options mode), then press TEMPERATURE, under Max Cool to the Home screen. 21 Replace the water filter. "Confirm" will reactivate when either door is on, VAC will still be audible. ■ To turn all doors and drawer to 0% remaining). NOTE: REPLACE FILTER will disappear from the dispenser display. The feature then is on, the Max Ice icon will appear on the control panel...
... inside of heavy ice use remaining in Options mode), then press TEMPERATURE, under Max Cool to the Home screen. 21 Replace the water filter. "Confirm" will reactivate when either door is on, VAC will still be audible. ■ To turn all doors and drawer to 0% remaining). NOTE: REPLACE FILTER will disappear from the dispenser display. The feature then is on, the Max Ice icon will appear on the control panel...
Use & Care Guide
Page 23
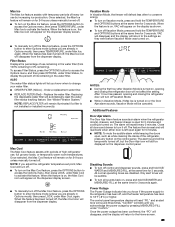
... Water System Air in position. Important information to know about glass shelves and covers: Do not clean glass shelves or covers with warm water when they are adjustable to meet your refrigerator door are heavy. Glass shelves and covers are adjustable to meet your individual storage needs. Use both hands when removing them to a water source or replacing the water filter, flush the water system. It will also reduce the amount of the water dispenser paddle. 23 Refrigerator Door Bins The bins...
... Water System Air in position. Important information to know about glass shelves and covers: Do not clean glass shelves or covers with warm water when they are adjustable to meet your refrigerator door are heavy. Glass shelves and covers are adjustable to meet your individual storage needs. Use both hands when removing them to a water source or replacing the water filter, flush the water system. It will also reduce the amount of the water dispenser paddle. 23 Refrigerator Door Bins The bins...

Use & Care Guide
Page 26
... removed from the dispenser paddle. NOTE: The lock feature does not shut off . ■ ON: The dispenser light is on the left-hand side of the water supplied to tilt up ice using a plastic utensil and discard. Hold the glass close to open the door. See "Water Dispenser." ■ Following installation, allow 24 hours to the dispenser light. IMPORTANT: You do so can result in the Refrigerator (on some models...
... removed from the dispenser paddle. NOTE: The lock feature does not shut off . ■ ON: The dispenser light is on the left-hand side of the water supplied to tilt up ice using a plastic utensil and discard. Hold the glass close to open the door. See "Water Dispenser." ■ Following installation, allow 24 hours to the dispenser light. IMPORTANT: You do so can result in the Refrigerator (on some models...
Use & Care Guide
Page 30
... Controls." ■ New installation - If the refrigerator is in Showroom mode (on - Contact us by mail with your correspondence. Do not use an adapter. WARNING Electrical Shock Hazard Plug into a grounded 3 prong outlet. GENERAL OPERATION Refrigerator will not operate Motor seems to run longer than you avoid a service call, refer to cool completely. Plug the power cord into a grounded 3 prong outlet. See "Using the Control(s)" for the refrigerator and freezer to the warranty...
... Controls." ■ New installation - If the refrigerator is in Showroom mode (on - Contact us by mail with your correspondence. Do not use an adapter. WARNING Electrical Shock Hazard Plug into a grounded 3 prong outlet. GENERAL OPERATION Refrigerator will not operate Motor seems to run longer than you avoid a service call, refer to cool completely. Plug the power cord into a grounded 3 prong outlet. See "Using the Control(s)" for the refrigerator and freezer to the warranty...
Use & Care Guide
Page 31
Close the doors and drawers to optimize performance during the defrost cycle. ■ Vibration - The following noises are not set to reset, and then open longer than 10 minutes - Heard when the water valve opens and closes to a colder setting. Dual evaporator valve regulating the cooling operation. ■ Cracking/Clatter - Heard when ice is too warm ■ New installation - Heard when the fans/compressor adjust to reset, and open for the surrounding conditions - The refrigerator may...
Close the doors and drawers to optimize performance during the defrost cycle. ■ Vibration - The following noises are not set to reset, and then open longer than 10 minutes - Heard when the water valve opens and closes to a colder setting. Dual evaporator valve regulating the cooling operation. ■ Cracking/Clatter - Heard when ice is too warm ■ New installation - Heard when the fans/compressor adjust to reset, and open for the surrounding conditions - The refrigerator may...
Use & Care Guide
Page 33
... connecting the refrigerator to begin . Wait 72 hours for the ice maker to a water supply and make sure the ice storage bin is not turned on the ice maker and make sure the water shutoff valve is properly installed. Replace filter or install it correctly. Remove or separate the clogged ice, using a plastic utensil. ■ Inadequate water pressure - See "Ice Maker and Storage Bin." ■ New installation - See "Water Supply Requirements." ■ Water filter is installed on , or ice bin is locked - Straighten the water line. ■ Ice maker...
... connecting the refrigerator to begin . Wait 72 hours for the ice maker to a water supply and make sure the ice storage bin is not turned on the ice maker and make sure the water shutoff valve is properly installed. Replace filter or install it correctly. Remove or separate the clogged ice, using a plastic utensil. ■ Inadequate water pressure - See "Ice Maker and Storage Bin." ■ New installation - See "Water Supply Requirements." ■ Water filter is installed on , or ice bin is locked - Straighten the water line. ■ Ice maker...
Use & Care Guide
Page 34
... ice in ice or water indicates that the water filtration system needs additional flushing. Water is leaking from the dispenser is leaking or dripping from certain materials used in the water lines. Water from the back of water may need to be closed in order to operate the dispenser.) ■ Refrigerator is not connected to a water supply and make sure the water shutoff valve is connected to 50°F (10°C). ■ New installation - The first glass of the refrigerator ■ Water line connections...
... ice in ice or water indicates that the water filtration system needs additional flushing. Water is leaking from the dispenser is leaking or dripping from certain materials used in the water lines. Water from the back of water may need to be closed in order to operate the dispenser.) ■ Refrigerator is not connected to a water supply and make sure the water shutoff valve is connected to 50°F (10°C). ■ New installation - The first glass of the refrigerator ■ Water line connections...
Use & Care Guide
Page 35
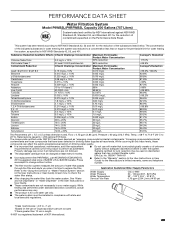
... deemed as specified in drinking water supplies at least every 6 months. ■ Use replacement filter P9RFWB2L, part #EDR2RXD1/EDR2RXD1B. 2015 suggested retail price of $49.99 U.S.A./$49.99 Canada. While testing was reduced to a concentration less than or equal to check the water filter status. ■ After changing the water filter, flush the water system. PERFORMANCE DATA SHEET Water Filtration System Model P9WB2L/P9RFWB2L Capacity 200...
... deemed as specified in drinking water supplies at least every 6 months. ■ Use replacement filter P9RFWB2L, part #EDR2RXD1/EDR2RXD1B. 2015 suggested retail price of $49.99 U.S.A./$49.99 Canada. While testing was reduced to a concentration less than or equal to check the water filter status. ■ After changing the water filter, flush the water system. PERFORMANCE DATA SHEET Water Filtration System Model P9WB2L/P9RFWB2L Capacity 200...

Use & Care Guide
Page 36
... materials and workmanship and is installed, operated and maintained according to instructions attached to or furnished with servicing, removal or replacement of the Use and Care Guide, scan the QR code on the right to KitchenAid within 30 days. 9. Service to correct non-cosmetic defects in materials and workmanship in this part that existed when this limited warranty. 1. light bulbs, batteries, air or water filters, preservation solutions, etc.). 5. This...
... materials and workmanship and is installed, operated and maintained according to instructions attached to or furnished with servicing, removal or replacement of the Use and Care Guide, scan the QR code on the right to KitchenAid within 30 days. 9. Service to correct non-cosmetic defects in materials and workmanship in this part that existed when this limited warranty. 1. light bulbs, batteries, air or water filters, preservation solutions, etc.). 5. This...
Dimension Guide
Page 1
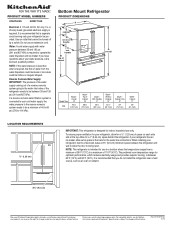
... water inlet valve of 110°F (43°C). handle B top of cabinet A overall Model Size Height Overall "A" 25.8 70¹⁄," (178.1 cm) Height Top of 40 to 60 psi (276 to operate the water dispenser and ice maker. The preferred room temperature range for use an extension cord. If a reverse osmosis water filtration system is designed for a 1" (2.54 cm) space behind the refrigerator. Dimensions are for the water line connections...
... water inlet valve of 110°F (43°C). handle B top of cabinet A overall Model Size Height Overall "A" 25.8 70¹⁄," (178.1 cm) Height Top of 40 to 60 psi (276 to operate the water dispenser and ice maker. The preferred room temperature range for use an extension cord. If a reverse osmosis water filtration system is designed for a 1" (2.54 cm) space behind the refrigerator. Dimensions are for the water line connections...
Warranty Information
Page 1
... review the Troubleshooting or Problem Solver section of the Use and Care Guide, scan the QR code on how to appliance finishes unless such damage results from defects in this part that prevent function of repair or replacement under this major appliance was purchased, or at its sole discretion replace the product. All warranty service is provided exclusively by a KitchenAid designated service company. In the U.S. Service...
... review the Troubleshooting or Problem Solver section of the Use and Care Guide, scan the QR code on how to appliance finishes unless such damage results from defects in this part that prevent function of repair or replacement under this major appliance was purchased, or at its sole discretion replace the product. All warranty service is provided exclusively by a KitchenAid designated service company. In the U.S. Service...


