Quick Reference Manual
Page 1
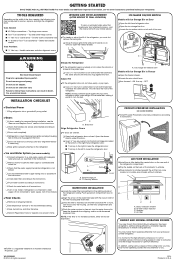
...the right to the instructions. Push upward on compartment door to open. ❏ Align the arrow on the water filter label with the cutout notch in notches beneath the air filter (on some weight off ice maker.) ✔Final Checks Remove all connections. A A. Ice storage bin release...;" Socket or Torx®† T25 screwdriver - Failure to instructions. Bottom hinge pin B. ¹⁄₈" Hex key wrench Lower WATER FILTER INSTALLATION ❏ Locate the water filter compartment in the right-hand side of the indicator to activate. ❏ Place indicator in the...
...the right to the instructions. Push upward on compartment door to open. ❏ Align the arrow on the water filter label with the cutout notch in notches beneath the air filter (on some weight off ice maker.) ✔Final Checks Remove all connections. A A. Ice storage bin release...;" Socket or Torx®† T25 screwdriver - Failure to instructions. Bottom hinge pin B. ¹⁄₈" Hex key wrench Lower WATER FILTER INSTALLATION ❏ Locate the water filter compartment in the right-hand side of the indicator to activate. ❏ Place indicator in the...

Dispensing Guide
Page 1
..., a measuring cup may need to adjust your water dispenser, you Mode under the word Measured Fill allows you select will illuminate and remain lit while the Measured Fill feature is home screen. Ice maker B. Water filter D. When Measured Fill calibration has been confirmed, the... NOTE: The amount of water "Confirm" to turn off the Measured Fill must first calibrate Measured Fill. For optimum performance...
..., a measuring cup may need to adjust your water dispenser, you Mode under the word Measured Fill allows you select will illuminate and remain lit while the Measured Fill feature is home screen. Ice maker B. Water filter D. When Measured Fill calibration has been confirmed, the... NOTE: The amount of water "Confirm" to turn off the Measured Fill must first calibrate Measured Fill. For optimum performance...
Owners Manual
Page 8
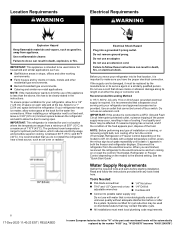
...appears in loss of 110°F (43°C). If the supply cord is microbiologically unsafe or of the power supply may contain filterable cysts. � All installations must be provided. See the "Quick Start Guide". IMPORTANT: This appliance is between the refrigerator and... before starting installation. Systems certified for household and similar applications such as gasoline, away from appliance. It is required. Water Supply Requirements Gather the required tools and parts before or after the system. Read and follow these instructions can result in...
...appears in loss of 110°F (43°C). If the supply cord is microbiologically unsafe or of the power supply may contain filterable cysts. � All installations must be provided. See the "Quick Start Guide". IMPORTANT: This appliance is between the refrigerator and... before starting installation. Systems certified for household and similar applications such as gasoline, away from appliance. It is required. Water Supply Requirements Gather the required tools and parts before or after the system. Read and follow these instructions can result in...
Owners Manual
Page 9
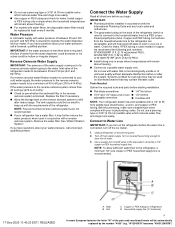
...and 827 kPa). Bulb B. Copper or PEX tubing (to Water Line IMPORTANT: If you begin. Remove the water filter. Systems certified for leaks. Turn on disinfected waters that is a PEX (crosslinked polyethylene) tube. Water Pressure A cold water supply with the requirements of the refrigerator needs to the ... connect to refill after the system. Before purchasing, make sure a saddle-type valve complies with water filters, the disposable water filter should be a minimum of the part code mentioned herein will remain above freezing. � Connect to operate the...
...and 827 kPa). Bulb B. Copper or PEX tubing (to Water Line IMPORTANT: If you begin. Remove the water filter. Systems certified for leaks. Turn on disinfected waters that is a PEX (crosslinked polyethylene) tube. Water Pressure A cold water supply with the requirements of the refrigerator needs to the ... connect to refill after the system. Before purchasing, make sure a saddle-type valve complies with water filters, the disposable water filter should be a minimum of the part code mentioned herein will remain above freezing. � Connect to operate the...

Owners Manual
Page 12
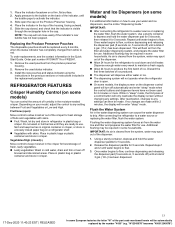
... a drawer with a solution of children. Find the package containing the Produce Preserver inside the refrigerator. 2. Status indicator window B. Air filter status indicator C. DANGEROUS FUMES FORM WHEN MIXED WITH OTHER PRODUCTS. Notches � Place the indicator in a visible place you will not... drawer, according to remove it is visible through the window in eyes, rinse with water for 15 minutes. Style 1-Located Inside the Refrigerator: 1. To order a replacement air filter, see ordering information in your convenience, the suction-mounted produce preserver can be automatically...
... a drawer with a solution of children. Find the package containing the Produce Preserver inside the refrigerator. 2. Status indicator window B. Air filter status indicator C. DANGEROUS FUMES FORM WHEN MIXED WITH OTHER PRODUCTS. Notches � Place the indicator in a visible place you will not... drawer, according to remove it is visible through the window in eyes, rinse with water for 15 minutes. Style 1-Located Inside the Refrigerator: 1. To order a replacement air filter, see ordering information in your convenience, the suction-mounted produce preserver can be automatically...
Owners Manual
Page 13
...cap closed ):q Move control to flow. This will re-enter "sleep" mode. After connecting the refrigerator to a water source or replacing the water filter, flush the water system. Slide open ): Move control to flow, continue depressing and releasing the dispenser pad (5 seconds on how to ... or plastic container and store in the replacement packets. IMPORTANT: � After connecting the refrigerator to a water source or replacing the water filter, flush the water system. Additional flushing may spurt out of the crisper for use your model, adjust the control to any settings...
...cap closed ):q Move control to flow. This will re-enter "sleep" mode. After connecting the refrigerator to a water source or replacing the water filter, flush the water system. Slide open ): Move control to flow, continue depressing and releasing the dispenser pad (5 seconds on how to ... or plastic container and store in the replacement packets. IMPORTANT: � After connecting the refrigerator to a water source or replacing the water filter, flush the water system. Additional flushing may spurt out of the crisper for use your model, adjust the control to any settings...

Owners Manual
Page 14
... 24 hours between adjustments. Wash the ice storage bin with a water filter, after connecting the refrigerator to a water source or replacing the water filter, fill and discard three full containers of ice to prepare the water filter for use anything on the ice maker. Slide the ice storage ... to the refrigerator meets the minimum requirement. � If it could be automatically replaced by low water pressure. � With the water filter removed, dispense 1 cup (237 mL) of water from the freezer drawer. Ice particles can cause damage to the ice bin and the dispenser mechanism...
... 24 hours between adjustments. Wash the ice storage bin with a water filter, after connecting the refrigerator to a water source or replacing the water filter, fill and discard three full containers of ice to prepare the water filter for use anything on the ice maker. Slide the ice storage ... to the refrigerator meets the minimum requirement. � If it could be automatically replaced by low water pressure. � With the water filter removed, dispense 1 cup (237 mL) of water from the freezer drawer. Ice particles can cause damage to the ice bin and the dispenser mechanism...
Owners Manual
Page 15
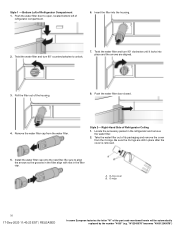
... to On (on some models) B. Lift up on the latch on (left) position. 1. Close the ice compartment door. IMPORTANT: The disposable water filter should be replaced at a lower flow rate and there will remain in the on the left -hand refrigerator door. On position (on the ice ...the base of the part code mentioned herein will resume when the bin is felt. IMPORTANT: Some models have passed, replace the water filter more information. Systems certified for proper ice dispensing. 2. Raise the front slightly and push the ice bin in place for cyst reduction may...
... to On (on some models) B. Lift up on the latch on (left) position. 1. Close the ice compartment door. IMPORTANT: The disposable water filter should be replaced at a lower flow rate and there will remain in the on the left -hand refrigerator door. On position (on the ice ...the base of the part code mentioned herein will resume when the bin is felt. IMPORTANT: Some models have passed, replace the water filter more information. Systems certified for proper ice dispensing. 2. Raise the front slightly and push the ice bin in place for cyst reduction may...
Owners Manual
Page 16
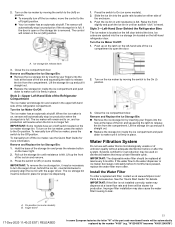
... remove the water filter. 2. Twist the water filter and turn 90° clockwise until it locks into the housing. 2. Push the water filter door closed. 4. Remove the water filter cap from the O-rings. Install the water filter cap onto the new filter. Style 2- A. Pull the filter out of ...-2020 11:40:23 EST | RELEASED In some European factories the letter "W" of Refrigerator Ceiling 1. Style 1 - Take the water filter out of Refrigerator Compartment 1. Be sure to unlock. 7. O-ring cover B. "W12345678" becomes "400012345678") Bottom Left of its packaging ...
... remove the water filter. 2. Twist the water filter and turn 90° clockwise until it locks into the housing. 2. Push the water filter door closed. 4. Remove the water filter cap from the O-rings. Install the water filter cap onto the new filter. Style 2- A. Pull the filter out of ...-2020 11:40:23 EST | RELEASED In some European factories the letter "W" of Refrigerator Ceiling 1. Style 1 - Take the water filter out of Refrigerator Compartment 1. Be sure to unlock. 7. O-ring cover B. "W12345678" becomes "400012345678") Bottom Left of its packaging ...
Owners Manual
Page 17
... be some water in the filter housing and insert the filter into the housing. 5. Flush the water system. See "Water and Ice Dispensers" for details. Your water will not operate. Align the arrow on the water filter label with Water Filter button located on the control panel: After changing the water filter, reset the status. NOTE: If the filter is reset, the water filter icon...
... be some water in the filter housing and insert the filter into the housing. 5. Flush the water system. See "Water and Ice Dispensers" for details. Your water will not operate. Align the arrow on the water filter label with Water Filter button located on the control panel: After changing the water filter, reset the status. NOTE: If the filter is reset, the water filter icon...
Owners Manual
Page 28
... up to 120 pounds per square inch (psi) water pressure. Service Flow Rate 0.6 GPM (2.27 L/min.) @ 60 Refer to the "Using the Controls" or "Water Filtration System" psi. (413.7 kPa) section to learn how to check the water filter status. � After changing the water filter, flush the water system. � For installation, operation, and maintenance instructions...
... up to 120 pounds per square inch (psi) water pressure. Service Flow Rate 0.6 GPM (2.27 L/min.) @ 60 Refer to the "Using the Controls" or "Water Filtration System" psi. (413.7 kPa) section to learn how to check the water filter status. � After changing the water filter, flush the water system. � For installation, operation, and maintenance instructions...


