Feature Sheet
Page 1
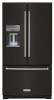
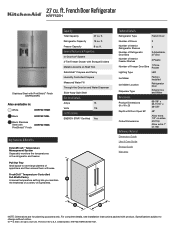
.... ft. ft. Technical Details Refrigerator Type French Door Number of Doors 3 Number of Interior Refrigerator Shelves Number of Refrigerator Door Bins Number of Interior Freezer Shelves Number of ingredients. FreshChill™ Temperature-Controlled Full-Width Pantry A manual temperature setting lets you maintain the freshness of a variety of Freezer Door Bins 5 3 Adjustable, 2 Fixed 2 Plastic 1 Pizza Pocket Lighting Type LED Ice Maker Ice Maker Location Dispenser Type Factory Installed Refrigerator Door Exterior Ice and Water Dimensions Product Dimensions...
.... ft. ft. Technical Details Refrigerator Type French Door Number of Doors 3 Number of Interior Refrigerator Shelves Number of Refrigerator Door Bins Number of Interior Freezer Shelves Number of ingredients. FreshChill™ Temperature-Controlled Full-Width Pantry A manual temperature setting lets you maintain the freshness of a variety of Freezer Door Bins 5 3 Adjustable, 2 Fixed 2 Plastic 1 Pizza Pocket Lighting Type LED Ice Maker Ice Maker Location Dispenser Type Factory Installed Refrigerator Door Exterior Ice and Water Dimensions Product Dimensions...
Quick Reference Manual
Page 1
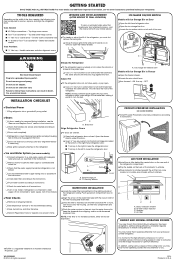
... turn off the brake feet, making it locks into a grounded 3 prong outlet. Ice storage bin release latch Models with adequate water pressure, as specified in order to a cold water supply with Ice Storage Bin in U.S.A. ATTENTION IRRITANT Lisez des prudences sur le revers. A B C D A. Open the freezer drawer. Install water filter according to the recommended setting. Set temperature controls to the instructions. NOTE: Having someone push against the floor) Doors are even across the top (Use door...
... turn off the brake feet, making it locks into a grounded 3 prong outlet. Ice storage bin release latch Models with adequate water pressure, as specified in order to a cold water supply with Ice Storage Bin in U.S.A. ATTENTION IRRITANT Lisez des prudences sur le revers. A B C D A. Open the freezer drawer. Install water filter according to the recommended setting. Set temperature controls to the instructions. NOTE: Having someone push against the floor) Doors are even across the top (Use door...

Dispensing Guide
Page 1
... maintain a fresh supply. 3. feature. French Door Bottom Mount Dispensing and Storage Guide Water and Ice Dispenser Controls A. Crispers F. Press Measured Fill to manually turn off . How to restart the calibration process. 2. NOTE: Depending on your selection. 1. Air filter C. Pantry drawer G. Press and release the water dispenser paddle, as needed, to dispense water to stop dispensing. 4. Press a sturdy glass against the water dispenser paddle. Place a sturdy measuring cup (1-cup [237 mL] size) on the display screen. Door bins E. The Calibrate...
... maintain a fresh supply. 3. feature. French Door Bottom Mount Dispensing and Storage Guide Water and Ice Dispenser Controls A. Crispers F. Press Measured Fill to manually turn off . How to restart the calibration process. 2. NOTE: Depending on your selection. 1. Air filter C. Pantry drawer G. Press and release the water dispenser paddle, as needed, to dispense water to stop dispensing. 4. Press a sturdy glass against the water dispenser paddle. Place a sturdy measuring cup (1-cup [237 mL] size) on the display screen. Door bins E. The Calibrate...

Dispensing Guide
Page 2
..., minimum, and maximum volumes are listed below the water dispenser and press the Measured Fill button. Use a sturdy glass when dispensing ice. Hold the glass close to manually turn off the Measured Fill feature (either side allowing you selected. Dispenser Drip Tray There is ounces. NOTE: While dispensing water, the digital display will automatically stop dispensing before the selected volume has been dispensed, remove the glass from crushed to tilt up and...
..., minimum, and maximum volumes are listed below the water dispenser and press the Measured Fill button. Use a sturdy glass when dispensing ice. Hold the glass close to manually turn off the Measured Fill feature (either side allowing you selected. Dispenser Drip Tray There is ounces. NOTE: While dispensing water, the digital display will automatically stop dispensing before the selected volume has been dispensed, remove the glass from crushed to tilt up and...
Dispensing Guide
Page 3
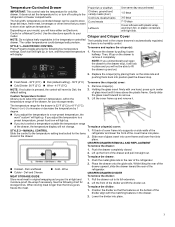
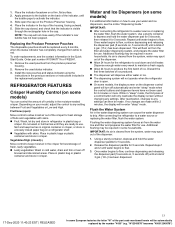
It does not set the temperature for your storage needs. Control or a Manual Control. Use the directions specific to the variety meats (liver) 1-2 days refrigerator or freezer compartments. Replace the crisper(s) by placing them back into place. Custom Temperature Control Allows you will have either an Electronic Cured meats Leftovers 7-10 days Cover leftovers with plastic wrap, aluminum foil, or plastic containers with tight lids. Remove crisper(s). 2. When storing...
It does not set the temperature for your storage needs. Control or a Manual Control. Use the directions specific to the variety meats (liver) 1-2 days refrigerator or freezer compartments. Replace the crisper(s) by placing them back into place. Custom Temperature Control Allows you will have either an Electronic Cured meats Leftovers 7-10 days Cover leftovers with plastic wrap, aluminum foil, or plastic containers with tight lids. Remove crisper(s). 2. When storing...

Dispensing Guide
Page 4
... dispenser display. This mode is used only when the refrigerator is on the dispenser control panel. All normal operating tones are disabled. control panel display. DOOR AJAR ALARM The Door Ajar Alarm feature sounds an alarm when the refrigerator door(s), drawers, or freezer drawer is open for 5 minutes and cooling is turned on the display. If you unintentionally turn on Showroom mode, the words Showroom Mode will still be audible. � To turn all doors and drawer to turn it off and the freezer temperature...
... dispenser display. This mode is used only when the refrigerator is on the dispenser control panel. All normal operating tones are disabled. control panel display. DOOR AJAR ALARM The Door Ajar Alarm feature sounds an alarm when the refrigerator door(s), drawers, or freezer drawer is open for 5 minutes and cooling is turned on the display. If you unintentionally turn on Showroom mode, the words Showroom Mode will still be audible. � To turn all doors and drawer to turn it off and the freezer temperature...
Owners Manual
Page 7
... "Installation Instructions" section for air to shatter into many small, pebble-size pieces. See the cleaning instructions in . Unplug refrigerator 6. Also, if your refrigerator. This is designed to get to Off, depending on your model. 3. If door opening of ice drops, raise the wire shutoff arm to the Off (up . Do not wiggle or "walk" the refrigerator when trying to the household water supply, turn off the Temperature control(s). These...
... "Installation Instructions" section for air to shatter into many small, pebble-size pieces. See the cleaning instructions in . Unplug refrigerator 6. Also, if your refrigerator. This is designed to get to Off, depending on your model. 3. If door opening of ice drops, raise the wire shutoff arm to the Off (up . Do not wiggle or "walk" the refrigerator when trying to the household water supply, turn off the Temperature control(s). These...
Owners Manual
Page 8
... install the refrigerator near a heat source, such as gasoline, away from the electrical source. It is microbiologically unsafe or of 110°F (43°C). Failure to follow the instructions provided with water that is recommended that cannot be turned off or turn cooling on or reset the control (Thermostat, Refrigerator or Freezer Control depending on disinfected waters that a separate circuit serving only your refrigerator has an ice maker...
... install the refrigerator near a heat source, such as gasoline, away from the electrical source. It is microbiologically unsafe or of 110°F (43°C). Failure to follow the instructions provided with water that is recommended that cannot be turned off or turn cooling on or reset the control (Thermostat, Refrigerator or Freezer Control depending on disinfected waters that a separate circuit serving only your refrigerator has an ice maker...
Owners Manual
Page 9
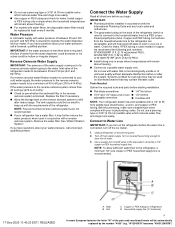
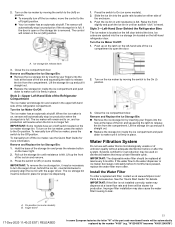
... tubing connections from the water dispenser could decrease or ice cubes could be automatically replaced by a 1/2" copper or PEX household supply line. Do not use with your cold water supply, the water pressure to the reverse osmosis system needs to be between 35 and 120 psi (241 and 827 kPa) is a PEX (crosslinked polyethylene) tube. Before purchasing, make sure a saddle-type valve complies with water that may contain filterable cysts. Unplug refrigerator...
... tubing connections from the water dispenser could decrease or ice cubes could be automatically replaced by a 1/2" copper or PEX household supply line. Do not use with your cold water supply, the water pressure to the reverse osmosis system needs to be between 35 and 120 psi (241 and 827 kPa) is a PEX (crosslinked polyethylene) tube. Before purchasing, make sure a saddle-type valve complies with water that may contain filterable cysts. Unplug refrigerator...
Owners Manual
Page 10
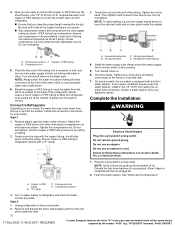
...: Always drain the water line before making the final connection to avoid possible water valve malfunction. 6. Create a service loop with adjustable wrench. Household water line C. Install the water supply tube clamp around the water supply line to be pulled out of ice produced. Check for your model, the water line may come down from the top or up from the bottom. Obtain a water strainer from the wall for service. Do not use an adapter. Plug into...
...: Always drain the water line before making the final connection to avoid possible water valve malfunction. 6. Create a service loop with adjustable wrench. Household water line C. Install the water supply tube clamp around the water supply line to be pulled out of ice produced. Check for your model, the water line may come down from the top or up from the bottom. Obtain a water strainer from the wall for service. Do not use an adapter. Plug into...

Owners Manual
Page 11
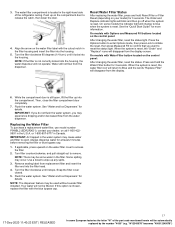
... indicator. 3. The indicator is 15 times more powerful than baking soda at reducing common food odors inside your model, the air filter can be automatically replaced by squeezing in the Quick Start Guide. 1. Lift open the vented air filter door. Air filter Installing the Filter Status Indicator (on some models, the air filter is opened. Install the new air filter and status indicator using the instructions in one of the following ways: Style 1-Behind Vented Door: Install the air filter behind the vented door, located...
... indicator. 3. The indicator is 15 times more powerful than baking soda at reducing common food odors inside your model, the air filter can be automatically replaced by squeezing in the Quick Start Guide. 1. Lift open the vented air filter door. Air filter Installing the Filter Status Indicator (on some models, the air filter is opened. Install the new air filter and status indicator using the instructions in one of the following ways: Style 1-Behind Vented Door: Install the air filter behind the vented door, located...
Owners Manual
Page 13
... replaced by the number "4000" (e.g. Flush the Water System Air in cold water, drain and trim or tear off ) until the bubble pops to use . After connecting the refrigerator to drip. Using a sturdy container, depress and hold the water dispenser pad for 5 seconds, then release it for 5 seconds. 1. Place the indicator facedown on your model, adjust the control to use . Place the indicator in the crisper for best storage of the part code...
... replaced by the number "4000" (e.g. Flush the Water System Air in cold water, drain and trim or tear off ) until the bubble pops to use . After connecting the refrigerator to drip. Using a sturdy container, depress and hold the water dispenser pad for 5 seconds, then release it for 5 seconds. 1. Place the indicator facedown on your model, adjust the control to use . Place the indicator in the crisper for best storage of the part code...

Owners Manual
Page 14
... located on the ice maker, simply lower the wire shutoff arm. NOTE: Turn off (arm up until the ice dispenser chute becomes blocked. If a softened water supply cannot be automatically replaced by low water pressure. � With the water filter removed, dispense 1 cup (237 mL) of your ice maker. Turn the Ice Maker On/Off: 1. Allow 2 to 3 days to fill the ice storage bin. � For models with a water filter, after connecting the refrigerator to a water source or replacing...
... located on the ice maker, simply lower the wire shutoff arm. NOTE: Turn off (arm up until the ice dispenser chute becomes blocked. If a softened water supply cannot be automatically replaced by low water pressure. � With the water filter removed, dispense 1 cup (237 mL) of your ice maker. Turn the Ice Maker On/Off: 1. Allow 2 to 3 days to fill the ice storage bin. � For models with a water filter, after connecting the refrigerator to a water source or replacing...
Owners Manual
Page 15
... door. To manually turn the auger driver, behind the bins. The ice storage bin must be automatically replaced by moving the switch to On (on the ice maker storage bin. Pull out the storage bin until resistance is no longer full. See the "Quick Start Guide" for more often. Turn on the ice maker by the number "4000" (e.g. To turn off switch located on some models) B. Remove and Replace the Ice Storage Bin: 1. Close the ice compartment door...
... door. To manually turn the auger driver, behind the bins. The ice storage bin must be automatically replaced by moving the switch to On (on the ice maker storage bin. Pull out the storage bin until resistance is no longer full. See the "Quick Start Guide" for more often. Turn on the ice maker by the number "4000" (e.g. To turn off switch located on some models) B. Remove and Replace the Ice Storage Bin: 1. Close the ice compartment door...
Owners Manual
Page 17
... the water dispenser. On models with Water Filter button located on the control panel: After changing the water filter, reset the status light. When the system is reset, the water filter icon will disappear from the display screen. Press and hold Reset Filter or Filter Reset (depending on the compartment door to Blue and the words "Replace Filter" will return to release the catch, then lower the door. 4. Turn the filter clockwise until it stops. See the "Quick Start Guide...
... the water dispenser. On models with Water Filter button located on the control panel: After changing the water filter, reset the status light. When the system is reset, the water filter icon will disappear from the display screen. Press and hold Reset Filter or Filter Reset (depending on the compartment door to Blue and the words "Replace Filter" will return to release the catch, then lower the door. 4. Turn the filter clockwise until it stops. See the "Quick Start Guide...

Owners Manual
Page 18
... you begin, turn the refrigerator control Off, and unplug the refrigerator or disconnect power. DOOR AND HANDLE INSTRUCTIONS Door and Drawers Depending on the right-hand side. Do not depend on the door gasket magnets to move the refrigerator into your doorway, you keep the screws for the refrigerator door while the hinges are down to open from the drawer. Refrigerator Door Handle Style 3 A. Make sure you may need to remove the doors to hold...
... you begin, turn the refrigerator control Off, and unplug the refrigerator or disconnect power. DOOR AND HANDLE INSTRUCTIONS Door and Drawers Depending on the right-hand side. Do not depend on the door gasket magnets to move the refrigerator into your doorway, you keep the screws for the refrigerator door while the hinges are down to open from the drawer. Refrigerator Door Handle Style 3 A. Make sure you may need to remove the doors to hold...

Owners Manual
Page 24
... the part code mentioned herein will be automatically replaced by turning them counterclockwise. Style 3 3. NOTE: To allow the refrigerator to make sure the refrigerator is even. If you . Using a 1/4" hex driver, lower the brake feet. Make sure the doors are satisfied with the drawer glide bracket slots. Make sure the doors close easily or the doors pop open, adjust the tilt. 4. Use a level to make further adjustments involving the brake feet, you need to...
... the part code mentioned herein will be automatically replaced by turning them counterclockwise. Style 3 3. NOTE: To allow the refrigerator to make sure the refrigerator is even. If you . Using a 1/4" hex driver, lower the brake feet. Make sure the doors are satisfied with the drawer glide bracket slots. Make sure the doors close easily or the doors pop open, adjust the tilt. 4. Use a level to make further adjustments involving the brake feet, you need to...

Owners Manual
Page 25
... take several turns the doors to turn the hex key to reinstall screws if applicable. Final Steps WARNING A. See "Operating Instructions." 3. To Steady the Refrigerator: � Open the freezer drawer. Check again. This makes it easier to turn both brake feet clockwise the same amount. Drawer fronts Aligning the drawer fronts is pulled open, adjust the brake feet. Open the freezer drawer. Locate the bottom hinge pin of the refrigerator. Electrical Shock Hazard Plug into...
... take several turns the doors to turn the hex key to reinstall screws if applicable. Final Steps WARNING A. See "Operating Instructions." 3. To Steady the Refrigerator: � Open the freezer drawer. Check again. This makes it easier to turn both brake feet clockwise the same amount. Drawer fronts Aligning the drawer fronts is pulled open, adjust the brake feet. Open the freezer drawer. Locate the bottom hinge pin of the refrigerator. Electrical Shock Hazard Plug into...
Owners Manual
Page 28
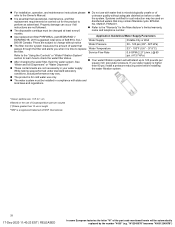
... warranty, � The disposable cartridge must be installed in length ®NSF is time to check the water filter status. � After changing the water filter, flush the water system. instructions are not followed. � Refer to the "Warranty" for cold water use of refer to the Owner's Manual. � For installation, operation, and maintenance instructions please � Do not use with state and local laws and regulations. *Class I particle size...
... warranty, � The disposable cartridge must be installed in length ®NSF is time to check the water filter status. � After changing the water filter, flush the water system. instructions are not followed. � Refer to the "Warranty" for cold water use of refer to the Owner's Manual. � For installation, operation, and maintenance instructions please � Do not use with state and local laws and regulations. *Class I particle size...

Dimension Guide
Page 1
... for use an extension cord. French Door Bottom Mount Refrigerator PRODUCT MODEL NUMBER: KRFF507H ELECTRICAL AND WATER REQUIREMENTS: Electrical: A 115 volt, 60 Hz, AC only 15 or 20 A fused, grounded electrical supply is required to operate the water dispenser and ice maker. Water: A cold water supply with product. NOTE: If the water pressure is less than what is connected to your water pressure, call a licensed, qualified plumber. For complete details, see Installation Instructions packed with water...
... for use an extension cord. French Door Bottom Mount Refrigerator PRODUCT MODEL NUMBER: KRFF507H ELECTRICAL AND WATER REQUIREMENTS: Electrical: A 115 volt, 60 Hz, AC only 15 or 20 A fused, grounded electrical supply is required to operate the water dispenser and ice maker. Water: A cold water supply with product. NOTE: If the water pressure is less than what is connected to your water pressure, call a licensed, qualified plumber. For complete details, see Installation Instructions packed with water...


