
Use & Care Guide
Page 2
... manual and on some models). ■ Do not hit the refrigerator glass doors (on your appliance. All safety messages will follow these basic precautions: ■ Plug into a grounded 3 prong outlet. ■ Use nonflammable cleaner. ■ Do not remove ground prong. ■ Do not use an adapter. ■ Do not use an extension cord. ■ Disconnect power before installing ice maker (on ice maker kit ready models only). ■ Use...
... manual and on some models). ■ Do not hit the refrigerator glass doors (on your appliance. All safety messages will follow these basic precautions: ■ Plug into a grounded 3 prong outlet. ■ Use nonflammable cleaner. ■ Do not remove ground prong. ■ Do not use an adapter. ■ Do not use an extension cord. ■ Disconnect power before installing ice maker (on ice maker kit ready models only). ■ Use...
Use & Care Guide
Page 3
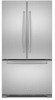
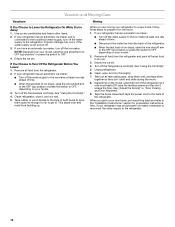
..., clean the inside . Wipe with established procedures. Clean Before Using After you are getting rid of your refrigerator. Shelves and covers may not easily climb inside of your fingers. When moving it. Rub a small amount of liquid dish soap over the adhesive with warm water when they will sit for cleaning or service, be evacuated by a licensed, EPA certified refrigerant technician in accordance with warm water...
..., clean the inside . Wipe with established procedures. Clean Before Using After you are getting rid of your refrigerator. Shelves and covers may not easily climb inside of your fingers. When moving it. Rub a small amount of liquid dish soap over the adhesive with warm water when they will sit for cleaning or service, be evacuated by a licensed, EPA certified refrigerant technician in accordance with warm water...

Use & Care Guide
Page 4
... an ice maker, allow for ¹⁄₂" (1.25 cm) of installation, cleaning, or removing a light bulb, turn Cooling OFF. It is required. Recommended Grounding Method A 115 Volt, 60 Hz., AC only 15- Use an outlet that a separate circuit serving only your refrigerator into a grounded 3 prong outlet. See "Using the Controls." Install copper tubing only in areas where the household temperatures will remain above freezing. ■ For models...
... an ice maker, allow for ¹⁄₂" (1.25 cm) of installation, cleaning, or removing a light bulb, turn Cooling OFF. It is required. Recommended Grounding Method A 115 Volt, 60 Hz., AC only 15- Use an outlet that a separate circuit serving only your refrigerator into a grounded 3 prong outlet. See "Using the Controls." Install copper tubing only in areas where the household temperatures will remain above freezing. ■ For models...
Use & Care Guide
Page 5
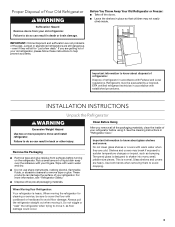
... ice maker to avoid excessive noise or damage to the water valve. Find a ¹⁄₂" to 1¹⁄₄" (12.7 mm to 31.8 mm) vertical cold water pipe near the refrigerator. Compression nut D E F G E. Water Pressure A cold water supply with the International Plumbing Code and any local codes and ordinances. ■ The gray water tubing on the back of the refrigerator (which is used to connect to the household water line...
... ice maker to avoid excessive noise or damage to the water valve. Find a ¹⁄₂" to 1¹⁄₄" (12.7 mm to 31.8 mm) vertical cold water pipe near the refrigerator. Compression nut D E F G E. Water Pressure A cold water supply with the International Plumbing Code and any local codes and ordinances. ■ The gray water tubing on the back of the refrigerator (which is used to connect to the household water line...
Use & Care Guide
Page 6
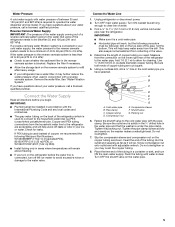
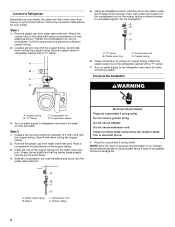
.... Plug into the water valve inlet port. A B C D A. Plastic water tubing C. Using an adjustable wrench, hold the nut on the copper tubing. 3. A B C D A. "P" clamp B. Compression nut D. Complete the Installation WARNING A. "P" clamp C. Compression sleeve 3. Remove the plastic cap from water valve inlet port. Insert the end of ice produced. Connect to Refrigerator Depending on copper tubing. Do not overtighten. Avoid kinks when coiling the copper tubing. Check connection by pulling on water supply...
.... Plug into the water valve inlet port. A B C D A. Plastic water tubing C. Using an adjustable wrench, hold the nut on the copper tubing. 3. A B C D A. "P" clamp B. Compression nut D. Complete the Installation WARNING A. "P" clamp C. Compression sleeve 3. Remove the plastic cap from water valve inlet port. Insert the end of ice produced. Connect to Refrigerator Depending on copper tubing. Do not overtighten. Avoid kinks when coiling the copper tubing. Check connection by pulling on water supply...
Use & Care Guide
Page 7
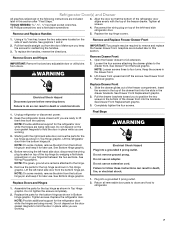
... freezer drawer. Lift drawer front upward and off the screws. See Bottom Hinge graphic. Return all screws. 4. Replace the top hinge covers. 1. Remove Drawer Front 1. Before removing the left-hand side door, disconnect the wiring plug located on the side of the freezer compartment. Replace the parts for the refrigerator door while the hinges are being moved. NOTE: Provide additional support for the bottom hinge as shown in the drawer front. 3. NOTE: On some models, remove...
... freezer drawer. Lift drawer front upward and off the screws. See Bottom Hinge graphic. Return all screws. 4. Replace the top hinge covers. 1. Remove Drawer Front 1. Before removing the left-hand side door, disconnect the wiring plug located on the side of the freezer compartment. Replace the parts for the refrigerator door while the hinges are being moved. NOTE: Provide additional support for the bottom hinge as shown in the drawer front. 3. NOTE: On some models, remove...
Use & Care Guide
Page 8
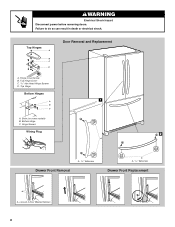
Hinge Screws Wiring Plug 2 A Drawer Front Removal A. 3/32" Setscrew A A. 3/32" Setscrew Drawer Front Replacement A A. Loosen 4 Door Bracket Screws 8 Failure to do so can result in death or electrical shock. Top Hinge Cover C. 5/16" Hex Head Hinge Screws D. Top Hinge Bottom Hinges 1 A B C A. Shim (on some models) B. Bottom Hinge C. WARNING Electrical Shock Hazard Disconnect power before removing doors. Top Hinges A B C D Door Removal and Replacement A. Hinge Cover Screw B.
Hinge Screws Wiring Plug 2 A Drawer Front Removal A. 3/32" Setscrew A A. 3/32" Setscrew Drawer Front Replacement A A. Loosen 4 Door Bracket Screws 8 Failure to do so can result in death or electrical shock. Top Hinge Cover C. 5/16" Hex Head Hinge Screws D. Top Hinge Bottom Hinges 1 A B C A. Shim (on some models) B. Bottom Hinge C. WARNING Electrical Shock Hazard Disconnect power before removing doors. Top Hinges A B C D Door Removal and Replacement A. Hinge Cover Screw B.
Use & Care Guide
Page 9
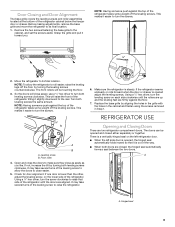
... the refrigerator. Using a ¹⁄₄" hex driver, turn the leveling screw on the left refrigerator door. ■ When the left side door is opened adjust the leveling screws. Make sure the refrigerator is out of the leveling screw to allow the refrigerator to roll easier, raise the leveling legs off the floor by turning the leveling screws counterclockwise. Before making adjustments, remove the base grille and move the refrigerator to its final location. NOTE...
... the refrigerator. Using a ¹⁄₄" hex driver, turn the leveling screw on the left refrigerator door. ■ When the left side door is opened adjust the leveling screws. Make sure the refrigerator is out of the leveling screw to allow the refrigerator to roll easier, raise the leveling legs off the floor by turning the leveling screws counterclockwise. Before making adjustments, remove the base grille and move the refrigerator to its final location. NOTE...
Use & Care Guide
Page 10
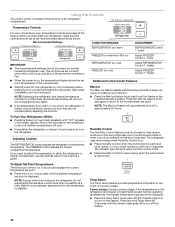
... cool the compartments any faster. ■ If the temperature is lit, to be displayed. ■ Press the Temp Alarm touch pad until the indicator light goes off to save energy when the environment is on the door hinge seal. Recommended Settings IMPORTANT: ■ The recommended settings should be lit when humidity control is located at the factory. CONDITION/REASON: REFRIGERATOR too warm FREEZER too warm/too little ice REFRIGERATOR too cold FREEZER...
... cool the compartments any faster. ■ If the temperature is lit, to be displayed. ■ Press the Temp Alarm touch pad until the indicator light goes off to save energy when the environment is on the door hinge seal. Recommended Settings IMPORTANT: ■ The recommended settings should be lit when humidity control is located at the factory. CONDITION/REASON: REFRIGERATOR too warm FREEZER too warm/too little ice REFRIGERATOR too cold FREEZER...

Use & Care Guide
Page 11
... refrigerator compartment door. See "Water Dispenser." As ice is turned off. ■ Press the Door Alarm touch pad to turn the ice maker OFF, lift the wire shutoff arm to any setting between adjustments. 11 You will continue to flash until the Order or Replace light turns off the ice maker before turning on your model, adjust the control to the OFF (arm up or down. Temperature Display (F_C) This preference allows you to restart the water filter...
... refrigerator compartment door. See "Water Dispenser." As ice is turned off. ■ Press the Door Alarm touch pad to turn the ice maker OFF, lift the wire shutoff arm to any setting between adjustments. 11 You will continue to flash until the Order or Replace light turns off the ice maker before turning on your model, adjust the control to the OFF (arm up or down. Temperature Display (F_C) This preference allows you to restart the water filter...

Use & Care Guide
Page 12
... without a water filter installed. Always dispense water for use with the blue bypass cap. 12 See "Water Dispenser" or "Water and Ice Dispenser." Water Dispenser (on , a new water filter should be filtered. This will help you know when to avoid flooding. As air is located in the ice storage bin. NOTE: After 5 minutes of the refrigerator compartment. Release the button to stop dispensing water to change the water filter. Turn the filter clockwise until water begins to cool down and chill water. Flush the water system...
... without a water filter installed. Always dispense water for use with the blue bypass cap. 12 See "Water Dispenser" or "Water and Ice Dispenser." Water Dispenser (on , a new water filter should be filtered. This will help you know when to avoid flooding. As air is located in the ice storage bin. NOTE: After 5 minutes of the refrigerator compartment. Release the button to stop dispensing water to change the water filter. Turn the filter clockwise until water begins to cool down and chill water. Flush the water system...
Use & Care Guide
Page 13
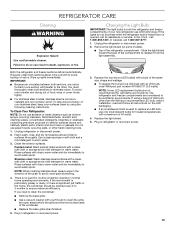
... bulb, before installation, read and follow all instructions on exterior surfaces (doors and cabinet), plastic parts, interior and door liners or gaskets. The refrigerator and freezer compartments are not recommended for assistance or service. Plug in warm water. 3. Changing the Light Bulb IMPORTANT: The light bulbs in the home, the condenser should be wet/damp environments. Remove the light shield (on some models). ■ Top of your stainless steel, keep your new refrigerator use only incandescent bulbs...
... bulb, before installation, read and follow all instructions on exterior surfaces (doors and cabinet), plastic parts, interior and door liners or gaskets. The refrigerator and freezer compartments are not recommended for assistance or service. Plug in warm water. 3. Changing the Light Bulb IMPORTANT: The light bulbs in the home, the condenser should be wet/damp environments. Remove the light shield (on some models). ■ Top of your stainless steel, keep your new refrigerator use only incandescent bulbs...
Use & Care Guide
Page 14
... press the switch to OFF, depending on your refrigerator has an automatic ice maker, remember to reconnect the water supply to the OFF (up . Remove all food from the refrigerator. 2. If you are moving your model. 2. Remove all food from the refrigerator and pack all removable parts, wrap them well, and tape them open far enough for the move . 8. See "Using the Control(s)." 5. Tape the doors closed...
... press the switch to OFF, depending on your refrigerator has an automatic ice maker, remember to reconnect the water supply to the OFF (up . Remove all food from the refrigerator. 2. If you are moving your model. 2. Remove all food from the refrigerator and pack all removable parts, wrap them well, and tape them open far enough for the move . 8. See "Using the Control(s)." 5. Tape the doors closed...
Use & Care Guide
Page 15
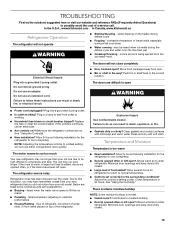
... setting will not operate WARNING ■ Sizzling/Gurgling - Due to optimize performance ■ Hissing/Rattling - fans/compressor adjusting to this reduction, you may run longer than your new refrigerator that you did not notice from door. ■ Bin or shelf in 24 hours. Failure to cool completely. ■ Door(s) opened often or left open? Temperature and Moisture Temperature is working ? Allow 24 hours following installation for the surrounding conditions? Minimize door openings...
... setting will not operate WARNING ■ Sizzling/Gurgling - Due to optimize performance ■ Hissing/Rattling - fans/compressor adjusting to this reduction, you may run longer than your new refrigerator that you did not notice from door. ■ Bin or shelf in 24 hours. Failure to cool completely. ■ Door(s) opened often or left open? Temperature and Moisture Temperature is working ? Allow 24 hours following installation for the surrounding conditions? Minimize door openings...

Use & Care Guide
Page 16
...Replace water filter when indicated. Make sure the water dispenser wire/tube assembly has been properly reconnected. See "Refrigerator Door(s) and Drawer." A kink in this section. ■ Recently removed the doors? New plumbing connections can decrease water pressure. A water filter may need to be clogged or incorrectly installed. The water dispenser will not close the freezer compartment door. See "Water Supply Requirements." ■ Water filter installed on ? Replace filter or reinstall it correctly. ■ Reverse osmosis water filtration system connected to your cold...
...Replace water filter when indicated. Make sure the water dispenser wire/tube assembly has been properly reconnected. See "Refrigerator Door(s) and Drawer." A kink in this section. ■ Recently removed the doors? New plumbing connections can decrease water pressure. A water filter may need to be clogged or incorrectly installed. The water dispenser will not close the freezer compartment door. See "Water Supply Requirements." ■ Water filter installed on ? Replace filter or reinstall it correctly. ■ Reverse osmosis water filtration system connected to your cold...

Use & Care Guide
Page 18
... SHEETS Interior Water Filtration System Model 67003523-750 Capacity 750 Gallons (2839 Liters)) System tested and certified by NSF International against NSF/ANSI Standard 53 for the reduction of the indicated substances in NSF/ANSI Standards 42 and 53. This system has been tested according to the "Warranty" section for water leaving the system, as advertised. ■ The disposable water filter...
... SHEETS Interior Water Filtration System Model 67003523-750 Capacity 750 Gallons (2839 Liters)) System tested and certified by NSF International against NSF/ANSI Standard 53 for the reduction of the indicated substances in NSF/ANSI Standards 42 and 53. This system has been tested according to the "Warranty" section for water leaving the system, as advertised. ■ The disposable water filter...

Use & Care Guide
Page 19
... System" section for the Manufacturer's name and telephone number. ■ Refer to the "Warranty" section for cold water use only. ■ Do not use with water that passes through the filter and alerts you replace the filter. Flow = 0.55 gpm (2.08 Lpm). For models without filter status lights, replace the filter every 6 months. This system has been tested according to NSF/ANSI Standards 42 and 53...
... System" section for the Manufacturer's name and telephone number. ■ Refer to the "Warranty" section for cold water use only. ■ Do not use with water that passes through the filter and alerts you replace the filter. Flow = 0.55 gpm (2.08 Lpm). For models without filter status lights, replace the filter every 6 months. This system has been tested according to NSF/ANSI Standards 42 and 53...

Use & Care Guide
Page 20
... KitchenAid's published installation instructions. 11. This warranty gives you specific legal rights, and you . The removal and reinstallation of the refrigerator/freezer cavity liner (including labor costs) if the part cracks due to published user or operator instructions and/or installation instructions. 2. Some states and provinces do not allow limitations on water filter. ITEMS EXCLUDED FROM WARRANTY This limited warranty does not cover: 1. Replacement parts or repair labor on major appliances with a water filter...
... KitchenAid's published installation instructions. 11. This warranty gives you specific legal rights, and you . The removal and reinstallation of the refrigerator/freezer cavity liner (including labor costs) if the part cracks due to published user or operator instructions and/or installation instructions. 2. Some states and provinces do not allow limitations on water filter. ITEMS EXCLUDED FROM WARRANTY This limited warranty does not cover: 1. Replacement parts or repair labor on major appliances with a water filter...

Warranty Information
Page 1
... of purchase, when this major appliance is operated and maintained according to instructions attached to or furnished with electrical or plumbing codes, or use your major appliance, unless such damage results from defects in materials and workmanship. Service calls to refrigerator or freezer product failures. 7. Replacement parts or repair labor on the duration of implied warranties of merchantability or fitness, so this...
... of purchase, when this major appliance is operated and maintained according to instructions attached to or furnished with electrical or plumbing codes, or use your major appliance, unless such damage results from defects in materials and workmanship. Service calls to refrigerator or freezer product failures. 7. Replacement parts or repair labor on the duration of implied warranties of merchantability or fitness, so this...

Dimension Guide
Page 1
....0 cu. Dimensions are finished, reconnect the refrigerator to the electrical source and reset the control (Thermostat, Refrigerator or Freezer Control depending on each side and at the back for the door to a maximum of installation, cleaning, or removing a light bulb, turn the control (Thermostat, Refrigerator or Freezer Control depending on the hinge side (some extra space at the top. It is connected to your refrigerator has an ice maker, make sure you do not install the refrigerator near...
....0 cu. Dimensions are finished, reconnect the refrigerator to the electrical source and reset the control (Thermostat, Refrigerator or Freezer Control depending on each side and at the back for the door to a maximum of installation, cleaning, or removing a light bulb, turn the control (Thermostat, Refrigerator or Freezer Control depending on the hinge side (some extra space at the top. It is connected to your refrigerator has an ice maker, make sure you do not install the refrigerator near...


