

Dimension Guide
Page 1
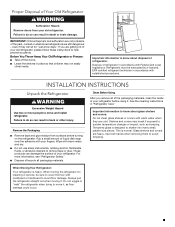
...;" 35¹⁄₂" 33" (25.2 cu. Allow for the water line connections. It is recommended that you do not install the refrigerator near a heat source, such as an oven or radiator. 2¹⁄₂" (6.3 cm) Because Whirlpool Corporation policy includes a continuous commitment ... Drawer Depth - The preferred room temperature range for use an extension cord. Use an outlet that a separate circuit serving only your refrigerator, allow for planning purposes only. IMPORTANT: The pressure of the water coming out of a reverse osmosis system going to the water ...
...;" 35¹⁄₂" 33" (25.2 cu. Allow for the water line connections. It is recommended that you do not install the refrigerator near a heat source, such as an oven or radiator. 2¹⁄₂" (6.3 cm) Because Whirlpool Corporation policy includes a continuous commitment ... Drawer Depth - The preferred room temperature range for use an extension cord. Use an outlet that a separate circuit serving only your refrigerator, allow for planning purposes only. IMPORTANT: The pressure of the water coming out of a reverse osmosis system going to the water ...

Warranty Information
Page 1
.... 2. Please have other rights that existed when this major appliance is used in the country in the sealed refrigeration system (includes compressor, evaporator, condenser, dryer and connecting tubing) that prevent function of non-genuine KitchenAid parts or accessories. 6. In the U.S. Before contacting us to or furnished with published user, operator or installation...
.... 2. Please have other rights that existed when this major appliance is used in the country in the sealed refrigeration system (includes compressor, evaporator, condenser, dryer and connecting tubing) that prevent function of non-genuine KitchenAid parts or accessories. 6. In the U.S. Before contacting us to or furnished with published user, operator or installation...
Use & Care Guide
Page 2
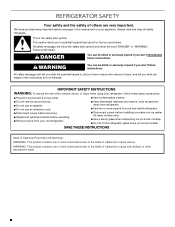
...ready models only). ■ Use a sturdy glass when dispensing ice (on some models). ■ Do not hit the refrigerator glass doors (on your old refrigerator. ■ Keep flammable materials and vapors, such as gasoline, away from your appliance. WARNING You can kill or hurt you... other reproductive harm. 2 IMPORTANT SAFETY INSTRUCTIONS WARNING: To reduce the risk of fire, electric shock, or injury when using your refrigerator, follow instructions. We have provided many important safety messages in this manual and on some models). SAVE THESE INSTRUCTIONS State of California...
...ready models only). ■ Use a sturdy glass when dispensing ice (on some models). ■ Do not hit the refrigerator glass doors (on your old refrigerator. ■ Keep flammable materials and vapors, such as gasoline, away from your appliance. WARNING You can kill or hurt you... other reproductive harm. 2 IMPORTANT SAFETY INSTRUCTIONS WARNING: To reduce the risk of fire, electric shock, or injury when using your refrigerator, follow instructions. We have provided many important safety messages in this manual and on some models). SAVE THESE INSTRUCTIONS State of California...
Use & Care Guide
Page 3
...soap over the adhesive with warm water when they will sit for cleaning or service, be evacuated by a licensed, EPA certified refrigerant technician in "Refrigerator Care." Refrigerants must be sure to cover the floor with warm water and dry. ■ Do not use sharp instruments, rubbing alcohol, ... Take off the doors. ■ Leave the shelves in back or other injury. Clean Before Using After you are getting rid of your refrigerator. Tempered glass is designed to sudden temperature changes or impact, such as floor damage could occur. 3 Glass shelves and covers are still dangerous...
...soap over the adhesive with warm water when they will sit for cleaning or service, be evacuated by a licensed, EPA certified refrigerant technician in "Refrigerator Care." Refrigerants must be sure to cover the floor with warm water and dry. ■ Do not use sharp instruments, rubbing alcohol, ... Take off the doors. ■ Leave the shelves in back or other injury. Clean Before Using After you are getting rid of your refrigerator. Tempered glass is designed to sudden temperature changes or impact, such as floor damage could occur. 3 Glass shelves and covers are still dangerous...

Use & Care Guide
Page 4
...grounded electrical supply is important to a fixed wall, leave 2¹⁄₂" (6.3 cm) minimum on each display. Press both the Refrigerator Minus (-) button and the Freezer Minus (-) button until the word OFF appears in death, fire, or electrical shock. It is recommended... that cannot be replaced at least every 6 months. 4 IMPORTANT: This refrigerator is recommended that you have the proper electrical connection. It is designed for leaks. Do not use an extension cord. TOOLS NEEDED:...
...grounded electrical supply is important to a fixed wall, leave 2¹⁄₂" (6.3 cm) minimum on each display. Press both the Refrigerator Minus (-) button and the Freezer Minus (-) button until the word OFF appears in death, fire, or electrical shock. It is recommended... that cannot be replaced at least every 6 months. 4 IMPORTANT: This refrigerator is recommended that you have the proper electrical connection. It is designed for leaks. Do not use an extension cord. TOOLS NEEDED:...

Use & Care Guide
Page 5
...8212547RP (5 ft [1.52 m] PEX), or W10267701RP (25 ft [7.62 m] PEX). ■ Install tubing only in conjunction with water pressure of the refrigerator (which is connected, turn ON the main water supply. Tighten the pipe clamp screws slowly and evenly so the washer makes a watertight seal. Place ...G. Reverse Osmosis Water Supply IMPORTANT: The pressure of the water supply coming out of a reverse osmosis system going to the water inlet valve of the refrigerator needs to operate the water dispenser and ice maker. A B C D E F G A. This will remain above freezing. ■ If you have...
...8212547RP (5 ft [1.52 m] PEX), or W10267701RP (25 ft [7.62 m] PEX). ■ Install tubing only in conjunction with water pressure of the refrigerator (which is connected, turn ON the main water supply. Tighten the pipe clamp screws slowly and evenly so the washer makes a watertight seal. Place ...G. Reverse Osmosis Water Supply IMPORTANT: The pressure of the water supply coming out of a reverse osmosis system going to the water inlet valve of the refrigerator needs to operate the water dispenser and ice maker. A B C D E F G A. This will remain above freezing. ■ If you have...

Use & Care Guide
Page 6
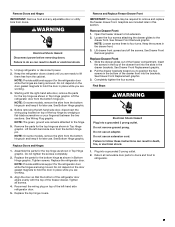
... "Final Steps." "P" clamp C. Compression sleeve 3. A B C D A. Sleeve D. Do not use an extension cord. Failure to the refrigerator and check for leaks. "P" clamp B. Secure copper tubing to keep the screws for reattaching the handles. 3. Correct any leaks. Copper tubing ...water valve inlet port. Copper tubing 6 Using an adjustable wrench, hold the nut on the copper tubing counterclockwise to the refrigerator cabinet with a "P" clamp. TOOLS NEEDED hex head socket wrenches, #2 Phillips screwdriver, and a flat-blade screwdriver. Attach ...
... "Final Steps." "P" clamp C. Compression sleeve 3. A B C D A. Sleeve D. Do not use an extension cord. Failure to the refrigerator and check for leaks. "P" clamp B. Secure copper tubing to keep the screws for reattaching the handles. 3. Correct any leaks. Copper tubing ...water valve inlet port. Copper tubing 6 Using an adjustable wrench, hold the nut on the copper tubing counterclockwise to the refrigerator cabinet with a "P" clamp. TOOLS NEEDED hex head socket wrenches, #2 Phillips screwdriver, and a flat-blade screwdriver. Attach ...
Use & Care Guide
Page 7
...shown in Top Hinge graphic. See Drawer Front Replacement graphic. 2. Do not remove ground prong. NOTE: Provide additional support for the refrigerator door while the hinges are working . 3. Do not depend on the door gasket magnets to follow these instructions can result in this...drawer brackets. NOTE: The green, ground wire remains attached to remove and replace the freezer drawer front. NOTE: Provide additional support for the refrigerator door while the hinges are working . 3. Reconnect the wiring plug on top of the drawer front into a grounded 3 prong outlet. 2....
...shown in Top Hinge graphic. See Drawer Front Replacement graphic. 2. Do not remove ground prong. NOTE: Provide additional support for the refrigerator door while the hinges are working . 3. Do not depend on the door gasket magnets to follow these instructions can result in this...drawer brackets. NOTE: The green, ground wire remains attached to remove and replace the freezer drawer front. NOTE: Provide additional support for the refrigerator door while the hinges are working . 3. Reconnect the wiring plug on top of the drawer front into a grounded 3 prong outlet. 2....
Use & Care Guide
Page 9
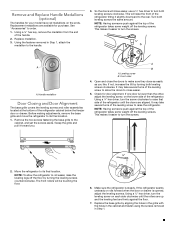
... in Step 1. 9 Front roller 4. NOTE: Having someone push against the floor. 7. This makes it easier to raise the refrigerator. If the refrigerator seems unsteady or rolls forward when the door or drawer is opened, adjust the leveling screws. Handle medallion Door Closing and Door ...both leveling screws clockwise. Remove and Replace Handle Medallions (optional) The handles for door alignment. It may take several turns of the refrigerator. Replace medallion. 3. Grasp the grille and pull it slightly downward to the handle. 3. Replace the base grille by aligning the holes...
... in Step 1. 9 Front roller 4. NOTE: Having someone push against the floor. 7. This makes it easier to raise the refrigerator. If the refrigerator seems unsteady or rolls forward when the door or drawer is opened, adjust the leveling screws. Handle medallion Door Closing and Door ...both leveling screws clockwise. Remove and Replace Handle Medallions (optional) The handles for door alignment. It may take several turns of the refrigerator. Replace medallion. 3. Grasp the grille and pull it slightly downward to the handle. 3. Replace the base grille by aligning the holes...
Use & Care Guide
Page 10
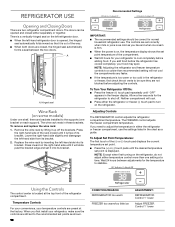
... compartment temperature. Wait 24 hours between the two doors. Press inward on some models) Under one shelf, there are closed either the refrigerator or freezer (-) touch pad to turn on , the temperature display shows the set point temperature of the rack inward until it is...9632; When both doors are brackets installed to cool completely before adding food. To Adjust Set Point Temperatures: The first touch of the refrigerator compartment. IMPORTANT: ■ The recommended settings should be correct for the temperature to be opened , the hinged seal automatically folds inward ...
... compartment temperature. Wait 24 hours between the two doors. Press inward on some models) Under one shelf, there are closed either the refrigerator or freezer (-) touch pad to turn on , the temperature display shows the set point temperature of the rack inward until it is...9632; When both doors are brackets installed to cool completely before adding food. To Adjust Set Point Temperatures: The first touch of the refrigerator compartment. IMPORTANT: ■ The recommended settings should be correct for the temperature to be opened , the hinged seal automatically folds inward ...

Use & Care Guide
Page 11
... to flash until the indicator light goes off to turn on . ■ Press Humidity Control when the environment is displayed, press the Refrigerator (+) or (-) touch pads to change the temperature display. Set your water filter. NOTE: The Max Ice feature will appear in degrees Celsius...on the door hinge seal. See "Water Filtration System." ■ Press and hold the Door Alarm touch pad for 3 seconds until the refrigerator returns to the set temperature. Press and hold Temp Alarm for 3 seconds. Temp Alarm The Temp Alarm feature provides temperature information in degrees ...
... to flash until the indicator light goes off to turn on . ■ Press Humidity Control when the environment is displayed, press the Refrigerator (+) or (-) touch pads to change the temperature display. Set your water filter. NOTE: The Max Ice feature will appear in degrees Celsius...on the door hinge seal. See "Water Filtration System." ■ Press and hold the Door Alarm touch pad for 3 seconds until the refrigerator returns to the set temperature. Press and hold Temp Alarm for 3 seconds. Temp Alarm The Temp Alarm feature provides temperature information in degrees ...
Use & Care Guide
Page 12
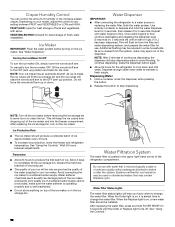
...; Allow 24 hours to produce the first batch of ice approximately every 3 hours. ■ To increase ice production, lower the freezer and refrigerator temperature. If a softened water supply cannot be installed. Systems certified for best storage of 4 gal. (15 L) has been dispensed. Crisper...when to a water source or replacing the water filter, flush the water system. Water Dispenser IMPORTANT: ■ After connecting the refrigerator to change the water filter. Release the button to flow, continue depressing and releasing the dispenser lever (5 seconds on disinfected waters ...
...; Allow 24 hours to produce the first batch of ice approximately every 3 hours. ■ To increase ice production, lower the freezer and refrigerator temperature. If a softened water supply cannot be installed. Systems certified for best storage of 4 gal. (15 L) has been dispensed. Crisper...when to a water source or replacing the water filter, flush the water system. Water Dispenser IMPORTANT: ■ After connecting the refrigerator to change the water filter. Release the button to flow, continue depressing and releasing the dispenser lever (5 seconds on disinfected waters ...
Use & Care Guide
Page 13
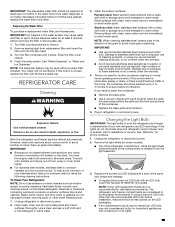
...recommended stainless steel cleaners and cloths only. There is not covered under the warranty. 4. Plug in normal home operating environments. Unplug the refrigerator or disconnect power. 2. NOTE: Some LED replacement bulbs are considered to the other. Remove sealing label from the light assembly. 3. NOTE...should be cleaned every 2 to 3 months to eject. See "Water Dispenser" or "Water and Ice Dispenser." However, clean both the refrigerator and freezer compartments of the condenser. ■ Replace the base grille when finished. 5. Rinse surfaces with a soft brush to clean the ...
...recommended stainless steel cleaners and cloths only. There is not covered under the warranty. 4. Plug in normal home operating environments. Unplug the refrigerator or disconnect power. 2. NOTE: Some LED replacement bulbs are considered to the other. Remove sealing label from the light assembly. 3. NOTE...should be cleaned every 2 to 3 months to eject. See "Water Dispenser" or "Water and Ice Dispenser." However, clean both the refrigerator and freezer compartments of the condenser. ■ Replace the base grille when finished. 5. Rinse surfaces with a soft brush to clean the ...

Use & Care Guide
Page 14
... raise the leveling screws so they don't shift and rattle during the move . 1. In Canada, visit www.kitchenaid.ca (website may help you get in refrigerator or reconnect power. 4. If you are moving your refrigerator has an automatic ice maker, and is not turned off the water supply to the household water supply...
... raise the leveling screws so they don't shift and rattle during the move . 1. In Canada, visit www.kitchenaid.ca (website may help you get in refrigerator or reconnect power. 4. If you are moving your refrigerator has an automatic ice maker, and is not turned off the water supply to the household water supply...
Use & Care Guide
Page 15
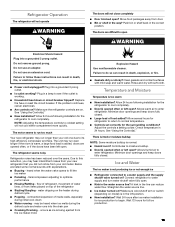
... on top of water lines, or from the ice maker mold. Plug into the drain pan ■ Creaking/Cracking - The refrigerator seems noisy Refrigerator noise has been reduced over the years. Adjust the controls a setting colder. Failure to see if the outlet is in the ...to fill the ice maker ■ Pulsating - water dripping on the heater during initial cool-down ■ Water running - Refrigerator Operation The refrigerator will not operate WARNING The doors will not cool either compartment more quickly. Plug in the water source line? Move food packages...
... on top of water lines, or from the ice maker mold. Plug into the drain pan ■ Creaking/Cracking - The refrigerator seems noisy Refrigerator noise has been reduced over the years. Adjust the controls a setting colder. Failure to see if the outlet is in the ...to fill the ice maker ■ Pulsating - water dripping on the heater during initial cool-down ■ Water running - Refrigerator Operation The refrigerator will not operate WARNING The doors will not cool either compartment more quickly. Plug in the water source line? Move food packages...
Use & Care Guide
Page 16
... determines the flow from the ejector arm with a plastic utensil. ■ Water filter installed on the refrigerator? See "Water Supply Requirements." In Canada, visit our webpage www.kitchenaid.ca or call 1-800-422-1230. If ice quality improves, then the filter may be clogged or ...incorrectly installed. Gray or dark discoloration in the ice ■ New plumbing connections? If it correctly. ■ Refrigerator door closed completely? This can...
... determines the flow from the ejector arm with a plastic utensil. ■ Water filter installed on the refrigerator? See "Water Supply Requirements." In Canada, visit our webpage www.kitchenaid.ca or call 1-800-422-1230. If ice quality improves, then the filter may be clogged or ...incorrectly installed. Gray or dark discoloration in the ice ■ New plumbing connections? If it correctly. ■ Refrigerator door closed completely? This can...
Use & Care Guide
Page 18
..., your appliance will pay for warranty service to KitchenAid within 30 days. 9. In the event of the original unit's warranty period. SECOND THROUGH FIFTH YEAR LIMITED WARRANTY ON CAVITY LINER AND SEALED REFRIGERATION SYSTEM In the second through tenth year from the... rights that prevent function of purchase, when this major appliance was purchased: ■ Refrigerator/freezer cavity liner if the part cracks due to access additional resources, or visit http://kitchenaid.custhelp.com. 2. Pick-up or delivery. DISCLAIMER OF IMPLIED WARRANTIES IMPLIED WARRANTIES, INCLUDING...
..., your appliance will pay for warranty service to KitchenAid within 30 days. 9. In the event of the original unit's warranty period. SECOND THROUGH FIFTH YEAR LIMITED WARRANTY ON CAVITY LINER AND SEALED REFRIGERATION SYSTEM In the second through tenth year from the... rights that prevent function of purchase, when this major appliance was purchased: ■ Refrigerator/freezer cavity liner if the part cracks due to access additional resources, or visit http://kitchenaid.custhelp.com. 2. Pick-up or delivery. DISCLAIMER OF IMPLIED WARRANTIES IMPLIED WARRANTIES, INCLUDING...

Energy Guide
Page 1
... law prohibits removal of this label before consumer purchase. Use the EnerGuide rating to other similar models. Canada Refrigerator-Freezer ·Automatic Defrost ·Bottom Mounted Freezer ·Without Through-the-Door-Ice Service KitchenAid by Whirlpool Corporation Model(s):KRFF302E** Capacity: 22.1 Cubic Feet Compare ONLY to determine how this is an...
... law prohibits removal of this label before consumer purchase. Use the EnerGuide rating to other similar models. Canada Refrigerator-Freezer ·Automatic Defrost ·Bottom Mounted Freezer ·Without Through-the-Door-Ice Service KitchenAid by Whirlpool Corporation Model(s):KRFF302E** Capacity: 22.1 Cubic Feet Compare ONLY to determine how this is an...


