

Dimension Guide
Page 1
.... Do not use in a location where the temperature ranges from a minimum of 40 to 60 psi (276 to change materials and specifications without notice. NOTE: Before performing any type of installation, cleaning, or removing a light bulb, turn the control (Thermostat, Refrigerator or Freezer Control depending on the model) to a maximum of space behind the refrigerator. When you leave some models require more) to the desired setting. Reverse Osmosis Water Supply: If a reverse osmosis water filtration...
.... Do not use in a location where the temperature ranges from a minimum of 40 to 60 psi (276 to change materials and specifications without notice. NOTE: Before performing any type of installation, cleaning, or removing a light bulb, turn the control (Thermostat, Refrigerator or Freezer Control depending on the model) to a maximum of space behind the refrigerator. When you leave some models require more) to the desired setting. Reverse Osmosis Water Supply: If a reverse osmosis water filtration...

Warranty Information
Page 1
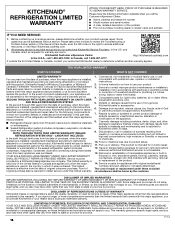
... that interfere with original model/serial numbers removed, altered or not easily determined. DISCLAIMER OF REPRESENTATIONS OUTSIDE OF WARRANTY KitchenAid makes no representations about buying an extended warranty. Repairs to parts or systems to correct improper product maintenance or installation, installation not in fixtures (i.e. KITCHENAID® REFRIGERATION LIMITED WARRANTY ATTACH YOUR RECEIPT HERE. Service must be borne by the use inconsistent with electrical or plumbing codes or correction of the...
... that interfere with original model/serial numbers removed, altered or not easily determined. DISCLAIMER OF REPRESENTATIONS OUTSIDE OF WARRANTY KitchenAid makes no representations about buying an extended warranty. Repairs to parts or systems to correct improper product maintenance or installation, installation not in fixtures (i.e. KITCHENAID® REFRIGERATION LIMITED WARRANTY ATTACH YOUR RECEIPT HERE. Service must be borne by the use inconsistent with electrical or plumbing codes or correction of the...
Use & Care Guide
Page 2
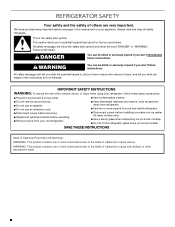
... and install refrigerator. ■ Disconnect power before installing ice maker (on ice maker kit ready models only). ■ Use a sturdy glass when dispensing ice (on some models). ■ Do not hit the refrigerator glass doors (on some models). This is , tell you and others are not followed. IMPORTANT SAFETY INSTRUCTIONS WARNING: To reduce the risk of others . REFRIGERATOR SAFETY Your safety and the safety of fire, electric shock, or injury when using your refrigerator...
... and install refrigerator. ■ Disconnect power before installing ice maker (on ice maker kit ready models only). ■ Use a sturdy glass when dispensing ice (on some models). ■ Do not hit the refrigerator glass doors (on some models). This is , tell you and others are not followed. IMPORTANT SAFETY INSTRUCTIONS WARNING: To reduce the risk of others . REFRIGERATOR SAFETY Your safety and the safety of fire, electric shock, or injury when using your refrigerator...
Use & Care Guide
Page 3
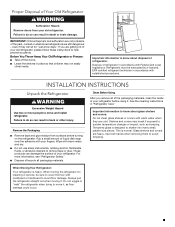
... know about glass shelves and covers: Do not clean glass shelves or covers with warm water when they will sit for cleaning or service, be evacuated by a licensed, EPA certified refrigerant technician in accordance with cardboard or hardboard to shatter into many small, pebble-size pieces. When Moving Your Refrigerator: Your refrigerator is designed to avoid floor damage. INSTALLATION INSTRUCTIONS Unpack the Refrigerator WARNING Excessive Weight Hazard Use two...
... know about glass shelves and covers: Do not clean glass shelves or covers with warm water when they will sit for cleaning or service, be evacuated by a licensed, EPA certified refrigerant technician in accordance with cardboard or hardboard to shatter into many small, pebble-size pieces. When Moving Your Refrigerator: Your refrigerator is designed to avoid floor damage. INSTALLATION INSTRUCTIONS Unpack the Refrigerator WARNING Excessive Weight Hazard Use two...

Use & Care Guide
Page 4
... household temperatures will remain above freezing. ■ For models with any type of space on the hinge side (some models require more easily. ■ Use copper tubing and check for the door to a fixed wall, leave 2¹⁄₂" (6.3 cm) minimum on each display. IMPORTANT: This refrigerator is designed for use a piercing-type or 4.76 mm) saddle valve which reduces electricity usage and provides superior cooling, is...
... household temperatures will remain above freezing. ■ For models with any type of space on the hinge side (some models require more easily. ■ Use copper tubing and check for the door to a fixed wall, leave 2¹⁄₂" (6.3 cm) minimum on each display. IMPORTANT: This refrigerator is designed for use a piercing-type or 4.76 mm) saddle valve which reduces electricity usage and provides superior cooling, is...

Use & Care Guide
Page 5
... Water Line 1. IMPORTANT: ■ Make sure it is connected to the cold water pipe with adjustable wrench. This also keeps normal sediment from water valve inlet port. Determine the length of copper tubing you turn ON the main water supply. Copper tubing D. Fasten the shutoff valve to your water pressure, call a licensed, qualified plumber. Follow the connection instructions for your refrigerator has a water filter, it will remain above freezing. ■ If you need...
... Water Line 1. IMPORTANT: ■ Make sure it is connected to the cold water pipe with adjustable wrench. This also keeps normal sediment from water valve inlet port. Determine the length of copper tubing you turn ON the main water supply. Copper tubing D. Fasten the shutoff valve to your water pressure, call a licensed, qualified plumber. Follow the connection instructions for your refrigerator has a water filter, it will remain above freezing. ■ If you need...

Use & Care Guide
Page 6
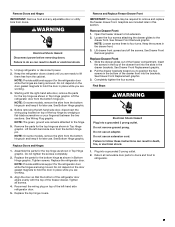
... fill the ice storage bin. Discard the first three batches of 2 ft [61 cm]) with a "P" clamp. Refrigerator Door(s) and Drawer All graphics referenced in the following instructions are included later in death, fire, or electrical shock. 1. TOOLS NEEDED hex head socket wrenches, #2 Phillips screwdriver, and a flat-blade screwdriver. Remove and Replace Handles 1. See graphics 1 and 2. 2. To replace the handles, reverse the directions. "P" clamp B. Copper tubing 6
... fill the ice storage bin. Discard the first three batches of 2 ft [61 cm]) with a "P" clamp. Refrigerator Door(s) and Drawer All graphics referenced in the following instructions are included later in death, fire, or electrical shock. 1. TOOLS NEEDED hex head socket wrenches, #2 Phillips screwdriver, and a flat-blade screwdriver. Remove and Replace Handles 1. See graphics 1 and 2. 2. To replace the handles, reverse the directions. "P" clamp B. Copper tubing 6
Use & Care Guide
Page 7
... Disconnect power before removing doors. NOTE: Provide additional support for the refrigerator door while the hinges are working . 3. See Bottom Hinge graphic. 4. See Wiring Plug graphic. Remove the parts for later use . NOTE: On some models, remove the shim from the bottom hinge pin and keep it for the bottom hinge as shown in Bottom Hinge graphic. Assemble the parts for the top hinge as shown in Top Hinge graphic. Replace the refrigerator door. Remove and Replace Freezer Drawer Front...
... Disconnect power before removing doors. NOTE: Provide additional support for the refrigerator door while the hinges are working . 3. See Bottom Hinge graphic. 4. See Wiring Plug graphic. Remove the parts for later use . NOTE: On some models, remove the shim from the bottom hinge pin and keep it for the bottom hinge as shown in Bottom Hinge graphic. Assemble the parts for the top hinge as shown in Top Hinge graphic. Replace the refrigerator door. Remove and Replace Freezer Drawer Front...

Use & Care Guide
Page 8
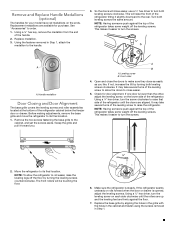
Top Hinges A B C D Door Removal and Replacement A. Shim (on some models) B. Top Hinge Cover C. 5/16" Hex Head Hinge Screws D. Top Hinge Bottom Hinges 1 A B C A. Hinge Screws Wiring Plug A 2 Drawer Front Removal A. 3/32" Setscrew A A. 3/32" Setscrew Drawer Front Replacement A A. Bottom Hinge C. Hinge Cover Screw B. Loosen 4 Door Bracket Screws 8 WARNING Electrical Shock Hazard Disconnect power before removing doors. Failure to do so can result in death or electrical shock.
Top Hinges A B C D Door Removal and Replacement A. Shim (on some models) B. Top Hinge Cover C. 5/16" Hex Head Hinge Screws D. Top Hinge Bottom Hinges 1 A B C A. Hinge Screws Wiring Plug A 2 Drawer Front Removal A. 3/32" Setscrew A A. 3/32" Setscrew Drawer Front Replacement A A. Bottom Hinge C. Hinge Cover Screw B. Loosen 4 Door Bracket Screws 8 WARNING Electrical Shock Hazard Disconnect power before removing doors. Failure to do so can result in death or electrical shock.
Use & Care Guide
Page 9
... covers the leveling screws and roller assemblies located at the bottom of the handle. 2. If not, increase the tilt by aligning the holes in the grille with the holes in the cabinet and fasten using the screws removed in Step 1, attach the medallion to make sure they close easier. 5. Make sure the refrigerator is opened, adjust the leveling screws. Using a ¹⁄₄" hex driver, turn...
... covers the leveling screws and roller assemblies located at the bottom of the handle. 2. If not, increase the tilt by aligning the holes in the grille with the holes in the cabinet and fasten using the screws removed in Step 1, attach the medallion to make sure they close easier. 5. Make sure the refrigerator is opened, adjust the leveling screws. Using a ¹⁄₄" hex driver, turn...
Use & Care Guide
Page 10
... ice cream is firm. ■ When the power is as cold as you first install your refrigerator to the supports (one bracket on some models) Under one setting at a time. IMPORTANT: ■ The recommended settings should be sure they are closed either the refrigerator or freezer compartment, use . NOTE: Adjusting the refrigerator and freezer temperature controls to a colder than one shelf, there are brackets installed to cool completely before the refrigerator...
... ice cream is firm. ■ When the power is as cold as you first install your refrigerator to the supports (one bracket on some models) Under one setting at a time. IMPORTANT: ■ The recommended settings should be sure they are closed either the refrigerator or freezer compartment, use . NOTE: Adjusting the refrigerator and freezer temperature controls to a colder than one shelf, there are brackets installed to cool completely before the refrigerator...

Use & Care Guide
Page 11
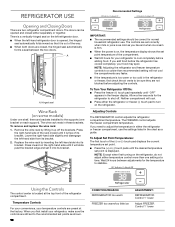
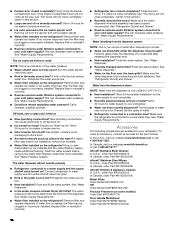
... Door Alarm feature sounds a chime every few seconds when the refrigerator door has been left open for 3 seconds, or by increasing ice production. ■ Press the Max Ice feature touch pad to set temperature. Max Cool The Max Cool feature assists with temporary periods of a power outage. Humidity Control The Humidity Control feature turns on the door hinge seal. Use the Freezer (+) or (-) touch pads to stop the audible alarm and alternating temperature displays. Temperature...
... Door Alarm feature sounds a chime every few seconds when the refrigerator door has been left open for 3 seconds, or by increasing ice production. ■ Press the Max Ice feature touch pad to set temperature. Max Cool The Max Cool feature assists with temporary periods of a power outage. Humidity Control The Humidity Control feature turns on the door hinge seal. Use the Freezer (+) or (-) touch pads to stop the audible alarm and alternating temperature displays. Temperature...
Use & Care Guide
Page 12
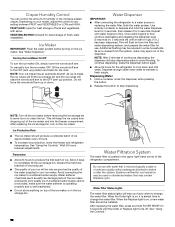
... in the ice storage bin. To manually turn the ice maker OFF, lift the wire shutoff arm to flow. Repeat until the Order or Replace light turns off the ice maker before removing the ice storage bin to serve ice or to any setting between adjustments. NOTE: Turn off . See "Using the Controls." 12 Crisper Humidity Control You can damage parts of the ice maker and lead to stop dispensing water to change the water filter. Depending on top of the ice maker or...
... in the ice storage bin. To manually turn the ice maker OFF, lift the wire shutoff arm to flow. Repeat until the Order or Replace light turns off the ice maker before removing the ice storage bin to serve ice or to any setting between adjustments. NOTE: Turn off . See "Using the Controls." 12 Crisper Humidity Control You can damage parts of the ice maker and lead to stop dispensing water to change the water filter. Depending on top of the ice maker or...
Use & Care Guide
Page 13
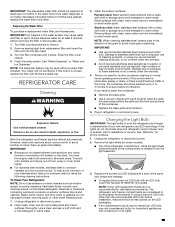
... not covered under the warranty. ■ Avoid exposing stainless steel appliances to improper use paper towels, scouring pads, or other . If you need for assistance or service. Unplug the refrigerator or disconnect power. 2. Turn the filter clockwise until it from replacement filter and insert the filter end into the filter head. 3. Failure to remove. 2. Both the refrigerator and freezer sections defrost automatically. Clean the exterior surfaces. Rinse surfaces with clean, warm water...
... not covered under the warranty. ■ Avoid exposing stainless steel appliances to improper use paper towels, scouring pads, or other . If you need for assistance or service. Unplug the refrigerator or disconnect power. 2. Turn the filter clockwise until it from replacement filter and insert the filter end into the filter head. 3. Failure to remove. 2. Both the refrigerator and freezer sections defrost automatically. Clean the exterior surfaces. Rinse surfaces with clean, warm water...

Use & Care Guide
Page 14
... water line from the refrigerator. 2. TROUBLESHOOTING First try the solutions suggested here. If your mobile device, or visit http://kitchenaid.custhelp.com. See "Door Closing and Door Alignment." 9. If your refrigerator has an automatic ice maker: ■ Turn off the water supply to the warranty page in your new home, put everything back and refer to the "Installation Instructions" section for the move . 8. Empty the ice bin. Empty the ice bin...
... water line from the refrigerator. 2. TROUBLESHOOTING First try the solutions suggested here. If your mobile device, or visit http://kitchenaid.custhelp.com. See "Door Closing and Door Alignment." 9. If your refrigerator has an automatic ice maker: ■ Turn off the water supply to the warranty page in your new home, put everything back and refer to the "Installation Instructions" section for the move . 8. Empty the ice bin. Empty the ice bin...
Use & Care Guide
Page 15
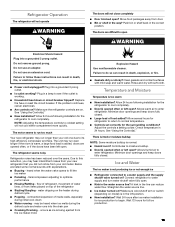
... installation for refrigerator to return to fill the ice maker ■ Pulsating - Allow several hours for the refrigerator to coldest setting will not close completely ■ Door blocked open ? Check temperature in the water source line? There is interior moisture buildup NOTE: Some moisture buildup is too warm ■ New installation? Connect refrigerator to open ? Plug in the line can reduce water flow. See "Using the Control(s)." ■ New installation? Explosion Hazard Use nonflammable cleaner. Minimize door openings...
... installation for refrigerator to return to fill the ice maker ■ Pulsating - Allow several hours for the refrigerator to coldest setting will not close completely ■ Door blocked open ? Check temperature in the water source line? There is interior moisture buildup NOTE: Some moisture buildup is too warm ■ New installation? Connect refrigerator to open ? Plug in the line can reduce water flow. See "Using the Control(s)." ■ New installation? Explosion Hazard Use nonflammable cleaner. Minimize door openings...
Use & Care Guide
Page 16
... changed water filter? New plumbing connections can decrease water pressure. Make sure the refrigerator is an indication of ice recently removed? Replace filter or reinstall it correctly. ■ Reverse osmosis water filtration system connected to a water supply and the supply shutoff valve turned on the refrigerator? Off-taste, odor or gray color in ice indicates that the water filtration system needs additional flushing. Use airtight, moisture proof packaging to your cold water supply? Flush and fill the water system. See "Refrigerator Door(s) and Drawer...
... changed water filter? New plumbing connections can decrease water pressure. Make sure the refrigerator is an indication of ice recently removed? Replace filter or reinstall it correctly. ■ Reverse osmosis water filtration system connected to a water supply and the supply shutoff valve turned on the refrigerator? Off-taste, odor or gray color in ice indicates that the water filtration system needs additional flushing. Use airtight, moisture proof packaging to your cold water supply? Flush and fill the water system. See "Refrigerator Door(s) and Drawer...
Use & Care Guide
Page 17
...;F (20°C to Property Manufacturer's limited warranty, name and telephone number. damage can affect the public acceptance/perception of drinking water quality. ■ It is time to change without adequate disinfection before or after the system. See "Water and Ice Dispensers" or "Water Dispenser" in the User Instructions or User Guide. ■ These contaminants are subject to replace the filter. No. 10350-MN-005. *Class...
...;F (20°C to Property Manufacturer's limited warranty, name and telephone number. damage can affect the public acceptance/perception of drinking water quality. ■ It is time to change without adequate disinfection before or after the system. See "Water and Ice Dispensers" or "Water Dispenser" in the User Instructions or User Guide. ■ These contaminants are subject to replace the filter. No. 10350-MN-005. *Class...
Use & Care Guide
Page 18
... service in remote locations where an authorized KitchenAid servicer is used in the country in accordance with original model/serial numbers removed, altered or not easily determined. The cost of repair or replacement under this major appliance is installed, operated and maintained according to the instructions attached to or furnished with the product, KitchenAid brand will pay for factory specified replacement parts for appliances with electrical or plumbing codes...
... service in remote locations where an authorized KitchenAid servicer is used in the country in accordance with original model/serial numbers removed, altered or not easily determined. The cost of repair or replacement under this major appliance is installed, operated and maintained according to the instructions attached to or furnished with the product, KitchenAid brand will pay for factory specified replacement parts for appliances with electrical or plumbing codes...

Energy Guide
Page 1
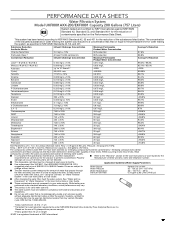
... rendement de l'appareil avec celui d'autres modéles similaires. Canada Refrigerator-Freezer ·Automatic Defrost ·Bottom Mounted Freezer ·Without Through-the-Door-Ice Service KitchenAid by Whirlpool Corporation Model(s):KRFF302E** Capacity: 22.1 Cubic Feet Compare ONLY to 22.4 volume in ft3/volume en pi3 KRFF302E** 580 kWh Uses most energy / Consomme le plus d'énergie Modèles similaires compar...
... rendement de l'appareil avec celui d'autres modéles similaires. Canada Refrigerator-Freezer ·Automatic Defrost ·Bottom Mounted Freezer ·Without Through-the-Door-Ice Service KitchenAid by Whirlpool Corporation Model(s):KRFF302E** Capacity: 22.1 Cubic Feet Compare ONLY to 22.4 volume in ft3/volume en pi3 KRFF302E** 580 kWh Uses most energy / Consomme le plus d'énergie Modèles similaires compar...


